LowBridge
Aug 14 2015, 07:57 AM
I'm new here and this is my first post..
I’ll start with a short back story.. I owned a 1975 914 2.0 in the early 80"s as a teenager and sold it many many years ago. About 9 months ago my youngest son (18yrs), wife and my dad decided to see if they could track down my car and well they did and last week my son along with my high school friend (who owned the car before me) drove down to GA buy it back.
The previous owner had begun to restore but as we all know life happened and only got the car half way done, but in drivable condition which give us a great head start. I took the car for a short test drive and mechanically it worked, engine, brakes, gearbox all checked out well, so we bought the car and towed it home.
Now the problem, only the front and side running lights and the passengers rear tail light worked. No headlights (high or low), fog lights and the driver’s rear tail light did not work. My son and I started to do a little investigating to see if it was something simple and found the fogs were not plugged in, so simple fix here.
At this point my son tells me the running lights “feel” hot so I tell him to turn the key off because at this point no need to kill the battery (with all the reading I’m doing I now know this was a mistake to leave the key on). We also disconnect the battery with the heads lights in the up position so they are easier to work with.
With the battery disconnected we start to disassembled the headlights and found the passenger side bulb burned out however the driver’s side was fine and but no power.
We trouble shoot some more and I found a few more wires loose and make the connections. We now go back to try the lights again and reconnect the battery. The head lights go about 2/3’s back down and stop, we are dead with no power going anywhere and nothing happening when we turn the key. Just for giggles I remove the battery and charge it overnight, so just in case we killed it from earlier actions.
I have checked my ground and metered it to make sure the connection was working (when we disconnect the battery I adjusted the ground wire because it was not on correctly). Additionally with more reading on the forums I think the 5 red wires coming off the battery go to the starter, ignition switch, fuse panel, hazard switch and relay board. We also disconnect all wires that we connected beforehand to get back to the same starting point.
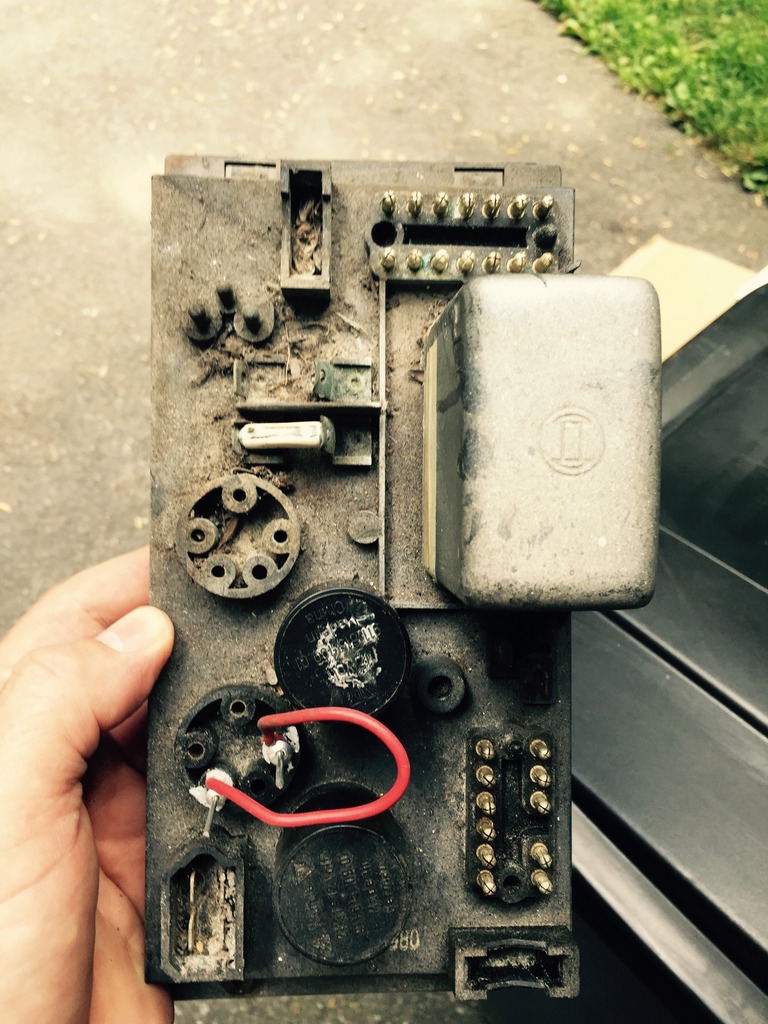
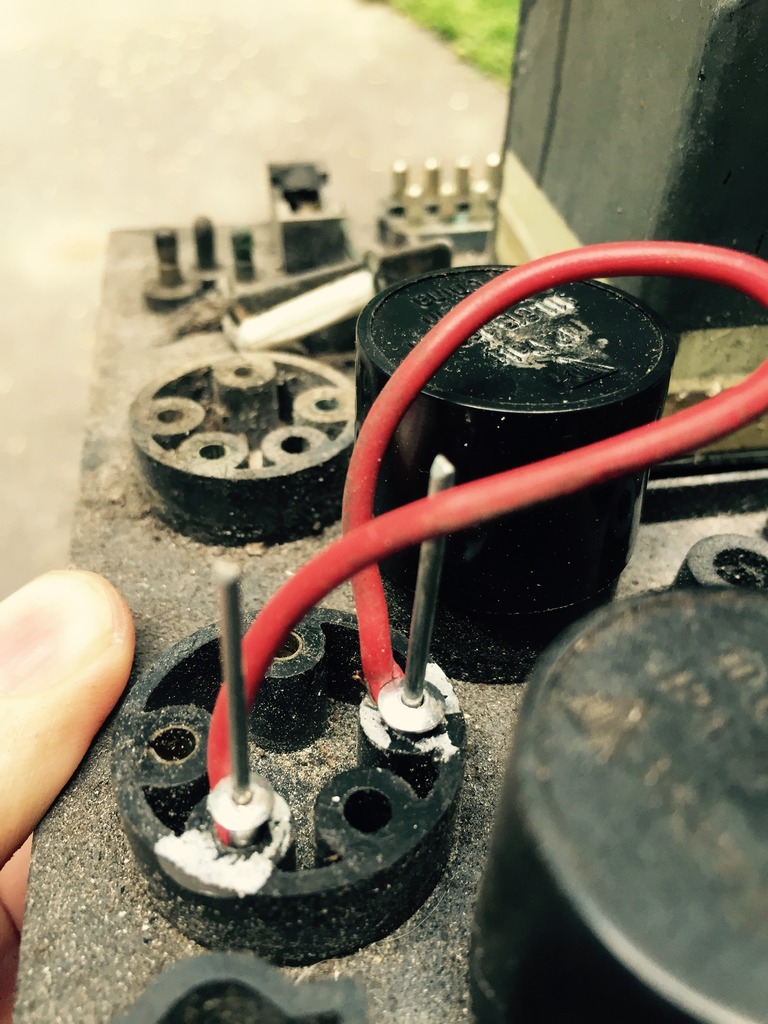
Now I do some more looking and find this (see picture) on what I think is the relay board in the engine compartment. The engine has been converted to Webers, so this seems to be some kind of crude jumper? I did have a spare relay and plugged it into that slot.
At this point I’m not sure what to do next, I have ordered a color wiring diagram and a manual that should be here in a week. I did reconnect the battery and give the key a try but still dead, so thoughts?
Cairo94507
Aug 14 2015, 08:06 AM

Well you are definitely headed in the correct direction by ordering a color wiring diagram.
I cringe when I see people have removed the original FI to install carbs. Few are done correctly and problems just seem to flow from that one (bad) decision. If it were my car..... I would source a complete stock FI system, reinstall, and return all wiring to essentially stock. Good luck and how fortunate you were to have a family and friends who cared enough to locate your original car.
LowBridge
Aug 15 2015, 07:33 AM
mepstein
Aug 15 2015, 07:46 AM
How about some pics of the car
Spoke
Aug 15 2015, 09:43 AM
About those pop rivet relay contact replacements, this is for the fuel pump. The PO removed the fuel pump relay and just shorted the relay contacts together with the rivets.
If the fuel pump runs ok, I wouldn't remove this jumper until you replace the relay. You should put tape on rivets to protect them since they are +12V.
As far as the other electrical issues, pick one to work on and follow the wiring either from the element (light bulb) back to the power or from the power to the element. You will need a voltmeter to do this. If you don't have a voltmeter, borrow or buy one; you'll need it again and again. There are schematics on Pelican Parts you can use until you get the manuals you ordered.
It's good to remove each fuse (disconnect battery negative first) and clean its contacts as well as the contacts on the fuse panel. You may want to check the resistance of the fuses just to make sure they are good.
It's kinda hard to debug an issue over the internet when the PO may or may not have modified the wiring.
rhodyguy
Aug 15 2015, 02:22 PM
The simplest and cleanest method for powering your carb fuel pump, using the relay, is detailed in the classics thread forum. Page #2.
LowBridge
Aug 15 2015, 02:24 PM
picture of Daisy and more updates on progress below..

ok making progress with electrical issues. turns out bad battery and not a great ground. fixed both and now I have running/tail/fog lights, also head lights go up and down. Additionally both headlight bulbs are burned out so I need to get to new ones and I have 12 volts at the starter.
fuel pump does not run now after I removed the "rivet jumper", so the relay I have must not be doing what it needs so next steps?
So I turn the key and get what looks like dash lights and low oil pressure and no starter noise or clicking of any kind. I do some more reading looks like i need to trouble shoot the ignition in the column, so I start with the relay under the passengers sit and no relay

, does this get removed with the Weber conversion?

so with no relay and knowing the car was running a few days ago, I'm onto the steering column and ignition key. I cannot wait until my color wiring diagram shows up next week. also any suggestions on a manual to pick up?
porschetub
Aug 16 2015, 12:35 PM
No, thats for the seatbelt interlock and its been bypassed anyway.
You can see the 2 Yellow wires have been looped,just make sure the connection is sound/clean.
Tom
Aug 16 2015, 06:28 PM
To energize the fuel pump, run a ground to pin #3 of the four pin connector ( lower left ) on the relay board. See the picture of the relay board to see the four pin connector. While you are troubleshooting and repairing electrical issues, it would save you much grief later to give that relay board a good cleaning. It looks very corroded. Some light sandpaper on all of the contacts and an alcohol brushing and rinse then blow dry should made worlds of difference. A small rolled up piece of sandpaper will get into the relay socket holes. Also lightly sand the relay prongs, then very slightly spread them with a sharp knife ( a few thousands will be enough). That way they will fit tighter and give a better electrical contact. Also sand the fuse contacts and the fuse ends lightly.
Tom
EdwardBlume
Aug 16 2015, 07:01 PM
Good luck with your restoration! Electric problems can be tough but use the parts diagrams on the Pelican site for references.
LowBridge
Aug 18 2015, 05:28 PM
still chasing this electrical problem and I do have a question about the steering wheel. Is these any reason that would case the car to be dead if the steering wheel is off while I'm having my issues?
just sitting here thinking and that popped into my head

Electrical is not my area and this is killing me
LowBridge
Aug 18 2015, 06:20 PM
answered my own question... yes timmy the wheel has to be on or the electrical system will be dead
Dave_Darling
Aug 18 2015, 07:31 PM
No, it doesn't. If the wheel is off, about the only electrical thing that is affected is that the horn won't work. If pulling the wheel off the steering shaft is killing your electrical system, you probably have something loose in the steering column that is getting moved around when you do the removal and installation.
--DD
LowBridge
Aug 19 2015, 04:59 AM
Ok good to know and after putting the wheel back on I now have working lights and the ignition is giving me dash lights but the starter is still DOA.
So it sounds like I need to revisit the electrical components of the steering column and do some more testing.
thank you
DRPHIL914
Aug 19 2015, 06:39 AM
great father-son project, and very cool you found your old car! Bought my '75 as a father/son project as well. but with hm busy in college i did most of it myself. He now has an engineering degree!, btw that car looks very nice body wise!
suggestion on the relay board. you could post a WTB add and just get a new or refurb one that has been gone thru. also consider going back to F.I. at some point. if the engine has the original cam you will have better performance and milage with the F.I. system. I have a 75 2.0 as well, about to acquire another 75 soon. I have little electrical work experience and still have not figured out my issue with the fresh air blower not working but there are some good 914 guys up in your neck of the woods so if you cant get is sorted out, i am sure someone near you will be able to help. - Spoke already had pointed you in the right direction . clean all the grounds, connections etc. go from there. Good luck!!
not sure about the brakes issue there, maybe Eric from PMB performance will chime in here on that subject
Hope you can get it on the road soon! if you do, you might consider coming down to the Octeenerfest gathering in Banner Elk NC in a month!!! would be a great way to meet some other guys and see about 50 other 914's!
Phil
LowBridge
Aug 19 2015, 08:07 AM
thanks Philip.. I have already PM Eric and with all the unknowns his suggestion was to go back to OEM on the brakes and I really think that is the best move there (so PMB will be getting an order from me shortly).
post that pic above of the relay board I have removed it and given it a good old cleaning per the suggestion of Tom (thanks) and it looks much better. I think Dave is onto something with the steering column and having a hidden issue there, so tonight my son and I will be testing connections there.
The car is in solid shape with the PO doing some rust work, so the body will be a year or so down the line before we start on it. I want to give me son some driving/track time before we take if off the road for a year plus.
My hopes are he gets bit by the same bug that got most of us


Shredhead
Aug 19 2015, 10:15 AM
Following this as I'm a 914 newbie and while my '74 2.0 California car is generally in great shape, the electricals are a bit of a mess. And I'm an idiot when it comes to electricity. Right now I have all lights working with the exception of my passenger side low beam. But the gauge is a different story... shows right turn signal continuous on when brights are lit, blue high beam indicator comes on when parking lights are turned on, left turn signal indicator goes on when right turn signal on, etc., etc.
LowBridge
Aug 20 2015, 07:16 PM
Well she is running and my son is hooked

, we took it for a short drive and he was smiling from ear to ear.
So still not sure what we fixed but checking everything and fixing little nicks in the wires and checking/cleaning grounds we most have done something or nothing
we still have issues and those are next
no dash lights
no hazard lights
no blinkers
no backup lights
and my oil pressure gauge is showing max pressure like 80 psi plus.
but it runs and like a bad game of golf it only takes one good shot to keep you playing

LowBridge
Aug 21 2015, 05:53 PM
couple of questions...
my oil pressure sender has 2 lugs and one lug seems to do nothing and the second lug shows a "green" dash light on oil when hooked up. is that correct and what is the other lug for?
now my console which as an oil pressure gauge is pegged from a constant 12v, so that one has me confused. I'm going to trace the 3 wire harness tomorrow and see where they go.
now back to the steering wheel, now when the car is running and it is on I have no hazards/directional/high beams. however when I take it off with the car running I get the hazard light to blink and both lights on the tach also flash, but no lights on the car blink. the directional does cause the lights on the tach work both no matter if I move it up (right) or down both blink and again no lights on the car change.
seems that I still have a ground issue on the column? and if so would it be a main ground?
also tonight my son and I got the trunk roller on the torsion bar... OMG that is not fun , but the trunk works perfect now. another small win

also I ordered all new calipers/pads/pressure regulator and some new lines from PMB today.. what a fantastic group of people and a very big thank you again to Eric
Dave_Darling
Aug 21 2015, 08:44 PM
Check the two pins on the sender. One should have 0 ohms to the outside of the sender. The other should have some resistance. When the engine is running and there is oil pressure, the one pin should have infinite resistance to the case of the sender, and the other pin should have some lower resistance than it had before.
The outside of the sender should be grounded. If it isn't, you will get weird readings.
Not sure about the other stuff, but if all the tach lights are blinking you have something hooked up wrong.
--DD
bandjoey
Aug 21 2015, 08:58 PM
Another thing to do is clean all of the grounds Brown wires Any car of this age has a lot of ground corrosion There is also a large ground strap on top of the transmission Go to Harbor freight or like and get the $10 Dremel tool For your son to have a good project Use the needle super Thin sharp Dremel tools to go inside the wire connections and sandpaper and wire tool bits for the body connectors This alone cures many electrical issues There are really not that many Headlights taillights fuse box License plate light Etc. good luck. More pictures. Welcome to madness!

LowBridge
Aug 22 2015, 03:30 PM
update...
Found the ground/short problem
, it was the passengers front marker bulb,we check/cleaned I think every dam wire connection on the front harness (I Know its for the good of the car) and just never found anything that jumped out at us as a "PROBLEM". So slowly we have been eliminating one problem after another and this afternoon I started checking bulbs and BAM!!!
It looked like someone had dipped it in liquid corrosion, so about 30 minutes of cleaning/sanding and I give it the test.
well we now have headlights, running lights, hazards, turn signals, reverse lights, brake lights and light at the end of the tunnel

still no clue on the oil pressure gauge pigging once power is applied. I did follow your directions Dave and one lug is infinite resistance and the other one as about 14 ohms and that is the one I put the connection on.
I'll do some more checking but not really sure what more to look at.
also my order from 914rubber.com arrived, man what a great community this is with our members who add so much value

.
Going to get some dinner and start doing some more reading
also Bandjoey I'm going to get my son right on that transmission ground strap, I have read this as a point of problems in more than a few threads. thank you for reminding me to do that.
LowBridge
Aug 24 2015, 05:17 AM
still no progress on the oil pressure gauge... anyone have a thought?
also only thing left on the lights are the high beams. currently they are on "high" and will not change to low. Not sure but the column lever seems to move back when I pull on it to switch it from high to low, but nothing happens.
do you think it could be the relay on the fuse panel or switch in the column?
Dave_Darling
Aug 24 2015, 04:29 PM
The high/low relay is on top of the fuse panel; it is a suspect here. Check the wire from the switch to the relay (might be brown/yellow? don't have my references here at work!) to make sure it grounds when you pull the headlight lever back.
Does the infinite-resistance pole on the oil pressure sender go to 0 resistance when the oil pressure is zero? If so, that's the sender for the light. The resistance on the other post should change with oil pressure, which should vary with temperature (hotter == lower pressure) and RPM (higher == higher pressure). I think the resistance goes lower for higher pressure, but I could have that wrong.
Make sure the wires on the senders actually get to the warning light and the gauge. Also make sure the gauge has power. (That's a red/white wire that has +12V when the key is on.)
--DD
LowBridge
Aug 28 2015, 06:07 PM
Dave you are the MAN

!!!! it was a bad relay, so new relay and BAM!!! lights, so my son and I took the car to a local Friday night car show/gathering and had a blast tonight.
we also chased down the short in the steering column. the 4 screws that hold the turn signal and wiper clusters in place have a funny problem. the top left screw when in place causes the whole column to short out. the other 3 are fine and for the life of me I can not see what is causing this problem

Dave_Darling
Aug 28 2015, 06:21 PM
The screw may be going through a wire or two, or may be causing wires to get crushed between some pieces when you tighten it.
--DD
LowBridge
Sep 27 2015, 11:41 AM
ok finally found the electrical short in the steering column.. on the headlight cluster there is a small grounding tab that connects this circuit to the steering column and it was broken so that it sometimes worked and other times not so much..
wow that was a real pain to trouble shoot.
We have started to rebuild both the rear and front suspensions because the passengers side swing arm bushings are completely worn out (big movement in the wheel) and after really looking at everything else I noticed that parts I put on the suspension back in the 80"s are still on it.
So everything most go

, however I do have a question about removing the front control arm knowing there is a torsion bar in there. with the car up on stands is this bar under load? I'm thinking it is and if so will jacking the arm up level with ride height release this load?
Or better yet, what's the simple way to remove them?
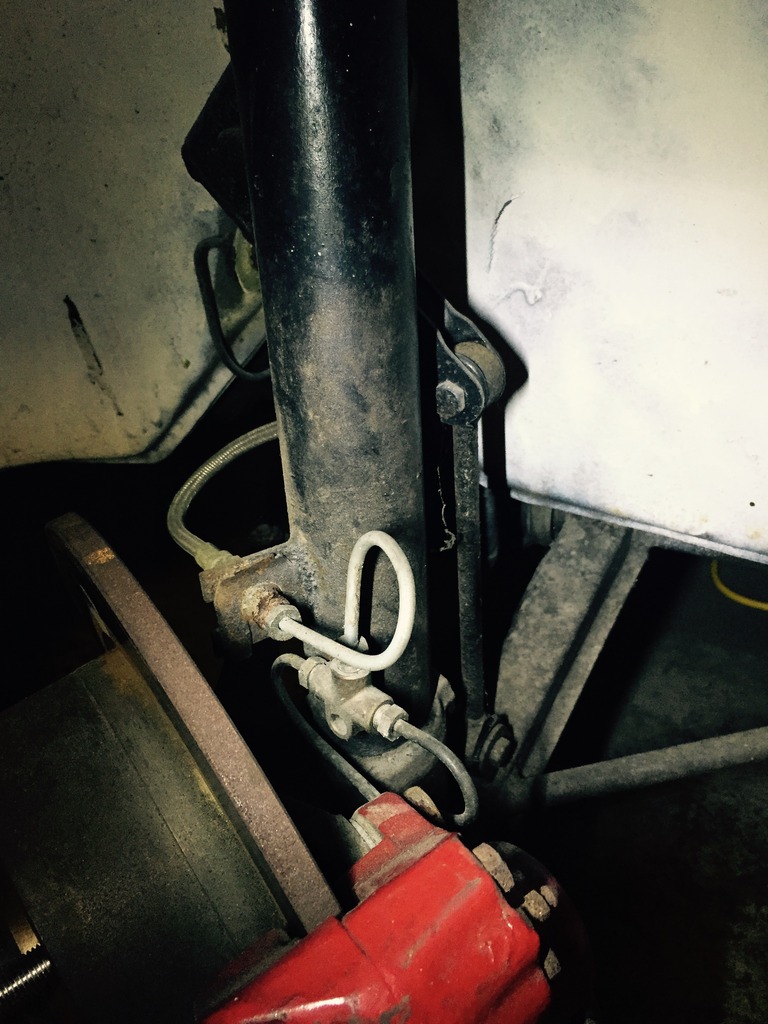
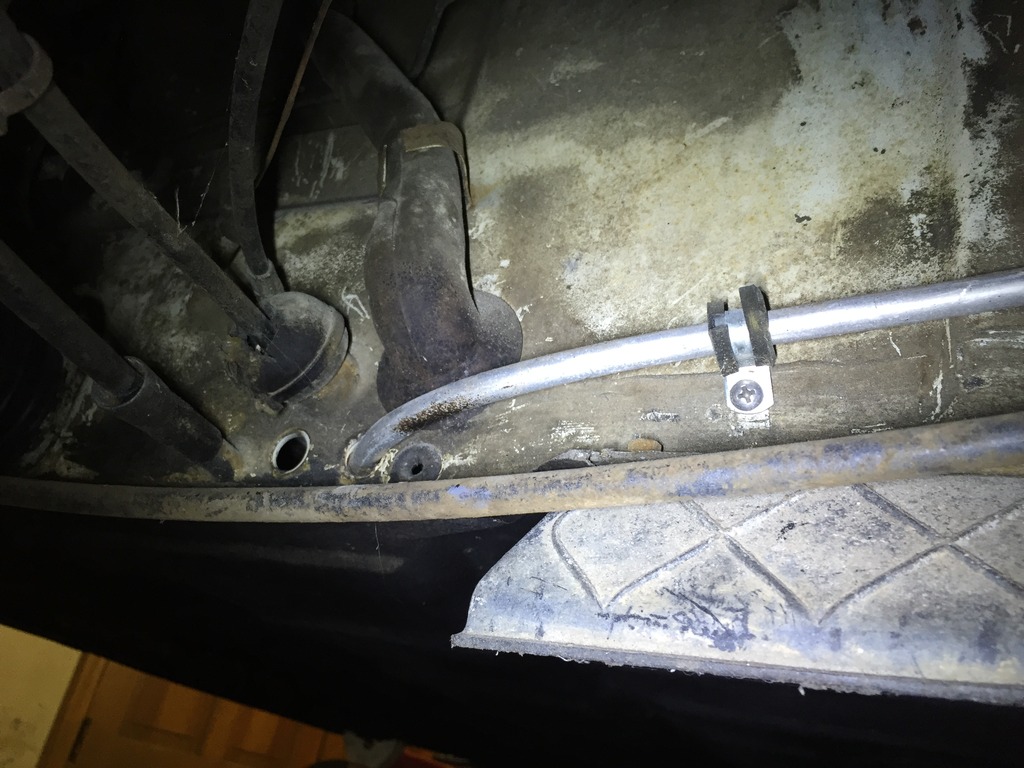
Now on to the picture.. the PO told me he had replaced the fuel line and I have now looked at it... the PO used standard hardware store aluminum tubing
also notice how they used a grommet at the fire wall where the line is rubbing metal on metal


and the same grommet was used where it passes through the engine tin

, so fire was just a matter of time.
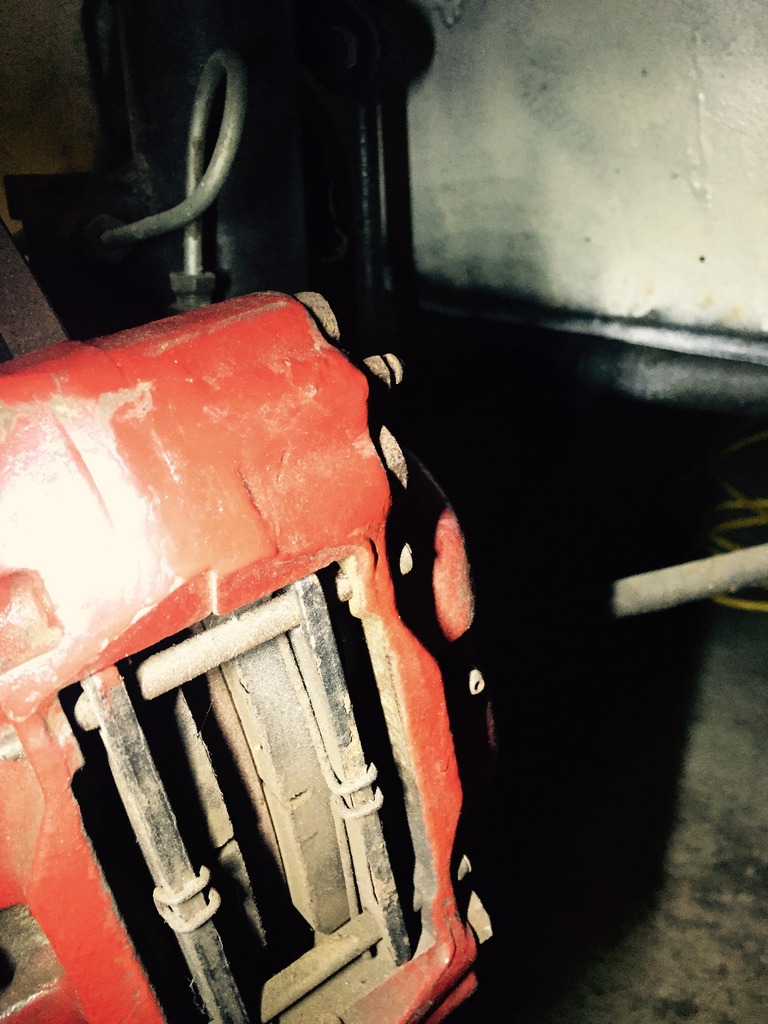
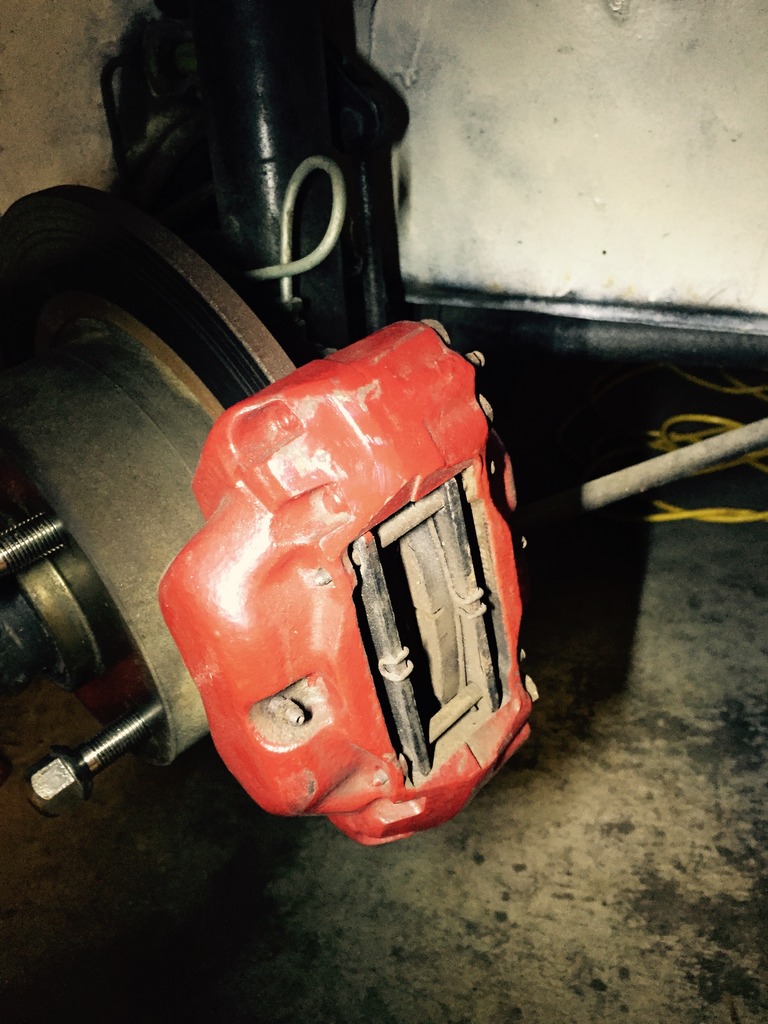
next question/picture is the master cylinder, I know the PO replaced the front calipers with some type of Volvo caliper and we have replaced them with PMB ones (
) but the peddle is still super soft even after tons of bleeding and no bubbles showing.
So I'm not sure how to tell what size or even if the master cylinder is correct. We also have a flex when my son presses the brake peddle and I'm under the car looking at the master. I did find this website where they make a brace (
Master Cylinder Bracehowever here are a few pictures on the master cylinder
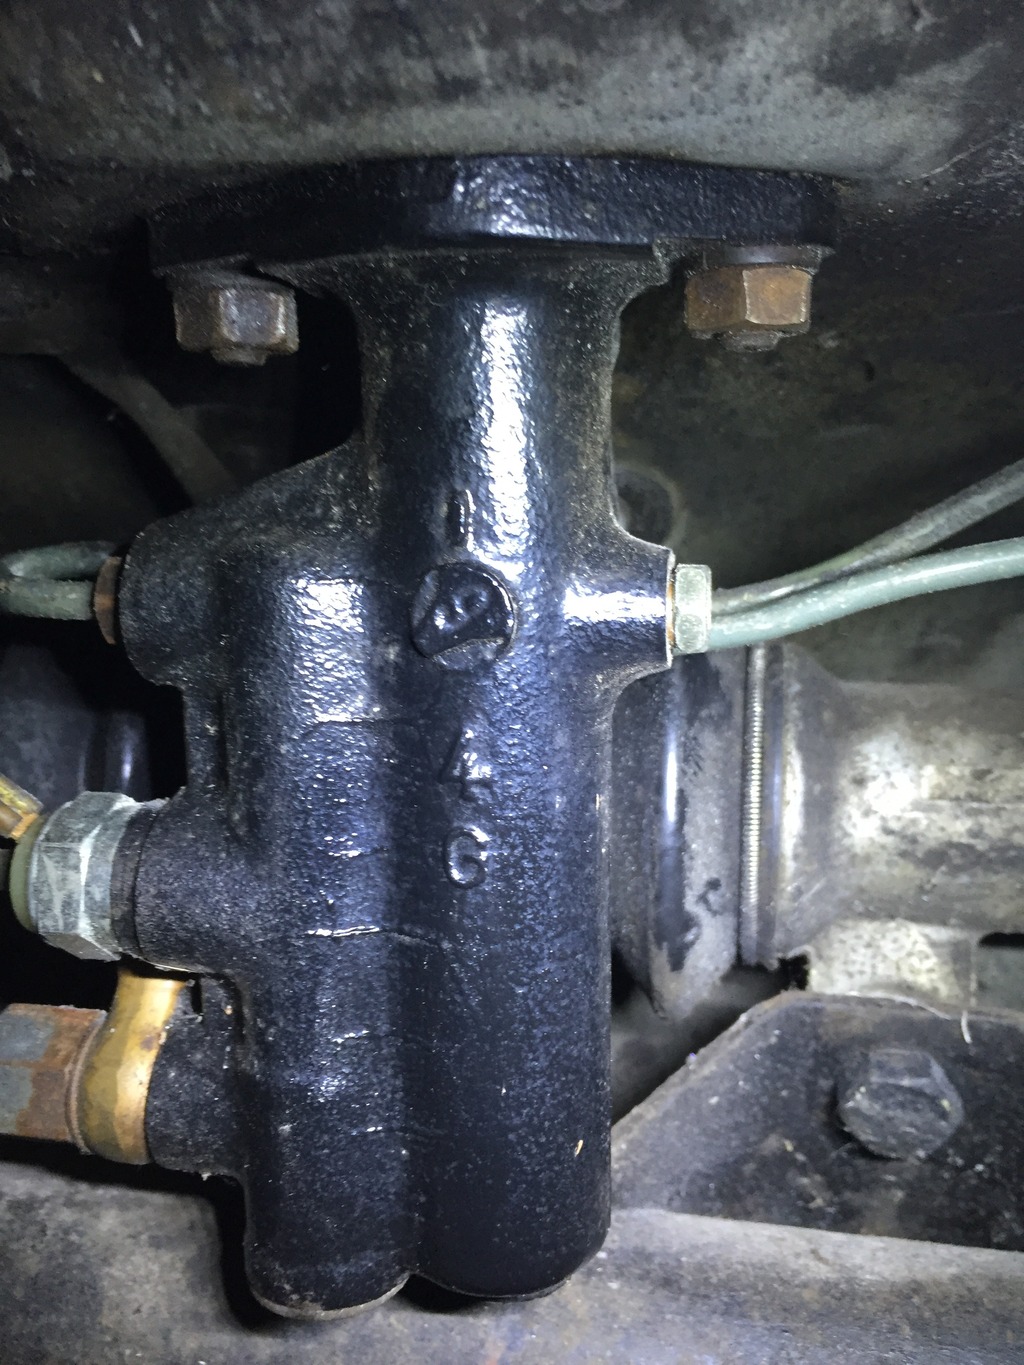
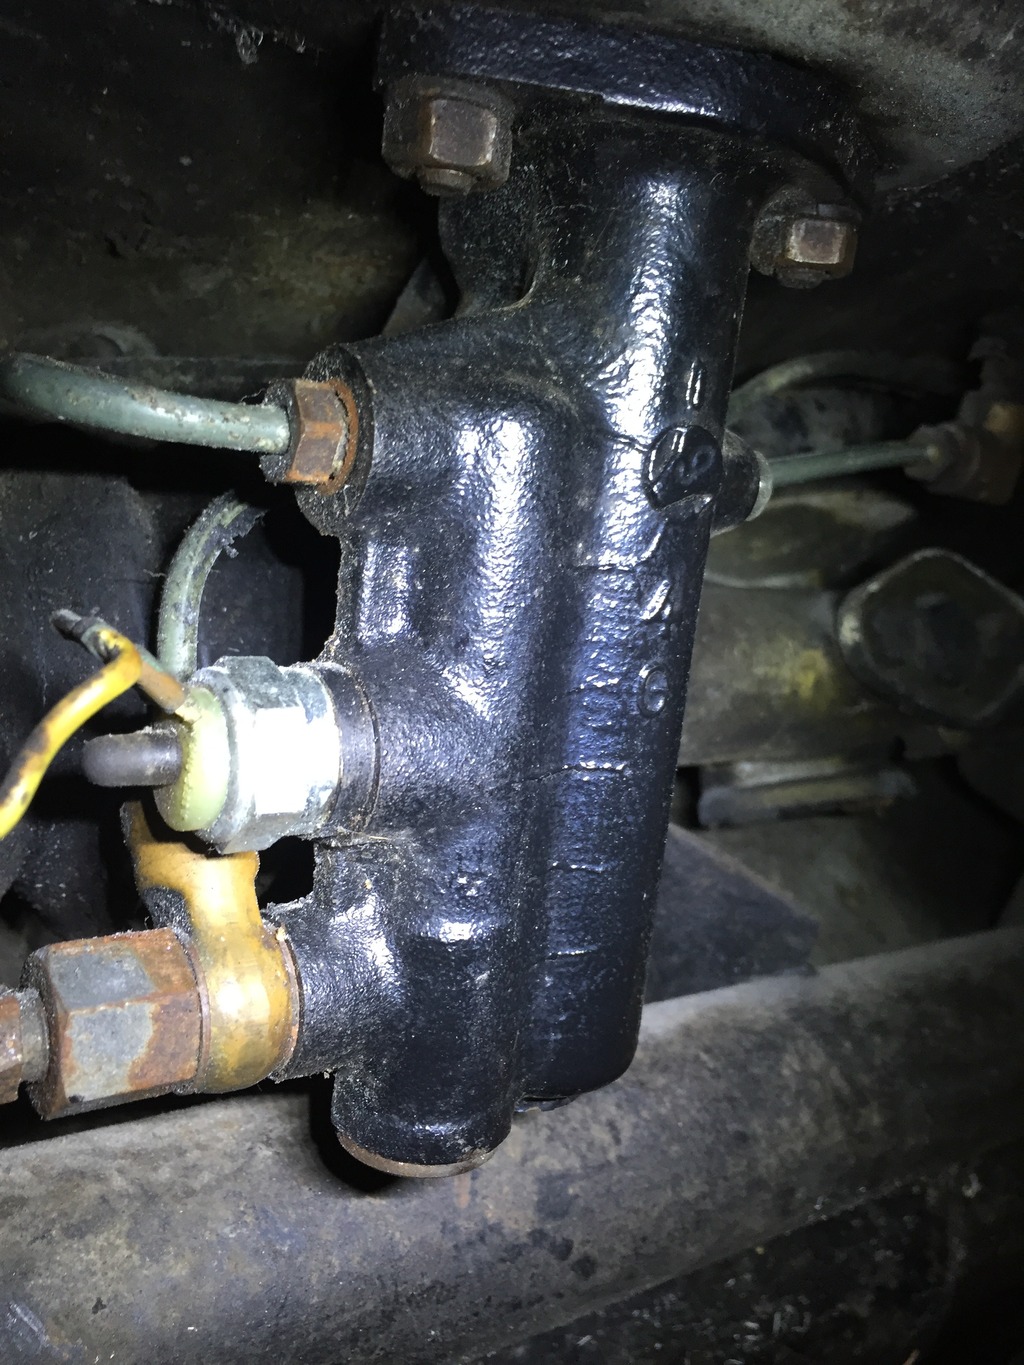
thoughts?
914Sixer
Sep 27 2015, 01:07 PM
Could be a MB or BMW master cylinder. Either case it is too large for stock brakes.
LowBridge
Oct 6 2015, 12:36 PM
does anyone know the preset angles for the front control arm after replacing the bushing or does it not matter? I see on the elephant racing video they reference it but do not list it and I cannot seem to find anything on the forms about it.
also any thoughts on the master cylinder?
as always thanks in advance...
mrholland2
Oct 6 2015, 05:44 PM
QUOTE(914Sixer @ Sep 27 2015, 12:07 PM)

Could be a MB or BMW master cylinder. Either case it is too large for stock brakes.
But didn't he have Volvo or some other calipers??
LowBridge
Oct 6 2015, 05:54 PM
Yes he had used an unknown set of Volvo calipers on the front that did not line up correctly. It was a very odd swap that just did not look correct/safe so I made the call to go back to OEM.
QUOTE(mrholland2 @ Oct 6 2015, 07:44 PM)
QUOTE(914Sixer @ Sep 27 2015, 12:07 PM)
Could be a MB or BMW master cylinder. Either case it is too large for stock brakes.
But didn't he have Volvo or some other calipers??
LowBridge
Oct 12 2015, 05:24 AM
who does or can suggest someone who handles 914 alignments around the MA area? I have the suspension back on and need to get it aligned.
Dave_Darling
Oct 12 2015, 09:26 AM
If you can get it to Tangerine Racing in CT...
--DD
LowBridge
Oct 12 2015, 03:56 PM
thanks Dave and I did see on their website but I'd like to find something closer as they are about 2 hours from me and the car would need to be trailered down and that comes with it's own set of logistics as I have nether the trailer or tow vehicle.
hoping to find someone that I can make the short drive to after I have "eyeballed" the alignment

LowBridge
Nov 9 2015, 06:51 AM
So the car is coming along nicely with our effort to inspect and replace as needed for ware.
Brakes front/rear replaced (PMB what a great place).. check
front suspension bushings replaced.. check
front bearings inspected and repacked... check
ball joints/tie rods replaced.. check
front/rear shocks inspected.. this winter to replace
rear bushings replaced... OMG, rightside inner was almost completely gone.. check
rear bearings.. seem to be good, no noise or play.. check
drive shafts inspected and looking good.. check
On the alignment front my local Sears Automotive has a tech who has worked on 914's before and can do the alignment as long as I have the shims and for a cost of $89, I'm going to give it a try before I trailer the car 2hrs into CT.
however after reading the manual on ride height adjustments, I was wondering how much lower than factory can I bring the front down without really impacting the suspension geometry?
I have set it and everything is looking good, but the factory rake seems to have the car sitting nose up and doing some reading here this seems to be the standard.
So looking to the vets here to give me some feedback because I'm thinking 1/2 - 3/4 down from factory should not have to much of an impact on the suspension geometry and improve the look/handling.
thoughts?
LowBridge
Dec 11 2015, 04:54 PM
I'm looking to install a 4-point harness using the cross bar which bolts behind the seats in the shoulder belt pivot point on the B pillar. However I cannot find them, does anyone have a link or has the practice of attaching shoulder belts this way evolved to something different?
progress update.. brakes (PMB), electrical, suspension (PMB) and new window trim (914rubber) all completed. The winter projects are new front windshield, remove and reinstall with new rubber rear window, replace jack points (they are already removed) and install 4 point harness for both sides.
my son is loving driving the car on every clear sunny day and we have been very lucky this year in New England with above normal temps.
wndsnd
Dec 11 2015, 08:53 PM
Glad to see you have made so much progress. I was just reading the thread and you did really well sorting out the wiring mess and got great advice from Dave and others. Now that it is driving, I will re suggest taking a run down to Chris and Ed at Tangerine in CT. They are masters at setting up suspensions among other things and can make a good car great.
The northeast has quite a few driving 914's, and if you and your son get really enthusiastic, you should think about making the run with us down to Hershey April 2016. There is already a thread going for 2016 so check it out.
Traveling in a pack makes the drive go quickly and there are a lot of spare hands and tools if something goes awry.
Hope to meet you guys soon.
Dave_Darling
Dec 11 2015, 08:58 PM
Don't do four-points. Submarining is a thing, and even if you don't slip out from under the belt, there's nothing to keep the buckle from turning edge-on into your gut. Which is kinda bad for you if you actually need the belt.
Use the stock three-point belts, they're plenty good for the street.
If you're going on the track, Step Zero is to RTFR--Read The Rulebook. Very few places will let you run with four-points. Five- or six-points are the way to go; the single or dual sub straps keep the belt down around your hips where it belongs. But a lot of places require a seat with built-in pass-throughs for the belts (professionally built seats, not home-modified stock seats) if you're using multi-point restraints.
I have six-points that I installed many years ago. I used a harness bar to mount the upper belts, and eye-bolts in the stock belt holes to mount the lap belts and dual sub straps. It would not pass tech today; the shoulder belts need to be attached to the firewall and only pass over the harness bar, and only one belt is allowed to be attached to any single point so the sub straps wouldn't fly either. And I have stock seats with no pass-throughs. (Even though the belts don't go through the seat when I'm sitting in it.)
Use the stock three-point belts, they're a whole lot simpler.
--DD
steuspeed
Dec 12 2015, 12:36 AM
Now that you have your lights working properly, this is a great little mod. You can run your fog lights while the pop ups are down. This is great for cruising near dusk or just adding a little more visibility. It's plug and play. No modifications required. You can also flash fellow teeners you see on the road.
http://www.jwesteng.com/shop/electrical-91...ht-module.html#
LowBridge
Dec 12 2015, 02:06 PM
QUOTE(steuspeed @ Dec 12 2015, 01:36 AM)
Now that you have your lights working properly, this is a great little mod. You can run your fog lights while the pop ups are down. This is great for cruising near dusk or just adding a little more visibility. It's plug and play. No modifications required. You can also flash fellow teeners you see on the road.
http://www.jwesteng.com/shop/electrical-91...ht-module.html#I have seen this and was wondering if it was worth installing. thanks for the recommendation.
any help in the cross bar?
LowBridge
Dec 14 2015, 10:41 AM
I'm looking to replace my current carb linkage as the arms tend to slip on the round cross tube.
so out of the two options below, what is the working opinion on a better choice?
Option 1Option 2thanks for your feedback
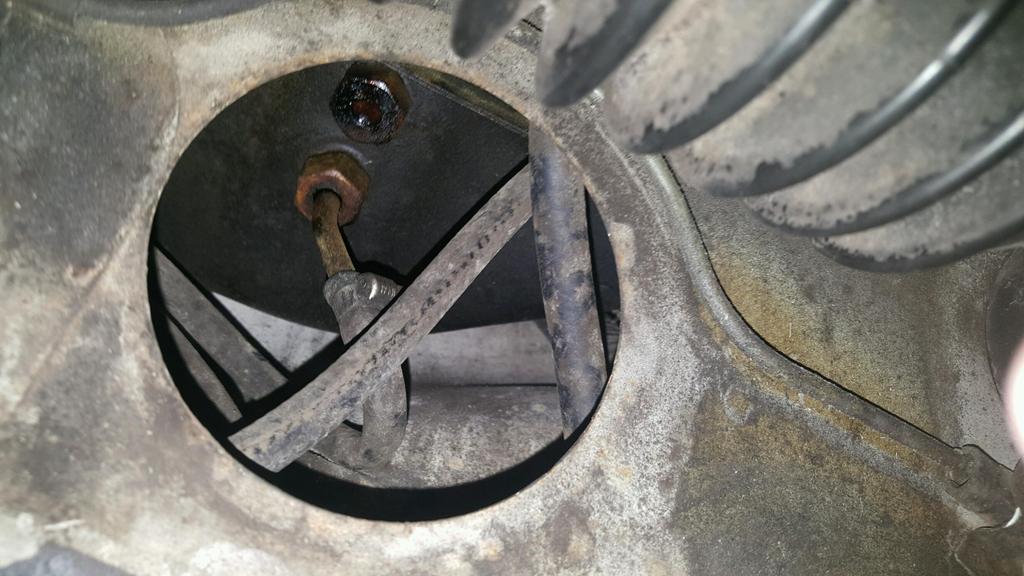
also can someone point me in the right direction on finding this cover..
Dave_Darling
Dec 14 2015, 09:55 PM
If any option ever says "Tangerine Racing" and you can afford it, that is the thing to get. Doesn't matter what the other option is, if there's a Tangerine version GET IT.
There is no cover for the round hole. There is a cover below the steering rack and brake master cylinder and such, but no separate cover for the round hole. The cover under the steering rack is sometimes called a "gravel guard", and sometimes a "steering rack cover". And sometimes other labels, especially if it has gotten tweaked and you are trying to thread the fourth bolt in...

--DD
LowBridge
Dec 15 2015, 05:48 AM
QUOTE(Dave_Darling @ Dec 14 2015, 10:55 PM)
If any option ever says "Tangerine Racing" and you can afford it, that is the thing to get. Doesn't matter what the other option is, if there's a Tangerine version GET IT.
There is no cover for the round hole. There is a cover below the steering rack and brake master cylinder and such, but no separate cover for the round hole. The cover under the steering rack is sometimes called a "gravel guard", and sometimes a "steering rack cover". And sometimes other labels, especially if it has gotten tweaked and you are trying to thread the fourth bolt in...
--DD
nice.. I do have the gravel cover and only noticed that hole when I removed it to replace the bushing.
and thanks on the Tangerine Racing suggestion, it is so cool to have so many great community members who are also vendors
... I'll be ordering my Tangerine Racing linkage this week
again thanks Dave
LowBridge
Dec 27 2015, 09:02 PM
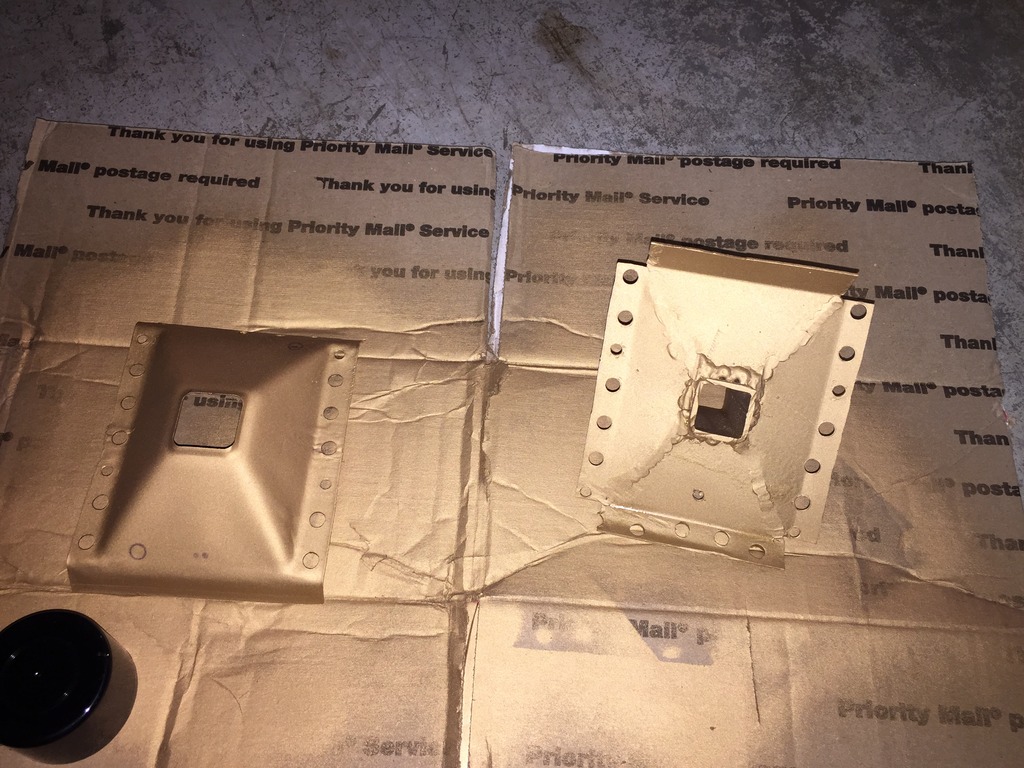
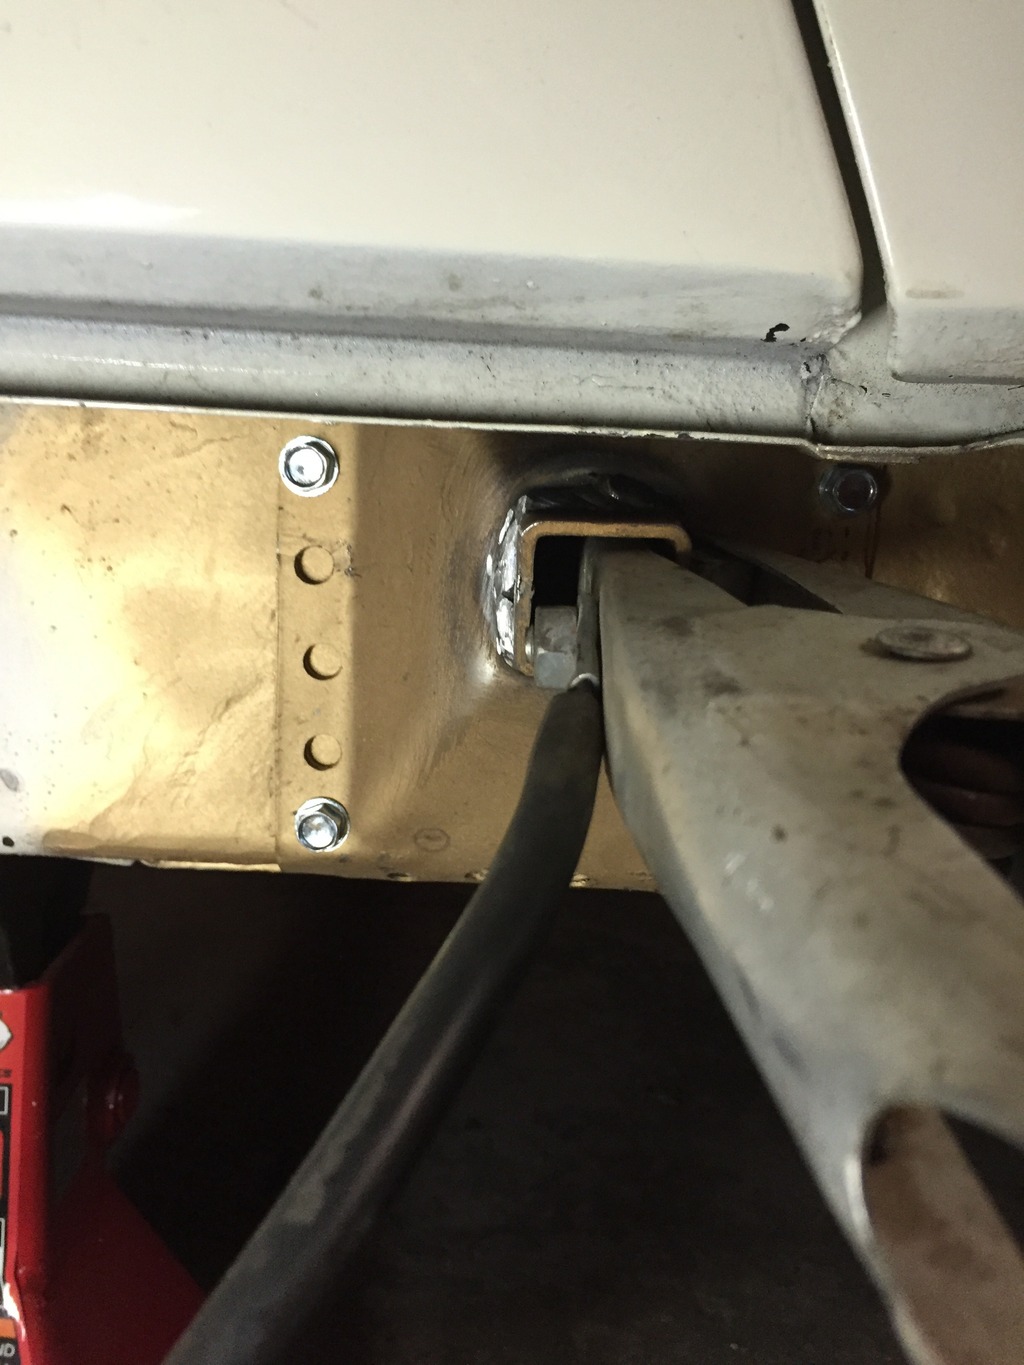
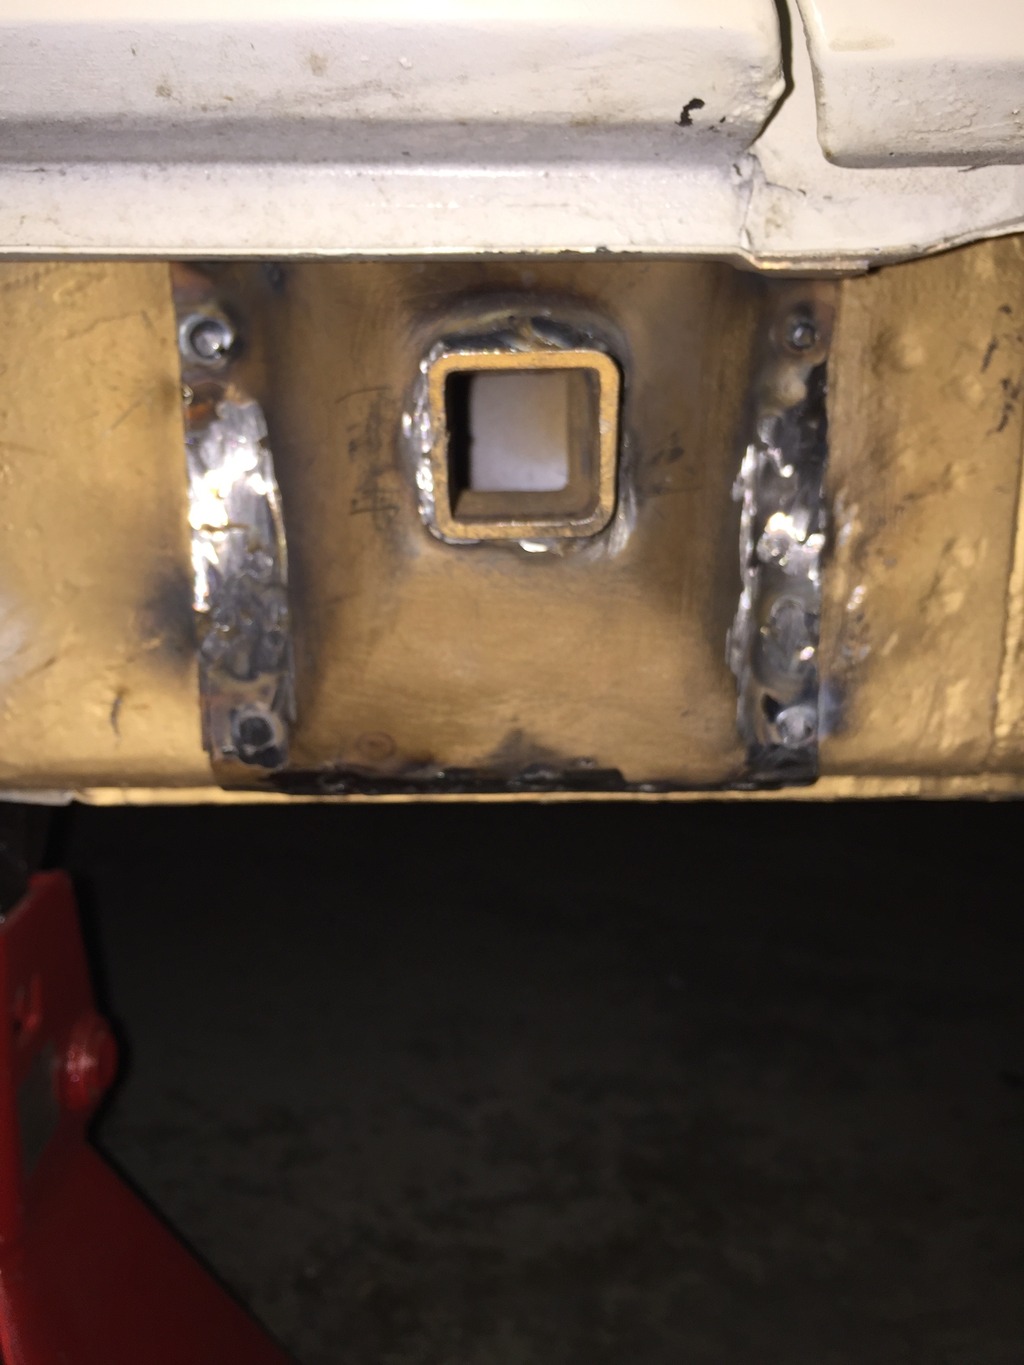
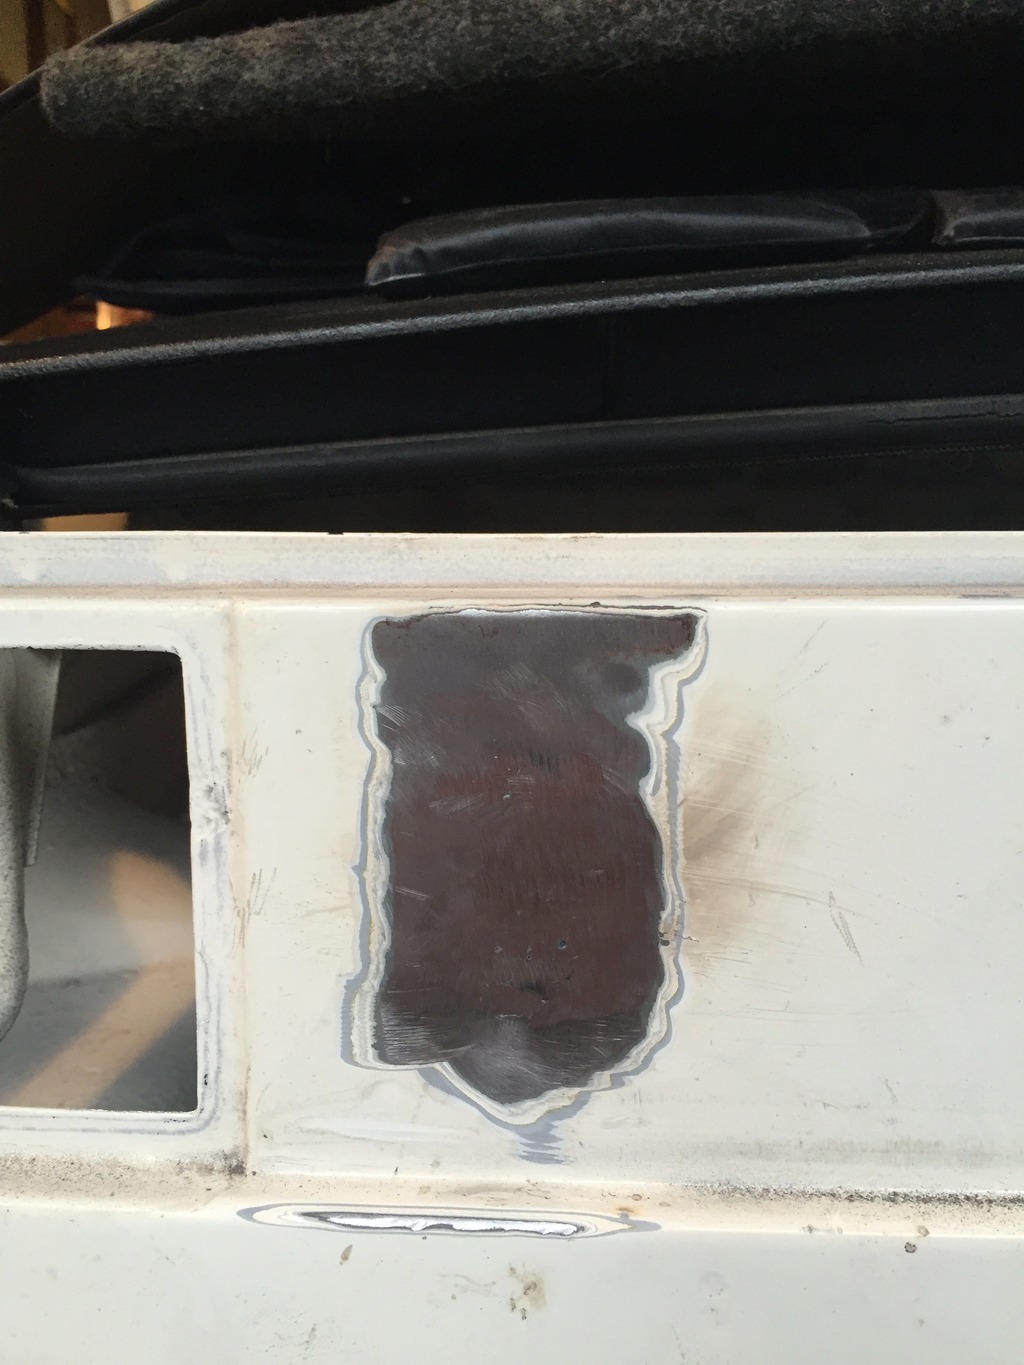
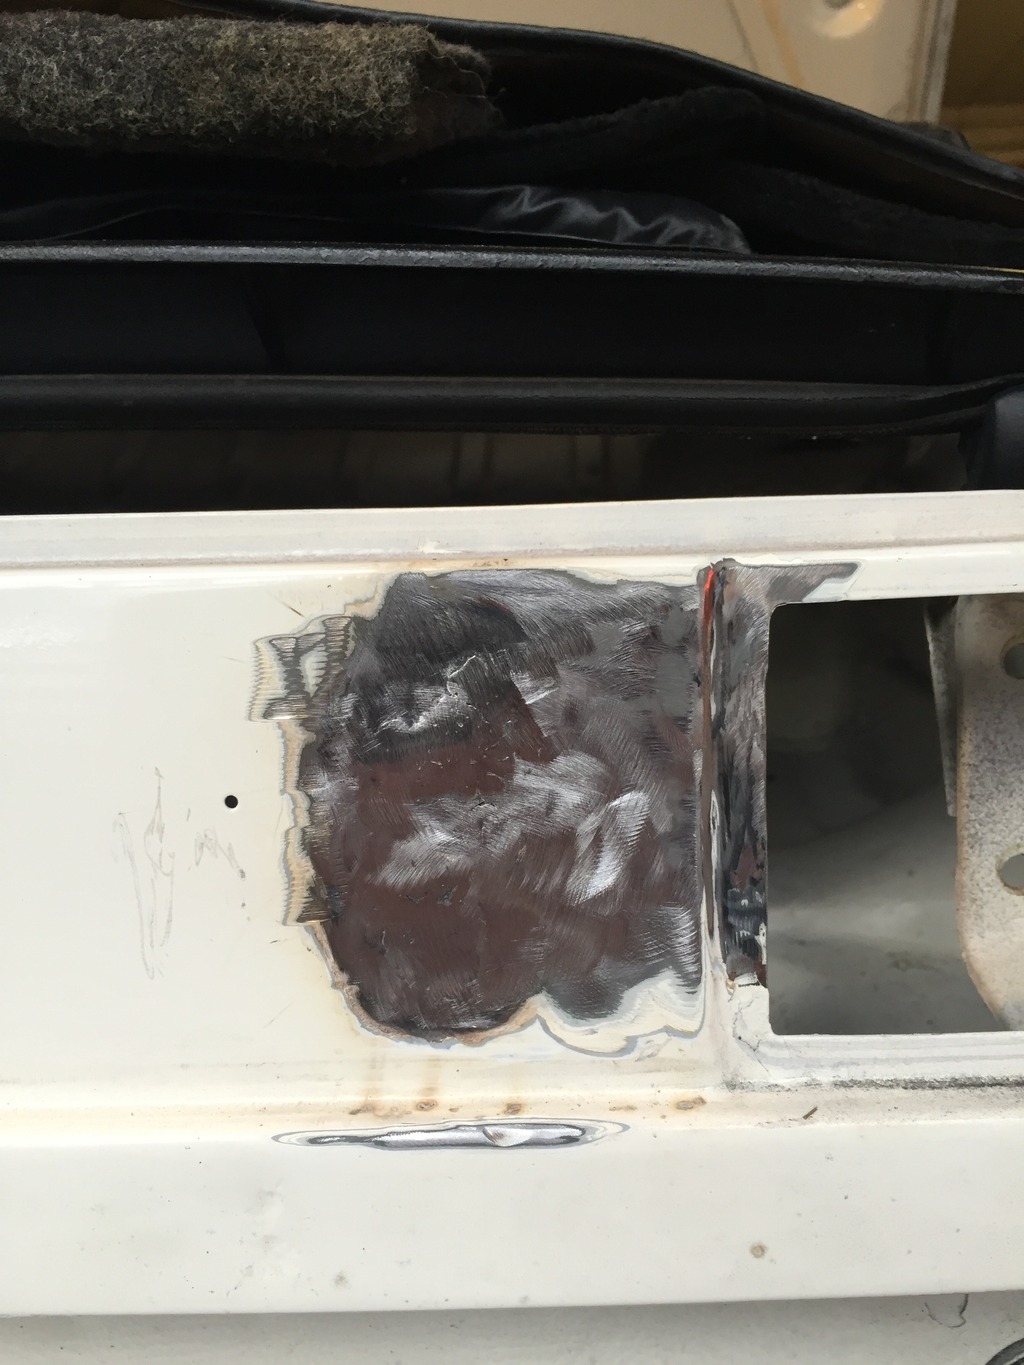
Couple of weeks off over the holidays and making progress. The car did not have it's jacking points so we are replacing them and making the back plate from scratch.

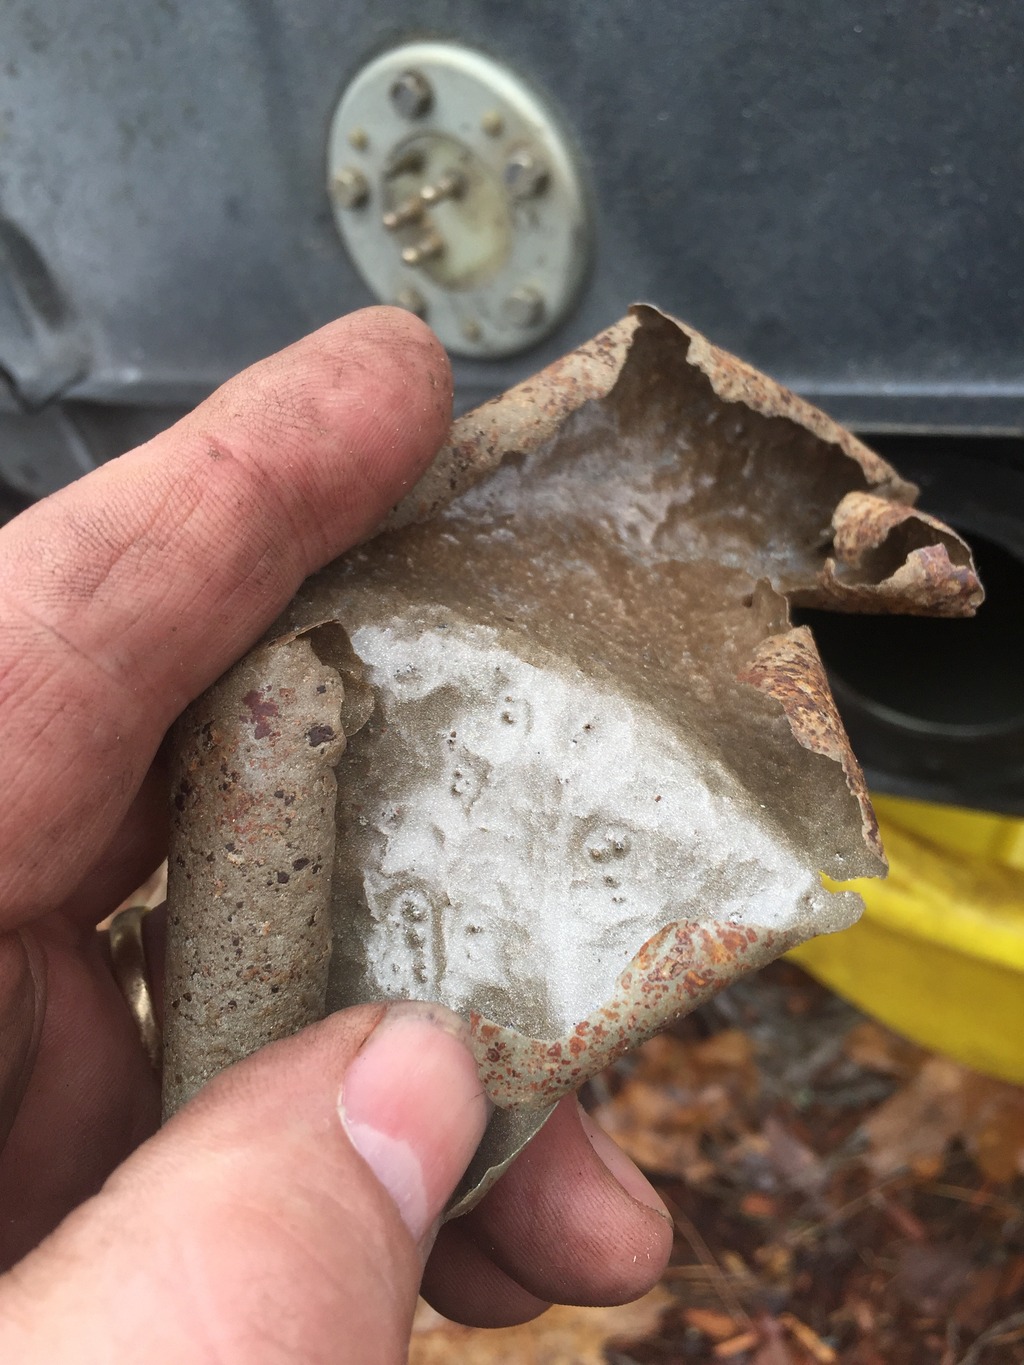
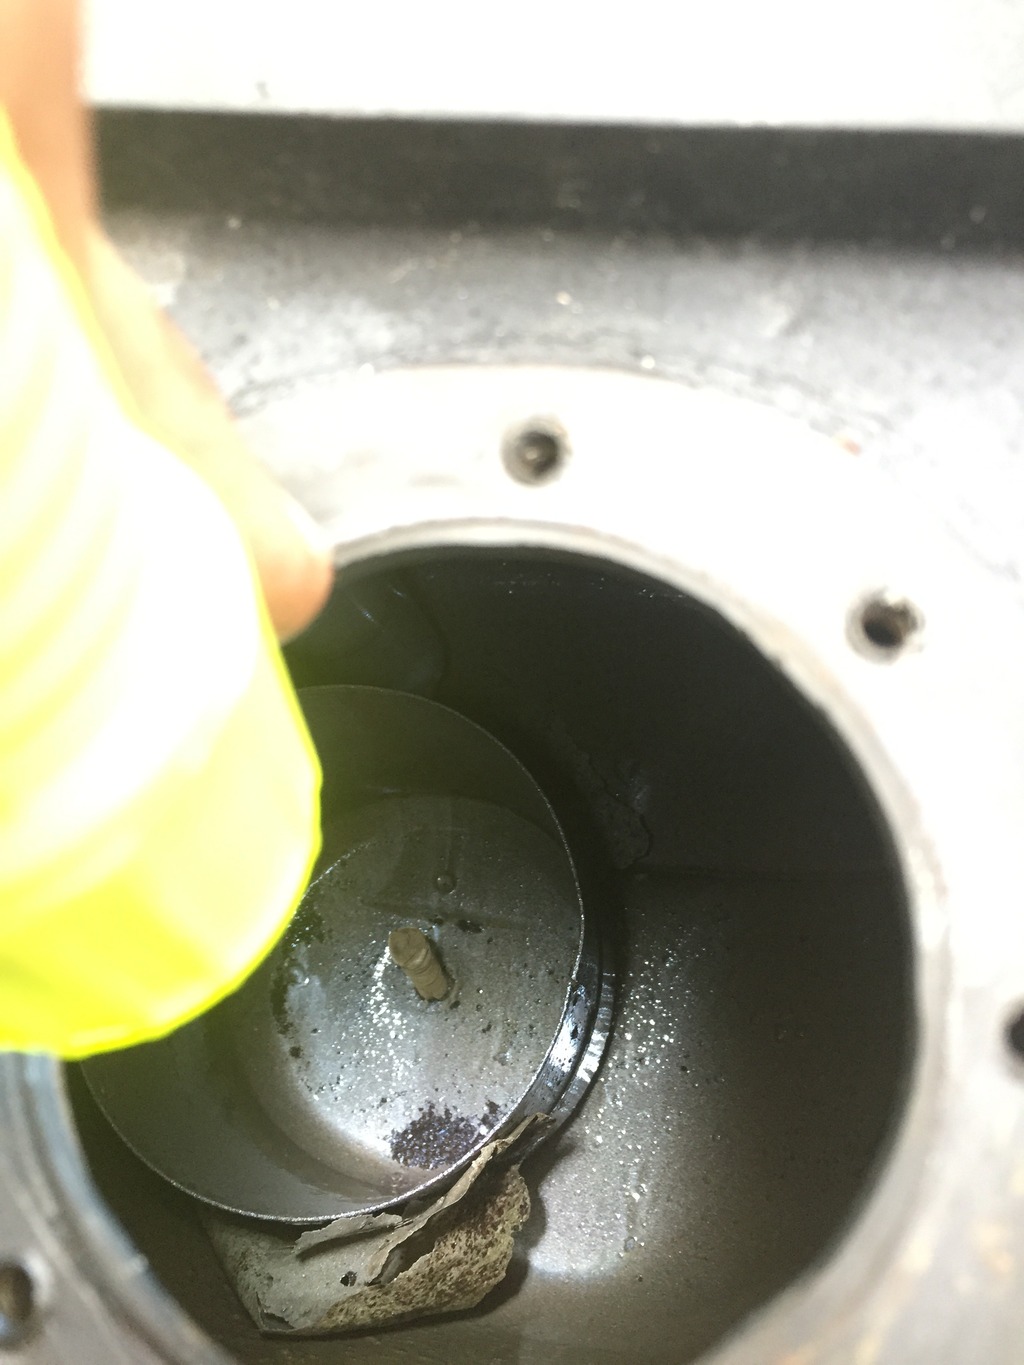
Also pulled the fuel tank today so we could fix some issues with the air box and wipers, but in doing this I found this problem. the PO told me he had the tank coated and it seem to not have taken.
Does anyone have any suggestions on how to deal with this?
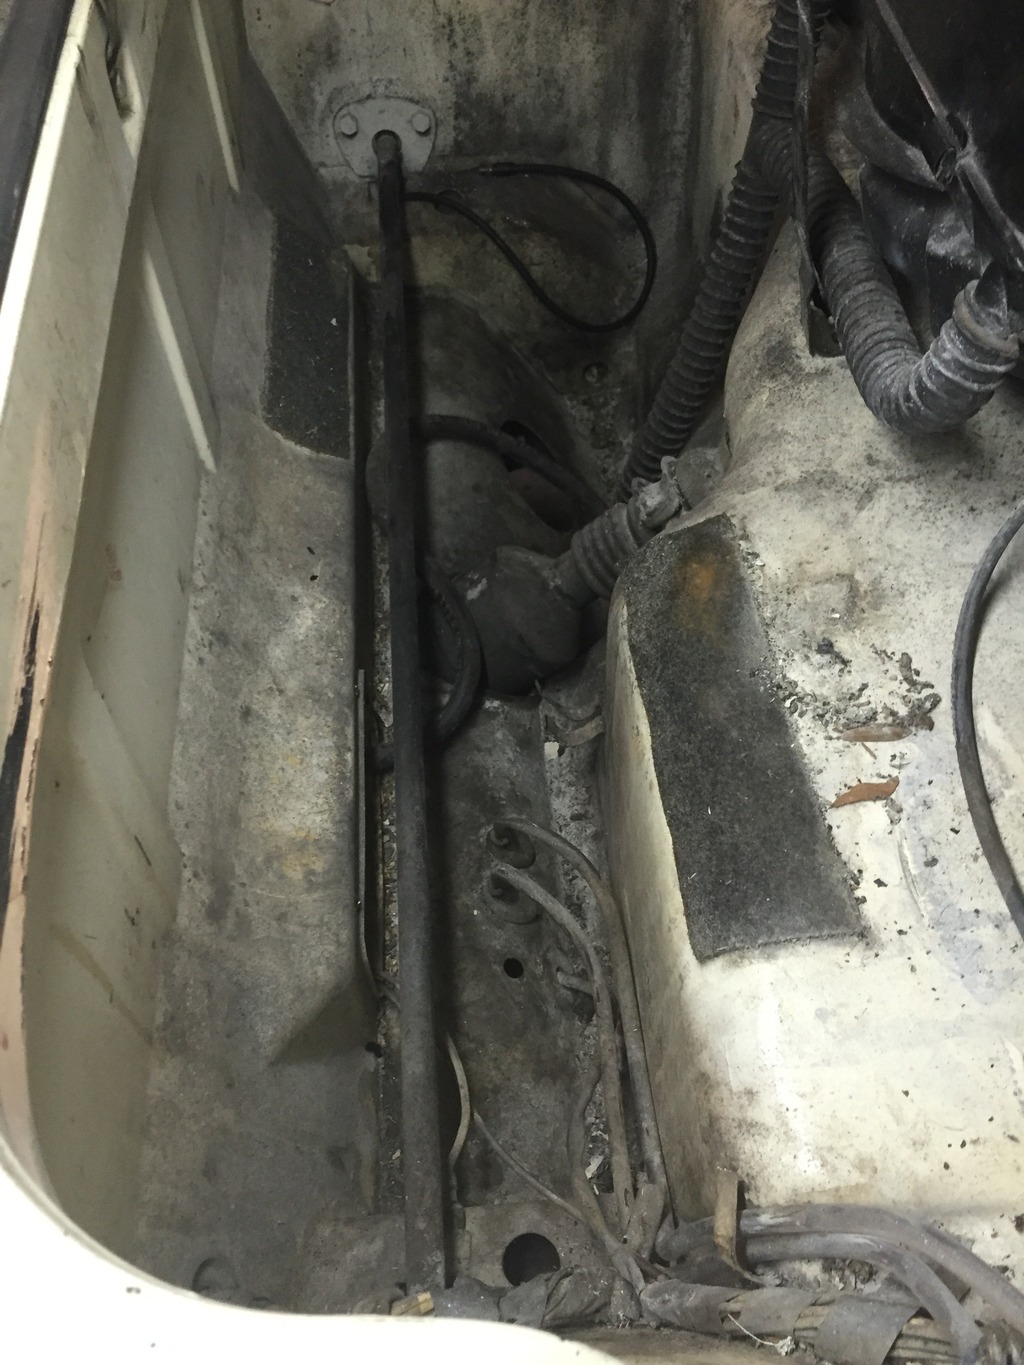
pic under the tank and we have some real cleaning to do here..
also had to weld up some holes in the rear tail light area that should not have been there from a "porsche" reflector plate.
Also removed the back glass and found things to be in great shape
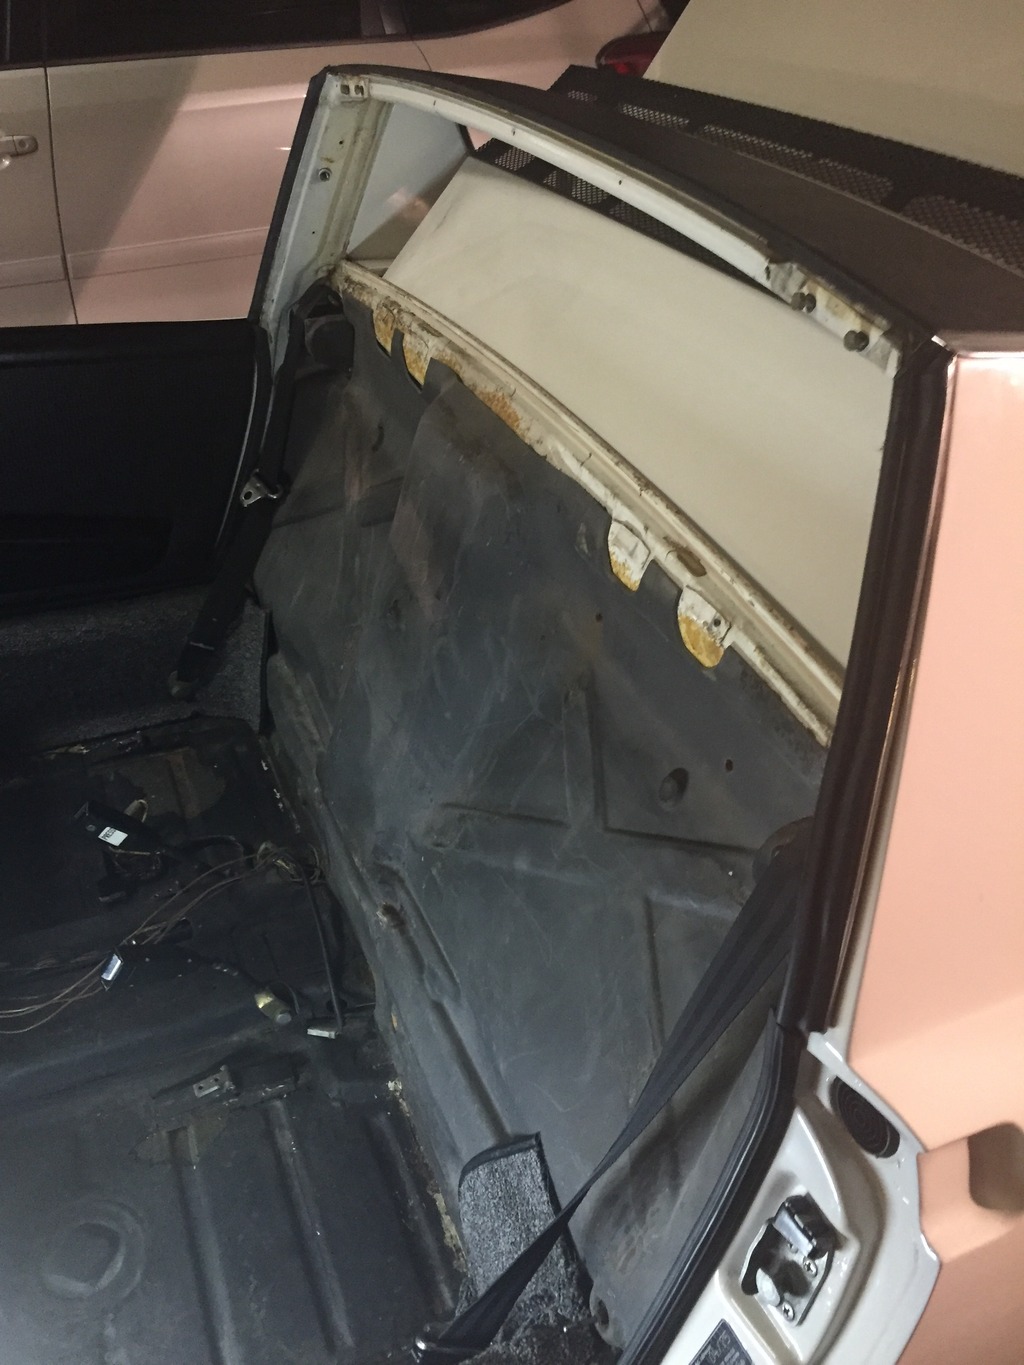
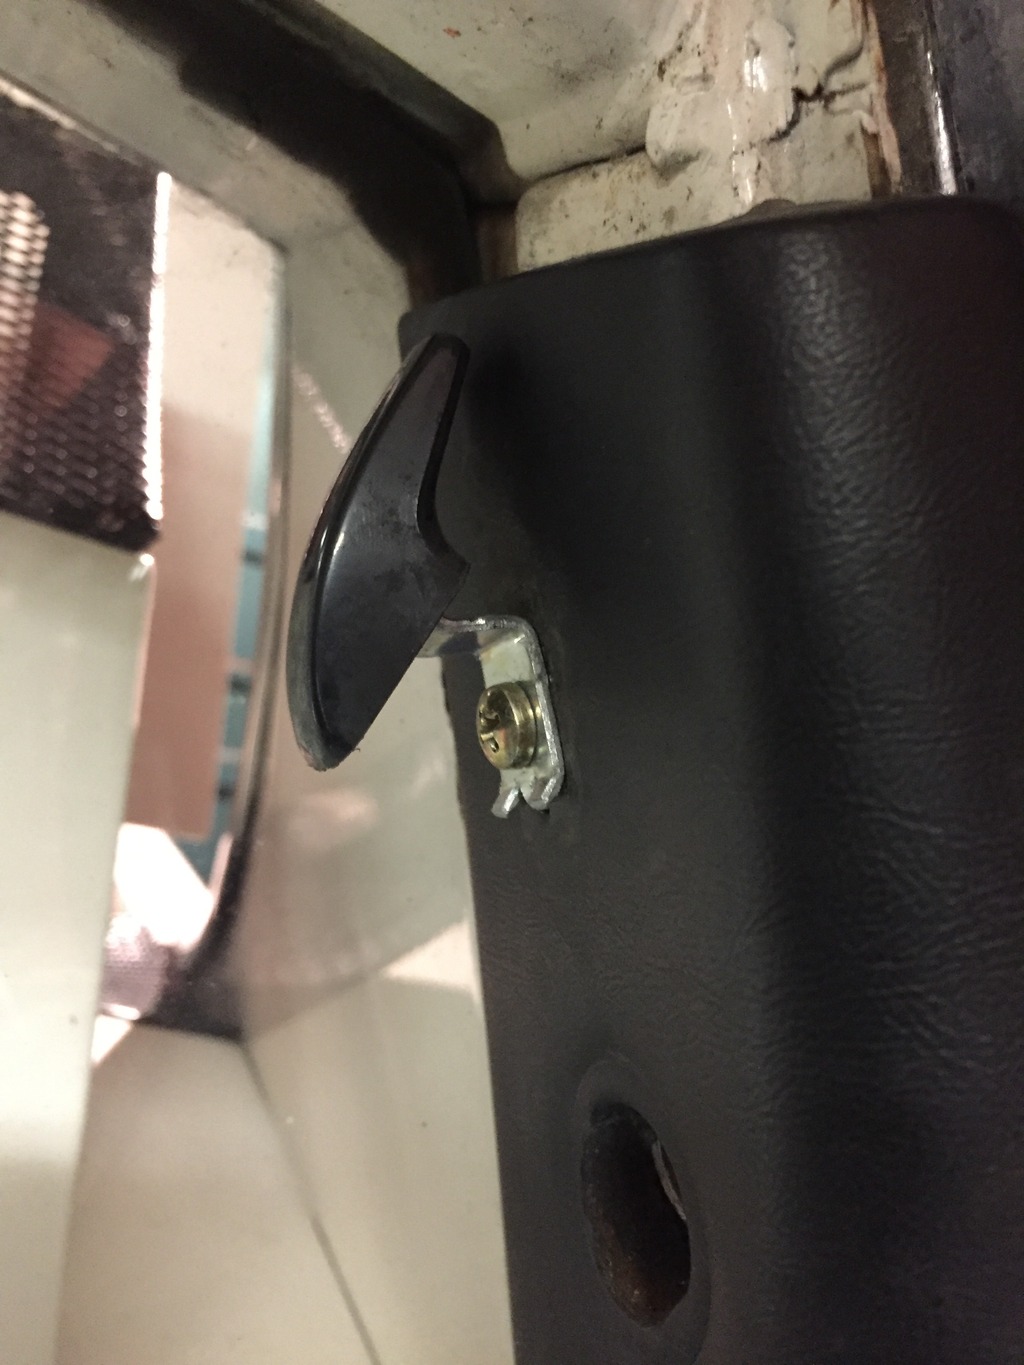
also for anyone who does not know how to remove the hooks above the shoulder belt point, here is a pic... I had no clue and it took me a while to figure this puzzle out
Tomorrow I'm starting on removing the front windshield and getting it ready for new glass. along with finishing the new carpet and speaker mounts
Cairo94507
Dec 28 2015, 08:43 AM
You guys are doing a terrific job on your car. Before you know it you will have all the must-do items done and be looking at what else you can do to make it perfect. Have fun and enjoy.
76-914
Dec 28 2015, 09:11 AM
Good job! Don't know how I missed this thread before.

saigon71
Dec 28 2015, 12:45 PM
Nice car and great story! You will be

before you know it!
One suggestion...replace those sections of carpet that the fuel tank sits on with something that won't hold water. Any type of moisture will be absorbed by that carpet and cause rust. I used polyethelene pipe wrap for mine.
For the fuel tank, take it to a radiator shop & have it cleaned & re-sealed. Replace fuel sock in the tank and fiber washers on the tank connectors.
I don't mean to add too much to your to-do list, but I'd also recommend stainless steel fuel lines that run from the tank to the engine bay "while youre in there." These are available at Tangerine racing as well.
LowBridge
Dec 30 2015, 10:08 AM
anderssj
Dec 30 2015, 06:23 PM
Hi!

Regarding the Volvo 240 calipers--oops--just saw that you went to PMB for OEM brakes (good choice). As far as that master cylinder is concerned, it doesn't look like a Volvo 240 part (stock 240 master cylinder has a 22 mm bore--considerably larger than the 17mm or 19mm usually used on our cars). Some of the Volvo guys use a 24mm MC from a 94 Mustang GT--maybe it's one of those?
Hope this helps!
LowBridge
Dec 31 2015, 01:12 PM
QUOTE(anderssj @ Dec 30 2015, 07:23 PM)
Hi!
Regarding the Volvo 240 calipers--oops--just saw that you went to PMB for OEM brakes (good choice). As far as that master cylinder is concerned, it doesn't look like a Volvo 240 part (stock 240 master cylinder has a 22 mm bore--considerably larger than the 17mm or 19mm usually used on our cars). Some of the Volvo guys use a 24mm MC from a 94 Mustang GT--maybe it's one of those?
Hope this helps!
I ended up removing it and confirming it was a 19mm, so I'm all good there, really at this point the big question is what do I do with my fuel tank, I was able to confirm with the OP that it is a POR-15 coating.
I did talk with POR-15 their answer was to use an aircraft stripping and then re-coat with another POR-15 kit. After seeing this I'm not sure I want to do that again..
anyone have any feelings/thoughts on using a coating on the tank?
This is a "lo-fi" version of our main content. To view the full version with more information, formatting and images, please
click here.
 . I've seen where people do BMW mods, thoughts?