Help - Search - Members - Calendar
Full Version: 914-6 conversion/ rusturation GT style
914World.com > The 914 Forums > 914World Garage
Pages: 1, 2, 3, 4, 5, 6, 7, 8, 9, 10, 11, 12, 13, 14, 15, 16, 17, 18, 19, 20, 21, 22, 23, 24, 25, 26, 27, 28
mb911
QUOTE(porschetub @ Jun 21 2018, 02:56 PM) *

QUOTE(914forme @ Jun 17 2018, 03:19 AM) *

QUOTE(mb911 @ May 22 2018, 11:16 AM) *

QUOTE(Mark Henry @ May 21 2018, 05:32 PM) *

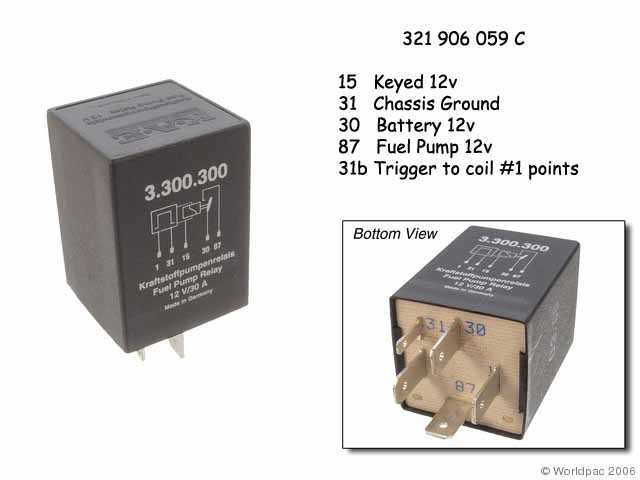
Right now I'm running off of the ignition, but I just bought a early 80's VW Rabbit CIS fuel pump relay. It runs off of the tach signal, if no tach signal it will turn the pump off. Starting isn't an issue as the carbs have enough fuel in the bowls to start. Only issue would be first dry bowls start, would be easy enough to install a NO push button switch.

Relay part number 321 906 059C the one I got has a 15a fuse built right into the top of the relay.

IPB Image

You could do a similar thing with a generic DTDP relay and run it off the oil pressure (idiot light) switch, but it won't be as fast reacting as the Rabbit switch.

There's also an inertia switch from a Ford (IIRC), but guys say it trips every time you hit a bad bump, simple to reset.


On how I made my relay board delete engine harness go to post #150 of my engine build thread. You can get the connector from member Perry Kiel, he also makes full conversion harnesses.
Since I'm cheap I made a male connector by hacking a female connector from an old engine harness.
http://www.914world.com/bbs2/index.php?sho...9913&st=140


I did the same thing as you on my last conversion. Relay for sure on this one.. It just seems safer.

I will probably delete the board as suggested and either make my own harness or buy one from perry..

Gotta figure the regulator wiring out as well then..


Don't forget some of the CIS relays also have a built in rev limit function. Learned that the hard way going down the back straight of Mid-Ohio. Still below the red-line first time out. and I would drop power WTF.gif traced it back to the relays I was using. In my setup one powered the coil one powered the fuel pump.

I grabbed the relays from a my hoard of VW CIS parts from my previous Scirocco collection. Yes Ben I am back to using the term Hoard. When in Rome.


Would the starter cranking speed be enough to trigger that relay ?,my 87 GTI has what I think is the very similar relay and has the rev-limit built in with a plain rotor,comes in around 6400,some CIS Golfs have a different setup and use a rev-limiting rotor.
The setup in my Golf has a priming function to charge the fuel accumulator and the fuel distributor, the first time you turn the key ,after that the main and tank pump run up when cranking the engine,thinking this would fill my fuel bowls but I don't know what would cause the relay to prime in a carb application.
Been looking for sometime @ a safety solution and think this setup might be the go,if only I knew more about car electrics dry.gif .


Yup I think I will try this..
mb911
Just finished up everywhere that needed touch up. And painted trans.. Click to view attachment
mb911
Click to view attachment
TravisNeff
I like the color you picked for the transmission. Did you end up doing cerakote?
mb911
QUOTE(Travis Neff @ Jun 22 2018, 06:17 PM) *

I like the color you picked for the transmission. Did you end up doing cerakote?


Thanks used cerakote titanium only because I bought a sample of the color and had some left. Its a "rebuild" in a can so to speak.
mb911
Off the rotisserie. 1st time in last 2 years.. Thinking I might sell the rotisserie not sure yet..Click to view attachment
mb911
Can't figure out why pictures are loading upside down etc.
mepstein
QUOTE(mb911 @ Jun 24 2018, 03:54 PM) *

Off the rotisserie. 1st time in last 2 years.. Thinking I might sell the rotisserie not sure yet.

Dibs
mb911
GT oil cooler set up has started.Click to view attachment
mb911
Click to view attachment
whitetwinturbo
.............just got a pair of anti-gravity boots to help watch this coo build smoke.gif
mb911
Here is Finished prototype for front oil cooler. It will have a foam rubber seal up front and rubber washers top to bottom.. Now to lay out trunk for cutting. Click to view attachment
mb911
Click to view attachment
mb911
Click to view attachment
mb911
So I know welding is not done.. Making progress on the oil cooler though.. Happy about that.Click to view attachment
mb911
Click to view attachment
bbrock
Wow! The fab work is fantastic but what really caught my eye are those plug welds. They are works of art. Those will look just like spot welds after paint. smiley_notworthy.gif
mb911
QUOTE(bbrock @ Jun 27 2018, 09:40 AM) *

Wow! The fab work is fantastic but what really caught my eye are those plug welds. They are works of art. Those will look just like spot welds after paint. smiley_notworthy.gif


Thanks.

Also note how my car was clipped on passenger side.. I know we have reviewed that but this is why I feel this is a perfect car for the build.. If I had a virgin rust free car I am not sure I could do all this cutting etc.. I also would have worried more about metal finishing.
mb911
Figuring out hose lengths.. Might neck down to 26mm cooler hoses. 30 is a tight fit..Click to view attachment
mb911
Just got back from vacation and had some goodies waiting for me.

Thanks Mark E, Mark H, and Brad .. These are the last bits to get the engine started. Also not pictured is the 22 to 30mm fitting and the oil pressure gauge.

And picture fixed
Click to view attachment
mb911
Distributor just came yesterday along carb gaskets etc. Yeah.. Click to view attachment
mb911
Carb repair.. Drilled/tapped/loctite brass bushing for the drain plug.. Click to view attachment Click to view attachmentClick to view attachment

Who said welders can't be machinist wink.gif
RektOne
QUOTE(bbrock @ Feb 27 2018, 08:03 AM) *

QUOTE(mb911 @ Feb 26 2018, 07:10 PM) *

I have access to a small 5 gallon sized blaster.. Might try that.. I have a decent sized compressor that should work for the areas I need done..


I have the HF 40 lb. blaster and it works well. I'm using crushed glass for media. My only problem is finding a hood that doesn't cost a fortune and doesn't fog up. I just bought one on Amazon that got good reviews but I haven't tested.


We had a HF model for a long time. We recently upgraded to this wet blast cabinet: https://www.raptorblaster.com/wet-blast-cab...abinet-rb4836s/. Good visibility, and works great for removing powder coating.
mb911
Today's update.. Finally got the factory replacement fender from Garold epoxy primed, got the flywheel on along with mounting the engine trans combo into the test run stand. Decided to just place the carbs and air cleaner on.. Good progress. Click to view attachment Click to view attachmentClick to view attachment
mepstein
QUOTE(mb911 @ Aug 2 2018, 07:02 PM) *

Today's update.. Finally got the factory replacement fender from Garold epoxy primed, got the flywheel on along with mounting the engine trans combo into the test run stand. Decided to just place the carbs and air cleaner on.. Good progress. Click to view attachment Click to view attachmentClick to view attachment

Drop the engine down to the floor, glass top on the metal frame, your done.
mb911
QUOTE(mepstein @ Aug 2 2018, 04:00 PM) *

QUOTE(mb911 @ Aug 2 2018, 07:02 PM) *

Today's update.. Finally got the factory replacement fender from Garold epoxy primed, got the flywheel on along with mounting the engine trans combo into the test run stand. Decided to just place the carbs and air cleaner on.. Good progress. Click to view attachment Click to view attachmentClick to view attachment

Drop the engine down to the floor, glass top on the metal frame, your done.


Very true.. Lol
GeorgeRud
Just have to correct the snorkel position to the other side of the engine and it’ll be perfect! Truly would make an impressive (though expensive) table!
toolguy
QUOTE(GeorgeRud @ Aug 3 2018, 08:09 AM) *

Just have to correct the snorkel position to the other side of the engine and it’ll be perfect! Truly would make an impressive (though expensive) table!


It looks like the snorkel has the 'warm air' tube for 911 applications. .
mb911
QUOTE(toolguy @ Aug 3 2018, 07:31 AM) *

QUOTE(GeorgeRud @ Aug 3 2018, 08:09 AM) *

Just have to correct the snorkel position to the other side of the engine and it’ll be perfect! Truly would make an impressive (though expensive) table!


It looks like the snorkel has the 'warm air' tube for 911 applications. .


Yup.. Gotta grear deal on it.
mb911
Small project today.. Did get a great deal on some high quality semi H4 headlight housing for my eventual LED setup.. Click to view attachment Click to view attachment
Dion
Beautiful engine and prolly the cleanest e-brake handle I’ve ever seen.
mb911
Front oil cooler mounting is welded in. Needs a bit of finishing but another step forward.. Also note see the braze repair probably dating back to the late 70s or early 80s.. I wrestled with repairing that or leaving as is.. I may someday find a front clip or just the front panel to correct it.. I just felt for my semi race car /GT tribute it just was not worth it.. If the right parts come along that maybe something to do in the future.

Anyhow I TIG welded this in only because I was out of Argon /co2 for the MIG. Click to view attachment
TravisNeff
That cooler duct looks great!
mb911
QUOTE(Travis Neff @ Aug 21 2018, 06:52 PM) *

That cooler duct looks great!


Its a pretty simple design. I made a couple of them based off of my oil cooler which I am very impressed with the quality of. Much nicer then a setrab not that there is anything wrong with setrab just the cooler I have is built to supercar quality.
mepstein
QUOTE(mb911 @ Aug 22 2018, 05:05 PM) *

QUOTE(Travis Neff @ Aug 21 2018, 06:52 PM) *

That cooler duct looks great!


Its a pretty simple design. I made a couple of them based off of my oil cooler which I am very impressed with the quality of. Much nicer then a setrab not that there is anything wrong with setrab just the cooler I have is built to supercar quality.

Do you think the front needs reinforcement now that there are two big openings in the nose and front pan.
mb911
QUOTE(mepstein @ Aug 22 2018, 01:54 PM) *

QUOTE(mb911 @ Aug 22 2018, 05:05 PM) *

QUOTE(Travis Neff @ Aug 21 2018, 06:52 PM) *

That cooler duct looks great!


Its a pretty simple design. I made a couple of them based off of my oil cooler which I am very impressed with the quality of. Much nicer then a setrab not that there is anything wrong with setrab just the cooler I have is built to supercar quality.

Do you think the front needs reinforcement now that there are two big openings in the nose and front pan.


I am not sure. With the duct welded all around along with the louvered floor welded the same I would think its pretty strong.. I think some just bolt them on the front opening and I think that is not strong enough..
TravisNeff
QUOTE(mb911 @ Aug 22 2018, 02:05 PM) *

QUOTE(Travis Neff @ Aug 21 2018, 06:52 PM) *

That cooler duct looks great!


Its a pretty simple design. I made a couple of them based off of my oil cooler which I am very impressed with the quality of. Much nicer then a setrab not that there is anything wrong with setrab just the cooler I have is built to supercar quality.


I have the setrab unit from PMS and the replica GT ducting. Your design definately has all the air going through the cooler, while the replica setup will need a little work I think. Also has to add some strength back to the front end.
mb911
Yes never seen the PMS one in person. Do you know the dimensions of it (cooler opening)?
TravisNeff
Dimensions of the cooler or the shroud? Gimme a few minutes and I will measure and take pics
TravisNeff
Here is the cooler 21x4.5
mb911
Thanks that is helpful to know. Mine is 24x6 so the factory style shroud wouldn't work.. I am going to make one from scratch it seems.
mepstein
The truth is there was not just one configuration for GT's. I saw a recent Petrolicious article and it looked like a real GT with the oil cooler on the front of the bumper. As long as it works and looks good, I'm in.
mb911
Update:

Been doing allot of sanding and paint removal as of late both on my car and my sons 944. I stripped the hood for my car and removed all the headlights and wiring and started removing the undercoating that someone sprayed in the front trunk. Most of the nasty paint is gone. I sanded the rest.. I have a small section of the front bulkhead needs to be repaired.. The plan is to fix this area and get ready for epoxy over the next few weeks.

Mark Epstein has sent me some bumpers and I will doing GT treatment for both of us and sending out for chroming. I need to find out what size the plug was that Mark Henry did so that will be the next question I have..
mb911
Distractions.. Click to view attachment Click to view attachment
mb911
Spent some time painting the cabin then the shock mounting areas so that I can actually roll the car around.. The color is saturn red which is the same color as my last conversion car.. I think I like it. Please note this is not typical order of things but nees to get the car more complete for spring. We (wife) keeps thinking of selling our country property in favor of moving to something with a smaller yard.
mb911
Oops and the picture. Click to view attachment
TravisNeff
ooh! I like the color
sixnotfour
Tangerine....
mepstein
QUOTE(sixnotfour @ Sep 15 2018, 07:01 PM) *

Tangerine....


I’m guessing Saturn red. shades.gif

Congrats on the progress. Paint is certainly a milestone.
mb911
QUOTE(mepstein @ Sep 15 2018, 03:41 PM) *

QUOTE(sixnotfour @ Sep 15 2018, 07:01 PM) *

Tangerine....


I’m guessing Saturn red. shades.gif

Congrats on the progress. Paint is certainly a milestone.


I think saturn red is very similar to tangerine.
This is a "lo-fi" version of our main content. To view the full version with more information, formatting and images, please click here.
Invision Power Board © 2001-2024 Invision Power Services, Inc.