I need to replace the front rubber bushings and am planning to use the Elephant Racing bushings and install tools. I have not been able to find a video or other info regarding removal of the control arms. I am not near my car so I can't crawl under right now.
Will I need to remove the hubs, brakes or anything else to remove the control arms?
Thanks,
Jack
Full Version: Control Arm Bushing Replacement
I did the Elephant rubber bushings and it was not too tough if you have the big clamp tool or equivalent.
The Elephant has how to vids on their site.
The Elephant has how to vids on their site.
QUOTE(pete000 @ Nov 30 2015, 04:03 PM) 
I did the Elephant rubber bushings and it was not too tough if you have the big clamp tool or equivalent.
The Elephant has how to vids on their site.
I watched the video. What I need to know is how many other components no to be removed in order to remove the control arms.
The only hard part was getting the old bushings off. I used lots of heat
David
David
QUOTE(Harpo @ Nov 30 2015, 04:30 PM)
The only hard part was getting the old bushings off. I used lots of heat
David
What about any other components that need removal prior to removal of the control arms? I'm not in town and not near my car.
This is the minimum needed to replace the bushings...
1. Disconnecting the inboard cv axle
2. Flex brake line from the arm to the body
3. The bottom shock bolt
Once this is done you will need to support the control arm under the bearing area (balancing) before you go any further.
Once you have this done it's a simple matter of unbolting the camber mount and the inside nut on the shaft and press the shaft out and replace the bushing.
hope this helps
QUOTE(LowBridge @ Nov 30 2015, 04:49 PM)
This is the minimum needed to replace the bushings...
1. Disconnecting the inboard cv axle
2. Flex brake line from the arm to the body
3. The bottom shock bolt
Once this is done you will need to support the control arm under the bearing area (balancing) before you go any further.
Once you have this done it's a simple matter of unbolting the camber mount and the inside nut on the shaft and press the shaft out and replace the bushing.
hope this helps
I'm replacing the front bushings. This sounds like a rear description...
Burning the rubber bushing is messy.
They do just pop out when they get molten. The burnt rubber is sticky goo and can drip.
They do just pop out when they get molten. The burnt rubber is sticky goo and can drip.
I have done this twice recently, once at the track so it is not too bad.
loosen both front wheels (lugs)
Block rear and jack up front and support with jackstands on/near front body donuts, remove wheels.
Remove steering rack cover (2X large rear bolts, 2X front small (8mm?))
Jack up on spindle to take the load off of the balljoint.
Remove balljoint retention bolts (early vs late differ - one has a wedge bolt) one on each side.
See if you can get the balljoint to pull out of the strut (this will be the first challenge).
The first time I did this I had to pull the top hats loose from the shock tower mounts (will ruin your alignment , so make carefully first).
Then I was able to compress the strut and had more range of motion to wrestle the strut off the ball joint.
Once the strut comes loose, support it up out of the way, don't let any weight pull on the brake flex line.
Lower the jack and the control arm will just pivot down away from the car.
Mark the allen screws that are at the back of each control arm (tis sets your front ride height), then remove them completely from the rear torsion bar holder, then the rear holder will slide right out the back.
Loosen the front bolts that hold the control arm front carrier in, lower it and the torsion bar should be able to come out the back now.
Now the second challenge (maybe) is to pull the rear bushing carrier free from the steering rack bracket.
It is supposed to slide right out, but you might have to fight a bit.
My bushings weren't too hard to get off I didn't need heat or anything and they are still intact.
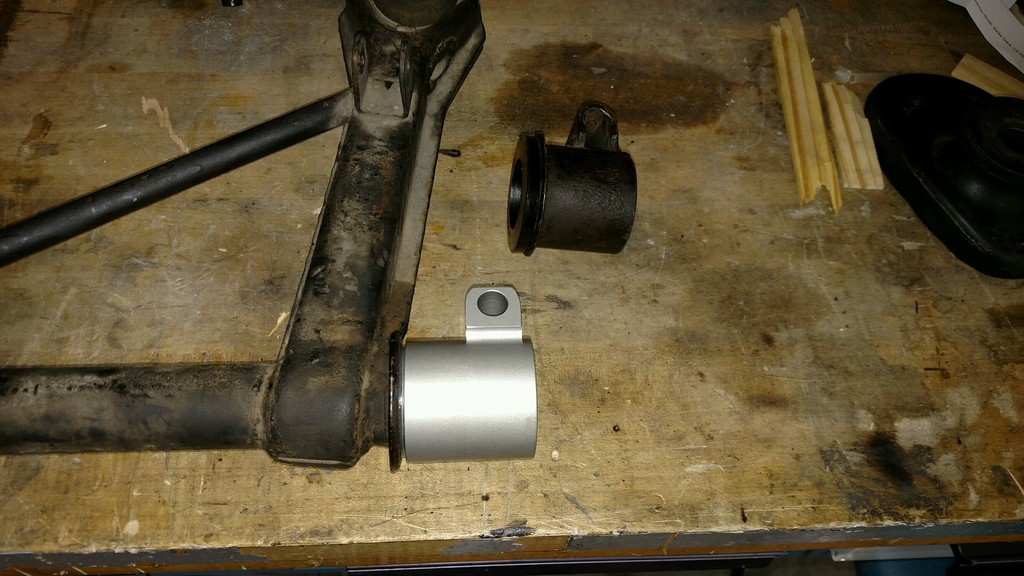
I was going to get the elephant polybronze bushings, but one of my rear carriers was out of round. For the extra $$ to get the elephant replacement rear carriers, it was the same price (bushings plus carriers) to just get the spherical bushings, so I got them instead.
Heres a pic:
loosen both front wheels (lugs)
Block rear and jack up front and support with jackstands on/near front body donuts, remove wheels.
Remove steering rack cover (2X large rear bolts, 2X front small (8mm?))
Jack up on spindle to take the load off of the balljoint.
Remove balljoint retention bolts (early vs late differ - one has a wedge bolt) one on each side.
See if you can get the balljoint to pull out of the strut (this will be the first challenge).
The first time I did this I had to pull the top hats loose from the shock tower mounts (will ruin your alignment , so make carefully first).
Then I was able to compress the strut and had more range of motion to wrestle the strut off the ball joint.
Once the strut comes loose, support it up out of the way, don't let any weight pull on the brake flex line.
Lower the jack and the control arm will just pivot down away from the car.
Mark the allen screws that are at the back of each control arm (tis sets your front ride height), then remove them completely from the rear torsion bar holder, then the rear holder will slide right out the back.
Loosen the front bolts that hold the control arm front carrier in, lower it and the torsion bar should be able to come out the back now.
Now the second challenge (maybe) is to pull the rear bushing carrier free from the steering rack bracket.
It is supposed to slide right out, but you might have to fight a bit.
My bushings weren't too hard to get off I didn't need heat or anything and they are still intact.
I was going to get the elephant polybronze bushings, but one of my rear carriers was out of round. For the extra $$ to get the elephant replacement rear carriers, it was the same price (bushings plus carriers) to just get the spherical bushings, so I got them instead.
Heres a pic:
QUOTE(stugray @ Nov 30 2015, 05:12 PM)
I have done this twice recently, once at the track so it is not too bad.
loosen both front wheels (lugs)
Block rear and jack up front and support with jackstands on/near front body donuts, remove wheels.
Remove steering rack cover (2X large rear bolts, 2X front small (8mm?))
Jack up on spindle to take the load off of the balljoint.
Remove balljoint retention bolts (early vs late differ - one has a wedge bolt) one on each side.
See if you can get the balljoint to pull out of the strut (this will be the first challenge).
The first time I did this I had to pull the top hats loose from the shock tower mounts (will ruin your alignment , so make carefully first).
Then I was able to compress the strut and had more range of motion to wrestle the strut off the ball joint.
Once the strut comes loose, support it up out of the way, don't let any weight pull on the brake flex line.
Lower the jack and the control arm will just pivot down away from the car.
Mark the allen screws that are at the back of each control arm (tis sets your front ride height), then remove them completely from the rear torsion bar holder, then the rear holder will slide right out the back.
Loosen the front bolts that hold the control arm front carrier in, lower it and the torsion bar should be able to come out the back now.
Now the second challenge (maybe) is to pull the rear bushing carrier free from the steering rack bracket.
It is supposed to slide right out, but you might have to fight a bit.
My bushings weren't too hard to get off I didn't need heat or anything and they are still intact.
I was going to get the elephant polybronze bushings, but one of my rear carriers was out of round. For the extra $$ to get the elephant replacement rear carriers, it was the same price (bushings plus carriers) to just get the spherical bushings, so I got them instead.
Heres a pic:
Just the info I needed. Thank you!
Jack
After purchasing the elephants, I found these for significantly less:
http://www.tarett.com/items/914-products/9...rfbk-detail.htm
They look to be very similar. Cant say about the quality of the tarett, but the elephants are like butter.
http://www.tarett.com/items/914-products/9...rfbk-detail.htm
They look to be very similar. Cant say about the quality of the tarett, but the elephants are like butter.
QUOTE(stugray @ Nov 30 2015, 08:05 PM)
After purchasing the elephants, I found these for significantly less:
http://www.tarett.com/items/914-products/9...rfbk-detail.htm
They look to be very similar. Cant say about the quality of the tarett, but the elephants are like butter.
Those look like the parts that Rebel racing produces, based on the RSR part number I would assume they are "Part #RSRFBS"
also cheaper if you buy direct from Rebel.
http://rebelracingproducts.com/Suspension/Steering.html
The Rebel front bushings are Fuching amazing! I personally chose them over the polybronze for a few reasons.
QUOTE(jack20 @ Nov 30 2015, 07:54 PM)
QUOTE(LowBridge @ Nov 30 2015, 04:49 PM)
This is the minimum needed to replace the bushings...
1. Disconnecting the inboard cv axle
2. Flex brake line from the arm to the body
3. The bottom shock bolt
Once this is done you will need to support the control arm under the bearing area (balancing) before you go any further.
Once you have this done it's a simple matter of unbolting the camber mount and the inside nut on the shaft and press the shaft out and replace the bushing.
hope this helps
I'm replacing the front bushings. This sounds like a rear description...
sorry about that, I missed that part. however stugray is right on point. I'll add on reassembly to make adjusting the ride height easier you should start with the bogey in the middle of the range with the adjusting bolt touching the top to take out any slack. doing this will get you very close right out of the gate.
If you are going with the rubber bushings, absolutely make note of the angle of your bushing retainers when you pull off your control arms. That way, when you install the new rubber bushings and go to set the angles, you will be putting them back in the same position. I just did this with Elephant rubber bushings and had a problem with the retainers being off slightly....not sure if I just wasn't accurate in measuring or if they moved a little. I used the angles provided with the Elephant instructions but it's also possible that my car may be slightly different. Be diligent in all those details and it should be fairly easy.
QUOTE(Java2570 @ Dec 1 2015, 10:20 AM)
If you are going with the rubber bushings, absolutely make note of the angle of your bushing retainers when you pull off your control arms. That way, when you install the new rubber bushings and go to set the angles, you will be putting them back in the same position. I just did this with Elephant rubber bushings and had a problem with the retainers being off slightly....not sure if I just wasn't accurate in measuring or if they moved a little. I used the angles provided with the Elephant instructions but it's also possible that my car may be slightly different. Be diligent in all those details and it should be fairly easy.
I thought that angle was only helpful for the initial installation. the control arms move in the bushings when the suspension is working. those angles will change depending on where the suspension is in its travel. not in relation to each other but in relation to the 0 point of the control arm you used when setting them..
QUOTE(Olympic 1.7 @ Dec 1 2015, 09:49 AM)
QUOTE(Java2570 @ Dec 1 2015, 10:20 AM)
If you are going with the rubber bushings, absolutely make note of the angle of your bushing retainers when you pull off your control arms. That way, when you install the new rubber bushings and go to set the angles, you will be putting them back in the same position. I just did this with Elephant rubber bushings and had a problem with the retainers being off slightly....not sure if I just wasn't accurate in measuring or if they moved a little. I used the angles provided with the Elephant instructions but it's also possible that my car may be slightly different. Be diligent in all those details and it should be fairly easy.
I thought that angle was only helpful for the initial installation. the control arms move in the bushings when the suspension is working. those angles will change depending on where the suspension is in its travel. not in relation to each other but in relation to the 0 point of the control arm you used when setting them..
With rubber bushings the control arms don't move within the bushing, the bushings bind to the arm and housing and rotational movement of the control arm flexes the rubber. Installation angle is important to not preload the rubber bushings.
This is why one piece replacement poly bushings suck so bad, the surfaces they ride on were designed to bind on rubber, not slip on poly.
Easy! 20 ton press takes the bushings with the wings off in a couple minutes. There's no good place to grab the other end bushings on the press, so I use an air cut off tool and make a vertical slice down the steel bushing cap, effectively splitting it in half. Pops right off. Of course this method is only if you are using Rebel bushings and you don't need the stock ones.
This is a "lo-fi" version of our main content. To view the full version with more information, formatting and images, please click here.