I know it's not a 914 but one of my girls (I have twin 7 year old girls in girl scouts) wanted a "Sally" from Cars.
So obviously I was excited to get started on that as Sally is based off of a 996, so to CAD I went. This is only the second year I've "helped" my girls with their cars so this is my first attempt at adding flares to a pinewood car. Should be fun. Next year they will do most of the work and I'll just help make it fast but this year I'll handle most of the construction while they do the paint. The other car is going to be a puppy.
I had to modify it a little to fit the size limits and the minimum wheelbase being 4" pushed the rear wheels back a little.
Click to view attachment
Full Version: Pinewood Derby Season
Looks good....I hope you leave off the tramp stamp Sally has 
Going to hand carve or throw that on a CNC mill/router?
Going to hand carve or throw that on a CNC mill/router?
QUOTE(Mueller @ Dec 10 2015, 09:40 AM) 
Looks good....I hope you leave off the tramp stamp Sally has
Going to hand carve or throw that on a CNC mill/router?
Ha, the tramp stamp, that would be hilarious! I will be hand carving and lots of dremel work. It probably won't turn out nearly as nice as the drawing, but at least I have a plan...
We are building a car too. Last year we won the Beauty contest for his den, which I wasn't trying to do. And we should have won the whole shebang, which I was trying to do. Somehow one of my canted rear axles got turned and veered the car hard so we lost one race before I identified the problem.
Last year the two cars I made with my girls (I had never made one before) did quite well. In the girl scout division one car finished 2nd, losing to the overall champion. The other car finished just off the podium for the girl scouts.
If I have time, I may make one for myself and enter the adult division, lol. If I did, I think I would have to do a 914-6 GT style car!
If I have time, I may make one for myself and enter the adult division, lol. If I did, I think I would have to do a 914-6 GT style car!
Both my boys were in for years (we even did guides before cub scouts) my youngest son who is turning 18 next week is an eagle scout....
I was a den leader for many years and cubmaster for some, then a scout leader for a few more.
After a while, here is what I learned.
1. tape off the axle area then let the boys make any car they want. It doesn't matter
2. help them cut it and carve it and let them paint it. It doesn't matter
3. balance it and make it weigh 5.000 or 4.9999
4. make it roll across the floor straight and fast.
5. let them race it. let them play with it after the racing is over, let them have fun.
We won a lot but hopefully what is more important is they had fun.
QUOTE(dflesburg @ Dec 10 2015, 11:55 AM)
1. tape off the axle area then let the boys make any car they want. It doesn't matter
2. help them cut it and carve it and let them paint it. It doesn't matter
3. balance it and make it weigh 5.000 or 4.9999
4. make it roll across the floor straight and fast.
5. let them race it. let them play with it after the racing is over, let them have fun.
We won a lot but hopefully what is more important is they had fun.
Yeah, I agree with all of this. I'm allowing myself to do most of the work one more time. The ideas and inspiration are theirs, I'm just the labor. I just don't yet trust my girls with the tools. Next year if they do it again, I'll let them do most of it, even if it just ends up to be a painted block of wood.
This should be a build post -- I'd love to see the car as it develops. Fun!
QUOTE(dflesburg @ Dec 10 2015, 09:55 AM)
Both my boys were in for years (we even did guides before cub scouts) my youngest son who is turning 18 next week is an eagle scout....
I was a den leader for many years and cubmaster for some, then a scout leader for a few more.
After a while, here is what I learned.
1. tape off the axle area then let the boys make any car they want. It doesn't matter
2. help them cut it and carve it and let them paint it. It doesn't matter
3. balance it and make it weigh 5.000 or 4.9999
4. make it roll across the floor straight and fast.
5. let them race it. let them play with it after the racing is over, let them have fun.
We won a lot but hopefully what is more important is they had fun.
Good advise here.
I have built many cars in the last ten plus years.
My oldest in a Life Scout and finishing up his Eagle requirements. My middle son is heading to Boy Scouts next month and my youngest is a Bear. Also have a daughter who is the twin to my older son and she is in American Heritage Girls.
If you can get your car to run on three wheels in a straight line that is the key. Don't forget to make room for your weights prior to cutting your body. You will need a significant amount of weight so plan accordingly. Make sure you read-up on tract clearance under the wheels and overhead. The car usually has to stay within it's wheel base. Polish your axles on a drill or drill press. use dry graphite on the axles after you get your car built, it will make a BIG difference. You can get extra supplies at Michaels/Hobby Lobby, etc.
I ran the Pine Wood Derby for several years....it was often more exciting for the Dads than the lads/girls but was always fun either way!
Have a great time!
When you think it's at max weight, add staples with a office paper stapler. You will be amazed how many you can add before tipping the scale.
Here's one I helped my grandson with last year. Fastest car of the day, and second place appearance.

QUOTE(The Cabinetmaker @ Dec 10 2015, 07:11 PM)
Here's one I helped my grandson with last year. Fastest car of the day, and second place appearance.
Needs jack stands!
QUOTE(The Cabinetmaker @ Dec 10 2015, 04:11 PM)
Here's one I helped my grandson with last year. Fastest car of the day, and second place appearance.
Looks like it has three wheels???
My brother in law made this for my niece and then I received it after:
QUOTE(PlantMan @ Dec 10 2015, 07:48 PM)
QUOTE(The Cabinetmaker @ Dec 10 2015, 04:11 PM)
Here's one I helped my grandson with last year. Fastest car of the day, and second place appearance.
Looks like it has three wheels???
It does in that pic. One of the nails (axles) was missing, but I found it.
QUOTE(PlantMan @ Dec 10 2015, 04:20 PM)
If you can get your car to run on three wheels in a straight line that is the key.
We tuned our car to rail ride, not straight. It works.
QUOTE(PlantMan @ Dec 10 2015, 04:20 PM)
Don't forget to make room for your weights prior to cutting your body.
Get the tungsten weights, they are more dense than anything else and make placement much easier and tune-able. Buy them at Hobby Lobby with the 40% coupon from their website.
Our boys first year, he won two 1st place trophys! We worked on the car together, bought one of the books and followed it as to weight plasmeant, grooved and polished the Axels w/graphite, running on three wheels and had a bit of a trick front as to the way the start worked, a spoiler placed high as to release the car quickly. Click to view attachment
Click to view attachment video of one of the races.
Click to view attachment not bad for his first year!
Built a few cars for a friend's son before. I told my buddy he should build it with his son and he said the car would be a square block of wood with wheels.
Here's one not intended to be raced...
Here's one not intended to be raced...
Sand wheels true and sand the nails for the axles.
We actually own a legal track from my childhood when my dad was that guy.
Tune and test as much as possible, friction is the enemy
We actually own a legal track from my childhood when my dad was that guy.
Tune and test as much as possible, friction is the enemy
All good advice!
We are in year 3. Buddy took 3rd overall and 1st in his grade level and den. We followed a YouTube video. I can find it again if anyone is interested.
This year it's all on him to do. I may make a car for fun.
We are in year 3. Buddy took 3rd overall and 1st in his grade level and den. We followed a YouTube video. I can find it again if anyone is interested.
This year it's all on him to do. I may make a car for fun.
QUOTE(r_towle @ Dec 11 2015, 01:38 PM)
Sand wheels true and sand the nails for the axles.
We actually own a legal track from my childhood when my dad was that guy.
Tune and test as much as possible, friction is the enemy

What a coincident. My dad also did a lot to build the local troop's track. I don't remember him building it but I do remember the track set up in our basement and my dad and his best friend, the scout master, tuning up the track.
A couple other things: use dry graphite as lubricant for the wheels.
File the inside of the nail head as the wheels will bump against the inside of the nail head during the race. Chuck the nails in your drill and polish the shafts and file the heads.
Also do not get any paint on the car surface adjacent to the wheel hub. You probably want to rub dry graphite on that portion of the car chassis.
The car must roll straight as an arrow. We had a lot of success aligning wheels by rolling the car on a truly flat surface. The more the car hits the side rails the more momentum it loses.
You should distribute the weights such that the most of the weight is just in front of the rear wheels. This is all kinetic energy. If all the weight is near the front, once the front wheels hit the flat part of the track, the weight provides just momentum. Weights near the rear wheels still provide kinetic energy once the front wheels hit the level part.
Long front ends are also good. When the back wheels hit the flat part, kinetic energy is gone. You want the front end to be as far forward as possible; ie., win by a nose.
QUOTE(Spoke @ Dec 11 2015, 02:44 PM)
QUOTE(r_towle @ Dec 11 2015, 01:38 PM)
Sand wheels true and sand the nails for the axles.
We actually own a legal track from my childhood when my dad was that guy.
Tune and test as much as possible, friction is the enemy
What a coincident. My dad also did a lot to build the local troop's track. I don't remember him building it but I do remember the track set up in our basement and my dad and his best friend, the scout master, tuning up the track.
A couple other things: use dry graphite as lubricant for the wheels.
File the inside of the nail head as the wheels will bump against the inside of the nail head during the race. Chuck the nails in your drill and polish the shafts and file the heads.
Also do not get any paint on the car surface adjacent to the wheel hub. You probably want to rub dry graphite on that portion of the car chassis.
The car must roll straight as an arrow. We had a lot of success aligning wheels by rolling the car on a truly flat surface. The more the car hits the side rails the more momentum it loses.
You should distribute the weights such that the most of the weight is just in front of the rear wheels. This is all kinetic energy. If all the weight is near the front, once the front wheels hit the flat part of the track, the weight provides just momentum. Weights near the rear wheels still provide kinetic energy once the front wheels hit the level part.
Long front ends are also good. When the back wheels hit the flat part, kinetic energy is gone. You want the front end to be as far forward as possible; ie., win by a nose.
with Spoke. It's all in the prep. My son's last car took him one day. He dried the block of wood in the oven. drilled a hole in the back for max lead. Cut a dowel stick for 8 discs, sprayed it red. Third place finisher. It was a laugh riot. This was the most important tool.
alignment app
Sliding internal weight inside a tube
We built several cool cars, the "Cheese Wedge" comes to mind. Never won squat. Will's friend Joey however built his own car w/o help. Basically slapped paint on the wood block, stuck a big bolt on it , crookedly. He raced it in one of the heats a wheel fell off, and yet he got fast time of day and walked off with a trophy taller than he was!
I don't know what the moral of this story is but it's still a pretty good story.
I don't know what the moral of this story is but it's still a pretty good story.
QUOTE(RobW @ Dec 11 2015, 01:34 PM)
All good advice!
We are in year 3. Buddy took 3rd overall and 1st in his grade level and den. We followed a YouTube video. I can find it again if anyone is interested.
This year it's all on him to do. I may make a car for fun.
https://www.youtube.com/watch?v=-RjJtO51ykY
Shaping pretty much complete. Just needs a little more sanding. Biggest concern at this point is that I need to remove about 1.8oz of material to make weight...
Click to view attachment
Click to view attachment
Looks Great! 1.8 OZ, that sounds like a lot. Did you weigh it with wheels etc? Does your car have to fit in a box to be dimension-ally legal? Ours does and I'm not sure that car would fit.
That looks great! Shave the bottom down until you hit your weight target.
QUOTE(jasons @ Dec 17 2015, 03:38 PM)
Looks Great! 1.8 OZ, that sounds like a lot. Did you weigh it with wheels etc? Does your car have to fit in a box to be dimension-ally legal? Ours does and I'm not sure that car would fit.
It does appear to be a lot of weight, I'll have to do some cutting under the car. The car is at the maximum width of 2-3/4" allowed by the rules.
Drill holes from underneath in the front area until you get to the desired waight as you want the waight just front of the rear wheels.
QUOTE(wes @ Dec 17 2015, 08:32 PM)
Drill holes from underneath in the front area until you get to the desired waight as you want the waight just front of the rear wheels.
Yeah, that's what I've started to do. I'll have a small recessed area in front of the front axle and a large cutout area behind the front axle. Hopefully that will be enough...
After doing some calculations, it's going to be a bit more difficult to remove 1.8 ounces than I had thought.
The body plus wheels and axles weighed in at 6.6 ounces. 1.6 ounces need to be removed to get to 5, but I wanted to remove a bit more to allow for paint.
Apparently the approximate weight for ponderosa pine is 1 cubic foot weighs 28 pounds which works out to be about .259 ounces per cubic inch. That calculates to about 7 cubic inches of material that I need to remove, perhaps a bit more depending on how dry the wood is. So the car will need to basically be hollowed out, lol.
Yeah, what I know is this.... I watched a bunch of dads (most of which were not very mechanically inclined) try to get there cars up to weight using fishing weights and drilling holes. Most of them had to add around 2-3 oz. They were making their cars look like Swiss cheese. That's why if you need to add weight, I strongly suggest the tungsten weights you can get at Hobby Lobby. They are much easier to strategically place for center of gravity tuning. More specifically, getting your COG as far back as you can reasonably do.
This is starting to sound like the movie "Down and Derby", a must watch for all cub scouts (and their dads)! 
QUOTE(jasons @ Dec 18 2015, 01:25 PM)
Yeah, what I know is this.... I watched a bunch of dads (most of which were not very mechanically inclined) try to get there cars up to weight using fishing weights and drilling holes. Most of them had to add around 2-3 oz. They were making their cars look like Swiss cheese. That's why if you need to add weight, I strongly suggest the tungsten weights you can get at Hobby Lobby. They are much easier to strategically place for center of gravity tuning. More specifically, getting your COG as far back as you can reasonably do.
I have tungsten weights left over from last year, but for this particular car because of the fenders and roof, I'm having to remove weight which I'm finding a bit more of a pain in the arse.

Use a drill pres with the car on its side and cut in and hollow out the cockpit, cut a rear window outline, keep the roof.
Click to view attachment
Click to view attachment
Looking good. My son was a big Dale Jr. fan. I had to hollow out the bottom to make weight and then I covered it in monocote. You can kind of see the forstner bit holes through the covering.
Bottom
Micro polish the nails (shaft and back of nail head) and drive them in as square as possible for tracking. If you place one of the rear slightly higher than the other three, the car will run on three wheels and have a little less drag.
Click to view attachment
Here are a couple of "life-size" cardboard cars we built for drive-in movie nights at church.
Click to view attachment
Click to view attachment
Click to view attachment
Here are a couple of "life-size" cardboard cars we built for drive-in movie nights at church.
Click to view attachment
Click to view attachment
QUOTE(db9146 @ Dec 18 2015, 10:59 PM)
Micro polish the nails (shaft and back of nail head) and drive them in as square as possible for tracking. If you place one of the rear slightly higher than the other three, the car will run on three wheels and have a little less drag.
Click to view attachment
Wow, that 962 is amazing. This Sally car I'm working on won't be painted so perfectly since I figured my daughter should at least paint it herself.
I ended up cutting out a lot of wood underneath. It's now sitting at 4.875 oz., hopefully the paint won't put it over.
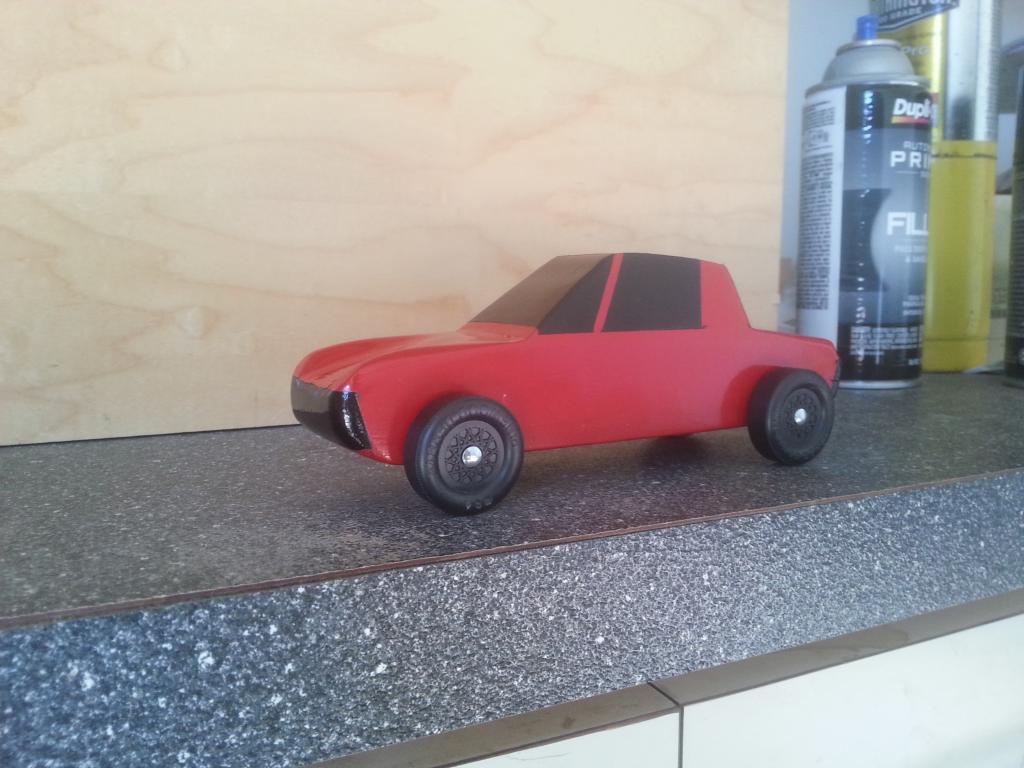
So I'm just about done. It's not perfect, but it doesn't need to be and the kids did the painting and they had a blast with that. I used printable decals for "sally". Just need to paint the mouth on the front of her and add some tail lights. Not going to get to overly detailed beyond that. The dalmatian is for my other daughter.
Click to view attachment Click to view attachment
Click to view attachment Click to view attachment
Wow! Nice work!
Here is one, I made back in the day around 1998 (not one of the kids cars) - we had a Dad's completion.
Click to view attachment
Click to view attachment
We don't have our cars yet but this year will be SUPER competitive. We took 3rd overall and 1st in Buddy's age group last year. We made a simple wedge last year but saw that the 1 and 2 cars were flat and low. Any ideas on best shape?
We did a wedge last year. I'm sure flatter/simpler is going to be better but we went for more style this year. Last year someone built a semi truck looking thing and it was fast too.
Here is our finished car for this year. I just pressed the wheels in last night. We have a car show tonight. The derby is the 23rd. I still need to tune the axles. I drilled them with a 3 degree cant, but one is not straight. The car rides on 3 wheels and I will tune it to rail ride.
Click to view attachment
Flat/wedge seems to be a winning style, but as long as it's pointy in the front, I imagine it's good. I've heard some like a high nose so that when the wire "gate" pivots down to release the cars, you get a faster release. I can see that in theory, not sure if it makes a real difference.
When I was a scout, we concentrated on getting as close to 5 oz, putting the weight near the rear, but not so far back the front would bounce, and getting smooth rolling wheels. If you flicked the wheels on my best car, they would spin for three minutes.
Always wanted some sort of unlimited category where you could try wacky stuff like sliding weights, sleeved hubs, etc...
This is a "lo-fi" version of our main content. To view the full version with more information, formatting and images, please click here.