I'm in the middle of rebuilding my dash.
I'm using the following parts (all from 914 rubber - Thanks Mark!)
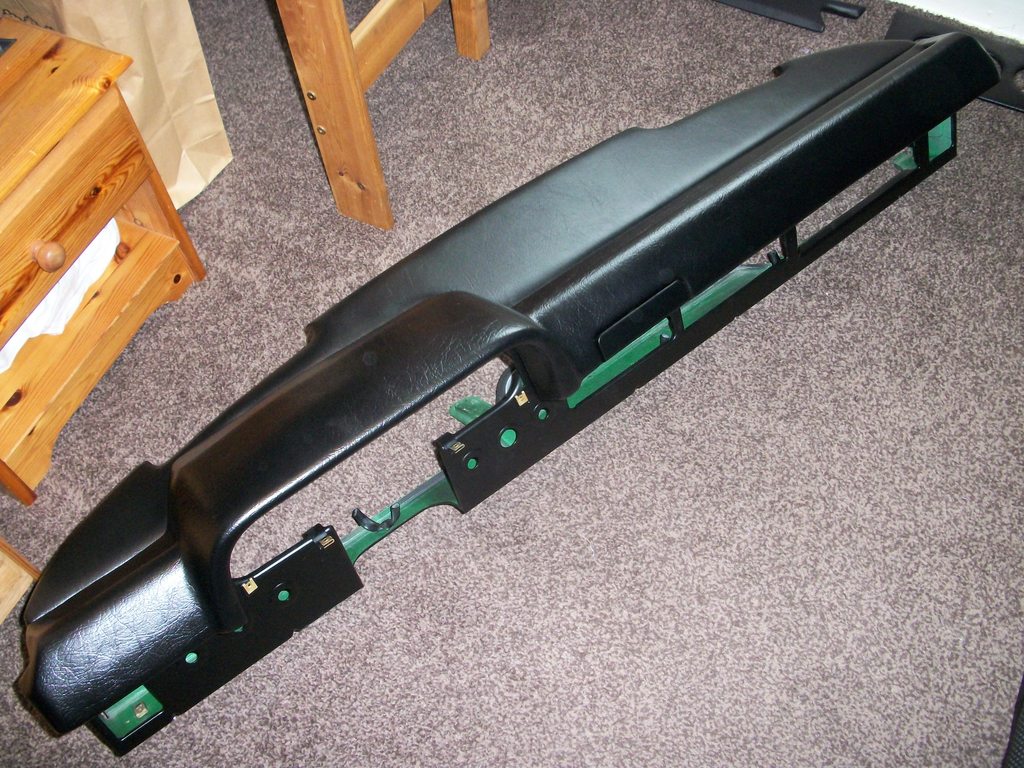
New top dash.
New top padding and vinyl that goes on the top between the windshield and back of the dash top.
New rubber seal for inside front windshield to dash top.
New dash face metal and vinyl.
I removed the steel dash frame - as it made a lot of sense to me.
It appears I can assemble the whole dash (all the parts above - except the seal that would go on last) onto the steel frame, and then install the whole assembled dash in the car. Then finally install the windshield seal.
AS OPPOSED TO - putting the steel frame back in - then putting the dash on the frame, etc.
Bottom line is putting the dash onto the frame and then into the car - seems to me to be a whole lot easier to do.
Has anyone done it that way?
Thanks,
Len
Full Version: Has Anyone Done This?
I do not think it will fit.
If it does, please share, I need to do this and I hate those stupid plastic nuts.
If it does, please share, I need to do this and I hate those stupid plastic nuts.
I haven't installed one, but I have parted my fair share of 914s and have taken some dash frames out with the dash pad still installed. Just needed to remove the A-pillar trim first to give room to tilt the everything so I don't see why you can't. 
It is easier with the top pad attached. The bottom pad needs to stay off as the sides bolt on.
The glove box can stay on too.
The glove box can stay on too.
Well, here's the deal.
Both a-pillars off, both doors open, frame has top dash attached. BTW - those silly 8 nuts are a cinch to put on the frame removed.
It goes in that way just fine.
I didn't try with the bottom dash on - but just looking at it, I think that would be a bit much.
Let me say this, I put my old dash top on the frame - only used 4 nuts to snug it in, then, put the assembly on. It took a little wiggling, but I did it by myself in a dark garage.
That said, if you are ONLY doing the top dash pad, I'm not sure it's worth the effort.
I'm doing the whole top dash, plus the top between the dash and windshield, and the face, so it's basically a full dash restore.
But it does work and that makes me a happy camper!
Nice
What about all the wiring for the gauges? I think you could do it your way kinda, but the wiring harness going into the front trunk will make it difficult. I'm trying to visualize how the harness goes through everything. Can you pull all the gauges through the dash without unplugging their wires? I may be wrong, but I'm thinking you can get the entire dash assembly lowered but not removed.
QUOTE(Krieger @ Jan 27 2016, 01:37 AM) 
What about all the wiring for the gauges? I think you could do it your way kinda, but the wiring harness going into the front trunk will make it difficult. I'm trying to visualize how the harness goes through everything. Can you pull all the gauges through the dash without unplugging their wires? I may be wrong, but I'm thinking you can get the entire dash assembly lowered but not removed.
As far as the harness goes, there is no need to worry about the harness. It is mostly attached to the steel dash frame - along the bottom. It's just held in place with pressure clips - easy to remove from the frame.
There is prep work first of course. You need to remove the gauge cluster, the heater controls, all the switches, steering wheel (although you don't need to remove the column - just the wheel), A-Pillars, pull all wires down from the steel frame to the floor, etc.
Just make sure you label EVERYTHING so you know where all the wires go later. AND take pictures - I do both - labels and photos. Ask me why.

Yep,
As you said you can rebuild the whole dash out of the car. Just leave off the Knee Roll to allow you to refit it.
It's makes for easier access but it's a big job disconnecting everything, then putting it all back just for trimming purposes. The real benefit is you can glue the vinyl sheet material on well and fold the edges under (along the base of the screen and around the vents) and glue them down for a better job. (You cant do this with it in the car)
As you said you can rebuild the whole dash out of the car. Just leave off the Knee Roll to allow you to refit it.

It's makes for easier access but it's a big job disconnecting everything, then putting it all back just for trimming purposes. The real benefit is you can glue the vinyl sheet material on well and fold the edges under (along the base of the screen and around the vents) and glue them down for a better job. (You cant do this with it in the car)
Can the whole dash be pulled out this way?
I have an old parts car with a perfect dash pad.
I would like to pull it this way to ensure I don't screw up the pad on the way out.
I have an old parts car with a perfect dash pad.
I would like to pull it this way to ensure I don't screw up the pad on the way out.
QUOTE(r_towle @ Jan 30 2016, 05:11 PM)
Can the whole dash be pulled out this way?
I have an old parts car with a perfect dash pad.
I would like to pull it this way to ensure I don't screw up the pad on the way out.
Yes.
As long as you disconnect everything (wires, blower cables and steering column) take off the A pillar pads and knee roll, the dash will come out real easy.
I'd guess they built the dash up at the factory with the trim and top fitted and installed it the same way.
Great youtube tutorial, but I'd say they were very optimistic on how long the job takes! In reality I'd allow an hour more especially if you haven't done it before.
QUOTE(r_towle @ Jan 30 2016, 12:11 PM)
Can the whole dash be pulled out this way?
I have an old parts car with a perfect dash pad.
I would like to pull it this way to ensure I don't screw up the pad on the way out.
I'd pull the lower dash pad off though. The top pad on the frame should be a snap. Be sure to remove the a-pillars too. Drop the wire harness - disconnect the heater controls. You can leave the glove box in as well.
Anyone post some pics of the fasteners that hold the dashboard frame in place?
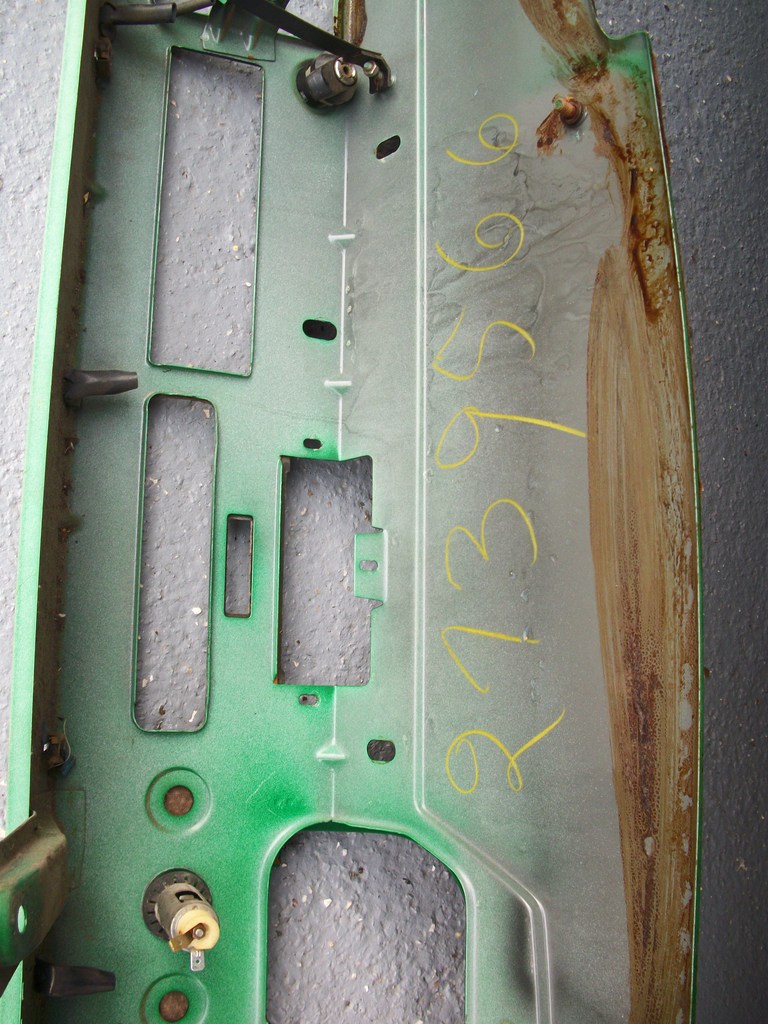
To remove the WHOLE dash....There are 4 x M6 nuts up under the scuttle (access via trunk with vent hoses off each side for more room) and an M6 bolt on a lower support leg under the cigarette lighter, then screws at each side (access with doors open and Knee roll off)
I trawled my photo collection and found this one of the underside of my dash with Karmann body number on.. at the bottom of the last No6 in my body number you can see one of the 4 x M6 studs. They are either side of each vent slot. Be careful as there are tiny plastic packing/spacing washers on these studs that set the height on the dash to screen. They do fall off and get missed when refitting.
In the bottom left of the picture you can just see the "leg" under the cigarette lighter which has a M6 bolt hold it up.
Some more info here
http://www.914world.com/bbs2/index.php?sho...ash+pad+removal
I trawled my photo collection and found this one of the underside of my dash with Karmann body number on.. at the bottom of the last No6 in my body number you can see one of the 4 x M6 studs. They are either side of each vent slot. Be careful as there are tiny plastic packing/spacing washers on these studs that set the height on the dash to screen. They do fall off and get missed when refitting.
In the bottom left of the picture you can just see the "leg" under the cigarette lighter which has a M6 bolt hold it up.

Some more info here
http://www.914world.com/bbs2/index.php?sho...ash+pad+removal
I would imagine when these cars were put together at the factory, I would bet that they would assemble as much as they could on the dash outside of the car.
Cool thread. I eventually have to tear apart my dash for my GT build and I really didn't want to chance cracking my early dash. This might give me a fighting chance.
Probably the most difficult part of this is the heater controls. It won't go through the hole in the dash as you're pulling the dash out (even with the chrome trim ring removed). So you have to pull it before the dash will come out. The problem is getting the heater control cables off. Next to impossible to pull them from the heater controls because there just is t enough room to get under the dash and move the controls to a point you can release the cables (the cable clamps are on the top side of the controls, so you can't get them off from lying under the dash). So you need to pull them from the flapper boxes in the front trunk. Which makes sense, I'm sure the dash was installed first at the factory, then the flapper boxes were installed. This is the exact reason why the flapper boxes are a PITA to get out. Once the dash is out of the car, you'll see how much more room there is in that area inside the car and how easy it would be to pull the flapper boxes.
It seems like to long job, but really after you've done it once, you'll never spend that futile three hours dicking with turning those two plastic nuts under the gauge hood 1/32 of a turn at a time.
It seems like to long job, but really after you've done it once, you'll never spend that futile three hours dicking with turning those two plastic nuts under the gauge hood 1/32 of a turn at a time.
I am really happy to learn this.
Does this make sense to pull the dash and work on it in your lap for wired cars? ![popcorn[1].gif](http://www.914world.com/bbs2/style_emoticons/default/popcorn[1].gif)
Plastic dash bolts suck!
Plastic dash bolts suck!
QUOTE(RobW @ Jan 31 2016, 05:55 AM)
Does this make sense to pull the dash and work on it in your lap for wired cars?
Plastic dash bolts suck!
Unless someone did something.....uh, creative.... with the wring, it won't get in the way of removing the dash. You do have to detach the gauges and switches from the frame though. Those are easier to install on the wiring harness, then connect to the dash frame after.
Len or Darren, did you have to have the windshield out to get the dash frame out? I've loosened the four nuts from the trunk side, but it seems that the windshield is limiting travel of the fasteners - or they are just a little rusty & stuck.
TIA
TIA
You should be able to get the dash out with the windshield still in the car. That said it is without doubt a much easier job with the glass out the car.
Either way the inner rubber seal across to base of the windshield will need to be removed to aid removal, to allow the dash to “lift” a little to free the M6 studs. After refurbishing the dash, you’re gonna want to fit a new seal anyway. The new ones are far, far more supple and easier to fit than getting to old one out was.
Take care with removing the old seal. Mine was solidified from UV sun damage, heat and age. It splintered and shattered in 1000 pieces (flying everywhere) when I removed it, so please be prepared with eye protection/ wear goggles.
Like all things that haven't been apart in a good while, you may find its stuck down and get a little resistance.
This is a "lo-fi" version of our main content. To view the full version with more information, formatting and images, please click here.