Hey everyone;
I need to replace the brake reservoir grommets and decided I can't with the master cylinder mounted to car, at least I decided it would be better and easier out.
My question is this, after looking at both the Hanes and shop manuals it seems that the pushrod connected to the pedal stays connected to the pedal and pulls out of the master cylinder. Is that correct as I would hate to REALLY mess things up.
TIA
Rick
Full Version: PULLING BRAKE MASTER CYLINDER
QUOTE(rmdinmd @ Aug 14 2016, 08:19 AM) 
Hey everyone;
I need to replace the brake reservoir grommets and decided I can't with the master cylinder mounted to car, at least I decided it would be better and easier out.
My question is this, after looking at both the Hanes and shop manuals it seems that the pushrod connected to the pedal stays connected to the pedal and pulls out of the master cylinder. Is that correct as I would hate to REALLY mess things up.
TIA
Rick
Yes the rod stay connected to the pedal. I would recommend dropping the MC to put them in as well. It is critical they are seated properly & hard to do with it in place. Plus you can clean it up & make sure there is nothing hiding that will cause problems later
I totally agree with Jamie. I just did this with the MC mounted in the car and it was a total pain in the ass. Probably the hardest job so far on my car. I recommend pulling the MC to replace the grommets.
Thanks for the confirmation. was just scared of breaking something.
Yes, remove the master cyl.
Also detach the reservoir from its bracket.
This will allow the reservoir to moved down (with the master attached) so that the supply tubes can be removed and reinstalled more easily.
Afterward raise the whole affair making sure the pushrod enters the master properly.
Reattach the plumbing (careful not to cross thread !!!) and the reservoir and bleed.
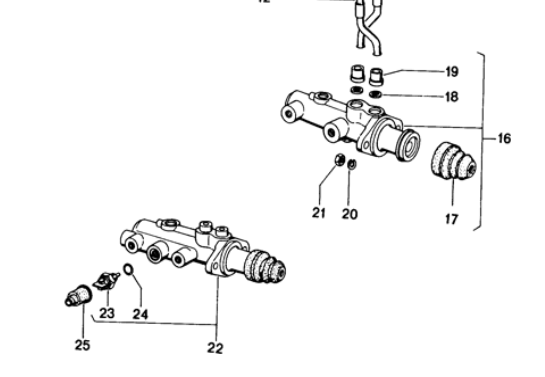
Question in the same vein. Can someone tell me what the washers pictured directly under the grommets #18 in this picture are/for?
thx
Mike
Yes, remove the master cyl.
Also detach the reservoir from its bracket.
This will allow the reservoir to moved down (with the master attached) so that the supply tubes can be removed and reinstalled more easily.
Afterward raise the whole affair making sure the pushrod enters the master properly.
Reattach the plumbing (careful not to cross thread !!!) and the reservoir and bleed.
thx
Mike
QUOTE(rgalla9146 @ Aug 14 2016, 06:55 PM)
Yes, remove the master cyl.
Also detach the reservoir from its bracket.
This will allow the reservoir to moved down (with the master attached) so that the supply tubes can be removed and reinstalled more easily.
Afterward raise the whole affair making sure the pushrod enters the master properly.
Reattach the plumbing (careful not to cross thread !!!) and the reservoir and bleed.
They keep the MC from leaking at those supply lines. You're going to want to make sure you have them.
It's a required washer for the grommet to seal it into the master cylinder. There usually supplied with the new master cylinder.
Thanks, from the picture it is hard to "see" how a metal washer would help a rubber seal seal! Wouldn't you just machine the seating surface? So, do they go into the MC before the hoses with the grommets attached? I.E., the metal flange of the inlet pipes rest on this washer? Just found my MC low pressure switch was disabled and the MC looks pretty original so a swap out is probably called for.
It's a required washer for the grommet to seal it into the master cylinder. There usually supplied with the new master cylinder.
QUOTE(Garland @ Aug 23 2016, 09:23 AM)
It's a required washer for the grommet to seal it into the master cylinder. There usually supplied with the new master cylinder.
QUOTE(87m491 @ Aug 23 2016, 03:52 PM)
So, do they go into the MC before the hoses with the grommets attached? I.E., the metal flange of the inlet pipes rest on this washer?
Yes. Those washers get placed in the MC. Then you press in the supply lines with the grommets already on them. And hopefully you get some sort of satisfying "click" to indicate the supply line is firmly attached (that's what some people say anyway).
I just made sure they were in place (the washers), I than pushed the rubber grommet into place than pushed the metal line into the rubber grommet. I didn't feel or hear any click but no leaks so far. 
What are the washers for? No clue, but from what I have gathered if you leave them out it leaks.
The hardest part for me was getting the master cylinder back in; I had to try to feed the plastic lines up through the body grommets and catch the push rod on the pedal at the same time while laying on my back and not popping the lines loose.
The next day I had my girlfriend come over to help, it just went together with no problem and her just watching.
when she told me she didn't do anything I told her she was good luck.
Great, what is she doing this weekend? I hope to replace the MC line/body grommets as well. I am hoping just sliding them on in the general vicinity (above or below not yet decided) will leave me enough wiggle room to remount the MC and then deal with the body grommets after....
The next day I had my girlfriend come over to help, it just went together with no problem and her just watching.
when she told me she didn't do anything I told her she was good luck.
QUOTE(rmdinmd @ Aug 23 2016, 12:15 PM)
The next day I had my girlfriend come over to help, it just went together with no problem and her just watching.
when she told me she didn't do anything I told her she was good luck.
For me putting the grommets in afterwards seemed almost impossible. I ended up putting the grommets in than ran the hoses up through them, part of the reason it was so much fun. 
also pay close attn. which metal line is closest to the firewall. Mine were bent slightly different (suspect they all are like that) and when I mixed them up the one was touching the firewall so I had to pull everything and swap them around.
others may have a better way of doing this, just letting you know how I did it. been a week and still no leak.
Oh, Cindy has plans this weekend she wants me to get the "sexy car" finished and ready to
  .
.
also pay close attn. which metal line is closest to the firewall. Mine were bent slightly different (suspect they all are like that) and when I mixed them up the one was touching the firewall so I had to pull everything and swap them around.
others may have a better way of doing this, just letting you know how I did it. been a week and still no leak.
Oh, Cindy has plans this weekend
she wants me to get the "sexy car" finished and ready to .
You need the washers. Leave them out and the mc will leak.
Hopefully the Kroil does it's job. Found the soft line in grommets split and the low pressure switch disconnected and disabled, never a good sign. Actually very little signs of rust post a 30 year old 'restoration" but the brake fluid looks like maple syrup and new lines and MC are relatively cheap insurance....
For me putting the grommets in afterwards seemed almost impossible. I ended up putting the grommets in than ran the hoses up through them, part of the reason it was so much fun.
also pay close attn. which metal line is closest to the firewall. Mine were bent slightly different (suspect they all are like that) and when I mixed them up the one was touching the firewall so I had to pull everything and swap them around.
others may have a better way of doing this, just letting you know how I did it. been a week and still no leak.
Oh, Cindy has plans this weekend she wants me to get the "sexy car" finished and ready to .
QUOTE(rmdinmd @ Aug 24 2016, 01:06 AM)
For me putting the grommets in afterwards seemed almost impossible. I ended up putting the grommets in than ran the hoses up through them, part of the reason it was so much fun.
also pay close attn. which metal line is closest to the firewall. Mine were bent slightly different (suspect they all are like that) and when I mixed them up the one was touching the firewall so I had to pull everything and swap them around.
others may have a better way of doing this, just letting you know how I did it. been a week and still no leak.
Oh, Cindy has plans this weekend
she wants me to get the "sexy car" finished and ready to .
Kroil is very good. use it a lot at work.
I would spray those several times and give it time in between to work. also the flare nut wrench. I have screwed up more than one before by being in a rush . worst case Eric at PMB can sell you new metal lines.
I would spray those several times and give it time in between to work. also the flare nut wrench. I have screwed up more than one before by being in a rush
. worst case Eric at PMB can sell you new metal lines.
I am really hoping Micky is doing something like that on the ones he has in the project pipeline.
looking at the units available online, even ATE units, I do not always see the small washers broken out/pictured as to be included. If they do not get included, can I use the ones from my existing unit and swap them over? I will be going 19mm to save a few $'s.
QUOTE(Kansas 914 @ Aug 24 2016, 05:39 AM)
QUOTE(87m491 @ Aug 24 2016, 11:48 AM)
looking at the units available online, even ATE units, I do not always see the small washers broken out/pictured as to be included. If they do not get included, can I use the ones from my existing unit and swap them over? I will be going 19mm to save a few $'s.
Not sure about all brands, but I'm pretty sure they were included with the last ATE MC I purchased (from PMB). I also don't see why you couldn't reuse the old ones if you had to, but someone else may know different.
Ok; everything got replaced and no leaks. tested it last weekend 180 miles and seemed fine.
Went to drive it last night and the pedal got spongy then drifted down feeling like it had a leak. Searched and couldn't find any leaks and reservoir was still full. So this morning I adjusted the piston play; read in one of the threads that if this isn't done that fluid has trouble getting into the MC from the reservoir.
Does this sound right? I REALLY want to it to teenerfest.
So far seems fine so far and might try bleeding the proportioning valve next.
180 miles and seemed fine.Went to drive it last night and the pedal got spongy then drifted down feeling like it had a leak.
Searched and couldn't find any leaks and reservoir was still full. So this morning I adjusted the piston play; read in one of the threads that if this isn't done that fluid has trouble getting into the MC from the reservoir.Does this sound right? I REALLY want to
it to teenerfest. So far seems fine so far and might try bleeding the proportioning valve next.
QUOTE(BeatNavy @ Aug 24 2016, 12:10 PM)
QUOTE(87m491 @ Aug 24 2016, 11:48 AM)
looking at the units available online, even ATE units, I do not always see the small washers broken out/pictured as to be included. If they do not get included, can I use the ones from my existing unit and swap them over? I will be going 19mm to save a few $'s.
Not sure about all brands, but I'm pretty sure they were included with the last ATE MC I purchased (from PMB). I also don't see why you couldn't reuse the old ones if you had to, but someone else may know different.
It's fine to reuse the old ones if they are not rusty.
QUOTE(rmdinmd @ Sep 10 2016, 07:25 AM)
Ok; everything got replaced and no leaks. tested it last weekend
180 miles and seemed fine.Went to drive it last night and the pedal got spongy then drifted down feeling like it had a leak.
Searched and couldn't find any leaks and reservoir was still full. So this morning I adjusted the piston play; read in one of the threads that if this isn't done that fluid has trouble getting into the MC from the reservoir.Does this sound right? I REALLY want to
it to teenerfest. So far seems fine so far and might try bleeding the proportioning valve next.
This was my experience with the URO part, drove me nuts, worked fine since I got the ATE one. Yes more expensive, but I trust it.
QUOTE(Mikey914 @ Sep 10 2016, 12:46 PM)
QUOTE(rmdinmd @ Sep 10 2016, 07:25 AM)
Ok; everything got replaced and no leaks. tested it last weekend
180 miles and seemed fine.Went to drive it last night and the pedal got spongy then drifted down feeling like it had a leak.
Searched and couldn't find any leaks and reservoir was still full. So this morning I adjusted the piston play; read in one of the threads that if this isn't done that fluid has trouble getting into the MC from the reservoir.Does this sound right? I REALLY want to
it to teenerfest. So far seems fine so far and might try bleeding the proportioning valve next.
This was my experience with the URO part, drove me nuts, worked fine since I got the ATE one. Yes more expensive, but I trust it.
Pretty sure it is an ATE. Was the MC on the car, I just replaced the rubber grommets from the reservoir. I am waiting on my son so I can bleed the proportioning as one thread suggested that sometimes is a tough spot to bleed the air from. I am actually waiting on when yours is ready to go on sale to replace the MC.
A question on the reservoir grommets and their proper orientation. I thought the small recess in the seating face was for the flair on the metal reservoir line ends as seen in this Pelican picture.
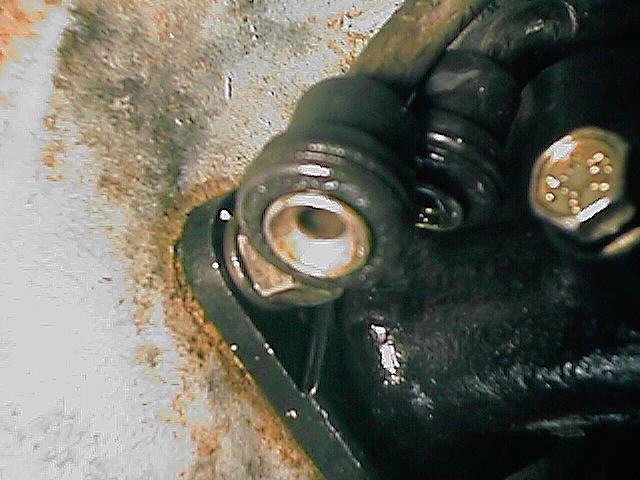
When I removed the cars original unit I saw The existing and pretty trashed grommets have a recess built into them that accepts the flair from the metal end coming from the reservoir. AFAI can tell, the metal tubes did not exit the grommets on the MC side on my installation that removed., (is this correct? The Pelican sight shows the metal flares protruding from the bottom of the grommet, ie, they would then sit against the small metal washer in the MC)
While the grommets supplied with my replacement ATE unit do not have the internal recess built in. This is causing the grommet to flair a pretty good amount if I don't push them through as in the picture.. Has anyone used this type grommet or have an opinion if they are correct? They appear similar in every other ways and PN. Any ideas if the original type are still available? Also metal reservoir tube ends inside the grommet or pushed through?
thx
Mike
It's a required washer for the grommet to seal it into the master cylinder. There usually supplied with the new master cylinder.
When I removed the cars original unit I saw The existing and pretty trashed grommets have a recess built into them that accepts the flair from the metal end coming from the reservoir. AFAI can tell, the metal tubes did not exit the grommets on the MC side on my installation that removed., (is this correct? The Pelican sight shows the metal flares protruding from the bottom of the grommet, ie, they would then sit against the small metal washer in the MC)
While the grommets supplied with my replacement ATE unit do not have the internal recess built in. This is causing the grommet to flair a pretty good amount if I don't push them through as in the picture.. Has anyone used this type grommet or have an opinion if they are correct? They appear similar in every other ways and PN. Any ideas if the original type are still available? Also metal reservoir tube ends inside the grommet or pushed through?
thx
Mike
QUOTE(Garland @ Aug 23 2016, 09:23 AM)
It's a required washer for the grommet to seal it into the master cylinder. There usually supplied with the new master cylinder.
QUOTE(87m491 @ Sep 17 2016, 10:31 AM)
A question on the reservoir grommets and their proper orientation. I thought the small recess in the seating face was for the flair on the metal reservoir line ends as seen in this Pelican picture.
When I removed the cars original unit I saw The existing and pretty trashed grommets have a recess built into them that accepts the flair from the metal end coming from the reservoir. AFAI can tell, the metal tubes did not exit the grommets on the MC side on my installation that removed., (is this correct? The Pelican sight shows the metal flares protruding from the bottom of the grommet, ie, they would then sit against the small metal washer in the MC)
While the grommets supplied with my replacement ATE unit do not have the internal recess built in. This is causing the grommet to flair a pretty good amount if I don't push them through as in the picture.. Has anyone used this type grommet or have an opinion if they are correct? They appear similar in every other ways and PN. Any ideas if the original type are still available? Also metal reservoir tube ends inside the grommet or pushed through?
thx
Mike
QUOTE(Garland @ Aug 23 2016, 09:23 AM)
It's a required washer for the grommet to seal it into the master cylinder. There usually supplied with the new master cylinder.
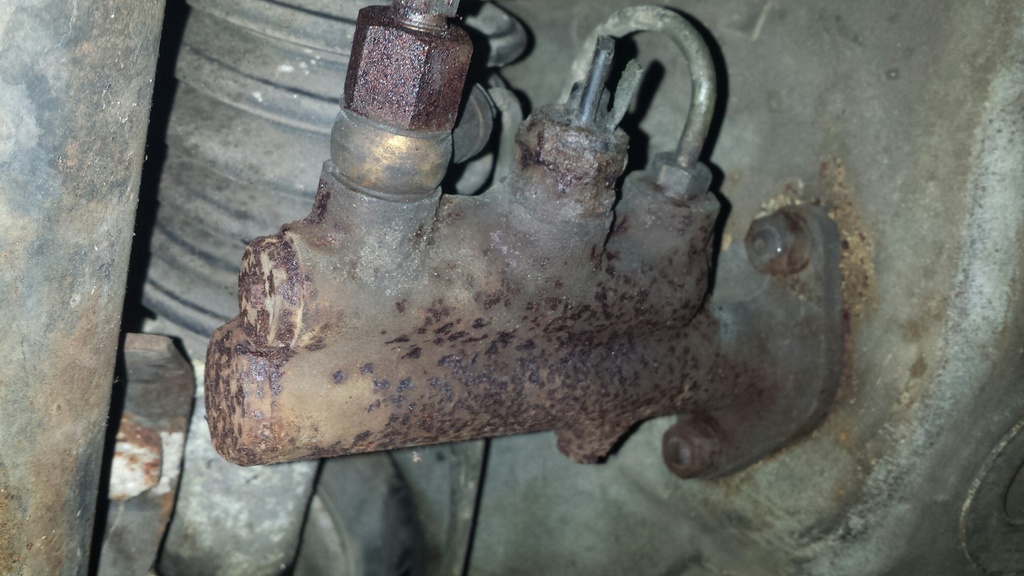
I did this a few weeks ago. When I bought my car the lines were leaking at the MC. The MC looked new. I could tell the leak was coming from the grommets. Same as the ones you are showing. Tried seating them in further with the MC in place. No go. Cannot get enough leverage with it in place to push them in further. So disconnected the lines at the reserve. Lossened the gas tank and lifted it up on the side where the reserve is to give me some room to the lines. Unbolted the MC and dropped it down with the lines
. Even with it out it was a PITA to get those grommets seated. I pulled them out. Put them on the lines and the flared end is seated in the little recess area of the grommet. I didn't have the washers in the MC and looking at the setup I couldn't see how they would do anything. So I went ahead and forced those suckers into the MC. Never heard a click. And took quite a bit of effort. When it looked good I routed the lines back up to the reserve. Mounted the MC and was good to go. Hasn't leaked sence! Good luck!
Interesting as folks say the washers are a must. I can see it being a problem if the grommets swell and cut off the flow outward by blocking the port.
As I am redoing the whole system, I dropped the fill lines totally and installed it all on a bench. I suspect the "click" some hear is the metal line flair seating against the washer. I did not hear it.
The face of the grommet against the washer would be one sealing surface, the inscribed O ring on the side of the grommet is another, and lastly the shoulder built in the grommet seats against the relief cut into the MC for sealing #3. Hopefully yours holds up.
[/quote]I did this a few weeks ago. When I bought my car the lines were leaking at the MC. The MC looked new. I could tell the leak was coming from the grommets. Same as the ones you are showing. Tried seating them in further with the MC in place. No go. Cannot get enough leverage with it in place to push them in further. So disconnected the lines at the reserve. Lossened the gas tank and lifted it up on the side where the reserve is to give me some room to the lines. Unbolted the MC and dropped it down with the lines
. Even with it out it was a PITA to get those grommets seated. I pulled them out. Put them on the lines and the flared end is seated in the little recess area of the grommet. I didn't have the washers in the MC and looking at the setup I couldn't see how they would do anything. So I went ahead and forced those suckers into the MC. Never heard a click. And took quite a bit of effort. When it looked good I routed the lines back up to the reserve. Mounted the MC and was good to go. Hasn't leaked sence! Good luck!
[/quote]
This is a "lo-fi" version of our main content. To view the full version with more information, formatting and images, please click here.