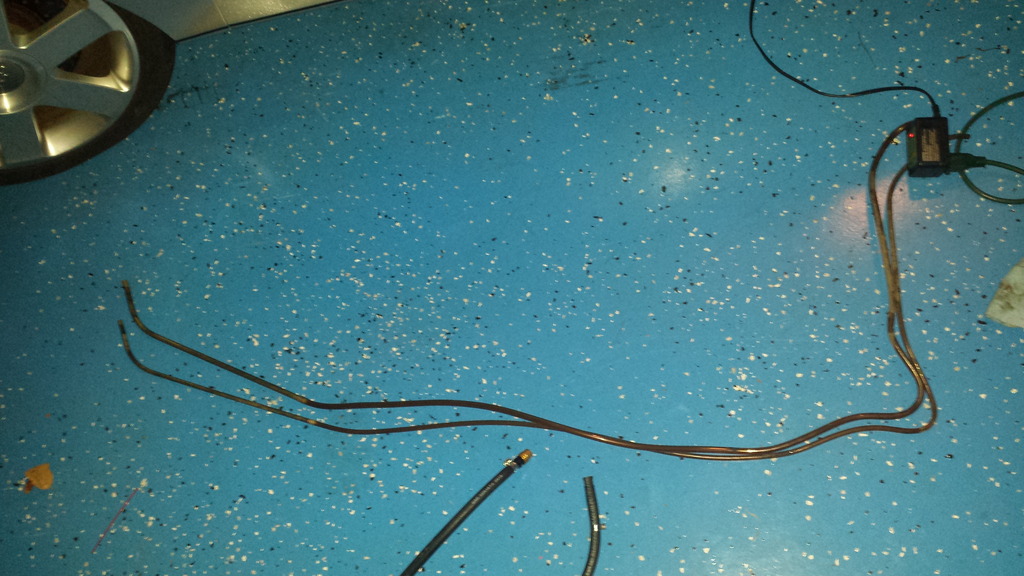
So over the weekend I changed my original fuel lines to SS. I figured since I just completed the task I would offer advice to anyone who is also looking to do the same thing.
This job only took me about 30 minutes and the engine is still in the vehicle. Granted my car was already on jackstands and the fuel tank was already drained. With that being said, to start I cut the lines on the fuel tank and removed it. Then I removed the front access panel (one screw) near the pedal assembly inside the vehicle. Next I crawled under the vehicle and cut the lines about 6 inches from the grommet. After I cut the lines I pulled each one out which happened very easily.
Now I placed the larger of the two stainless steel lines and pushed it into the grommet and started feeding it through the tunnel. It went in very easily all the way up to the bend. Once it got to this point I wedged myself into the area near the pedals, reached into the access panel and placed the line at the grommet. I got back under the car and gave it a push and it went right through the grommet where it was supposed to be. The next line didn't go in so easily. I will offer this piece of advice which worked for me. Lying on my back with my feet towards the front of the car, I fed the line through the grommet and twisted it up and down while feeding it through. This worked perfectly! Since the end of the line is bent, it can easily catch on other lines in the tunnel, but by twisting it as you push it this keeps it from catching. I lined it up with the grommet in the access panel, gave it a push and it went right through.
So that's that. It literally took me no less than 30 minutes and the fact that the engine was still in the car really did not make that much of a difference.
Full Version: SS Fuel line advice
Curious as to which lines/vendor you used as I am about to go down this road. Also would it be possible to attach some sort of string/wire from the old lines to the new ones so as to draw the new ones in as the old ones are drawn out?
So over the weekend I changed my original fuel lines to SS. I figured since I just completed the task I would offer advice to anyone who is also looking to do the same thing.
This job only took me about 30 minutes and the engine is still in the vehicle. Granted my car was already on jackstands and the fuel tank was already drained. With that being said, to start I cut the lines on the fuel tank and removed it. Then I removed the front access panel (one screw) near the pedal assembly inside the vehicle. Next I crawled under the vehicle and cut the lines about 6 inches from the grommet. After I cut the lines I pulled each one out which happened very easily.
Now I placed the larger of the two stainless steel lines and pushed it into the grommet and started feeding it through the tunnel. It went in very easily all the way up to the bend. Once it got to this point I wedged myself into the area near the pedals, reached into the access panel and placed the line at the grommet. I got back under the car and gave it a push and it went right through the grommet where it was supposed to be. The next line didn't go in so easily. I will offer this piece of advice which worked for me. Lying on my back with my feet towards the front of the car, I fed the line through the grommet and twisted it up and down while feeding it through. This worked perfectly! Since the end of the line is bent, it can easily catch on other lines in the tunnel, but by twisting it as you push it this keeps it from catching. I lined it up with the grommet in the access panel, gave it a push and it went right through.
So that's that. It literally took me no less than 30 minutes and the fact that the engine was still in the car really did not make that much of a difference.
QUOTE(sjhenry1075 @ Sep 19 2016, 06:05 AM) 
So over the weekend I changed my original fuel lines to SS. I figured since I just completed the task I would offer advice to anyone who is also looking to do the same thing.
This job only took me about 30 minutes and the engine is still in the vehicle. Granted my car was already on jackstands and the fuel tank was already drained. With that being said, to start I cut the lines on the fuel tank and removed it. Then I removed the front access panel (one screw) near the pedal assembly inside the vehicle. Next I crawled under the vehicle and cut the lines about 6 inches from the grommet. After I cut the lines I pulled each one out which happened very easily.
Now I placed the larger of the two stainless steel lines and pushed it into the grommet and started feeding it through the tunnel. It went in very easily all the way up to the bend. Once it got to this point I wedged myself into the area near the pedals, reached into the access panel and placed the line at the grommet. I got back under the car and gave it a push and it went right through the grommet where it was supposed to be. The next line didn't go in so easily. I will offer this piece of advice which worked for me. Lying on my back with my feet towards the front of the car, I fed the line through the grommet and twisted it up and down while feeding it through. This worked perfectly! Since the end of the line is bent, it can easily catch on other lines in the tunnel, but by twisting it as you push it this keeps it from catching. I lined it up with the grommet in the access panel, gave it a push and it went right through.
So that's that. It literally took me no less than 30 minutes and the fact that the engine was still in the car really did not make that much of a difference.
You don't need a string chaser because the new ss lines are stiff and thread through the tunnel. Having a spotter at the front of the tunnel is helpful and spraying the rubber grommet with some lube makes it really easy to push the lines through. I've always purchased mine at tangerine racing.
+1. No need for a string. I tried that the first time and actually had to do it again as the string got tangled somewhere. The lines go in easily on their own. If it seems stuck, just pull back and try again.
Also got mine from Tangerine. Great product and Chris provides great support if you have questions.
Also got mine from Tangerine. Great product and Chris provides great support if you have questions.
My experience is similar to those above. I did end up kinking the feed line under the fuel tank and had to pull the tank again and make loops. That worked fine. Oh and my original fuel pump crapped out so I installed a new bosch fuel pump too. Runs great now. Mine were Tangerine SS lines. Highly recommended.
I'm going to be doing this job sometime soon hopefully, as well as all the rubber fuel lines, brake lines and vac lines while I'm under there.
I was going to drop the engine and tranny but if it doesn't really affect anything maybe I should just leave it be? Is it still pretty easy to do all the other fuel and vacuum lines on the engine with it installed?
I was going to drop the engine and tranny but if it doesn't really affect anything maybe I should just leave it be? Is it still pretty easy to do all the other fuel and vacuum lines on the engine with it installed?
QUOTE(Nogoodwithusernames @ Sep 19 2016, 05:08 PM)
I'm going to be doing this job sometime soon hopefully, as well as all the rubber fuel lines, brake lines and vac lines while I'm under there.
I was going to drop the engine and tranny but if it doesn't really affect anything maybe I should just leave it be? Is it still pretty easy to do all the other fuel and vacuum lines on the engine with it installed?
I had no problems with the engine and tranny in; it literally took me about 30 minutes to remove and replace both lines. You don't need any type of chaser to do this job. Just remove the old lines, and push the new ones in, its really that easy. I got my lines from Pelican
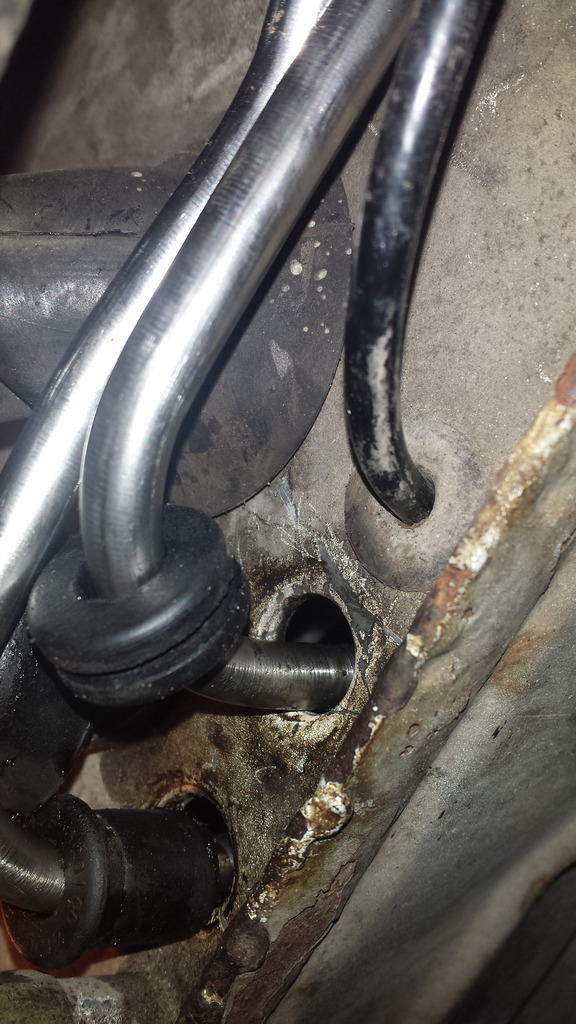
Can anyone weigh in with a picture of the plastic lines in the tunnel or the connections?
I have rehosed the front fuel pump and I had the metal projections/hoses from the bulkhead to the tank. I assumed they then connected into nylon in the tunnel.
Fast forward and I just went to install my SS lines and I have metal at least 4 inches in from the front, and the section just under the rear center tunnel access are also metal.
Even though I asked the PO who redid the car in 86 if he did these lines he didn't think so, but I am seeing metal. Though I definitely still have plastic in the engine compartment.
I'm going to be doing this job sometime soon hopefully, as well as all the rubber fuel lines, brake lines and vac lines while I'm under there.
I was going to drop the engine and tranny but if it doesn't really affect anything maybe I should just leave it be? Is it still pretty easy to do all the other fuel and vacuum lines on the engine with it installed?
I had no problems with the engine and tranny in; it literally took me about 30 minutes to remove and replace both lines. You don't need any type of chaser to do this job. Just remove the old lines, and push the new ones in, its really that easy. I got my lines from Pelican
I have rehosed the front fuel pump and I had the metal projections/hoses from the bulkhead to the tank. I assumed they then connected into nylon in the tunnel.
Fast forward and I just went to install my SS lines and I have metal at least 4 inches in from the front, and the section just under the rear center tunnel access are also metal.
Even though I asked the PO who redid the car in 86 if he did these lines he didn't think so, but I am seeing metal. Though I definitely still have plastic in the engine compartment.
QUOTE(sjhenry1075 @ Sep 20 2016, 04:19 AM)
QUOTE(Nogoodwithusernames @ Sep 19 2016, 05:08 PM)
I'm going to be doing this job sometime soon hopefully, as well as all the rubber fuel lines, brake lines and vac lines while I'm under there.
I was going to drop the engine and tranny but if it doesn't really affect anything maybe I should just leave it be? Is it still pretty easy to do all the other fuel and vacuum lines on the engine with it installed?
I had no problems with the engine and tranny in; it literally took me about 30 minutes to remove and replace both lines. You don't need any type of chaser to do this job. Just remove the old lines, and push the new ones in, its really that easy. I got my lines from Pelican
from the factory, starting under the tank, the lines are metal for about a foot to 18 inches into the tunnel and then transitions to plastic.
Can anyone weigh in with a picture of the plastic lines in the tunnel or the connections?
I have rehosed the front fuel pump and I had the metal projections/hoses from the bulkhead to the tank. I assumed they then connected into nylon in the tunnel.
Fast forward and I just went to install my SS lines and I have metal at least 4 inches in from the front, and the section just under the rear center tunnel access are also metal.
Even though I asked the PO who redid the car in 86 if he did these lines he didn't think so, but I am seeing metal. Though I definitely still have plastic in the engine compartment.
I'm going to be doing this job sometime soon hopefully, as well as all the rubber fuel lines, brake lines and vac lines while I'm under there.
I was going to drop the engine and tranny but if it doesn't really affect anything maybe I should just leave it be? Is it still pretty easy to do all the other fuel and vacuum lines on the engine with it installed?
I had no problems with the engine and tranny in; it literally took me about 30 minutes to remove and replace both lines. You don't need any type of chaser to do this job. Just remove the old lines, and push the new ones in, its really that easy. I got my lines from Pelican
QUOTE(87m491 @ Oct 1 2016, 08:28 AM)
Can anyone weigh in with a picture of the plastic lines in the tunnel or the connections?
I have rehosed the front fuel pump and I had the metal projections/hoses from the bulkhead to the tank. I assumed they then connected into nylon in the tunnel.
Fast forward and I just went to install my SS lines and I have metal at least 4 inches in from the front, and the section just under the rear center tunnel access are also metal.
Even though I asked the PO who redid the car in 86 if he did these lines he didn't think so, but I am seeing metal. Though I definitely still have plastic in the engine compartment.
QUOTE(sjhenry1075 @ Sep 20 2016, 04:19 AM)
QUOTE(Nogoodwithusernames @ Sep 19 2016, 05:08 PM)
I'm going to be doing this job sometime soon hopefully, as well as all the rubber fuel lines, brake lines and vac lines while I'm under there.
I was going to drop the engine and tranny but if it doesn't really affect anything maybe I should just leave it be? Is it still pretty easy to do all the other fuel and vacuum lines on the engine with it installed?
I had no problems with the engine and tranny in; it literally took me about 30 minutes to remove and replace both lines. You don't need any type of chaser to do this job. Just remove the old lines, and push the new ones in, its really that easy. I got my lines from Pelican
Another tip to help make things better.
Blow out the old lines BEFORE you pull them out through the tunnel.
This will ensure that no remaining gas inside the lines dribbles out inside the tunnel when pulling out the old lines.
Blow out the old lines BEFORE you pull them out through the tunnel.
This will ensure that no remaining gas inside the lines dribbles out inside the tunnel when pulling out the old lines.
Check the photos here: http://www.pelicanparts.com/techarticles/9...nter_tunnel.htm
The stock lines (70-74 at least) transition as shown in the 4th photo.
--DD
The stock lines (70-74 at least) transition as shown in the 4th photo.
--DD
I just did the same SS upgrade from Tangerine racing. I removed the rear right wheel, which made the installation even easier - 5min each line.
Thanks, a good reference until you can get them out! Mine (74 2.0) were not the easiest things to get out. First off , the center console was some work. I have no idea how folks say they can get it out without removing the shifter. Mine had a cross brace across the bottom of the console and not way that was getting by the shifter. Also had to dig a bit for the two tunnel crimps holding the lines.
Then the metal parts of the lines hung up but doses of WD40 into the tunnel helped that. Gotta wonder why the metal ends were used in the front but not in the engine bay?!
The metal lines took some finesse to get in, especially alone, the tape I put over the opening was pretty tatty by the time it emerged in the front bulkhead.
My nylon lines were certainly not "brittle" I had to take 3 cuts at each line to get all the way through and remove them from the other engine lines. Not sure I would do the in tunnel lines again should I get another original car. The rubber fuel lines in the engine bay were in much worse shape then the nylon.
Running the SS lines back in was pretty straight forward and would have been easier with two people. I got some firewall grommets with the lines but unfortunately they were not the long shouldered type like the original, so I reused one.
The lines orientation only allowed for the rear most hold down to be recrimped. The lines splay apart as they run to the front and I couldn't close that hold down.
Now I just need to figure out how to orient and connect the 2 engine compartment SS lines and I can consider fueling it back up.
Check the photos here: http://www.pelicanparts.com/techarticles/9...nter_tunnel.htm
The stock lines (70-74 at least) transition as shown in the 4th photo.
--DD
Then the metal parts of the lines hung up but doses of WD40 into the tunnel helped that. Gotta wonder why the metal ends were used in the front but not in the engine bay?!
The metal lines took some finesse to get in, especially alone, the tape I put over the opening was pretty tatty by the time it emerged in the front bulkhead.
My nylon lines were certainly not "brittle" I had to take 3 cuts at each line to get all the way through and remove them from the other engine lines. Not sure I would do the in tunnel lines again should I get another original car. The rubber fuel lines in the engine bay were in much worse shape then the nylon.
Running the SS lines back in was pretty straight forward and would have been easier with two people. I got some firewall grommets with the lines but unfortunately they were not the long shouldered type like the original, so I reused one.
The lines orientation only allowed for the rear most hold down to be recrimped. The lines splay apart as they run to the front and I couldn't close that hold down.
Now I just need to figure out how to orient and connect the 2 engine compartment SS lines and I can consider fueling it back up.
QUOTE(Dave_Darling @ Oct 1 2016, 03:19 PM)
Check the photos here: http://www.pelicanparts.com/techarticles/9...nter_tunnel.htm
The stock lines (70-74 at least) transition as shown in the 4th photo.
--DD
Did you do the engine compartment lines as well? In my haste/enthusiasm I discoed the engine compartment lines with out noting which was the line IN and which was the LINE OUT at the engine. I see lots of diagrams but not one which lists these so I can rehook up my lines.
So over the weekend I changed my original fuel lines to SS. I figured since I just completed the task I would offer advice to anyone who is also looking to do the same thing.
This job only took me about 30 minutes and the engine is still in the vehicle. Granted my car was already on jackstands and the fuel tank was already drained. With that being said, to start I cut the lines on the fuel tank and removed it. Then I removed the front access panel (one screw) near the pedal assembly inside the vehicle. Next I crawled under the vehicle and cut the lines about 6 inches from the grommet. After I cut the lines I pulled each one out which happened very easily.
Now I placed the larger of the two stainless steel lines and pushed it into the grommet and started feeding it through the tunnel. It went in very easily all the way up to the bend. Once it got to this point I wedged myself into the area near the pedals, reached into the access panel and placed the line at the grommet. I got back under the car and gave it a push and it went right through the grommet where it was supposed to be. The next line didn't go in so easily. I will offer this piece of advice which worked for me. Lying on my back with my feet towards the front of the car, I fed the line through the grommet and twisted it up and down while feeding it through. This worked perfectly! Since the end of the line is bent, it can easily catch on other lines in the tunnel, but by twisting it as you push it this keeps it from catching. I lined it up with the grommet in the access panel, gave it a push and it went right through.
So that's that. It literally took me no less than 30 minutes and the fact that the engine was still in the car really did not make that much of a difference.
QUOTE(sjhenry1075 @ Sep 19 2016, 06:05 AM)
So over the weekend I changed my original fuel lines to SS. I figured since I just completed the task I would offer advice to anyone who is also looking to do the same thing.
This job only took me about 30 minutes and the engine is still in the vehicle. Granted my car was already on jackstands and the fuel tank was already drained. With that being said, to start I cut the lines on the fuel tank and removed it. Then I removed the front access panel (one screw) near the pedal assembly inside the vehicle. Next I crawled under the vehicle and cut the lines about 6 inches from the grommet. After I cut the lines I pulled each one out which happened very easily.
Now I placed the larger of the two stainless steel lines and pushed it into the grommet and started feeding it through the tunnel. It went in very easily all the way up to the bend. Once it got to this point I wedged myself into the area near the pedals, reached into the access panel and placed the line at the grommet. I got back under the car and gave it a push and it went right through the grommet where it was supposed to be. The next line didn't go in so easily. I will offer this piece of advice which worked for me. Lying on my back with my feet towards the front of the car, I fed the line through the grommet and twisted it up and down while feeding it through. This worked perfectly! Since the end of the line is bent, it can easily catch on other lines in the tunnel, but by twisting it as you push it this keeps it from catching. I lined it up with the grommet in the access panel, gave it a push and it went right through.
So that's that. It literally took me no less than 30 minutes and the fact that the engine was still in the car really did not make that much of a difference.
Follow on question. I just ran the engine compartment SS lines and connected to the SS tunnel lines. Used NAPA 5/16 ID Hi Press FI hose. Using their recommended 14mm FI hose clamps, I was not able to snug the hose down enough in the line. I then went to a smaller 11-13mm FI hose clamps. These are a tight fit just to get over the hose when fully extended and not yet on the SS lines.
When ¾ of the way clamped down the clamp are VERY tight, but if you were to grasp the clamp with 2 fingers and twist, the hose still rotates pretty freely around the SS line and with a little effort you can still slide the clamped hose alone the hard line.
I’m guessing these ethanol proof hose linings are pretty slick. Anyone else run across this?
So over the weekend I changed my original fuel lines to SS. I figured since I just completed the task I would offer advice to anyone who is also looking to do the same thing.
So that's that. It literally took me no less than 30 minutes and the fact that the engine was still in the car really did not make that much of a difference.
When ¾ of the way clamped down the clamp are VERY tight, but if you were to grasp the clamp with 2 fingers and twist, the hose still rotates pretty freely around the SS line and with a little effort you can still slide the clamped hose alone the hard line.
I’m guessing these ethanol proof hose linings are pretty slick. Anyone else run across this?
QUOTE(sjhenry1075 @ Sep 19 2016, 06:05 AM)
So over the weekend I changed my original fuel lines to SS. I figured since I just completed the task I would offer advice to anyone who is also looking to do the same thing.
So that's that. It literally took me no less than 30 minutes and the fact that the engine was still in the car really did not make that much of a difference.
For those that need them we make the new 8mm and 10mm correct fuel line grommets, not just a Home Depot special, they hold the lines with about 1/2" of rubber.
Just yesterday I actually reran the fuel lines pictured above in order to install 8mm "long" grommets. 2 observations; unfortunately I could not install the grommets with the hard lines already installed, though I could with the original one seen in the picture. Deciding I wanted two new ones, I bit the bullet and withdrew the hard lines, inserted your grommets and ran the hard lines though them. Second, if you noticed the chamfer on the grommet hole, it was pretty easy for a slightly lubed grommet to slide right into the car body when subjected to pressure twists and turns needed to seat the internal lines, which it unfortunately did to me. Fishing it back out and starting over were a bit of a PITA. I would make the shoulder design larger and or place a groove in the grommet to help hold it in place. in diameter to avoid this. The second line was a bit easier, but at the end of the day that grommet "shoulder" also sits more inside the fire wall that I might like.
For those that need them we make the new 8mm and 10mm correct fuel line grommets, not just a Home Depot special, they hold the lines with about 1/2" of rubber.
QUOTE(Mikey914 @ Oct 24 2016, 06:40 AM)
For those that need them we make the new 8mm and 10mm correct fuel line grommets, not just a Home Depot special, they hold the lines with about 1/2" of rubber.
This is a "lo-fi" version of our main content. To view the full version with more information, formatting and images, please click here.