1. What's wrong with this picture? - Hint the LS3 operates with a DBW throttle body. That there is a mechanical linkage.
Answer: Nothing is wrong with the pic.
2. What silliness have I committed myself to now?
Answer: I'll post pics as soon as I can!
Cracker
Aug 5 2017, 02:03 PM
I have a hunch...does that control the Flux-Capacitor?!?!?
T
tygaboy
Aug 5 2017, 06:32 PM
Well, it's finally happened. I'd been doing well on the "nothing I've welded in has had to be cut out" front but the work sunk into the fire wall openings for the initial main hoop design has been cut out. And it's going back to exactly what it was before I started messing with it. Ah well, it is what it is...
tygaboy
Aug 6 2017, 11:19 AM
Turns out I had kept the driver side piece from the '72 I parted out. I still have a few tweaks before I'll call it done but it's turning out pretty well. I'm !
Now to source the passenger side piece. Sounds like Cary has a nice one...
Cracker
Aug 6 2017, 11:30 AM
Very well done Chris...it look great!
T
tygaboy
Aug 6 2017, 09:07 PM
It was a day of metal work. First the firewall then back to work on the chassis stiffening. I decided not to do the gussets as the primary tie-in for the front hoop. Instead, it'll be a bar from the hoop to the front suspension tower. So I thought I'd take a swing at fabbing up a support pad. The big compound curve means I got to practice with the English Wheel and shrinker. It still needs some additional work and final trimming but I think I like it!
tygaboy
Aug 6 2017, 09:11 PM
QUOTE(Cracker @ Aug 6 2017, 10:30 AM)
Very well done Chris...it look great!
T
Thank you, sir! I'm leaning toward doing a tinted bed liner on the entire underside of the chassis and both sides of the firewall. I suspect once that coating goes on, any evidence of the repair will totally disappear. Hope so, anyway.
Andyrew
Aug 6 2017, 09:20 PM
QUOTE(tygaboy @ Aug 6 2017, 08:07 PM)
It was a day of metal work. First the firewall then back to work on the chassis stiffening. I decided not to do the gussets as the primary tie-in for the front hoop. Instead, it'll be a bar from the hoop to the front suspension tower. So I thought I'd take a swing at fabbing up a support pad. The big compound curve means I got to practice with the English Wheel and shrinker. It still needs some additional work and final trimming but I think I like it!
English wheels are fun!!! Thats a small panel to be working though... Be careful with your fingers...
cary
Aug 7 2017, 01:16 PM
Took a bit of work to get the piece you need. Its jacked up on Super In Laws wooden stacker. So we got the Big Joe pallet stacker out and lifted it off the contraption. Click to view attachment
Part was extracted by Super In Law. Pretty simple until you get to the air vent hole. It has 3-4 layers going 3-4 different directions. Took him a couple hours to figure it out. But he got it out for you with the flanges intact. Click to view attachment
Part left with Matt. It will get shipped out at 914 Rubber.
After that he kept tearing down the parts car. Not keeping too much. Cut out the remaining portion of the firewall. Probably the headlight buckets. Longs are crap, but we'll cut out the uppers and the mounts. We'll cut out the tunnel and see what we have. Door hinge posts. Front portion of engine the engine tray. He busted his ass all day .. Still amazes me ..........
tygaboy
Aug 7 2017, 02:40 PM
Cary - That's it exactly! I send you an email w/details on next steps. Thanks SO MUCH! Chris
tygaboy
Aug 9 2017, 12:40 PM
Much as I love Martin's help doing the TIG welding - and plan to have him do more - I happily admit it pisses me off and is a personal sore point. I will never hide this fact and whenever anyone comments "wow, nice welding", I have to give credit where it's due and I tell them about Martin.
It's... I'll say "disappointing", because I'll never be able to say I did 100% of my build. It's just how I'm wired.
So what to do? How about practice?
As some of you may know, I have a little side business doing yard art sorts of stuff and that affords me some work where my welding structural and visual results aren't quite as critical. Not that I don't do the best I can...
Anyway, here's part of yesterday's MIG work, as welded, not cleaned up. It's part of a 12' wide, 7' tall, vertical xylophone I was commissioned to do for a local school.
The "out of position" work is where I'm not reliably up to snuff. But I'm SLOWLY getting to where I may feel comfortable doing my own welding on some of the more visual areas of my build.
Andyrew
Aug 9 2017, 01:32 PM
Dem some nice C's! Penetration looks great as well!
Can you turn up your welder any more? I would have preferred a hair more heat myself so long as the metal can take it. (My only critique, Your technique looks spot on!)
Dion
Aug 9 2017, 01:45 PM
Chris, top notch as usual. You reshape metal quicker than I can turn the welder on! Looks great. Cheers
tygaboy
Aug 9 2017, 02:10 PM
QUOTE(Andyrew @ Aug 9 2017, 12:32 PM)
Dem some nice C's! Penetration looks great as well!
Can you turn up your welder any more? I would have preferred a hair more heat myself so long as the metal can take it. (My only critique, Your technique looks spot on!)
Thanks Andrew - Yep, I have lots more headroom in the welder and I was thinking that same thing when I examined the HAZ. Coulda been a little hotter.
tygaboy
Aug 9 2017, 02:21 PM
QUOTE(Dion @ Aug 9 2017, 12:45 PM)
Chris, top notch as usual. You reshape metal quicker than I can turn the welder on! Looks great. Cheers
Hey Dion! Not so sure about the "...as usual" part. More like "sporadic flashes of competence!" But I am gaining some consistency. It's funny how I "know" what to do but things seems to get a little blurred as they moves from my brain to my hands...!
tygaboy
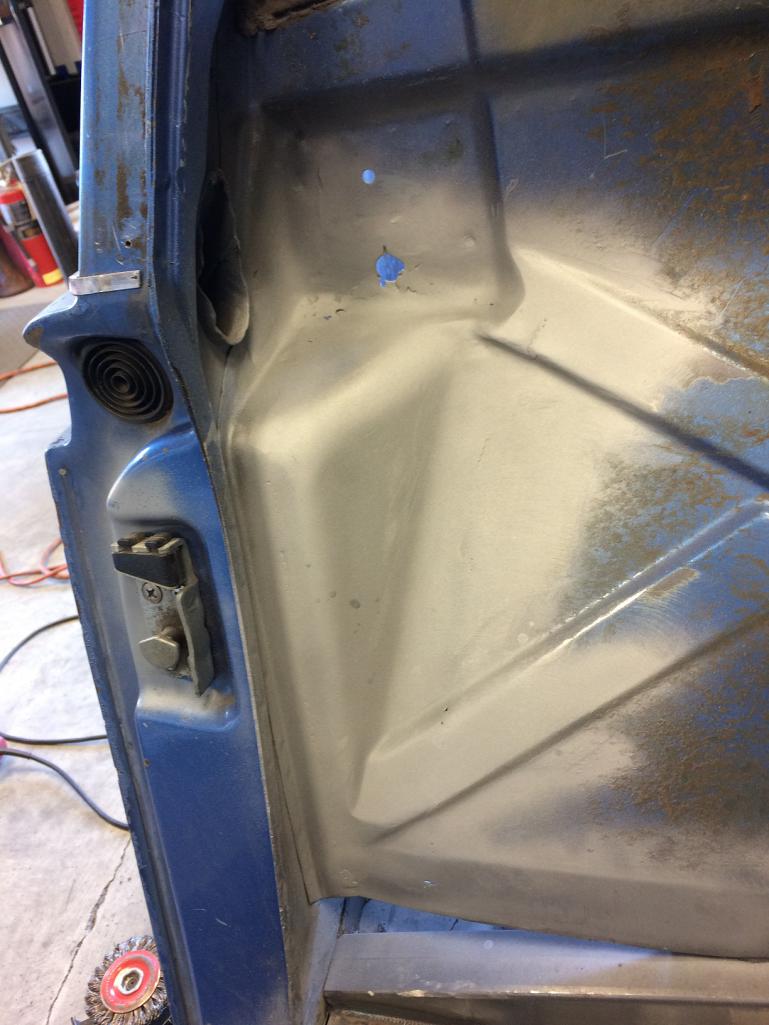
Aug 11 2017, 04:24 PM
Big thanks to Cary, Super In-Law and 914 Rubber! The firewall patch showed up yesterday! I had planned a day off to work on the car so in it went. Here it is all trimmed up, ready for welding.
tygaboy
Aug 11 2017, 04:25 PM
and some and a bit of grinding...
tygaboy
Aug 11 2017, 04:27 PM
Hit it with some weld through primer (I found a few pin holes I need to close up...) but I wanted to get it at least some protection. By the time it gets the final finish, I think it'll look "factory fresh". Hope so, anyway.
bbrock
Aug 11 2017, 04:52 PM
QUOTE(tygaboy @ Aug 11 2017, 04:27 PM)
Hit it with some weld through primer (I found a few pin holes I need to close up...) but I wanted to get it at least some protection. By the time it gets the final finish, I think it'll look "factory fresh". Hope so, anyway.
Dangit! You aren't helping me feel satisfied with the patch I just did in that same spot. Nicely done. But you know... I REALLY could have used that firewall patch a couple days ago.
cary
Aug 11 2017, 11:49 PM
gooder as new.
tygaboy
Aug 12 2017, 05:21 PM
With the firewall patching complete, it's back to work on the chassis stiffening. I hole sawed through the seat belt retractor area as well as the support pads for that area. This allows me some for/aft adjustment as I get to fitting the door bars.
Note that in the pics, the bars are shifted rearward over 3" because I have yet to trim the front end of the bar. So the angled part will sit a bunch forward from how it looks - see the pics earlier in thread for a more accurate view.
Anyway, once everything is welded in, I'll dress any part of the tube that may poke through and weld around the tube, securing it to that support pad. Then another support pad goes on the engine compartment side and I run the tube from there, back to the cross bar/rear shock tower.
And the vertical support is just there to support the bar. Final locations for all the verticals are tbd upon completion of trimming the front of the tube and determining where the rear-most vertical will be.
I'm liking the way this is coming together.
tygaboy
Aug 12 2017, 05:31 PM
However, before the door bars go in, I want to more securely tie the front hoop to the chassis. As mentioned, I decided I wanted to run a tube from the hoop to the front suspension. Before I can do that, I have to add support pads to the suspension area.
This is proving to be a lot of work. Not a flat surface to be seen! And my initial mock up wasn't going to be sufficient - I need to use at least 12 gauge for the support pads so it's back to the drawing board.
First I made up paper templates then cut the material to size. Now, how to shape it?
How about this handy curved chunk of wood and a rubber mallet? These and some various size scraps of tube from 1" to 3"...
Here's the result. I was surprised that, within not a very long time, I was able to get a pretty tight fit and good side-to-side symmetry.
These pieces wrap the "upper" part of the tower.
Oh, and note to self: Push the top of the struts all the way back to be sure there's suitable clearance for everything!
tygaboy
Aug 12 2017, 05:35 PM
Then it was on to the "lower" pad. This is a real bitch of a compound curve. I'm not done shaping but you get the idea how this will all go together.
Next, I need to bend up the bars. Or maybe just go to a bar...
tygaboy
Aug 12 2017, 05:41 PM
This time, I used a piece of pretty stout welding rod to mock up an initial guestimate of the shape of the tube. Doing all this by myself can be "fun". Trying to hold something in position while bending the other end while trying to keep the stinkin' thing in the middle of the hole I want it to pass through....!
And it worked! I got it on the first try. Then it's copy the shape for the other side. I used the same jig approach and I nailed the shape of tube #2 with just one additional adjustment.
Still have to do final trimming on both ends of both tubes.
tygaboy
Aug 12 2017, 05:46 PM
Then I finished up my day by prepping the vertical supports' support pads. After careful consideration, I think I'll have three verticals per side, plus the hoop.
Chris Foley (Tangerine Racing) was kind enough to sell me just the pads. However, because I skinned my longs, the radius Chris uses doesn't work for my car and needs adjustment.
I devised a way of using a vise and trusty rubber mallet to tighten the radius. Then I have to reset the angle. Not too bad, though. And each one fits nicely where it needs to be.
I'm calling that a successful day. Almost ready to weld all this stuff in! That will be a major accomplishment and big milestone in the build.
Maybe next week/weekend?
tygaboy
Aug 18 2017, 09:30 AM
With the chassis stiffening coming together, I started thinking about closing up the lower firewall. Initial mock up was one piece but with all the systems that have to pass through it, I decided to make it with a removable center section. So I started playing with one of the outer pieces. This is just a test piece in my typical approach of "I need to see it in physical form before I know if I like it". Plus, it gives me a chance to practice with the bead roller. It's little things like connecting the last bit of the bead to where it first started. You can see I just barely missed (center of the top section.)
And design wise, I think I can come up with something more interesting than this first draft.
This was also my first attempt at hammer forming. I used this technique on the flanges and am really happy with how it wraps the corner at the top of the long. It nicely fits the curve!
I'm confident I can get these pieces to turn out really well within a couple more attempts.
914dave
Aug 18 2017, 10:43 AM
Looking good!!! I'm impressed with all the details...
bbrock
Aug 18 2017, 11:24 AM
Nice work! Would love to see a pic of your form. What are you using for a corking tool to hammer in those beads. I'm heading to town for some hard maple this afternoon. Maybe you have something better?
Loving the progress!
tygaboy
Aug 18 2017, 01:30 PM
The chassis stiffening I'm doing is just that: chassis stiffening. This isn't to be confused with a roll cage. That said, I am doing most all I can to make it correctly. However, I'll admit to cutting a couple corners. And here's one: Getting that 12 ga material to fit well against the front fender compound curve didn't go as well as I wanted. So, after much debate and consultation with a couple race car fab folks (and given my "race rod" disclaimer), I decided to wimp out and make the support pads out of 14 ga. There is a fair bit if structure up around the suspension towers already and this more than doubles the material thickness of the fender well. Plus the force is directed (mostly) at the tower. That's my story and I'm sticking to it. Again, my race car consultants both said that, given my application, this should be more than sufficient. So, instead of hammering into the curved block like last time, out comes the English wheel!
It's the proper tool for making compound curves in sheet.
Here's the blank as I start to raise the shape.
tygaboy
Aug 18 2017, 01:31 PM
14 ga material has some strength to it... It took me about 30 mins of wheeling to get it where I needed it to be. Good little upper body workout, too!
tygaboy
Aug 18 2017, 01:34 PM
Once I had the shape I wanted, I laid out the pattern for the pieces. Needing mirror image pieces means it's important to REMEMBER TO FLIP THE PATTERN when doing the layout... Ask me how I know...
After looking at this for a minute, I realized that if I ever get tired of working on cars, I can always go into business making steel bras.
tygaboy
Aug 18 2017, 01:43 PM
QUOTE(bbrock @ Aug 18 2017, 10:24 AM)
Nice work! Would love to see a pic of your form. What are you using for a corking tool to hammer in those beads. I'm heading to town for some hard maple this afternoon. Maybe you have something better?
Loving the progress!
Sorry, I cheat. I have a bead roller.
I only hammer formed the edge flanges. I did that by simply using an open inside corner I created by fixturing two steel block, corner to corner. Then I used a rounded end piece of solid round stock that was the same diameter as the corner I wanted. I just whacked the flanges down and into the corner until the material was at a full 90 degrees. Worked like a dream.
Mueller
Aug 18 2017, 02:03 PM
Great work as usual.
bbrock
Aug 18 2017, 03:46 PM
QUOTE(tygaboy @ Aug 18 2017, 01:43 PM)
Sorry, I cheat. I have a bead roller.
Man I'd love to have one of those. Can't justify the expense though Still, fabtabulous work. Love the bra.
tygaboy
Aug 18 2017, 05:21 PM
I was able to get all the pieces rough trimmed and fit. You can see how, in the first pic, the piece lays nicely on the fender. In the second pic, the top part "interferes" a bit and moves it out of position. That's OK because all the final trimming will happen as the parts are welded in and the exact intersections are able to be determined and any interference gets cleaned up. I'm really happy with how these turned out.
tygaboy
Aug 18 2017, 05:31 PM
Next, I went back to work on the the chassis stiffening. I have to so some fancy cutting / piecing to make the cross bar that will connect in at the top of the door bars.
It has to fit behind the seat head rest supports then pop out to clear the bump in the firewall, then pop back in and fit behind the other seat.
The mighty, mighty bender can't make the needed bends close enough together so I have to do the cross bar in pieces. Again, just fine for a race rod. And if I get it right, you'll be hard pressed to know it's not a one piece bar.
Anyway... I was diligently working away on fabbing the cross bar when UPS showed up...
And that was the end of my productivity.
tygaboy
Aug 18 2017, 05:38 PM
I don't know what to say other than I couldn't take any more of Tony saying I'd be a fool not to do it...
Well, OK, that's no entirely true. I do know what to say:
I've always wanted an engine with ITBs. So what the hell. Now I have one.
This is so f-ing bad ass I can't hardly stand it.
Problem is, now I'll spend the next 2 weeks standing there staring at it and not make any progress on the build.
Mueller
Aug 18 2017, 05:55 PM
How are you going to control those 8 beautiful butterflys right there?
tygaboy
Aug 19 2017, 07:34 AM
QUOTE(Mueller @ Aug 18 2017, 04:55 PM)
How are you going to control those 8 beautiful butterflys right there?
It's cable actuated. I took advantage of the fact that Borla will package up a "kit". They recommended the Holley HP ecu and since I'm a fan of the "one throat to choke" model, I went with everything from them: ITBs, injectors, ecu, harness, fuel pump, sensors, fuel filter. They even threw in a sync tool.
Coming up soon on the to-do list, I'm going to pull the motor and send it to a tuner/dyno to get an initial set up.
Any suggestions for a shop in the SF bay area that can do this work?
Cracker
Aug 19 2017, 07:45 AM
Chris - You already know what I think about it - SICK! Now that I also own two of these systems myself I am a very interested party in your tuning experience.
Hurry up so I don't have to go first!
T
PS: For once on this build it appears you don't have to modify the firewall for the stacks...how they are canted - it looks like you DID make it PERFECT! Damn!
tygaboy
Aug 19 2017, 08:02 AM
QUOTE(Cracker @ Aug 19 2017, 06:45 AM)
Chris - You already know what I think about it - SICK! Now that I also own two of these systems myself I am a very interested party in your tuning experience.
Hurry up so I don't have to go first!
T
PS: For once on this build it appears you don't have to modify the firewall for the stacks...how they are canted - it looks like you DID make it PERFECT! Damn!
Oh, I'm sure we'll be talking regularly as we learn about these systems! Re: the fit, these are the 55 mm air horns. I have room to go to the 75s, if I wanted to. There's also a 35 mm option.
Taller moves the power curve lower in the RPM range (not really my priority) so I went with the middle option as a start. Let's see what the dyno says.
Plus, a bit shorter makes it easier for what I have planned for the air box. I did get the bug screens but I want a "real" air filter. I have a rough draft design and with the goodies here, I can get started. Like I need more to do...
Mueller
Aug 19 2017, 09:18 AM
QUOTE(tygaboy @ Aug 19 2017, 06:34 AM)
QUOTE(Mueller @ Aug 18 2017, 04:55 PM)
How are you going to control those 8 beautiful butterflys right there?
It's cable actuated. I took advantage of the fact that Borla will package up a "kit". They recommended the Holley HP ecu and since I'm a fan of the "one throat to choke" model, I went with everything from them: ITBs, injectors, ecu, harness, fuel pump, sensors, fuel filter. They even threw in a sync tool.
Coming up soon on the to-do list, I'm going to pull the motor and send it to a tuner/dyno to get an initial set up.
Any suggestions for a shop in the SF bay area that can do this work?
Neat, this guy below is running ITB's with the Holley system as well.
That is going to be the best sounding LS 914 out there! SO EXCITED!
Didnt know you went with polished but I think it looks amazing!!!
Great decision there!
tygaboy
Aug 19 2017, 06:23 PM
QUOTE(Andyrew @ Aug 19 2017, 03:58 PM)
That is going to be the best sounding LS 914 out there! SO EXCITED!
Didnt know you went with polished but I think it looks amazing!!!
Great decision there!
Thanks Andrew. And actually, the throttle bodies and air horns are CNC'd so that's the 'base' finish. I could have gone w/powder coating but I can always do that later so I opted to start with this. I don't trust myself to pick any colors at this point.
But I have to agree, it really is crazy looking. I just love it!
csdilligaf
Aug 19 2017, 06:30 PM
Getting more awesome as the build goes on. I noticed the headers and started from the page 1 to see what they were but got tired around page 20 or so. What are they? A stock shelf item for maybe a boat? Or did you have them made? Sure lays in the ideal location though.
tygaboy
Aug 19 2017, 06:30 PM
After drooling over the intake set up for that past 24 hours, I re-hydrated and forced myself to get back to the chassis work.
Time to miter all the tubes in prep for welding.
Here's the notcher, in all it's glory, ready to cut the front hoop end of the door bar.
I set the tube in the car in the position I want it and use a simple, little plastic protractor to get the angle. Then set the notcher to that angle and cut the miter.
The only tricky part is that the hole in the firewall where the upper part of the door bar goes doesn't allow the door bar to sit quite parallel to the long. So I have to twist it just so to get it to line up. This causes the bends to sorta flare outward a bit... Hard to explain but suffice it to say that I have to cut the miter a bit out of line with the bends in the door bar.
So, here it is ready to cut. Ready... Set... CUT! (all the while praying I measured correctly and properly set all the angles...!)
tygaboy
Aug 19 2017, 06:32 PM
Yea! Measuring, checking and measuring again 47 times and cutting once pays off.
I got a really nice fit!
tygaboy
Aug 19 2017, 06:38 PM
I cut both door bars and all went well there. Then it was on to the verticals. I figured I start with what I thought would be the hardest one. I want the tube smack in the middle of the bend so I divide that bend angle in half and cut that angle into the top of the vertical. Then it's a matter of trimming the bottom until it's the exact length to hold the door bar in parallel alignment with the long (when viewed from directly above).
I have final, final trimming yet to do on the overall length but the fit is looking really nice.
This is the first time I've done this sort of detailed fab on cage tubes. I'm happy to report that if you follow what all those YouTube videos suggest, it all goes pretty much to plan. The series I found helpful was this one:
He gets into some of the important tips and tricks that I found spot on and really effective.
And certainly, having some nice tools makes it go faster and (for me), more accurately. Again, I'm no expert. But I'm thrilled at how it's going.
tygaboy
Aug 19 2017, 06:44 PM
QUOTE(csdilligaf @ Aug 19 2017, 05:30 PM)
Getting more awesome as the build goes on. I noticed the headers and started from the page 1 to see what they were but got tired around page 20 or so. What are they? A stock shelf item for maybe a boat? Or did you have them made? Sure lays in the ideal location though.
$149 ebay "turbo forward" headers. Not great but great for that price. I think I want the exhaust flange to end up about 4" lower. So I may modify these or start from scratch and make a set that give me exactly what I want. We'll see. I'd really like to get this on the road.
914forme
Aug 19 2017, 07:35 PM
On the ITBs just use individual filters, keep the look, I would hate to cover them up. They look so darn good
This is a "lo-fi" version of our main content. To view the full version with more information, formatting and images, please click here.


 !
!


 These and some various size scraps of tube from 1" to 3"...


 Still, fabtabulous work. Love the bra.
