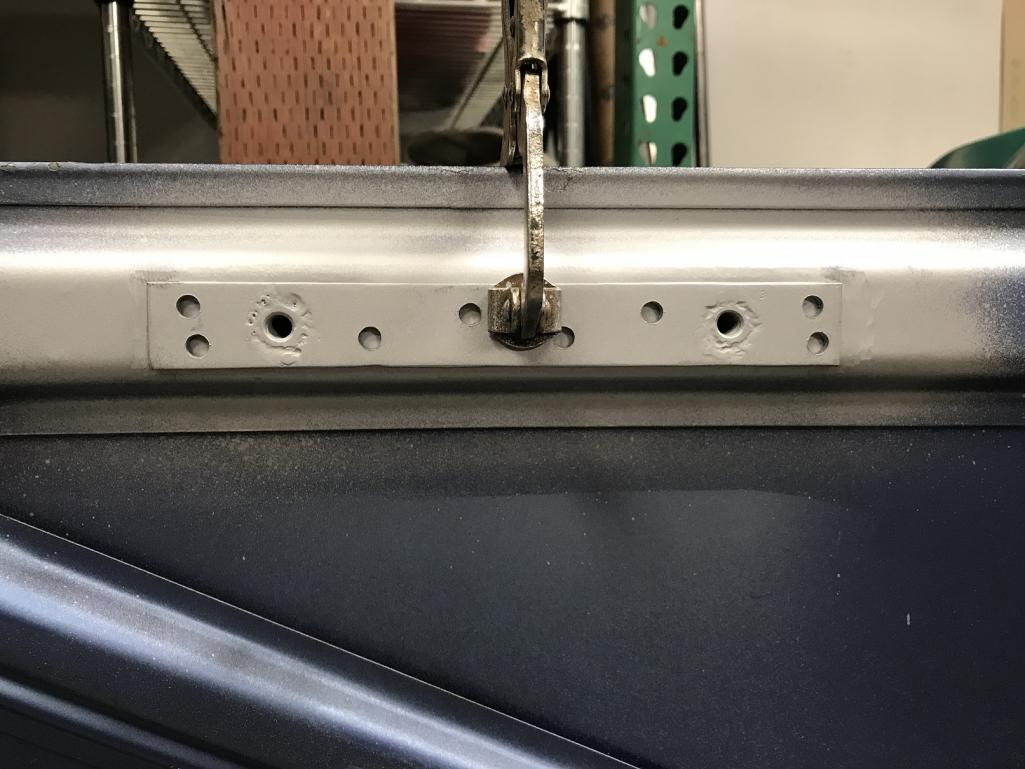
I removed all the paint under the stiffener plate and sprayed weld-through primer on the trunk lid and back side of the stiffener.
Then clamp for location. Very light clamping pressure, please!
Full Version: BUILD-OFF CHALLENGE: Tygaboy's '75 LS3
Pages: 1, 2, 3, 4, 5, 6, 7, 8, 9, 10, 11, 12, 13, 14, 15, 16, 17, 18, 19, 20, 21, 22, 23, 24, 25, 26, 27, 28, 29, 30, 31, 32, 33, 34, 35, 36, 37, 38, 39, 40, 41, 42, 43, 44, 45, 46, 47, 48, 49, 50, 51, 52, 53, 54, 55, 56, 57, 58, 59, 60, 61, 62, 63, 64, 65, 66, 67, 68, 69, 70, 71, 72, 73, 74, 75, 76, 77, 78, 79, 80, 81, 82, 83, 84, 85, 86, 87, 88, 89, 90, 91, 92, 93
I just tacked the corners of the stiffener plates and trial fitted everything.
I hadn't welded the cross bar together since I first wanted to get the entire assembly mocked up. Good thing, as it needed to be narrowed just a bit to allow everything to align nicely.
I still have to modify the part of the hinge plates that bolt to the trunk lid as they are still "Buick", as well as work out some sort of stop/rest for when it's in the full open position - which this picture isn't. It folds back much further and drops down lower behind the car. And I have what I think is a pretty cool idea for how to locate and secure the front edge... More on that as I get to it.
In the meantime, here it is: One (almost ready to go) flip trunk!
Big thanks again to Andy (Krieger) for having done this to his car. Seeing it in person made it a no-brainer decision for me. Thanks Andy!!
Finished welding the support pads to the trunk.
Really impressive Chris!
Tony
Tony
Then I started on closing up the underside of the rear suspension tower stiffener I added way back when. Here're the before and afters.
Then I trimmed and seam welded the top side of the passenger rear suspension tower stiffening panel. The driver side is on the schedule for the next shop session.
I also got the passenger side front bumper brace welded in. As a BUB car, my chassis didn't have them. I salvaged the pieces from the '72 parts car.
In all, I think it was a pretty productive day.
I also got the passenger side front bumper brace welded in. As a BUB car, my chassis didn't have them. I salvaged the pieces from the '72 parts car.
In all, I think it was a pretty productive day.
QUOTE(tygaboy @ Nov 4 2017, 09:44 AM) 
I removed all the paint under the stiffener plate and sprayed weld-through primer on the trunk lid and back side of the stiffener.
Then clamp for location. Very light clamping pressure, please!
Chris, this looks like a simple solution for mounting the alternate hinging hardware. I was thinking along the same lines for what I'm doing with Mini Cooper hinges.
Project is looking great. Keep at it.
QUOTE(tygaboy @ Nov 5 2017, 03:23 PM)
Then I started on closing up the underside of the rear suspension tower stiffener I added way back when. Here're the before and afters.
Yours stiffeners are prettier than mine...

Looks awesome my brother! 
I'm fortunate to be able to work from home and today, I took my lunch hour and got busy prepping the driver side rear suspension tower for finalization of the stiffening components.
Here's the before of the underside of the triangulation plate that starts at the long and wraps the tower. Ahead of welding, everything will be primed on the inside...
Here's the before of the underside of the triangulation plate that starts at the long and wraps the tower. Ahead of welding, everything will be primed on the inside...
Easy piece to fab. Paper template to start then some final tuning to get a nice tight fit.
That "loose" piece of sheet metal (the vertical one in the pic) is the front side of the suspension tower. It gets sandwiched between the plate I'm holding and the rear of the tower. Once welded, it'll all be nicely locked down.
That "loose" piece of sheet metal (the vertical one in the pic) is the front side of the suspension tower. It gets sandwiched between the plate I'm holding and the rear of the tower. Once welded, it'll all be nicely locked down.
QUOTE(tygaboy @ Nov 4 2017, 02:46 PM)
And here it is in action!

I haven't added the springs or any stop/bumpers, plus with the car on the rotisserie, the trunk doesn't end up where it really will, but you get the idea...
https://www.youtube.com/watch?v=D21URm1SNFE
the video was helpful, i was trying to figure out where the trunk was going.
that is pretty cool
QUOTE(gms @ Nov 9 2017, 02:19 PM)
QUOTE(tygaboy @ Nov 4 2017, 02:46 PM)
And here it is in action!
I haven't added the springs or any stop/bumpers, plus with the car on the rotisserie, the trunk doesn't end up where it really will, but you get the idea...
https://www.youtube.com/watch?v=D21URm1SNFE
the video was helpful, i was trying to figure out where the trunk was going.
that is pretty cool
Most people just put larger calipers and rotors to their cars when doing conversions, but noooooo, you have to add an air brake to stop that beast!
QUOTE(Mueller @ Nov 9 2017, 03:23 PM)
QUOTE(gms @ Nov 9 2017, 02:19 PM)
QUOTE(tygaboy @ Nov 4 2017, 02:46 PM)
And here it is in action!
I haven't added the springs or any stop/bumpers, plus with the car on the rotisserie, the trunk doesn't end up where it really will, but you get the idea...
https://www.youtube.com/watch?v=D21URm1SNFE
the video was helpful, i was trying to figure out where the trunk was going.
that is pretty cool
Most people just put larger calipers and rotors to their cars when doing conversions, but noooooo, you have to add an air brake to stop that beast!
 Ooh! I can't wait to see the parachute contraption he fabricates.
Car is off the rotisserie so I can get the tunnel built and determine what I need to fab to support all the systems: fuel, electrical, shifter cables, A/C lines, throttle cable, hydraulics for clutch and brakes...
But for now, here's a better look at why I love this trunk hinge set up: Access to everything!
But for now, here's a better look at why I love this trunk hinge set up: Access to everything!
I'm running the Numeric Racing Boxster shifter and don't plan to run a boot. It comes with the notched top to work with the stock Boxster shift knob. I like the NRG knob, which is threaded so that shift shaft had to be "adjusted".
Here's the modded part with a stainless bolt welded and blended onto the end.
Next will be a tapered aluminum sleve/jam nut set up to cover the exposed threads.
Here's the modded part with a stainless bolt welded and blended onto the end.
Next will be a tapered aluminum sleve/jam nut set up to cover the exposed threads.
I put my draft version of the cut out bumper on, just to see. I think I like it.
Looks a little small IMHO. Maybe Im wrong, could be the same size as the 916 cutout.
That shifter is awesome!!
QUOTE(tygaboy @ Nov 12 2017, 01:45 PM)
Car is off the rotisserie so I can get the tunnel built and determine what I need to fab to support all the systems: fuel, electrical, shifter cables, A/C lines, throttle cable, hydraulics for clutch and brakes...
But for now, here's a better look at why I love this trunk hinge set up: Access to everything!

Got the base of the tunnel/console fabricated. I drilled holes in the floor so it'll be rosette welded all along the underside.
Not yet sure how I'm going to tie in the cross brace.
Not yet sure how I'm going to tie in the cross brace.
The drive train is back in so I could get going on the tunnel, determine exactly where the shifter would go, etc.
So I couldn't resist messing with the induction. I hadn't played with the valley cover. It's pretty.
Not sure if I'll leave that throttle set up as is or try and move the stop and see if I can hide the throttle cable vs having it run out the rear and loop back forward. We'll see.
So I couldn't resist messing with the induction. I hadn't played with the valley cover. It's pretty.
Not sure if I'll leave that throttle set up as is or try and move the stop and see if I can hide the throttle cable vs having it run out the rear and loop back forward. We'll see.
And one of the mock-up of the likely shifter location... And for you funny guys:
I'll use metal and not cardboard in the final installation.
I'll use metal and not cardboard in the final installation.
Nice shifter, great attention to detail with the serrations on the adjustable clamps!
QUOTE(tygaboy @ Nov 4 2017, 12:46 PM)
And here it is in action!
I haven't added the springs or any stop/bumpers, plus with the car on the rotisserie, the trunk doesn't end up where it really will, but you get the idea...
https://www.youtube.com/watch?v=D21URm1SNFE
That trunk mechanism is awesome. Fantastic stuff Chris.
Wow.
Dont forget the seatbelt anchors Before you move on and cover that area up... 
Minor update: Got the spacer done to cover the extra threaded area.
One more mod to go on the shifter. If you guess what it's going to be, you'll win a "You win!" comment from me!
One more mod to go on the shifter. If you guess what it's going to be, you'll win a "You win!" comment from me!
QUOTE(falcor75 @ Nov 19 2017, 10:33 PM)
Dont forget the seatbelt anchors Before you move on and cover that area up...
You guys just don't miss a thing, do you? Yep, I hadn't welded it in yet as I was still debating some of the details of the seat belt attachment. I've decided and today, I ordered the belts from Seat Belt Planet.
I went with the 914 belt set with 15" extra added to the length in the retractor to account for the new, lower location. And I swapped out the standard cable and buckle style for a belt and different buckle that will fit through the slots in the seats.
Click to view attachment
All the good ones use CAD (Carboard Aided Design) I have a tone of them around, and well, I don't consider myself that good.
All the good ones use CAD (Carboard Aided Design) I have a tone of them around, and well, I don't consider myself that good.
With both pedal sets inside it looks like your building a dual control car? That is a great idea for long drives or when you have an instructor for time trialing 
Playing with console layout ideas. I like this height for the shift tower. Now I need to determine if I want to tie it into the front hoop, as pictured, or flip the tubes and have the whole thing "stay low", more like the stock tunnel.
Either way, I'll have other tubes tie in higher up on the firewall.
Decisions, decisions...
Either way, I'll have other tubes tie in higher up on the firewall.
Decisions, decisions...
Tie it into the hoop as pictured. Kinda gives it that modern Porsche look.
QUOTE(tomeric914 @ Nov 23 2017, 02:14 PM)
Tie it into the hoop as pictured. Kinda gives it that modern Porsche look.
I agree that it's a more modern look and after thinking on it, I decided to go "low".
So, low it is. Here's the main top section. I still have to tie in the front to that plate that's rosetted to the front fire wall. I'm thinking two horizontals should do it.
Then I'll figure out something to tie in the rear fire wall. Still noodling on a couple different ideas.
Pics are out of time sequence. The 2nd one is pre having added the cross braces. It's the same height and all that...
Then I'll figure out something to tie in the rear fire wall. Still noodling on a couple different ideas.
Pics are out of time sequence. The 2nd one is pre having added the cross braces. It's the same height and all that...
Are you going to build it so it has any storage space? (What can I say, I've gotten spoiled driving newer vehicles with center console storage.  )
)
)
QUOTE(AZBanks @ Nov 24 2017, 05:45 PM)
Are you going to build it so it has any storage space? (What can I say, I've gotten spoiled driving newer vehicles with center console storage.
)Yep, I plan a small cubbie at the rear and cup holders ahead of the shift tower.
Mocked in the shifter mounting bosses and had to try in out.
The tunnel isn't welded in yet and the shift cable aren't adjusted so pardon the noises, but man, this thing is snick, snick and SOOOOO positive.
https://www.youtube.com/watch?v=qEJe2BXhvtY
The tunnel isn't welded in yet and the shift cable aren't adjusted so pardon the noises, but man, this thing is snick, snick and SOOOOO positive.
https://www.youtube.com/watch?v=qEJe2BXhvtY
QUOTE(tygaboy @ Nov 25 2017, 10:25 AM)
Mocked in the shifter mounting bosses and had to try in out.
The tunnel isn't welded in yet and the shift cable aren't adjusted so pardon the noises, but man, this thing is snick, snick and SOOOOO positive.
https://www.youtube.com/watch?v=qEJe2BXhvtY
Needs more vroom, vroom engine sounds!
Continuing work on the console. The rear section will become the cubbie/storage area.
That looks great, don't you ever sleep? Too productive!
With all the time I've put into the chassis stiffening/roadster cage and now this console, I've decided to name this part of the build "Jail Time". Why?
I've spent a lot of time behind bars!
And yes, I spent time to get the angle of the rear part of the console to match the angle of the door bars. Details, details...
I've spent a lot of time behind bars!
And yes, I spent time
to get the angle of the rear part of the console to match the angle of the door bars. Details, details...
A couple requisite artsy-fartsy shots...
I'm happy with how this is turning out.
I'm happy with how this is turning out.
Wow! Gotta get down there! You hit the hyperspace button! 
I like it! Kinda the idea I had for mine! I like tying it into the front hoop though.
But this makes it easier to put the finishing touches on
But this makes it easier to put the finishing touches on
Finished today by getting started on the pedal mount. First step is to level out that area. This piece gets me started.
How ate you attaching the plate to the floor...or is there a second plate as well? If there is not, I believe you might find that is too small Chris.
T
Finished today by getting started on the pedal mount. First step is to level out that area. This piece gets me started.
T
QUOTE(tygaboy @ Nov 26 2017, 07:22 PM)
Finished today by getting started on the pedal mount. First step is to level out that area. This piece gets me started.
QUOTE(Cracker @ Nov 26 2017, 04:50 PM)
How ate you attaching the plate to the floor...or is there a second plate as well? If there is not, I believe you might find that is too small Chris.
T
QUOTE(tygaboy @ Nov 26 2017, 07:22 PM)
Finished today by getting started on the pedal mount. First step is to level out that area. This piece gets me started.
Good point - that's the "filler plate" that gets me to level, then I plan a larger plate that'll give me a bit larger footprint, will tie into the console and further back toward the seat and closer to the driver long.
Fabbing the last few pieces of the console/tunnel. I'll probably triangulate down the passenger side but I have a neat little thing planned for the driver side...
I am a top supporter of your work. At some risk I can't help asking... Why the spaghetti? It's very noodley. I LOVE curves, mind you, I'm just feeling too much of them. WOW, now THAT's something I'd never hear myself saying.
Less metal for same function?
Less metal for same function?
This is a "lo-fi" version of our main content. To view the full version with more information, formatting and images, please click here.