Full Version: Adding Heated Seats
I am looking for input on wiring a pair of heated seats. They draw about 5 amps each. Any suggestions on where I should run the power from.
Fuses 10/11/12 are all battery direct, I would use that to actually power the seat heaters because the wires are larger. Use a relay to keep the seat heaters from being 'live' all the time. Get piggyback connectors instead to cutting or damaging stock wires. Also, no crimp connector should ever be red/blue/yellow. Those are waiting for failure. Invest slightly more in a correct double crimp connector and some heat shrink. You look like a professional and you're less likely to have odd issues later.
http://www.mouser.com/Search/ProductDetail...lkey571-60279-2
http://www.mouser.com/Search/ProductDetail...lkey571-60279-2
I installed heated seats about 10 years ago; works great !
I wired mine to the rear window defrost circuit and used a dash switch to turn the circuit on.
1. Dash; old fog light switch with switched power source; run the other lead to the front of the relay board. I ran mine down the tunnel , then behind the seat and through a hole just in front of the relay board.
2. Seat: Two wires; one is a ground, the other wire goes up to the front of the relay board next to the wire from the dash.
3. In the front of the relay board are two posts and a position holder ( like the fuel tank sender ). Those two posst connect to the rear window defrost relay-the first relay from the front.
4. The wire from the dash goes on one of those posts. It is the trigger wire ( aka 85) for the relay.
5. The other post is the relays 87 or 12v output.
6. Its that simple. Relay already has power and is wired for a similar application. You are just going to use it for seat heaters instead of the heated window
7. And, my voltmeter doesn't even move when the heaters are on- and I have my voltmeter wired directly to the battery.
8. I was lucky in that I found a rear window defrost connector that fits directly onto the two posts.
Good luck, and enjoy ! I use mine almost every day in the am or if I have a ore back...
Oh, duh. Thinking about Jim's post reminded me, you want switched power. Edited my other post.
I ran a 12ga dedicated circuit from a battery distribution box. Most likely your seats come with the relays and lighted hi/lo rocker switches. I have mine located on the console. That is one of my favorite additions. 
Thanks for the tips, even though I am in the desert I love the heated seats in my other vehicles.
ed
I ran a 12ga dedicated circuit from a battery distribution box. Most likely your seats come with the relays and lighted hi/lo rocker switches. I have mine located on the console. That is one of my favorite additions.
ed
QUOTE(76-914 @ Nov 28 2016, 04:37 PM) 
I ran a 12ga dedicated circuit from a battery distribution box. Most likely your seats come with the relays and lighted hi/lo rocker switches. I have mine located on the console. That is one of my favorite additions.
Mark
For those of us who strive to do a more professional job, but are usually limited to Radio Shack or Auto Zone, how about a couple of points on crimp on connectors:
What Crimpers do you suggest?
Do you prefer crimp on over solder?
The link to the terminal from Mouser was great, never had heard of them before. If you were going to suggest putting together some common connectors for an enthusiasts workshop what pieces would you suggest?
Thanks
Ed
Fuses 10/11/12 are all battery direct, I would use that to actually power the seat heaters because the wires are larger. Use a relay to keep the seat heaters from being 'live' all the time. Get piggyback connectors instead to cutting or damaging stock wires. Also, no crimp connector should ever be red/blue/yellow. Those are waiting for failure. Invest slightly more in a correct double crimp connector and some heat shrink. You look like a professional and you're less likely to have odd issues later.
http://www.mouser.com/Search/ProductDetail...lkey571-60279-2
For those of us who strive to do a more professional job, but are usually limited to Radio Shack or Auto Zone, how about a couple of points on crimp on connectors:
What Crimpers do you suggest?
Do you prefer crimp on over solder?
The link to the terminal from Mouser was great, never had heard of them before. If you were going to suggest putting together some common connectors for an enthusiasts workshop what pieces would you suggest?
Thanks
Ed
QUOTE(McMark @ Nov 28 2016, 01:32 PM)
Fuses 10/11/12 are all battery direct, I would use that to actually power the seat heaters because the wires are larger. Use a relay to keep the seat heaters from being 'live' all the time. Get piggyback connectors instead to cutting or damaging stock wires. Also, no crimp connector should ever be red/blue/yellow. Those are waiting for failure. Invest slightly more in a correct double crimp connector and some heat shrink. You look like a professional and you're less likely to have odd issues later.
http://www.mouser.com/Search/ProductDetail...lkey571-60279-2
![popcorn[1].gif](http://www.914world.com/bbs2/style_emoticons/default/popcorn[1].gif) .........and where is the link(s) to do this work and buy supplies / heat mats?
.........and where is the link(s) to do this work and buy supplies / heat mats?
QUOTE(whitetwinturbo @ Nov 29 2016, 12:34 AM)
.........and where is the link(s) to do this work and buy supplies / heat mats?eBay
I picked mine up off of Amazon.
https://www.amazon.com/Carbon-Fiber-Heater-...2AER7D&th=1
They work fantastic! I mounted the switches in my center console.
Click to view attachment
Click to view attachment
Mine are wired through a relay that I mounted under the center console. I pulled switched power from the fuse box to the relay coil. A new 16 gauge wire was ran to the battery to through the relay to the seat heaters.
QUOTE(Mowog4 @ Nov 28 2016, 09:59 PM)
For those of us who strive to do a more professional job, but are usually limited to Radio Shack or Auto Zone, how about a couple of points on crimp on connectors:
What Crimpers do you suggest?
Do you prefer crimp on over solder?
The link to the terminal from Mouser was great, never had heard of them before. If you were going to suggest putting together some common connectors for an enthusiasts workshop what pieces would you suggest?
Thanks
Ed
What Crimpers do you suggest?
Do you prefer crimp on over solder?
The link to the terminal from Mouser was great, never had heard of them before. If you were going to suggest putting together some common connectors for an enthusiasts workshop what pieces would you suggest?
Thanks
Ed
Mouser is a great resource, but is extremely daunting because the catalog is huge and the search isn't that good. But uninsulated double crimp connectors of all types are available more places than your realize. NAPA Auto Parts has a decent selection. You can get bulk packs on eBay and Amazon. The main point is that if you're going to do wiring, and you don't already have connectors and tooling, you might as well get yourself set up with the good stuff.
This is similar to the crimper I use.
https://www.napaonline.com/napa/en/p/SER18930/SER18930
Here's a pretty good quick overview, grabbed from (here):
QUOTE
I've gotten professional results with similar crimpers and connectors. Let me describe the process. These photos were scoured from the web, so they don't match each other
First, notice two things about the crimpers.
There are two different elevations in the crimp die, for any given wire size. The tighter one is intended for the actual wires, while the larger one is meant for the insulation.
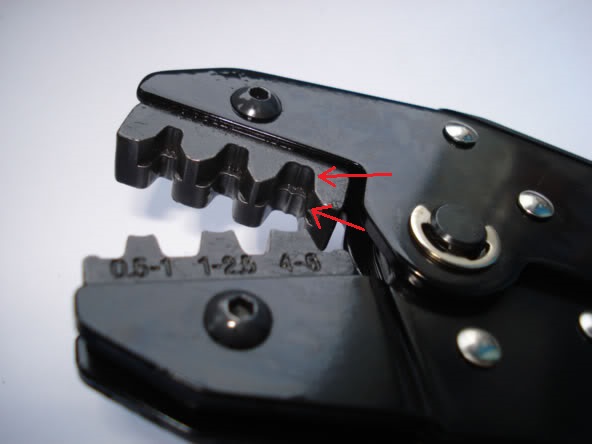
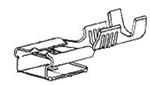
The crimp features aren't symmetric. One side has a single curve, and the other side has a double curve (making a ridge in the middle). The flat side of the connector should be against the single curve, and the open ends should be toward the double curve:
Simalarly, the connectors themselves have two crimp areas, one for the wire and one for the insulation. Since your crimpers have two levels, the wire and insulation get crimped in a single step.
Strip just enough insulation off of the wire so that you can position both the insulation and the bare conductor in the appropriate places in the connector:
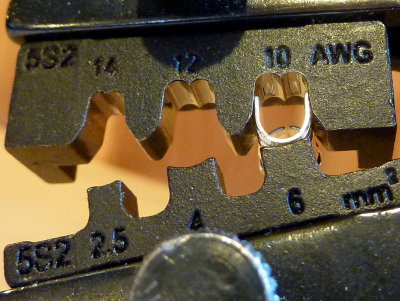
Finally, place the connector and wire into the crimper, making sure that the bigger aperture is over the insulation and the smaller one is over the wire. Crimp it!
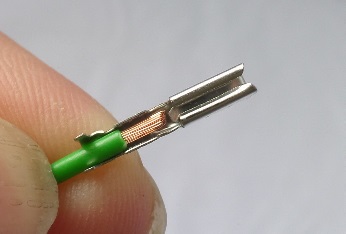
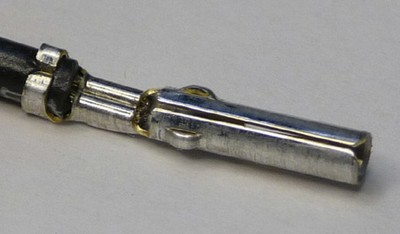
Here's what it should look like:
Hopefully this helps.
However, it may be that the Pololu connectors aren't perfectly compatible with the DuPont housings. It seems that some people are getting it to work, and others are having trouble. If there's still a problem, I would try getting matched-brand pairs and see if it works better.
Oh, and the Pololu parts are spec'd to work with #22-#28AWG wire, so you should be fine there.
Good luck!
First, notice two things about the crimpers.
There are two different elevations in the crimp die, for any given wire size. The tighter one is intended for the actual wires, while the larger one is meant for the insulation.
The crimp features aren't symmetric. One side has a single curve, and the other side has a double curve (making a ridge in the middle). The flat side of the connector should be against the single curve, and the open ends should be toward the double curve:
Simalarly, the connectors themselves have two crimp areas, one for the wire and one for the insulation. Since your crimpers have two levels, the wire and insulation get crimped in a single step.
Strip just enough insulation off of the wire so that you can position both the insulation and the bare conductor in the appropriate places in the connector:
Finally, place the connector and wire into the crimper, making sure that the bigger aperture is over the insulation and the smaller one is over the wire. Crimp it!
Here's what it should look like:
Hopefully this helps.
However, it may be that the Pololu connectors aren't perfectly compatible with the DuPont housings. It seems that some people are getting it to work, and others are having trouble. If there's still a problem, I would try getting matched-brand pairs and see if it works better.
Oh, and the Pololu parts are spec'd to work with #22-#28AWG wire, so you should be fine there.
Good luck!
Mouser...just down th street from me.
Scotty has a set of seat heaters for my seats. That reminds me, I need to remind him to send them off to the upholsterer with the seats. 
QUOTE(whitetwinturbo @ Nov 28 2016, 09:34 PM)
.........and where is the link(s) to do this work and buy supplies / heat mats?I've been selling these for awhile. There are several different kits you can buy.
I think these are the best for a few reasons
1- they are a carbon fiber net that can be trimmed easily to fit.
2-they are self contained requiring no additional parts - relay included, on off switch included. Harness is included
3-They have directions
4- Low current draw
5- They are reasonably priced
http://shop.914rubber.com/Seat-heater-asse...m?categoryId=-1
QUOTE(Mikey914 @ Nov 29 2016, 11:59 AM)
QUOTE(whitetwinturbo @ Nov 28 2016, 09:34 PM)
.........and where is the link(s) to do this work and buy supplies / heat mats?I've been selling these for awhile. There are several different kits you can buy.
I think these are the best for a few reasons
1- they are a carbon fiber net that can be trimmed easily to fit.
2-they are self contained requiring no additional parts - relay included, on off switch included. Harness is included
3-They have directions
4- Low current draw
5- They are reasonably priced
http://shop.914rubber.com/Seat-heater-asse...m?categoryId=-1
i installed these in my seats and the are awesome!! I have a center console so I put the on/off buttons in there, and ran my wiring back to the battery directly, and yes they are on their own fuse in back , only draw back is that they are not switched with ignition but, I have a quick release on the battery and usually flip that off anyway. -
phil
QUOTE(Mowog4 @ Nov 28 2016, 06:59 PM)
Mark
For those of us who strive to do a more professional job, but are usually limited to Radio Shack or Auto Zone, how about a couple of points on crimp on connectors:
What Crimpers do you suggest?
Do you prefer crimp on over solder?
The link to the terminal from Mouser was great, never had heard of them before. If you were going to suggest putting together some common connectors for an enthusiasts workshop what pieces would you suggest?
Thanks
Ed
QUOTE(McMark @ Nov 28 2016, 01:32 PM)
Fuses 10/11/12 are all battery direct, I would use that to actually power the seat heaters because the wires are larger. Use a relay to keep the seat heaters from being 'live' all the time. Get piggyback connectors instead to cutting or damaging stock wires. Also, no crimp connector should ever be red/blue/yellow. Those are waiting for failure. Invest slightly more in a correct double crimp connector and some heat shrink. You look like a professional and you're less likely to have odd issues later.
http://www.mouser.com/Search/ProductDetail...lkey571-60279-2
Some good information here. http://www.aeroelectric.com/articles/faston3.pdf
QUOTE(A&P Mech @ Nov 29 2016, 08:05 AM)
I picked mine up off of Amazon.
https://www.amazon.com/Carbon-Fiber-Heater-...2AER7D&th=1
They work fantastic! I mounted the switches in my center console.
Click to view attachment
Click to view attachment
Mine are wired through a relay that I mounted under the center console. I pulled switched power from the fuse box to the relay coil. A new 16 gauge wire was ran to the battery to through the relay to the seat heaters.
Nice shifter.
Thanks!
This is a "lo-fi" version of our main content. To view the full version with more information, formatting and images, please click here.