Stock engine, but idles VERY low, even when warmed up. On my throttle body, there is a flexible rod with a plastic knob on top of it, and when I turn it the idle changes. I can hear more air being sucked into the TB when I turn it counter-clockwise, and when I turn it all the way clockwise there is no air sound, and it idles so low it almost dies.
What exactly does this rod do? Is it for the idle adjustment, or fuel/air? The reason I'm asking is if I use it to adjust the idle, the car doesn't run very well, in that it will stumble and backfire if I use it to set the idle to just under 1K. If I use it to adjust fuel/air, I can get it to the point where it runs pretty good, but idles at the lowest mark on the tach when cold, and just above it when warm.
Any ideas? And yes, I did do the search function, and it appears that this flexible rod thing is to adjust the idle, but I just wanted to confirm with some newer replies.
Thanks
Full Version: Idle adjust on '73 1.7
There is no such thing on a 914. Post a pic please. We can't help here without a pic.
If you're looking at the TB from the driver's side, this rod thing comes up on the right side of the TB. I think the PO put this on to make it easier to adjust whatever it is this thing is attached to, i.e. no tools required. So is there some kind of TB adjustment that's on the right side of the TB, at the base? The throttle linkage/spring is on the left side, but I don't see any kind of adjustment screw to adjust the linkage. The only thing that's on that side is the throttle cable, and it would seem silly to me to adjust the idle by adjusting the cable.
The idle is adjusted with the air bleed screw on the throttle body. If your idle is low when the car is fully warmed-up, and bringing the idle up to 1000 rpm by adjusting it causes the car to run poorly, you have other issues going on.
I know others here have heard me say this before, I'll say it again - trying to diagnose a symptom like "poor idle" over the internet, with zero knowledge of the condition of all the systems on a car, is like the parable of the blind men and the elephant. The charging, fuel supply, ignition, motor mechanical, vacuum, and fuel injection / carburetor systems all interact and must all be working properly. I suggest you make sure everything you can check in those systems is working properly, and afterward, see if you still have the problem. Then, real troubleshooting can begin.
I know others here have heard me say this before, I'll say it again - trying to diagnose a symptom like "poor idle" over the internet, with zero knowledge of the condition of all the systems on a car, is like the parable of the blind men and the elephant. The charging, fuel supply, ignition, motor mechanical, vacuum, and fuel injection / carburetor systems all interact and must all be working properly. I suggest you make sure everything you can check in those systems is working properly, and afterward, see if you still have the problem. Then, real troubleshooting can begin.
If this "cable" was installed by a previous owner and it does adjust the idle, it seem very likely that there is an adjustment device that the cable is attached to. Just saying.....
I got the car back from the shop last week, and a bunch of things were checked and adjusted: fuel pump pressure, ignition points, fuel injection points, engine timing, check for vacuum leaks, ECU, etc. I had already installed new plugs, plug wires, dist cap, rotor, coil, new TPS circuit board, and checked the wire on the CHTS. I got a Monza dual muffler/quad tip exhaust from someone on the site, and got it powdercoated. The shop installed the exhaust, along with new gaskets, hardware, and support brackets. The shop did say the cold air valve wasn't working properly, in that there wasn't a whole lot of vacuum being pulled into it when it was cold. So they said to just keep my foot on the gas pedal when it was cold to keep the rpms up, and to let it warm up for a few minutes before taking off.
So my ritual now is to fully depress the gas pedal, start the car, then adjust my foot so it's idling around 1500-1600 rpms for about 5 minutes. I still have to give it a little more gas than usual to keep it from stalling when I'm starting out in first gear from a stop, but after a few minutes of driving it's idling to where it won't stall, but just barely. If I could just get the idle bumped up to around 950 or so, it would be running good enough for me.
I've bought a bunch of cars over the last dozen or so years, to include oddball things like a Merkur XR4Ti, Taurus SHO, Saturn Sky, Saab 900 turbo convertible, Land Rover Discovery I, Suzuki Samurai, Jeep Comanche pickup, etc. But this 914 is the first one I've regretted buying.
If you regret buying it why are you spending money on it? My advice is to sell it. Cut your losses and run.
QUOTE(The Cabinetmaker @ Dec 12 2016, 12:33 PM) 
If you regret buying it why are you spending money on it? My advice is to sell it. Cut your losses and run.
That's the plan, as soon as I get it running decently. Wouldn't want to pass this problem on to the next owner...
QUOTE(socal1200r @ Dec 12 2016, 10:07 AM)
I got the car back from the shop last week, and a bunch of things were checked and adjusted: fuel pump pressure, ignition points, fuel injection points, engine timing, check for vacuum leaks, ECU, etc. I had already installed new plugs, plug wires, dist cap, rotor, coil, new TPS circuit board, and checked the wire on the CHTS. I got a Monza dual muffler/quad tip exhaust from someone on the site, and got it powdercoated. The shop installed the exhaust, along with new gaskets, hardware, and support brackets. The shop did say the cold air valve wasn't working properly, in that there wasn't a whole lot of vacuum being pulled into it when it was cold. So they said to just keep my foot on the gas pedal when it was cold to keep the rpms up, and to let it warm up for a few minutes before taking off.
So my ritual now is to fully depress the gas pedal, start the car, then adjust my foot so it's idling around 1500-1600 rpms for about 5 minutes. I still have to give it a little more gas than usual to keep it from stalling when I'm starting out in first gear from a stop, but after a few minutes of driving it's idling to where it won't stall, but just barely. If I could just get the idle bumped up to around 950 or so, it would be running good enough for me.
I've bought a bunch of cars over the last dozen or so years, to include oddball things like a Merkur XR4Ti, Taurus SHO, Saturn Sky, Saab 900 turbo convertible, Land Rover Discovery I, Suzuki Samurai, Jeep Comanche pickup, etc. But this 914 is the first one I've regretted buying.
That's a lot of good information. Like your shop says, if your aux air regulator (AAR) isn't working, you'll have to hold the throttle open when cold. There are a number of threads on how to get yours working again.
If everything else in the car has been checked out, the symptoms you describe could be due to issues with the injection. Poor off-idle transition can be caused by an inoperative throttle position switch (TPS), which may not be providing additional injection pulses when opening the throttle. An easy way to check if it's working is to do the following: while the car is off and sitting still, and in a quiet setting (like a closed garage), turn the key to on. You should hear the fuel pump run for 1.5 sec to pressurize the fuel rail then turn off. Now, slowly open the throttle with the key still in the on position, you should hear a series of clicks (20 in all). If you hear the clicks, your TPS is providing transition pulses, if not, something is wrong with the switch, connector, harness, or ECU. I know you put in a new TPS, but it still has to check out as functional.
If the switch checks out, you may have a mixture problem. First, you need to make sure your part-load mixture is set correctly. Before you do any more complex tests, you need to assure your head temperature sensor and your air temperature sensors are working correctly. Information on how to do that is in the link in my sig below. While there, you should also check the parts number table to make sure you have all the correct parts for your car in the FI system.
You didn't say anything about your mainfold pressure sensor. Is it a rebuild? Does it hold a vacuum without leaking down? Is there evidence that the adjustment screws on the end have been tampered with (e.g. missing epoxy seal)? The best way to test the part-load mixture is to put the car on a dyno with a gas emissions tester connected, and to measure the part-load CO. Generally, it should measure 3.0%, or in a range from 2.5% to 3.5%. If it is outside of that range, then your MPS may be defective or misadjusted. Again, there is information in the link in my sig about what to do. There are also people on this site, such as Jeff Bowlsby, who offer MPS calibration and diagnostic services.
Once you have the part-load (and transition and full-load, too) mixture set, then you need to check your idle mixture. The '73 ECU is the 0 280 000 037 model, it has an idle mixture control knob on the top of it. There should be a mark in the plastic surround, that's the "factory" mark, and corresponds to the position where the knob has no rich/lean effect on the mixture as set by the MPS, CHT, and air temperature sensor at idle. Start tuning in that position. Check that the TPS idle control switch is on at idle (instructions in my sig). Clockwise on the knob is richer, counterclockwise is leaner. Generally, you get better idle results when the mixture is somewhat richer than the factory position, about 2 or 3 clicks more positive (corresponding to a mixture of 3.5 to 4.0%).
If you're still having problems, check for injectors that are clogged or poorly spraying injectors. There should be some postings here that describe how to do that
Note that I'm assuming your ignition system is in perfect condition, that the vacuum advance and retard are present and working correctly, that your timing and dwell are correct, points plate moving smoothly, that there is no shaft wobble in the distributor, that your points (or electronic system) are working properly, coil working properly, rotor, cap and plug wires are in good condition, plugs in good condition and gapped properly. Also that your valve clearances are correct, too. Sounds like you've assured all of those things already, but I'm just trying to cover everything.
I'd still like to see a pic of that cable. If that's not too much trouble for you.
QUOTE(The Cabinetmaker @ Dec 12 2016, 12:46 PM)
I'd still like to see a pic of that cable. If that's not too much trouble for you.
Here's a pic of that flexible cable with the knob on top. So what does this actually adjust on the throttle body?

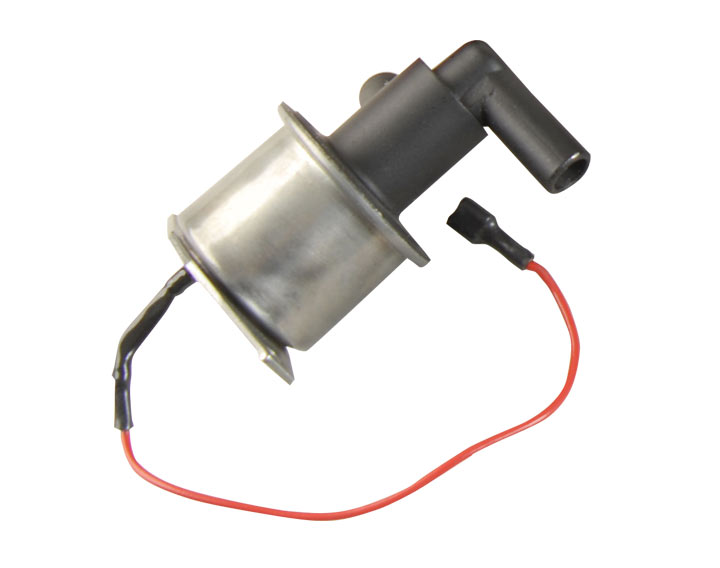
In this pic, I took the hose off to get a better picture. This is the gizmo that the shop said wasn't pulling enough vacuum when cold. Maybe I need to remove it, soak it in Coke overnight, then clean and reinstall?

And one more, what's this thing do? I'm assuming it's fuel-related?

That's more like it.
1 is attached to the idle bleed screw. I'd leave it like it is. Looks funny, but will work.
2 is the supplemental air valve. it opens when cold and closes when hot
3 deceleration valve. Not fuel related
1 is attached to the idle bleed screw. I'd leave it like it is. Looks funny, but will work.
2 is the supplemental air valve. it opens when cold and closes when hot
3 deceleration valve. Not fuel related
QUOTE(The Cabinetmaker @ Dec 13 2016, 05:06 PM)
That's more like it.
1 is attached to the idle bleed screw. I'd leave it like it is. Looks funny, but will work.
2 is the supplemental air valve. it opens when cold and closes when hot
3 deceleration valve. Not fuel related
1. So this is what's used to adjust the idle?
2. Does this act like a "choke" for the TB?
3. What is the purpose of a "deceleration valve"?
1 yes
2 supplemental air during warm up
3 emissions
2 supplemental air during warm up
3 emissions
If the deceleration valve is emissions related, can it be bypassed, i.e. remove the valve body and just connect the hoses?
Curt...unless I'm mistaken, that "decel valve" looks like it's connected to a fuel rail...with fuel lines.
Am I turned around?
Am I turned around?
#3 looks like fuel pressure regulator. If it is on the drivers side rear of the engine bay, then it most definitely is. Decel valve is passenger side of the engine bay.
http://members.rennlist.com/pbanders/djetparts.htm
Read that entire website for troubleshooting a d-jet system.
http://members.rennlist.com/pbanders/djetparts.htm
Read that entire website for troubleshooting a d-jet system.
QUOTE(BeatNavy @ Dec 13 2016, 05:49 PM)
Curt...unless I'm mistaken, that "decel valve" looks like it's connected to a fuel rail...with fuel lines.
Am I turned around?
Yeah, I was thinking the same thing. I read up on the decal valve on this site:
http://members.rennlist.com/pbanders/DJetParts.htm
From what I can tell, mine is not hooked up right, at least as a decal valve. To me, the big giveaway is there isn't a smaller hose connected on the end, where that nut is? I thought it might be something like a mechanical fuel pressure regulator, but when I followed the fuel lines, that is mounted on the other side of the engine, with an electrical connection.
So my question is, IF this is a decal valve, can I just remove it and connect the two hoses, or just replace the two sections of hose with one piece?
Decel valve and fuel pressure regulator look similar, but that last pic is definitely fuel pressure regulator.
Decel valve:
Click to view attachment
FP reg:
Click to view attachment
You can definitely eliminate the decel valve, but obviously not the fp regulator.
Decel valve:
Click to view attachment
FP reg:
Click to view attachment
You can definitely eliminate the decel valve, but obviously not the fp regulator.
Yes, the third item circled is the fuel pressure regulator. It maintains about 30psi of pressurized fuel, so be careful here. Misinformation can have dangerous consequences, so please folks, be as sure as you can be before you give advice here. 
Some of us maybe should stick to advising on woodworking projects:poke:
Some of us maybe should stick to advising on woodworking projects:poke:
Yeah, I thought it was a fuel pressure regulator. It appears to be hooked up correctly...as a fuel pressure regulator.
As Curt mentioned, number 2 is an Auxiliary Air Regulator (sometimes called a Supplementary Air Valve, or something like that). If it's locked closed, then you will have a low idle when cold. Best thing to do is to remove that thing and soak it in PB Blaster or something for a day or two and see if it opens up at room temperature.
Curt was moving quickly. He knows an FPR from a decel valve .
.
As Curt mentioned, number 2 is an Auxiliary Air Regulator (sometimes called a Supplementary Air Valve, or something like that). If it's locked closed, then you will have a low idle when cold. Best thing to do is to remove that thing and soak it in PB Blaster or something for a day or two and see if it opens up at room temperature.
Curt was moving quickly. He knows an FPR from a decel valve
.
QUOTE(BeatNavy @ Dec 13 2016, 03:36 PM)
number 2 is an Auxiliary Air Regulator (sometimes called a Supplementary Air Valve, or something like that). If it's locked closed, then you will have a low idle when cold.
No... AAR is a whole 'nother animal.

QUOTE(Rand @ Dec 13 2016, 06:42 PM)
No... AAR is a whole 'nother animal.
Yes, the second one in his picture above! Yikes, this becoming like an Abbot and Costello routine...

Oye...
You were right though, referring to pic #2 in the OP's post.
Love this place.
Love this place.
QUOTE(Rand @ Dec 13 2016, 06:32 PM)
Decel valve and fuel pressure regulator look similar, but that last pic is definitely fuel pressure regulator.
Decel valve:
Click to view attachment
FP reg:
Click to view attachment
You can definitely eliminate the decel valve, but obviously not the fp regulator.
Perfect, that object in my last pic looks definitely like a fp regulator, so it's staying put! I popped the engine lid and shined my flashlight around the engine compartment, and didn't see anything that looked like a decal valve. I'll take a better look tomorrow during the day.
I'll also remove that object in pic #2 and give it a good soak, because my car barely idles when cold, I have to keep my foot on the pedal at 1500 rpms for about 5 minutes before it'll idle enough to not die when coming to a stop. There aren't any surprises about removing that thing, other than the hoses and bolts, are there? There's isn't a spring-loaded jack-in-the-box thing waiting to come shooting out when I lift it off, is there?!
You guys are all absolutely correct that it's definitely a fuel pressure regulator. Should have taken more than a quick glance
QUOTE(socal1200r @ Dec 13 2016, 07:06 PM)
There aren't any surprises about removing that thing, other than the hoses and bolts, are there? There's isn't a spring-loaded jack-in-the-box thing waiting to come shooting out when I lift it off, is there?!
The only considerations for the AAR I can think of are:
1. Be careful with the wire lead as shown in Rand's picture above. You really don't want that thing to break off the base of the AAR, and it's kind of delicate.
2. Don't lead the wire lead from the wiring harness that connects to that wire lead on the AAR get grounded (against the engine case or anything else) with the ignition on. I believe that's the lead that will blow a fuse on the relay board if grounded (unless it's the thermo switch lead...can't remember).
There's a really good description of how the AAR works about halfway down on this page: http://members.rennlist.com/pbanders/djetparts.htm
I read the reference link about what the object in pic #2 does, how they're NLA, how they can be "rejuvenated" or "rebuilt", etc. Copy on being careful with the wire that runs underneath it, making sure it doesn't touch any metal with the key on.
So my question is, would it be okay to soak this thing overnight in a bowl of Coke, then rinse it out with some warm water, then maybe some brake cleaner ('cuz it dries fast), then some compressed air? Makes sense that without a filter of some kind, there will be debris that gets inside this thing, and could easily make the valve stick.
Just don't want to soak it in Coke if it'll muck up the bi-metallic thingys on the inside. Seems that my valve is stuck in the closed position, so don't see what harm cleaning it this way can do?
I don't think that would hurt it if you only did it overnight, but if I was to choose something out of the kitchen, I'd probably go with white vinegar to avoid the syrup/sugar that's in coke. Either way, clean it out thoroughly when you're done as mentioned. Others may know why that is or is not a good idea.
I fixed one by opening it up as described in the rebuild. Wasn't that hard, but it is probably safer to try soaking it in something first.
I fixed one by opening it up as described in the rebuild. Wasn't that hard, but it is probably safer to try soaking it in something first.
I agree with Rob about the vinegar and not coke.
Vinegar it is then. I have some in the kitchen, for my homemade windshield washer solution. I had similar concerns about using Coke, in that there are some "delicate" metallic things inside that valve body, and I didn't want the sugar in Coke to react badly to it and make things worse. I'll buy a new bottle from the dollar store, and give her a good overnight soak and see if it makes any difference. I figure it couldn't hurt at this point...
QUOTE(socal1200r @ Dec 14 2016, 08:30 AM)
Vinegar it is then. I have some in the kitchen, for my homemade windshield washer solution. I had similar concerns about using Coke, in that there are some "delicate" metallic things inside that valve body, and I didn't want the sugar in Coke to react badly to it and make things worse. I'll buy a new bottle from the dollar store, and give her a good overnight soak and see if it makes any difference. I figure it couldn't hurt at this point...
Wish I'd seen this earlier, I do not advise either vinegar or coke to soak the valve in. What I've done to get several of these working again is to do the following:
1. Test that the heating coil resistance. Remove the valve from the car, let it reach room temperature. Using a DMM, measure the resistance from the heater wire to the case, should be something like 13 ohms. If you get a short (e.g. 1 ohm or less) or an open (infinity), the coil or the heater wire continuity is bad and the unit will require a more extensive rework. Dave Darling posted a procedure on this some time ago.
2. Verify that the valve is open. Blow through the port and make sure you get good flow. Use a light and look into the lower port, you can see the valve mechanism, it should be open, you should see an open slot. If you can't blow through the valve, and/or the port appears to be closed, the valve is jammed, skip to step 4.
3. If you get 13 ohms or so, test the heater and valve operation. Apply +12V to the heater wire with the case grounded. Your supply can be the car battery or a bench supply that can provide at least 2 A. Look into the lower port - you should see the slot slowly closing. After a few minutes, the case will be noticeably warm to the touch, that will tell you the heater is working. If the port completely closes after about 10 minutes, and you can't blow through the valve, then it's working correctly. Let it cool to verify it opens completely again. If the valve doesn't close, then it's jammed open, and you need to free it.
4. I suggest first using WD-40 to free the valve. Spray a copious amount of WD-40 into the lower port. If it's jammed closed, position the valve so that the WD-40 stays in the port, and let it sit for at least an hour. Pour it out, spray more, let sit. Pour it out, and test the valve with the +12V supply again? Working? Great! No? Get a can of PB Blaster, and do the same procedure again. Working? Great! No? Either try it again, or maybe, at this point, you can try vinegar, what do you have to lose?
FWIW, this worked on two jammed AAR's I have that are now in my spares box.
This is a "lo-fi" version of our main content. To view the full version with more information, formatting and images, please click here.