I'm really paranoid about making sure I get everything right as a rebuild this engine so after I got the rocker arms bolted down I double-checked the timing. It was quite clear that I'd somehow gotten the distributor shaft off by 90 degrees and I figured that I knew which direction to rotate it so I did.
As I've checked things again, I'm just not sure that I'm not 180 degrees out now that I've repositioned it.
My confusion comes because both 1 & 3 are at TDC when the "0" on the fan is lined up with the case split. Both sets of valves look to me like they are closed at this point, but that doesn't seem right.
So how can I tell from the position of other valves whether #1 is at TDC and on the compression stroke? I know this just got discussed in another thread, but when it came down to actually doing it on the engine it just didn't seem as clear as I expected it to be.
Full Version: Type IV Static Engine Timing?
turn the engine through a few revolutions. you know the sequence...
intake valve open as piston descends;
both valves close as piston rises;
both valves remain closed as piston descends;
exhaust valve open as piston rises.
when you see the intake valve clse on the upstroke and remain closed on the downstroke - that is your power stroke for whatever cylinder you're on.
Before you go further..... There is an oil passage in the case that should line up with the one in the distributor shaft. Did you check this when you installed the distributor?
My engine is waiting to be installed, so I went and took a look.
When the rotor is at the #1 cyl. notch on my distributor it is pointing directly toward the front (pulley side) The only pair of valves that are fully closed when #1 is TDC are on #1.
My engine is a 1.8 litre converted to 1910cc, with a Web 86 cam, so I'm not sure if the cam makes a difference in your situation.
Top pic is #3&4 cyl....next down is #1&2
Hope this helps.
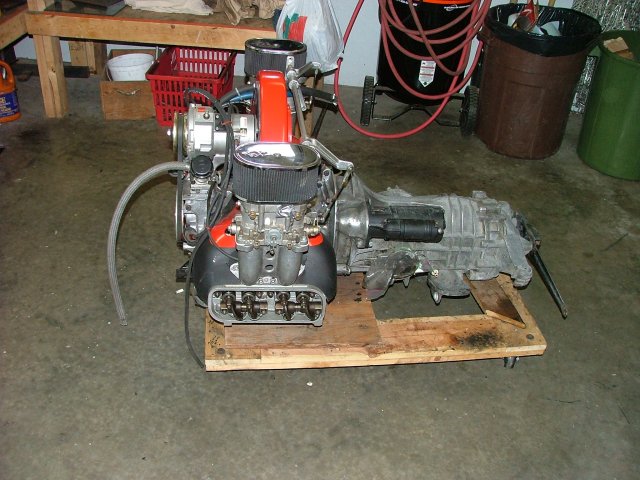
By the way....Here is a shot of the engine. It will be installed as soon as I get the firewall shift bushing I ordered.....I can't wait!
Thanks guys! The explanations and the pictures are very helpful. I'm pretty sure I've got it, but I'll use this to check again. One cannot be too careful about such a thing!
BTW - I figured out how I got off by 90 degrees. Because the vacuum pot gets in the way of the bracket nut, I loosen the bracket ring so that I can rotate the distributor to get to the nut. I figure I didn't rotate it back and lock it down again before I removed the distro and the rotation is about 90 degrees. I installed using Jake's video as a guide - using the distributor to make sure the distributor shaft got positioned "correctly" - and it would have if I'd remembered to rotate it back during removal!
Thanks again!
OT- is that a DTM?
No Aaron... I'm not sure who made this, but it was on the engine when I bought the car. It was not very good leaked lots of cooling air . I added some more shrouding to it and put a baffle inside to direct more air to the 3&4 side.
I'm hoping that it will work ok now. I'll be installing a head temp guage to monitor it. I have a large oil cooler with a fan and 180 degree thermostat.
It seems to move a lot of air, but it goes straight down, so the road dirt blows everywhere. I'm planning to use baffles to direct the air out the rear.
We will see how it all works....I only drove the car once before tearing it apart, but it didn't seem to be overheating....( I got stuck in rush hour traffic that one time.)
Here is a pic of the back.
Before i fire up a newly assembled engine, i like to get the #1 cylinder at TDC. use the degreed pulley to get it right on. pop the dist cap to verify that the rotor is pointing towards the center/front of the case. then stick a volt/ohm meter on the distributor. the positive on the points and the ground to ground. fine tune the point at which the spark plug fires by slowly twisting the distributor a little to the left and right. Watching the ohm meter tells me exacty when the sparkplug fires because as soon as the points come apart, the plug fires.
works every time.
any questions, feel free to ask.
best regards.
works every time.
any questions, feel free to ask.
best regards.
This is a "lo-fi" version of our main content. To view the full version with more information, formatting and images, please click here.