I've gotten behind on updates so let's get caught up. Let's start with some more sheet metal porn. These arrived last Wednesday:
Click to view attachment Now back to work. First up was finishing welding in the inner long floor. That went pretty well.
Click to view attachment Next, I welded in the outer wall, inner side patch behind the jack support. That little piece took forever to get right. Between the compound curves and limited access, it was a booger to get shaped and trimmed. You can see my whoopsy where I trimmed too much off of a corner. I'm not too worried about that though because once the inner wall is in, it should be easy enough to fill in that corner with the welder. But still...
 Click to view attachment
 Now let's patch that inner wall. This was another piece that was a PIA to get shaped and prepped.
Click to view attachment Tin worms had gotten to part of the inner wall over the hump for the engine mount bracket, but luckily, the outer wall had a little pitting, but was still sound. My plan was to include that area in the larger inner wall patch. But due to limited access, I couldn't get that little whoopty-do shaped and trimmed accurately as an integral appendage to the patch. So I made a template with tracing paper and just cut a small piece of sheet metal to patch that separately. Even then, there was no room to manipulate the welding gun, so the the welds look like turkey shit. But structurally, it is sound.
Click to view attachment Next the larger patch and outer wall were prepped, and the patch was welded in.
Click to view attachment Click to view attachmentClick to view attachment Again, space was so tight inside that area that I had just enough room to stick the gun in with a bare hand. So the rearward portion of the weld job is a bit of a shit show, but structurally sound. I take no pride in this part of the repair. But the only option to make that area look pretty would be to open up the inner wheel well to provide better access like I had on the passenger side. But that option seemed like it was fraught with a lot of risk for limited reward.
Click to view attachment Now it was time to tackle the inner wall of the jack support. This is a complicated piece and I was going to build a hammer form from maple or 3/16" steel, but then I happened to notice a scrap of 3" schedule 40 PVC in the shop and thought that might offer a simpler option. Sure enough, the PVC fit very close to the diameter of the doughnut I needed to create.
Click to view attachmentSo I drilled a 2" hole in a piece of sheet metal with a hole saw, then hammered it into a doughut using a wooden mallet and the PVC for a form. This would have been easier if I'd have cut the PVC down so I was hammering lower on the bench. But my table saw was covered with crap and I'm lazy.
Click to view attachment Click to view attachment I was able to raise a reasonable facsimile of the original doughnut. It isn't an exact match, but very close and functionally equivalent. The doughnut on the original is sunk in an hourglass-shaped recess to make it fit tight against the pyramid of the outer wall. I created the recess by lining up the piece on the edge of my anvil and tapping at an angle with the edge of my mallet. This took a bit of finesse, but I was happy with the result.
Click to view attachment Here's the final result.
Click to view attachment Click to view attachment Tuesday, Oct. 17 - the anti-climaxI spent a few hours grinding down welds and prepping things for epoxy primer. Everything was given a treatment with Jasco the night before. Then cleaned and wiped down with wax and grease remover, and all flanges and butt weld areas were masked before primer. I pulled my second ratte can of Eastwood Epoxy Primer off the shelf and found it was defective. I felt like a Who down in Whoville who, after weeks of preparation and anticipation, woke on Christmas Day to find the Grinch had been busy. That exciting moment of paint and reassembly would have to wait. I should say that this wasn't Eastwood's fault. They had already replaced the defective can. No need to bore with details except that I thought the original can was still usable, and it wasn't. My bad.
 Wednesday, Oct 18 - Primer, finally
I had a gallon of very expensive PPG DPLF series epoxy primer on hand, but no way to spray it. My only spray gun is an ancient siphon-fed high pressure pot, and I wasn't going to waste my $325/gallon primer through an inefficient gun. The next day, I took a trip to the local HF to pick up one of their cheap HVLP spray guns. It is good enough for primer, I think.
The new gun worked well. It was my first experience working with 2K paint or an HVLP gun. My how painting has improved over the decades!

But in my excitement, I forgot to take a picture of all the nicely primed parts.
 Yesterday, Oct, 19
I tried my best to shoot primer all the way to the rear of the long, but couldn't get it done. So I engineered and fabricated this high tech remote access primer delivery system.
Click to view attachment And I at least got a pic of that result.
Click to view attachment After this cures a week or two, I'll follow up with some Eastwood Internal Frame Coating as backup for any spots that might have been missed. And all cavities will be sprayed with cavity wax.
Reinstalling the the rear heater tube and hose went without a hitch. The outer paper wall of the heater hose split slightly when I removed it, so I put a wrap of Gorilla tape on just for a little added reinforcement. Would have been fine without, but I wanted to be sure. It would be nice to be able to clean that hose before reinstall, but didn't want to risk destroying it.
Click to view attachmentThen the jack area patch went in. I thought of all kinds of ways to offset the inner and outer wall welds, which is preferred. But access limited options and every alternative I could think of was fraught with risk. So I decided to chamfer the butt weld gap so I could make sure to run a puddle into both layers. It seemed to work well and the result is acceptable.
Click to view attachment Then I welded in the front wheel well patch that extends into the long.
Click to view attachment I wanted to primer the backs of those butt welds, so I designed and frabricated a space-aged limited tolerance primer delivery tool.
Click to view attachment And finally it was ready to fit the outer long! I like to weld up the patch area at the front first. That way, the piece can move with any shrinking that occurs from the butt weld without pulling the whole frame structure.
Click to view attachment Click to view attachment That was a lot to cover. Today I'll dry fit the door jamb with zip screws and refit the door so I can check gaps while I weld up the long. I'm running low on MIG gas, so we'll see how far I get.


 :
: Just to recap, here's what I was dealing with:
 It should be all downhill from here.


 I took this pic a little late, but here's how it looked.
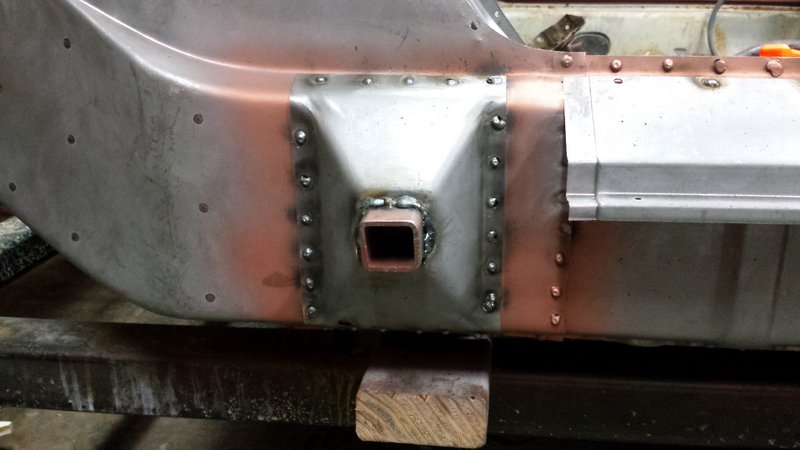
 First was the outer long. I picked up this tool from Eastwood a few years ago and love it for rosette welds. Not only does the clamp hold flanges tightly together, but the copper backing lets me crank up the welder to max voltage for better penetration to the bottom layer.

 I took the bracket over to the other side of the car to test it against an original threshold. Perfect fit. I checked the other three brackets, and they were all the same.


 !!
!!

 of a gift inside. A poor patch to say the least.


 And didn't you just put a complete floor pan on that machine?