Help - Search - Members - Calendar
Full Version: Intro from Montana: '73 2.0L rustoration thread
914World.com > The 914 Forums > 914World Garage
Pages: 1, 2, 3, 4, 5, 6, 7, 8, 9, 10, 11, 12, 13, 14, 15, 16, 17, 18, 19, 20, 21, 22, 23, 24, 25, 26, 27, 28, 29, 30, 31, 32, 33, 34, 35, 36, 37, 38, 39, 40, 41, 42, 43, 44, 45
rgalla9146
QUOTE(Dave_Darling @ Jun 21 2019, 06:48 PM) *

QUOTE(bbrock @ Jun 21 2019, 08:32 AM) *

I discovered that the front trunk lock was binding when the handle was bolted in place....


Aren't those two fasteners supposed to be Allen-head screws?

--DD


agree.gif I'm with you Dave.
bbrock
QUOTE(burton73 @ Jun 21 2019, 04:11 PM) *

QUOTE(Dion @ Jun 21 2019, 01:01 PM) *

Brent,
I’m loving every minute of this thread.
Sorry bout the snow, we’ve had a month of rain. “Waiting for the sun” cue the Doors.....
That coil set-up. Very slick!
Keep at it.


Doors – Waiting For The Sun Lyrics
At first flash of Eden, we race down to the sea.
Standing there on Freedom's Shore.
Waiting for the Sun (3x)
Can you feel it now that spring has come.
And it's time to live in the scattered sun.
Waiting for the Sun (3x, pause, again slower)
Waiting.... Waiting.... Waiting.... Waiting.... (2x)
Waiting for you to - come along
Waiting for you to - hear my song
Waiting for you to - come along
Waiting for you to - tell me what went wrong
This is the strangest life I've ever known.
Yeah! (Riff 8x)
Can you feel it now that spring has come.
And it's time to live in the scattered sun.
Waiting for the Sun (3x)
Waiting... For... The suuuuun. (Riff 2x)


That's some good MoJo Bob! It worked too. Today we were able to "Break On Through to the Other Side." Which, BTW, is spinning on the old B&O turntable and playing at high volume now thanks to your inspiration. I've gotta get me a lava lamp. aktion035.gif

Click to view attachment
bbrock
QUOTE(rgalla9146 @ Jun 21 2019, 04:53 PM) *

QUOTE(Dave_Darling @ Jun 21 2019, 06:48 PM) *

QUOTE(bbrock @ Jun 21 2019, 08:32 AM) *

I discovered that the front trunk lock was binding when the handle was bolted in place....


Aren't those two fasteners supposed to be Allen-head screws?

--DD


agree.gif I'm with you Dave.


You are correct. Seems like I might have already ordered those and forgotten about them. Will check the hardware stash and add to my next Belmetric order if I don't find them. Thanks for keeping me on my toes beerchug.gif
BPic
QUOTE(Dave_Darling @ Jun 21 2019, 06:48 PM) *

QUOTE(bbrock @ Jun 21 2019, 08:32 AM) *

I discovered that the front trunk lock was binding when the handle was bolted in place....


Aren't those two fasteners supposed to be Allen-head screws?

--DD


Excellent observation Dave. This car certainly will not run when he’s done. biggrin.gif

Seriously though Brent. I love this thread and it is my go to when I need info. I’m sure when your finished you’ll be up for a little moonlight drive.
bbrock
QUOTE(BPic @ Jun 21 2019, 05:09 PM) *

I’m sure when your finished you’ll be up for a little moonlight drive.


Yep, me and Gloria. Then it would be a wonderful night for a moondance. See what I did there? biggrin.gif

Allen screws added to the Belmetric order. That could have been worse than the car not running. Most likely the trunk lid would have flown open at high speed. BTDT with my first 914. FYI, it is a less than ideal situation. yikes.gif Y'all saved my bacon beerchug.gif
BPic
QUOTE(bbrock @ Jun 21 2019, 07:30 PM) *

QUOTE(BPic @ Jun 21 2019, 05:09 PM) *

I’m sure when your finished you’ll be up for a little moonlight drive.


Yep, me and Gloria. Then it would be a wonderful night for a moondance. See what I did there? biggrin.gif

Allen screws added to the Belmetric order. That could have been worse than the car not running. Most likely the trunk lid would have flown open at high speed. BTDT with my first 914. FYI, it is a less than ideal situation. yikes.gif Y'all saved my bacon beerchug.gif


Is Gloria a brown eyed girl? rolleyes.gif
bbrock
QUOTE(BPic @ Jun 21 2019, 05:35 PM) *

QUOTE(bbrock @ Jun 21 2019, 07:30 PM) *

QUOTE(BPic @ Jun 21 2019, 05:09 PM) *

I’m sure when your finished you’ll be up for a little moonlight drive.


Yep, me and Gloria. Then it would be a wonderful night for a moondance. See what I did there? biggrin.gif

Allen screws added to the Belmetric order. That could have been worse than the car not running. Most likely the trunk lid would have flown open at high speed. BTDT with my first 914. FYI, it is a less than ideal situation. yikes.gif Y'all saved my bacon beerchug.gif


Is Gloria a brown eyed girl? rolleyes.gif


thumb3d.gif
rgalla9146
smile.gif My wife and my daughter are both beautiful brown eyed girls.
I had those two allens plated yellow cad ....results not so good.
raynekat
Dang it Brent, you're scaring me about the 914Rubber front trunk cable. Mine seemed OK, but after reading your post, I'm ordering a factory one tomorrow to replace it. Last thing I want is a broken front trunk cable. Dude, you're making me rebuild my car again after I thought I had it nearly done. tongue.gif
bbrock
QUOTE(raynekat @ Jun 21 2019, 10:46 PM) *

Dang it Brent, you're scaring me about the 914Rubber front trunk cable. Mine seemed OK, but after reading your post, I'm ordering a factory one tomorrow to replace it. Last thing I want is a broken front trunk cable. Dude, you're making me rebuild my car again after I thought I had it nearly done. tongue.gif


Sorry about that. I really don't want to badmouth those cables. Maybe they are fine, but I didn't like the feel and way mine operated. Too important of a part to take chances for me.
bbrock
The big accomplishment this weekend was getting the HF portable garage tent set up for another (and hopefully last) season. I decided to back it several feet away from the house and garage door this year to better anchor the front and allow an easier path to walk between the tent and house. In the past, I've set it up so it became an almost connected extension of the garage when the doors were open. There really wasn't much benefit.

Click to view attachment

This let me offload some of the clutter from the garage which should yield a 17.8% reduction in non-recreational cursing. rolleyes.gif

Click to view attachment

The rest of the weekend was spent finishing up small tasks as I inch toward getting the car off the rotisserie. Got the calipers that @mb911 and @sixnotfour donated boxed to send down to PMB to exchange for plated housings. I needed to harvest the late adjusters from one of Ben's calipers and a piston from one of Jeff's to replace one of mine that was kind of marginal from corrosion. I added my late rear caliper to the box because I think that one is still good. If nothing else, maybe Eric can use those Ribe bolts.

Click to view attachment

I also installed spark plugs in the engine just to close those holes. The plan was to just loose thread them in the hope they would leak and not build compression so I could still easily turn the engine. That failed. Even lightly finger tight, they are building compression. I'll need to back them out some. All went well until the last one which was #2. I couldn't bet my spark plug socket in at the right angle. I realized then why the hole on the tin on that cylinder was mangled and pried open before I fixed it. A quick Google on this forum found an old thread with the right trick. Used a piece of fuel hose stuck on the end of the spark plug to get them started. I had a piece of silicone tubing left over from cushioning my fuel hardlines that did the trick.

Click to view attachment

I mentioned before that the 914Rubber SS trailing arm pivot shafts come with toothed washers to compensate for lack of serrations on the shaft ends.

Click to view attachment

That's a good solution and works fine with the original Fuji nuts. I had to replace two of those nuts and couldn't find the split Fuji nuts in that size, so I opted for reusable self-locking flange nuts. The flange nuts are taller than the Fujis and the last thread didn't engage. The solution was to replace the thick toothed washers with Schnorr washers which are thinner and actually match the original serrations on the shafts.

Click to view attachment

That was a lot of work for probably no real benefit but I feel better anyway smile.gif Thanks to the input on my question about installing just stubs vs full axles, I decided to install just the stubs while I was messing with the trailing arms. I'll torque them to spec once the car is on the ground to make sure my wheel bearings are safe when I roll the car around. The only thing left before pulling the car off the rotisserie is to install brake calipers and fill and bleed the system. I want to bleed it while I have easy access.

Last week I discovered I had mislabled a couple of the Bowden cables on my fresh air mixers so I took care of that tonight. A tedious task but I'm glad I caught it now rather than after the blower box was in yikes.gif

The last thing I did was order one of these:

IPB Image

A meter long piece of 60mm diameter hot air hose. Should be enough to do all the remaining hoses to match the original.

Good night. beerchug.gif
bbrock
Release the Kraken!

This is WWOT but I have posted a critter pic in awhile and just had to share this. Got an email from a friend today who was part of an expedition that a couple days ago filmed a frickin' giant squid in the Gulf of Mexico. He's the one interviewed in this article.

https://www.ksat.com/news/sa-zoo-part-of-ex...meZMBQagxCnzwTw

Here's the youtube version of the vid with cheezy music.


https://www.youtube.com/watch?v=M5cpDVsP2Sw
bbrock
Not too much exciting to report but figured I should get caught up.

I decided to swap out the 60mm hoses for the URO ones. The 914Rubber hoses are way more durable than the original or repro paper/foil hoses, and they are easier to install. I've discovered I have a bit more "weanie" in me than I thought though so wanted the original look.

As with the 50mm hose, this 60mm hose is a nice reproduction of the original. Here is the new hose next to some of my stained and dirty originals.

IPB Image

Unfortunately, I screwed up my measuring and ordered too short of a hose for all four pieces needed. That was an expensive mistake as it's going to cost me about $20 extra over what the right length hose would have cost. headbang.gif It you decide to do this, you want the longest (1500mm) posted by @UROpartsman . Screw-up aside, I think what I've been able to install dresses out the bulkhead area nicely.

IPB Image

I also followed a tip from @Aggiezig and bought an 8-pack of LED lights to hang in the tent. I'm hoping these will give me better light for working at night and painting - hoping they will help neutralize a bit of the yellow light that shines through the tent walls.

Click to view attachment

I took a day off from the car on the 4th to tackle a small project I've been putting off. It started off interesting right off the bat... literally. I opened the greenhouse door in the morning and this flopped onto my shoulder.

Click to view attachment

I let it climb into a crevice formed by a panel resting on the side of the house that the sun was beaming on. Bats like to day roost in crevices about 1/2" to an inch wide and HOT, like over 100F. That panel fit the bill and it was eager to crawl inside.

Back to work. The task was to finally build a potting bench inside the potting shed I built just before starting the car project and then piled it with junk so it was unusable for the intended purpose. Well, somebody liked it that way at least.

Click to view attachment

Project took a little longer than expected because I used only salvage materials I had on hand so it required designing and building at the same time.

Click to view attachment

Okay, that job is done, back to work on the car.
mepstein
Just don't let it scratch or bite you. Rabies shots are (usually) only available at the ER and are expensive.

Cute dog.
bbrock
Main task for the last few days has been to make a working alternator. I had 3 crusty cores to start with. Disassembly was pretty frustrating. The pulley was seized pretty bad on the first core. Factory service manual says to use a 3-pronged puller IF NEEDED . Yeah right. The pulley metal is quite soft and even after giving it all I could with MAPP gas, it wouldn't budge. Here's the result and it still hadn't budged on the shaft.

Click to view attachment

In the end, I had to use a ball joint pickle fork on an air chisel to get it off. Amazingly, the case nose suffered only a few small dents where the fork rode.

I'm going to spare many details but this set the stage for the rest of this frustrating project. I wound up swapping the positive diodes and carrier between two stator housings. The carrier on the stator I was going to use was corroded and pitted.

Click to view attachment

That alone didn't warrant swapping diodes but is kind of ugly. The real issue is that the insulation on the diodes had crumbled to dust so the diodes needed to be desoldered to replace the insulation anyway, so might as well swap with a better carrier.

Click to view attachment

I scavenged some high temperature insulation from some old halogen fixtures in the scrap bin. That should work.

Click to view attachment

Luckily, the diodes still tested good after the swap.

All three rotors tested good but one looks sketchy so I set that one aside. Slip rings need replaced on two of the rotors so I started with the rotor with good slip rings, and the one set of good brushes. New bearings went in easy but installing the rotor without wrecking the brushes is a challenge. The factory manual just says, "Pull up carbons before installation and arrest." What the hell does that mean!!!??? I finagled a piece of wire to hold the brushes enough out of the way to get the rotor in, then slid the nose housing on and pressed on the retaining washer to hold the rotor in place. I gave it a spin, nice and smooth but... PHUCK! There was a wobble. The shaft was bent. No doubt from all the BS trying to get that $#@% pulley off. I think it probably isn't bad enough to prevent it from working, but not worth the risk. I could see that thing constantly throwing belts. Since one of the other rotors looks a little weird to me, I gave up on having two working alternators and will settle for one good one, and one almost good one. I semi assembled the extra and tagged it with a description of what is good and what isn't before putting it in storage.

Click to view attachment

Then to add insult, I broke a brush extracting the bent rotor. I decided to order a new set of brushes and new slip ring rather than swap the ring from the bent rotor. Might as well start fresh. After replating all the washers and screws, here are pics of the semi assembled "new" alternator waiting for brushes, slip ring, and rear bearing.

First, the before pic.

Click to view attachment

And the refresh.

Click to view attachment

Click to view attachment

Click to view attachment
bbrock
QUOTE(mepstein @ Jul 6 2019, 08:58 PM) *

Just don't let it scratch or bite you. Rabies shots are (usually) only available at the ER and are expensive.

Cute dog.


That's why the glove. One thing about bats and rabies is that they succumb very quickly to rabies so bats that act healthy rarely have it. This bat was doing normal the normal healthy bat thing of roosting in a warm crevice until I opened the door and ruined it. The stats on rabies in bats are exaggerated because most bats collected for testing are bats found on the ground and obviously sick so the sample is skewed. That said, it is nothing to screw around with and there is no question that bats are a major reservoir although the actual risk to humans is quite low.

I actually looked into getting vaccinated for rabies because of my profession which includes occasionally working with bats. Even my exposure risk is too low to justify it though.
preach
I just replaced my florescents with 16 of those LEDs. HUGE difference.

Great attention to detail as always. smile.gif
Dion
Way to go Brent. Chip away at the stone. Learning a lot from your processes.
Always good. beerchug.gif
Superhawk996
Brent,

To the point of our conversation about metal working and shrinking in particular, here is a picture of a little shrinking bowl I made out of scrap Oak.

My homemade shrinking tines are sitting on top. These are used to "tuck" the material by inserting the sheet metal between the tines and then giving it a sharp twist to "fold" the material into a small triangle shaped teepee formation.

Then use the shrinking bowl to "push" the teepee together and downward.

Works miracles for shrinking metal.

Click to view attachment


bbrock
Operation Alternate Reality Complete.... i hope... blink.gif

Got the new slip rings and brushes to put on the unbent rotor. Removing the slip rings is easy, just a small puller works. I just pulled it up part way and then desoldered the lower rotor winding wire before pulling it the rest of the way.

Click to view attachment

Then I hit a snag when the fiber insulation on the slip ring connecting wires turned to dust. This sleeving is much smaller diameter than the diode sleeving so my salvage stash did me no good. I went all over town on Friday trying to find some high temp fiberglass insulation sleeve. No luck. I had resigned myself to another delay as I waited for another ebay order but a Saturday morning scavenger hunt through my halogen scrap pile again and found exactly what I needed. Rather than try to strip the wires completely and risk doing more damage, I just stripped them back to good insulating and wrapped the joint with some polyimide tape I had on hand. The tape is just to make sure the wires don't ground to the armature before being encapsulated in epoxy.

Click to view attachment

After the new slip ring was replaced and wires soldered on, I needed to secure and encapsulate the wires to the top of the rotor. The factory used insulating varnish which you can buy for about $8 shipped on ebay, but I had this epoxy potting compound left over from the relay board so I decided to use it.

IPB Image

It is rated for a constant service temp up to 284F and intermittent temps up to 347F. If my alternator gets that hot, I have bigger problems than failed glue. The only downside of the potting compound is that it is runny. Something a little more viscous would be better but it just took a little patience to build up a thick enough coat.

Click to view attachment

After assembly, the rotor tested 4.3 ohms resistance between slip rings. Right on spec.

Now time for the brushes. Nothing exciting to report there. Just desolder the old ones and solder in the new. Here's a pic with one old and one new brush installed to show the wear. Still plenty of life left in the old brushes if I hadn't broken the wire on one.

Click to view attachment

Now to figure out how to get the rotor in without trashing those new brushes. If the brushes are worn down enough, you can just leave the brush holder loose and push the brushes back out of the way while the rotor slides in. That's not an option with long new brushes and "Pull up carbons before installation and arrest" still wasn't helping me understand how to proceed for some reason. After fiddle farting around with bad ideas, I finally figured out you can push the brushes in and then grab the braided wires connecting them with a thin needle nose pliers through the plug connector.

This are the wires to grab.

Click to view attachment

Pinch them with needle nose while pushing the brushes all the way into the holder.

Click to view attachment

Now you can easily slide the rotor into the housing without crunching the brushes.

At this point, I had run through all the tests in the factory manual that can be done with a multimeter and the alternator outside the car. All 9 diodes tested good, as did the rotor and stator. It would be nice to test the output before bolting it in but I couldn't find any information about how to do this with an external regulator. I called my FLAPS who said they could do it but didn't sound that confident. I was skeptical but hauled the assembled alternator into the shop. Sure enough, as soon as it went on the bench, the diagnostics said the alternator could only be tested in the car. Oh well. I decided to just bolt it in. In theory, anything that could be bad has been replaced and/or tested good.

I bought a new gasket for the rear cover - some assembly required.
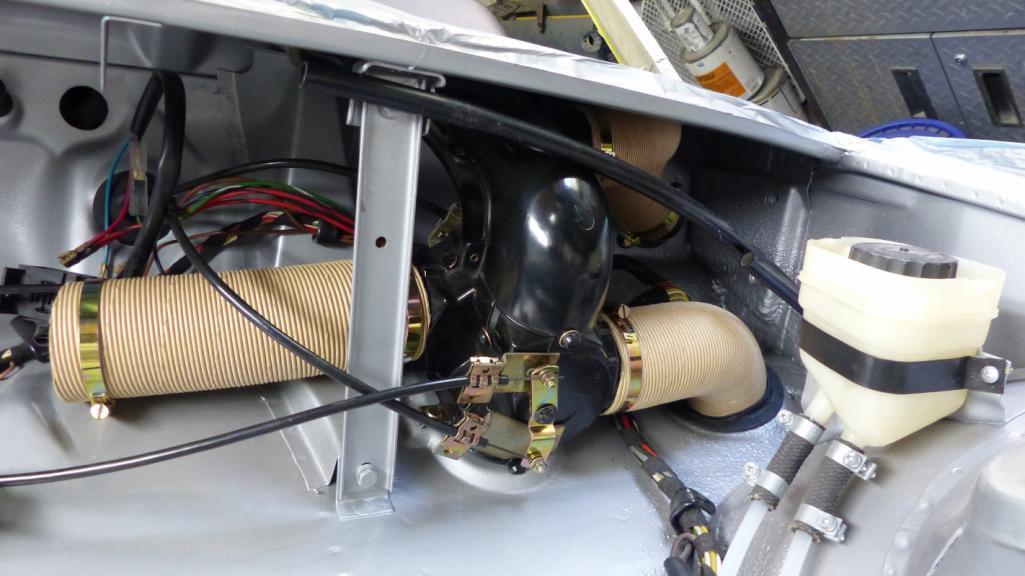
Click to view attachment

Then I connected the harness I made, put the cover on, and bolted it in place. So here she is back home after 35 years.

Click to view attachment

Click to view attachment

I won't lie. This project was not easy, but was it worth it? Absolutely. The best price I've seen for reman Bosch alternators is $167 at NAPA and most suppliers are listing over $200. The grand total that I have in mine to refurbish is $25. For a guy with more time than cash, that's a good deal. Plus, I now know a lot more about how alternators work. beer3.gif
76-914
thumb3d.gif Good job. Rebuilding alternators is easy. Taking them apart is an entirely different animal. If you ever have the opportunity: watch the Bat's leave their nest in Austin or Round Rock Texas some summer evening. It's one of Natures miraculous events that should be seen. beerchug.gif
bbrock
QUOTE(76-914 @ Jul 15 2019, 09:01 AM) *

thumb3d.gif Good job. Rebuilding alternators is easy. Taking them apart is an entirely different animal. If you ever have the opportunity: watch the Bat's leave their nest in Austin or Round Rock Texas some summer evening. It's one of Natures miraculous events that should be seen. beerchug.gif


Thanks and boy is that the truth! Once she is apart and cleaned up, the rest is a piece of cake.

Spent a very nice evening with the wife a few years ago eating dinner while watching the bats emerge from the Congress Avenue bridge in Austin. It was a bucket list item. Check. Next time we are in The Hill Country, we'll make a point to visit Bracken Cave to watch the even bigger show.
bbrock
QUOTE(Superhawk996 @ Jul 13 2019, 05:27 PM) *

Brent,

To the point of our conversation about metal working and shrinking in particular, here is a picture of a little shrinking bowl I made out of scrap Oak.

My homemade shrinking tines are sitting on top. These are used to "tuck" the material by inserting the sheet metal between the tines and then giving it a sharp twist to "fold" the material into a small triangle shaped teepee formation.

Then use the shrinking bowl to "push" the teepee together and downward.

Works miracles for shrinking metal.


Thanks for the pics Phil. I will probably follow up with questions. That project is probably going on hold for a few months while I focus on getting the exterior of the chassis painted.


Received a set of plated rear caliper housings on Saturday. Apparently USPS does not want me shipping calipers though. I shipped 5 calipers (2 fronts from @sixnotfour , 2 rears from @mb911 , and my 1 early rear that I think is still good). Only 4 calipers arrived at PMB... WTF.gif They were double boxed in a large flat rate box, packed tight, and wrapped with fiber reinforced tape. Package was 34 lbs. 14 oz. when weighed at the Bozeman post office. Half the max weight for allowed for a flat rate box. Calipers weigh about 6.5 lbs each so there is little question there were 5 of them in that box but then I got a call from Eric saying only four arrived. Regardless, Eric gave me a generous credit for the calipers so I wound up breaking even after the USPS insurance payment for the other lost caliper and generous donations of cores. I'm going to call it good.

Enough complaining. On with the show. Here's one of the housings ready to receive the pile of parts to make it a caliper again.

Click to view attachment

Assembling calipers is a breeze thanks to @Eric_Shea 's great tutorial vid.

Click to view attachment

Click to view attachment

And on the car almost ready for action. Just need to set vent clearances before putting the wheels back on.

Click to view attachment

Click to view attachment

Should have the fronts before too long and then I get the scary job of getting the car back on the ground.
Eric_Shea
Brent,

Looks like we mistakenly sent you a b-stock nose section. If you don’t mind, I’d like to send you another.
bbrock
QUOTE(Eric_Shea @ Jul 15 2019, 01:23 PM) *

Brent,

Looks like we mistakenly sent you a b-stock nose section. If you don’t mind, I’d like to send you another.


@Eric_Shea I was looking at that earlier but wasn't going to complain smile.gif . That would be great. I'll send this one back. Do you have any use for any of the housings that got too much acid? I'm guessing not but thought I'd check. Going to scrap otherwise.

Thanks for the great service. I really owe you!
bbrock
Finished a small chore for the distributor. I bought a plain Bosch rotor from 914Rubber since my Pertronix has a built-in rev limiter.

Click to view attachment

The Bosch rotors have a 1k ohm resitor inside that will apparently eventually fry if a high output coil like the one I have is used. With my luck, that would occur when I was trying to evade Johnny Law. happy11.gif

Click to view attachment

There is a great how-to to mod the rotor to remove the resistor. You can also buy a modded rotor from aircooled.net but they are too spendy for this CSOB.

Check the tutorial for details. Here's mine after I wallowed it out and soldered a 12g wire in.

Click to view attachment

And now there is 0 ohms resistance.

Click to view attachment

Last step was to refill the cavity with epoxy potting compound.

Click to view attachment

Aside from a couple small nicks on the ceramic from not having quite the right shaped Dremel bit on hand, you'd never know anything had been done to this.

Click to view attachment
bbrock
Hey guys and gals out there in 914land, this next number goes out to @914_7T3

Click to view attachment

Click to view attachment


What's the significance of 61? Well, it's obviously 26 better than 35 lol-2.gif but eight less than the holy grail happy11.gif

Most important... it's legit.

Click to view attachment

bye1.gif
bbrock
QUOTE(burton73 @ Jun 21 2019, 04:11 PM) *

QUOTE(Dion @ Jun 21 2019, 01:01 PM) *

Brent,
I’m loving every minute of this thread.
Sorry bout the snow, we’ve had a month of rain. “Waiting for the sun” cue the Doors.....
That coil set-up. Very slick!
Keep at it.


Doors – Waiting For The Sun Lyrics
At first flash of Eden, we race down to the sea.
Standing there on Freedom's Shore.
Waiting for the Sun (3x)
Can you feel it now that spring has come.
And it's time to live in the scattered sun.
Waiting for the Sun (3x, pause, again slower)
Waiting.... Waiting.... Waiting.... Waiting.... (2x)
Waiting for you to - come along
Waiting for you to - hear my song
Waiting for you to - come along
Waiting for you to - tell me what went wrong
This is the strangest life I've ever known.
Yeah! (Riff 8x)
Can you feel it now that spring has come.
And it's time to live in the scattered sun.
Waiting for the Sun (3x)
Waiting... For... The suuuuun. (Riff 2x)


Speaking of The Doors... I finally got around to cleaning up the doors I got from @914work that @Kelty360 delivered last year. Multiple coats of paint in every color to remove.

Click to view attachment

These doors have had non-stock mirrors on them. Creative mountin on the passenger door to be fixed. Luckily, they didn't mess with the hidden mounting nuts.

Click to view attachment

The drivers door got a set of rawl plugs jammed into the mountin holes. That's right, I said rawl plugs you wankers. biggrin.gif

Click to view attachment

I started with chemical stripper to get most of the paint off.

Click to view attachment

Of course, that revealed a hidden surprise on each door. Looks like they got the old slide hammer treatment to pull a couple creases. That might be typical sloppy body work from the 70s or 80s, but I have to cut them a little slack because that 2-ton crash bar is right behind these blocking access to the back side for a dolly. I'll see what I can do with a shrinking disk and spoon but will probably wind up having to put filler back in.

Click to view attachment

Click to view attachment

Then to media blasting. Only got one door done. Blasting sure is fun... NOT!

Click to view attachment
bbrock
Click to view attachment
Superhawk996
How you car still has these ID numbers on it is beyond me. Here in midwest all I see is rust. dry.gif

Doors are coming along nicely. Keep going!

I sympathize with the blasting is not fun. Been too hot and humid here to even attempt it.
bbrock
QUOTE(rgalla9146 @ Jun 21 2019, 04:53 PM) *

QUOTE(Dave_Darling @ Jun 21 2019, 06:48 PM) *

QUOTE(bbrock @ Jun 21 2019, 08:32 AM) *

I discovered that the front trunk lock was binding when the handle was bolted in place....


Aren't those two fasteners supposed to be Allen-head screws?

--DD


agree.gif I'm with you Dave.


Y'all gonna get off my case now, or do you want to complain about the finish? tongue.gif

Click to view attachment
bigkensteele
QUOTE(bbrock @ Jul 22 2019, 03:57 PM) *

QUOTE(rgalla9146 @ Jun 21 2019, 04:53 PM) *

QUOTE(Dave_Darling @ Jun 21 2019, 06:48 PM) *

QUOTE(bbrock @ Jun 21 2019, 08:32 AM) *

I discovered that the front trunk lock was binding when the handle was bolted in place....


Aren't those two fasteners supposed to be Allen-head screws?

--DD


agree.gif I'm with you Dave.


Y'all gonna get off my case now, or do you want to complain about the finish? tongue.gif

Click to view attachment

According to my very original car, they should be yellow cad... stirthepot.gif poke.gif shades.gif
bbrock
QUOTE(bigkensteele @ Jul 22 2019, 06:25 PM) *

QUOTE(bbrock @ Jul 22 2019, 03:57 PM) *

QUOTE(rgalla9146 @ Jun 21 2019, 04:53 PM) *

QUOTE(Dave_Darling @ Jun 21 2019, 06:48 PM) *

QUOTE(bbrock @ Jun 21 2019, 08:32 AM) *

I discovered that the front trunk lock was binding when the handle was bolted in place....


Aren't those two fasteners supposed to be Allen-head screws?

--DD


agree.gif I'm with you Dave.


Y'all gonna get off my case now, or do you want to complain about the finish? tongue.gif

Click to view attachment

According to my very original car, they should be yellow cad... stirthepot.gif poke.gif shades.gif


Wise guy slap.gif

I will have to fix that though. sunglasses.gif
914_7T3
QUOTE(bbrock @ Jul 21 2019, 09:14 PM) *

Hey guys and gals out there in 914land, this next number goes out to @914_7T3

Click to view attachment

Click to view attachment


What's the significance of 61? Well, it's obviously 26 better than 35 lol-2.gif but eight less than the holy grail happy11.gif

Most important... it's legit.

Click to view attachment

bye1.gif


Damn Baby Yeah!!! blink.gif

Wish I had 26 more...................


Click to view attachment
euro911
I've kind of been out of the loop here ... just brushed up on the last 4 pages of your progress. Looks like you've made a lot of progress since May aktion035.gif

Shan't be long now driving.gif
bbrock
QUOTE(euro911 @ Jul 23 2019, 09:45 AM) *

I've kind of been out of the loop here ... just brushed up on the last 4 pages of your progress. Looks like you've made a lot of progress since May aktion035.gif

Shan't be long now driving.gif


Thanks Mark. I've faced the reality that a test drive this fall is now out of the question. Summer is rapidly slipping away here and new work obligations are competing for time. My "must do" objective now is to get the exterior of the chassis prepped and painted before snow and cold settles back in. If I get that done, I should be able to finish everything else inside the garage over the winter for a maiden voyage next Spring silver914.jpg
David Billo
QUOTE(bbrock @ Jul 15 2019, 01:06 PM) *

...Here's one of the housings ready to receive the pile of parts to make it a caliper again.
Click to view attachment


Wow, your garage furniture is way nicer than mine!
bbrock
QUOTE(David Billo @ Jul 24 2019, 07:59 AM) *

Wow, your garage furniture is way nicer than mine!

laugh.gif Yyyyeah... about that... A couple weeks ago my wife and I were at a dinner party and I head the subject of my car come up on the other side of the room. Then I see my wife whip out her phone and start flipping through pics while everyone laughed. I'm thinking... WTF.gif I didn't know she had taken any pics of the car. I work my way over to see what she's showing and see pic after pic of every time the project had spilled over into the family room. Not one pic of the actual car, only parts scattered around the family room. I said, "What the hell!!!??? You've just been documenting every time I make a mess???" Beaming with pride, her answer was simply, "Yep!" dry.gif

Moving on... These just arrived from our friends at PMB. Two front caliper shells and 2 a-stock rear nose pieces as Eric promised. Not that there is any doubt about what a stand up guy Eric is, but scroll back a few posts to see where he noticed the b-stock noses in the pic I posted. Absolutely stellar commitment to his craft.

Click to view attachment
sixnotfour
QUOTE
laugh.gif Yyyyeah... about that...


how i staged our house sold in wa state....REagent wasn't impressed...
it had alot of working space so I thought it appropriate...

calis look great.. beerchug.gif
bigkensteele
QUOTE(bbrock @ Jul 24 2019, 01:27 PM) *

QUOTE(David Billo @ Jul 24 2019, 07:59 AM) *

Wow, your garage furniture is way nicer than mine!

laugh.gif Yyyyeah... about that... A couple weeks ago my wife and I were at a dinner party and I head the subject of my car come up on the other side of the room. Then I see my wife whip out her phone and start flipping through pics while everyone laughed. I'm thinking... WTF.gif I didn't know she had taken any pics of the car. I work my way over to see what she's showing and see pic after pic of every time the project had spilled over into the family room. Not one pic of the actual car, only parts scattered around the family room. I said, "What the hell!!!??? You've just been documenting every time I make a mess???" Beaming with pride, her answer was simply, "Yep!" dry.gif

LOL! My wife feels similarly about the fact that I have turned part of our nicely finished basement into my upholstery shop. In her defense, these have been down here waaayyyy too long.
Click to view attachment
bbrock
^^^^ That's a pic my wife would take mad.gif

Got the front calipers reassembled and finger tight on the car. Ran into a couple snags over course, because we can't have too many delays getting this tub off the rotisserie.

Somehow I wound up with one short brake pad pin so I'll have to order one. Otherwise, the calipers look real purty wub.gif

Click to view attachment

Even better bolted on the car.

Click to view attachment

Click to view attachment

Then I noticed a problem. Brake line no connecty.

Click to view attachment

I didn't remember seeing banjo fittings there but sure enough, verified they should be there with the PET. Laid awake a little last night wondering where I might have misplaced them. Spent some time early this morning rummaging through boxes with no luck. Finally, I pulled all the old brake lines out of the scrap pile to see if they held any clues. Sure enough, they did.

Click to view attachment

Somebody had performed a banjo delete by just straitening and reforming those lines. I knew those PO receipts for brake work at Midas were going to bite me in the butt. Now I need to track down a pair of banjo fittings for these fronts. huh.gif
sixnotfour
the calipers I sent had the brake line that went directly into the caliper...

#12

https://www.pmbperformance.com/914-brake-lines.html
bbrock
QUOTE(sixnotfour @ Jul 25 2019, 11:00 AM) *

the calipers I sent had the brake line that went directly into the caliper...

#12

https://www.pmbperformance.com/914-brake-lines.html


Well look at that!! Now I know what happened. 73 MY cars can have either early or late hard lines. Based on the pics I sent to PMB of my brake regulator, I needed an early brake line kit. My car appears to be a true bastard step child with its mix of early and late brake components so it looks like I had a mix of hard line components to match. I need to send the b-stock nose pieces to @Eric_Shea anyway so I'll toss these early lines in the box and order the late ones. Thanks for pointing that out! beerchug.gif
sixnotfour
i even took a pic.. line from the cali.
Superhawk996
QUOTE(sixnotfour @ Jul 25 2019, 01:00 PM) *

the calipers I sent had the brake line that went directly into the caliper...

#12

https://www.pmbperformance.com/914-brake-lines.html


Same - 1973 April build per door sticker
bbrock
QUOTE(sixnotfour @ Jul 25 2019, 12:20 PM) *

i even took a pic.. line from the cali.


Thanks for the pic. I'd say if you account for my original being a bit more beat up than that one, they are a pretty good match. At least I'm not losing my mind not remembering those banjo fittings! w00t2.gif
bbrock
Might be overdue for a critter pic. Took these a few minutes ago from our deck.

Click to view attachment

Click to view attachment
bbrock
PMB Performance came through once again! Yesterday, I received a pair of late hard lines to connect my front calipers. Eric didn't even bill me for shipping. Can't say enough about how helpful he's been. smilie_pokal.gif

Click to view attachment

That leaves me one caliper pin short of being able to fill and bleed the system before pulling the car off the rotisserie. The curse of the brakes continues though. While I was installing the final hard lines, Pelican sent an email informing me that the pin I had ordered would have to be ordered direct from Germany with a 20% upcharge over what was frankly an already overpriced item. I cancelled that item and just ordered it from another vendor in the US that claims to have it in stock and for a better price. Just another of what seems to be endless delays this summer.

After being out of town all of last week and having other obligations over the weekend, I'm eager to start making progress on the car again. Body filler should arrive tomorrow so I can start smoothing the little blemishes left from the body work.
sixnotfour
put the pads and one pin ,,start the sometimes horror of bleeding 914 brakes... drunk.gif
bbrock
QUOTE(sixnotfour @ Aug 7 2019, 12:06 PM) *

put the pads and one pin ,,start the sometimes horror of bleeding 914 brakes... drunk.gif


Thanks. I have one correct pin plus the short one in the last caliper and plan to pick up brake fluid next time I'm in town. Figure I'll get enough tubing to hook up all four corners for the "gravity" method and see how far that gets me. While the car is still on the rotisserie, it will be easy to crack lines at the MC and regulator if needed to coax the fluid through. Curious to see how this magic gravity method works on a brand new, bone dry system. chowtime.gif

Oh, it looks like the other pin should be here Friday which is probably my next chance to get brake fluid anyway.
This is a "lo-fi" version of our main content. To view the full version with more information, formatting and images, please click here.
Invision Power Board © 2001-2024 Invision Power Services, Inc.