Status update:
Plumbed and operational -
Click to view attachment
Loose panels sprayed with 3 coats PPG K36 Primer Surfacer. I was happy to see this will contrast well with the gray of the epoxy. It is windy as hell today so having a little trouble with trash (mostly bits of dry grass) blowing under the tent skirt and onto the panels. I'm not too worried about it since everything will be sanded down, but it's a good example of why I need to have things sealed and more sanitary before spraying color.
Click to view attachment
Click to view attachment
A couple better shots of the chassis in epoxy before it rolls into the tent for surfacer. While the loose panels are drying, I'll go over the chassis with glazing putty to clean up any gnats ass blemishes I find. By the time I'm done, I should be able to move the panels into the garage and roll the chassis into the tent for paint. Weather is turning but I think it will hold for a few more hours. Fingers crossed.
Click to view attachment
Click to view attachment
Full Version: Intro from Montana: '73 2.0L rustoration thread
Pages: 1, 2, 3, 4, 5, 6, 7, 8, 9, 10, 11, 12, 13, 14, 15, 16, 17, 18, 19, 20, 21, 22, 23, 24, 25, 26, 27, 28, 29, 30, 31, 32, 33, 34, 35, 36, 37, 38, 39, 40, 41, 42, 43, 44, 45
I had to take my compressor apart to get it where it had to go - Heavy! And I aint getting any stronger. Also, the days of having friends come over to help are waning - they too are getting older.
Amazing thread! Inspirational!
Amazing thread! Inspirational!
QUOTE(ssuperflyoldguy @ Sep 26 2019, 01:17 PM) 
I had to take my compressor apart to get it where it had to go - Heavy! And I aint getting any stronger. Also, the days of having friends come over to help are waning - they too are getting older.
Amazing thread! Inspirational!
Ha! Yeah, I think we both got hernias getting that sucker into place. The one that broke however, was pretty easy to manhandle by myself. That says something about the quality I think.
Okay, another update. I'm not going to lie. There was nothing fun about today at all

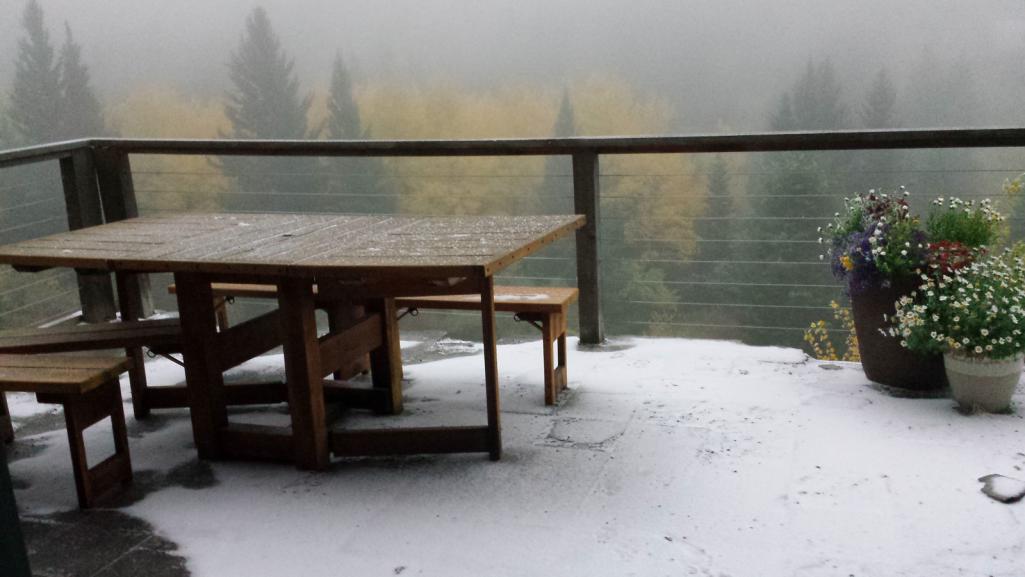
 As of last night, today's forecast was partly sunny and 70s but windy. What I got was 50s and light rain. Obviously the winter storm front is moving in ahead of schedule. This made working in the tent miserable but I went for it anyway. Lot's of cussing. Came close to breaking some shit but managed to control my temper. Whadaya know? I didn't know I could do that.
  In the end, I persevered. Here are the best shots I can get right now. In a couple hours I'll roll it back in the garage.
Click to view attachment
Click to view attachment
It has three coats of primer surfacer. There were some issues but overall, not bad considering the conditions I was spraying in, and that I have never shot this kind of paint before. I got a couple runs on the windshield frame. No biggie since it all gets sanded anyway. Just as I finished laying the first coat, a couple drips of water fell from the tent roof. Most hit masking plastic, but a couple hit paint. After inventing some new words, I blew them dry with air and then re-positioned the car to try to get all the drips on plastic instead of paint. Another piss off is that the Raptor bedliner undercoating is like teflon. That's a good quality in general unless you are trying to stick masking tape to it. At one point, I stepped too close to the car and my shoe caught the masking over the front wheel well and yanked it loose. More new words and wallowing on the wet ground to get it half-assed stuck back so I could finish the job.
Anyway, this part is done. I'm looking forward being able to slow down the pace.
Take a bunch of deep breaths. One thing i found out in Wisconsin is that when winter moves in you are just plain stuck. I tried to get in under the wire with my painting the 3.2 and it didnt turn out as i wanted it to. Looks OK, but when you do it yourself you can always find the flaws. I wish i had held off the final spraying till spring. With no booth though, the bugs will always land where the paint would have been perfect.
I wanted to have color on so i could spend the winter with assembly.
On another note i like the story of the mason who dressed the back side of the stones in addition to the front. When it was pointed out to him that no one would ever know, he replied that God will know. My father told me that story, as he also showed me how to make furniture. I would never have been able to work on 914s if I hadn’t made furniture first.
I can’t tell you how much i have enjoyed your posts. Good luck with the weatherand stay warm.
QUOTE(worn @ Sep 26 2019, 06:15 PM)
Take a bunch of deep breaths. One thing i found out in Wisconsin is that when winter moves in you are just plain stuck. I tried to get in under the wire with my painting the 3.2 and it didnt turn out as i wanted it to. Looks OK, but when you do it yourself you can always find the flaws. I wish i had held off the final spraying till spring. With no booth though, the bugs will always land where the paint would have been perfect.
I wanted to have color on so i could spend the winter with assembly.
On another note i like the story of the mason who dressed the back side of the stones in addition to the front. When it was pointed out to him that no one would ever know, he replied that God will know. My father told me that story, as he also showed me how to make furniture. I would never have been able to work on 914s if I hadn’t made furniture first.
I can’t tell you how much i have enjoyed your posts. Good luck with the weatherand stay warm.
Love the mason story! Sounds like you've been exactly where I am now. The reason I made such a push to get to this point is because 1) we should get at least a couple more nice weather spells in between small snow squalls before winter is here to stay. If I have my ducks in a row, I should yet get a change to spray color under nearly ideal conditions and under a much more relaxed situation 2) at this stage, imperfections can still be fixed. I know spraying today created more mistakes than had I been able to spray yesterday, but I know they won't affect the final product. 3) if I miss my fall window, I won't have acceptable weather again until late June, and like you said, more buggy. And 4) the wife has been very tolerant of this project but patience has limits...
So yeah, I'm tired and pissy and I have some runs and other flaws to clean up, but I've bought myself a chance to get a color coat I will be proud of before the real snows hit. We'll see... She's inside now. I'm going to let it just sit for a week to let the surfacer shrink before doing anything to it. I'll spend that time sealing up the tent i prep for color and hope for the best.
Click to view attachment
Just know, the 914 G-ds will watch over you and it will all work out!

Well this figures. It's been calm, sunny, and in the 60s all day today.  Perfect painting weather. Snow is no longer in the forecast and the winter storm that was predicted seems to have been erased from our future here. Oh well, it was nice to get back to my day job today and not worry about f'ing with this car.
Perfect painting weather. Snow is no longer in the forecast and the winter storm that was predicted seems to have been erased from our future here. Oh well, it was nice to get back to my day job today and not worry about f'ing with this car.
Back to doing fun stuff while I let the high build primer rest. I decided to mount the front trunk lid so it would be in its final shape when I do the final blocking. All of the 914s I've owned had a bit of spring flex to the lid when shut. I assume that is by design. Anyway, I blasted the hinges and installed them and the latch.
Click to view attachment
Then I spent some time shaping the lid to edge match it to the body. Maybe I should have done this earlier, but having everything this uniform light gray color helps to see clearly. My process was to find the low spots and place a rubber block under the outer frame member, then close the lid and press gently down on the high area with an open, flat palm to flex the lid to crown the way I wanted. Then I removed the block and shut the lid again before finishing shaping by pressing gently down on the newly reshaped crown until it was level with the adjacent body panel. This was surprisingly easy to do and worked great.
Click to view attachment
Click to view attachment
I'm really pleased with the alignment. I didn't spend the time to get the gaps absolutely perfect since the hood has to come off again. It is really close though and I'm happy. I know you can't tell squat in these pics but I'll post them anyway.
Click to view attachment
Click to view attachment
The latest forecast still says no snow today but they have put it back in for tomorrow. That leaves me awfully confused about what this stuff outside is though.
Click to view attachment
Click to view attachment
Then I spent some time shaping the lid to edge match it to the body. Maybe I should have done this earlier, but having everything this uniform light gray color helps to see clearly. My process was to find the low spots and place a rubber block under the outer frame member, then close the lid and press gently down on the high area with an open, flat palm to flex the lid to crown the way I wanted. Then I removed the block and shut the lid again before finishing shaping by pressing gently down on the newly reshaped crown until it was level with the adjacent body panel. This was surprisingly easy to do and worked great.
Click to view attachment
Click to view attachment
I'm really pleased with the alignment. I didn't spend the time to get the gaps absolutely perfect since the hood has to come off again. It is really close though and I'm happy. I know you can't tell squat in these pics but I'll post them anyway.
Click to view attachment
Click to view attachment
The latest forecast still says no snow today but they have put it back in for tomorrow. That leaves me awfully confused about what this stuff outside is though.
Click to view attachment
I saw that as much as 4' might be on the way. Crazy.
QUOTE(mepstein @ Sep 28 2019, 02:12 PM)
I saw that as much as 4' might be on the way. Crazy.
Yeah, I think NW and North Central Montana are going to get walloped. We are on the southern fringe of the storm which is why they are having a hard time with the forecast.
Get that snowblower warmed up Brent.
Seriously you are doing a great job with your build.
All on your own.
I had to bankroll some of mine for sure.
You must get a lot satisfaction from doing it all yourself.
Nice flocked glovebox ya got there too.
Seriously you are doing a great job with your build.
All on your own.
I had to bankroll some of mine for sure.
You must get a lot satisfaction from doing it all yourself.
Nice flocked glovebox ya got there too.
 We all know what a flocker Brent is.
 Seriously, the paint prep is looking great. And I'm going to steal your "how to get the lids to fit" trick. Very nice, thanks!
QUOTE(tygaboy @ Sep 28 2019, 05:43 PM)
We all know what a flocker Brent is. Seriously, the paint prep is looking great. And I'm going to steal your "how to get the lids to fit" trick. Very nice, thanks!
Ha Ha
Don't be knocking the flocking. Whenever I show the car to anyone, I make them stick their hand in the glove box and feel how nice it is. Everybody enjoys a good flocking. The flocked glove box is just one of many examples that I have not done this all by myself. The labor may be all mine, but I've had a LOT of help from you all in many ways. Scratch that. The labor is NOT all mine. Somebody did a fantastic job vapor blasting my carbs @mepstein
QUOTE(bbrock @ Sep 28 2019, 10:44 PM)
QUOTE(tygaboy @ Sep 28 2019, 05:43 PM)
We all know what a flocker Brent is. Seriously, the paint prep is looking great. And I'm going to steal your "how to get the lids to fit" trick. Very nice, thanks!
Ha Ha
Don't be knocking the flocking. Whenever I show the car to anyone, I make them stick their hand in the glove box and feel how nice it is. Everybody enjoys a good flocking. The flocked glove box is just one of many examples that I have not done this all by myself. The labor may be all mine, but I've had a LOT of help from you all in many ways. Scratch that. The labor is NOT all mine. Somebody did a fantastic job vapor blasting my carbs @mepstein
Thanks. I have a limited skill set so happy to help when I can.
Hang in there on the weather. Could just as well be in the 60's two weeks from now. 
QUOTE(Superhawk996 @ Sep 29 2019, 05:39 AM)
Hang in there on the weather. Could just as well be in the 60's two weeks from now.
Thanks, I'm counting on it. Could easily be in the 70s in two weeks. As you know, this snow is pretty normal this time of year but doesn't mean winter is here yet. I went back and checked the blog. Last year I sprayed undercoat on Oct. 21 and color on the interior on Nov. 15. Getting another weather window or two is quite likely. Having my
 together to be able to take advantage of it is the challenge.
Here's a pic from Sept. 28 of last year. Nothing new here.
Just be glad a big storm doesn't suddenly come in and gets you stranded in town for the evening ... and your wife calls you to say she'll be getting 8 inches tonight 
Well, another example of the help I've gotten on this project. Was surprised to find this waiting in my mailbox yesterday.
Click to view attachment
Many thanks @914_7T3 and @Superhawk996 ! You know how I love stickers. I owe you again!
Click to view attachment
Many thanks @914_7T3 and @Superhawk996 ! You know how I love stickers. I owe you again!
Very cool!
How much snow did you get?
How much snow did you get?
QUOTE(preach @ Oct 1 2019, 02:56 PM)
Very cool!
How much snow did you get?
About six inches. Mark was being generous with his estimate

QUOTE(bbrock @ Oct 1 2019, 10:57 AM)
Well, another example of the help I've gotten on this project. Was surprised to find this waiting in my mailbox yesterday.
Click to view attachment
Many thanks @914_7T3 and @Superhawk996 ! You know how I love stickers. I owe you again!
Glad you like them. There will be another version of the expansion tank decal on its way to you with the correct yellow background. They ended up printing this one on gold foil (similar to the ones in a 911 engine bay) instead.
QUOTE(914_7T3 @ Oct 1 2019, 06:45 PM)
QUOTE(bbrock @ Oct 1 2019, 10:57 AM)
Well, another example of the help I've gotten on this project. Was surprised to find this waiting in my mailbox yesterday.
Click to view attachment
Many thanks @914_7T3 and @Superhawk996 ! You know how I love stickers. I owe you again!
Glad you like them. There will be another version of the expansion tank decal on its way to you with the correct yellow background. They ended up printing this one on gold foil (similar to the ones in a 911 engine bay) instead.
And thanks again! I wondered about the expansion tank decal. I thought maybe they had used a couple versions. It all makes sense now.
Not get some color on there would ya'. 
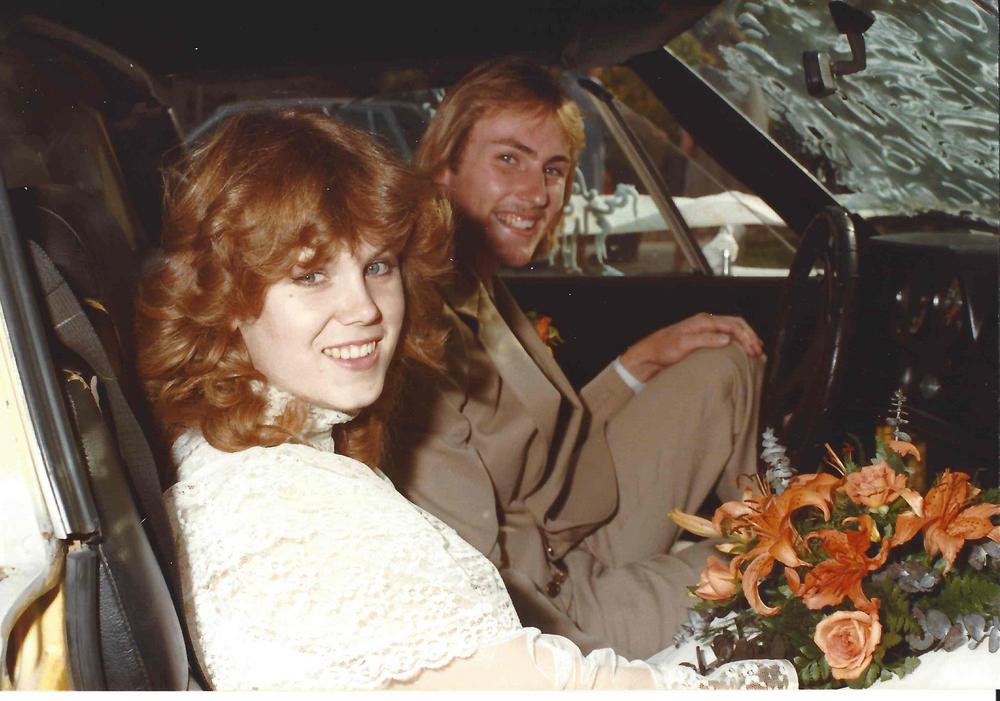
These pics were taken exactly 35 years ago today. That idiot has no idea how lucky he is...

Happy Anniversary Brent!!!
Congratulations! Maybe a ride in a 914 again for your 36th. Wouldn't that be something?
Happy Anniversary Brent.
Hmmm wonder if it would have been cheaper to restore that T-bird in the background
Hmmm wonder if it would have been cheaper to restore that T-bird in the background
Thanks all. Just got home from a nice dinner with the wife. I can't remember whose T-bird that is. Might have been my uncles. The Plymouth pickup was the best man's car which always cracks me up. His first car was a LeMans. That was the first car I experiences 100+ mph in and thought I was going to die. He sold that for a sweet 69 Firebird. That was the first car I experienced WELL over 100 mph in. Then he went for that pickup and drove it for many years.  That truck hauled the left fender of the trailer trash Porsche in the pic from the junk yard after I wrecked it the first time. On this day, our cousin had safely hidden Elizabeth's much nicer 914 for us that day so it didn't the 'just married' treatment. A couple months later, I bought the car I'm restoring now and sold this one for parts after swiping the engine. That engine wound up in a VW bus we bought a couple years later. The very bus and engine in the story posted back on page 51. Oh to be young and poor again...
That truck hauled the left fender of the trailer trash Porsche in the pic from the junk yard after I wrecked it the first time. On this day, our cousin had safely hidden Elizabeth's much nicer 914 for us that day so it didn't the 'just married' treatment. A couple months later, I bought the car I'm restoring now and sold this one for parts after swiping the engine. That engine wound up in a VW bus we bought a couple years later. The very bus and engine in the story posted back on page 51. Oh to be young and poor again...


Ad Astra per Aspera
That's the motto of my home state of Kansas and aptly describes the last month of this project. It translates to: To the stars through hardship If I detail everything that has gone wrong, it would fill a book so I'll stick to the highlights.
Winter came early and we have had cold and snow all through October, including a series of record breaking low temps. Our thermometer read 16 below zero at one point, flanked by sub zero temps in days before and after. Let's just say, the weather window for painting in the tent closed a good month early this year.
Click to view attachment
The problems that mothballing the car project for possibly nine months before good weather returns are unacceptable, so I started looking for a way to paint in the garage. There were three large obstacles to this: Space, dirt, and not being able to park the DD in the garage during a period of monumentally shitty weather.
The space issue needed to be tackled first. When we designed our house, we made the garage as small as possible with the intention of building a larger detached garage later and converting the current garage to living space. We have a timbe frame house, and the timbers in the garage eliminate a total of 13 feet of free span space. After a bit of measuring, it looked like could position the car diagonally across both car bays and have about 30" of clearance at four pinch points. Not ideal, but it might just work. I moved a bunch of shit around, re-positioned the car, and staged panels that would be sprayed off the car to test. Not great, but might just work. The worst would be spraying the interiors of panels off the car. Once that was done, they would be fitted to the chassis which would make things more workable. This shows just how tight and cluttered the shop was.
Click to view attachment
Then I pushed the car through the snow out to the tent to give the shop a thorough cleaning. This garage has been a woodworking shop for 15 years, then a welding shop, then a bodwork work shop, plus contains the mechanicals for the house. It had every kind of dust and dirt imaginable, up to a quarter inch deep in some places. Best of all, a giant wood rack hanging from the ceiling to make the perfect dirt disperser for painting.
Click to view attachment
Everything got vacuumed, blown with compressed air, hosed and scrubbed. That took two days. Then the floor was covered with plastic tarps and plastic sheeting was hung to try to create a clean space.
Click to view attachment
Click to view attachment
Click to view attachment
Space was tight, but finally ready to paint panel interiors, door jambs, thresholds, and deck seal gutters on Saturday. It was not without incident. I got some trash in the front deck that had to be sanded out and resprayed on Sunday.
Click to view attachment
As I was laying the last coat of clear on one of the thresholds, my elbow hit one of the workstand legs a door was on and knocked the gun forward causing a run.
Click to view attachment
Click to view attachment
That one will be hidden but I'll fix it anyway. I got a couple of other runs on the jambs just because I'm stupid. Those will also get fixed. Overall, I was happy with the result but I guess I didn't take any pics.
Shit Show
From Sunday on has been one frustration after another. I won't go into details but I finally got the car prepped for the main event Monday evening and I took the day off yesterday for the big finale. It did not go well. Started right off the bat with a chunk of crap landing in the sealer coat in the middle of the trunk lid. My attempt to quickly pick it out made things worse so I had to wait for the sealer to harden enough to stand the crap out and respray before moving on. At about 6 pm, I was ready for base coat. I was slowed down by a few dirt nibs that I had to sand off between coats. The worst was that the tight space makes hose control a real challenge. Despite trying to be as careful as possible, I wound up with two touches that had to be fixed. Finally, by 9pm I had 3 coats of L96D laid down nicely with no mottling or tiger striping. I few flecks of shit here and there, but nothing major, and not bad considering the conditions I was working under. There is a 24 hour recoat window for this paint so I decided to call it a night and spray clear this morning. Of course I forgot to take a pic.
After inspecting yesterday's work this morning, I decided to do a little touch up on the engine lid. There were a couple spots where the primer didn't get sanded perfectly flat and were telegraphing through the base. I sanded those down with 800 grit and resprayed with base. Not too hard but time consuming.
Okay, now time for clear coat. There were some issues here too, but I worked through them. The worse was a bug that plopped down on the hood. I was half way through my third wet coat and into the home stretch very happy with how things were looking. So happy, I was thinking I might even skip cut and buff and leave the little bit of orange peel as more faithful to the original finish. Moving up to the last coat on the front, I made the last pass spraying under the windshield frame when I heard a pop and then saw about a quarter pot of clear coat splash down on the hood and over the front left fender. It took a half second to realize what had happened.
The fucking lid had popped off the sprayer pot! Those plastic friction fit lids were the one thing that looked like trouble to me on these Finishline guns from the get go, but had not given me a lick of trouble on all the primer and base spraying I have down. The difference is that the clear coat is really slimy compared to the other coatings. In my shock, I just walked around muttering "ruined.... ruined." Then I grabbed an unused plastic body filler applicator and lightly squeegied off some of the clear coat. That was probably a mistake but I don't think made it worse. Next I laid on more clear coat really thick to get the puddle to flow as much as possible. That actually helped a lot. The plan is to let it hardened and then wet sand it down smooth. Then I'll decide whether to respray or just polish. I'm thinking I'll start with 800 grit and work down but open to suggestions.
After that chaos, I had lost my wet line and focus but I completed the spray. I wound up with some dry overspray in a couple spots so the whole car will get cut and polish. That all happened a couple hours ago so I'm still recouperatig. Here are a few quick pics of where it is now. I'll try to get better pics later. Part of the car looks great. The other part, not so much. I think it's going to look pretty fantastic though. I just caused a LOT more work for myself than I had hoped.
Click to view attachment
Click to view attachment
Click to view attachment
And the disaster zone:
Click to view attachment
Click to view attachment
It looks really good to me, Brent. And, on the upside, now you get to master the technique (and teach us at the same time) of removing runs from clearcoat.
QUOTE(doug_b_928 @ Nov 6 2019, 03:32 PM)
It looks really good to me, Brent. And, on the upside, now you get to master the technique (and teach us at the same time) of removing runs from clearcoat.
@doug_b_928
Thanks Doug. The pictures don't do justice though. It really looks horrible. Exactly how you would expect it to look if you spilled a whole bunch of clear coat. Alternatively, image an elephant with a really bad cold sneezing on a corner of the car. It's a damn mess but should sand out I think.
BTW, before thing started going upside down weeks ago, I was going to post some details on block sanding the surfacer. It turns out that I did have two high spots that needed to be knocked down a little before they would block out properly. You asked about that in the other thread and I said I didn't think they needed to be tapped down, but they did. Just very gentile taps with the body hammer followed by another coat or two of surfacer and they blocked out fine.
Forgive me if now isn't the best time to try and lighten your mood but I laughed out loud when I read "I just caused a LOT more work for myself than I had hoped."
Trust me, I get it. These sorts of mishaps make me see red, big time ... BUT:
Don't forget the absolutely enormous amount of work you've ALREADY DONE. The amount needed to fix this is a rounding error!
You are so close and you've done such a great job. Stand tall, be proud, stiff upper lip and all that.
Remember, there's a reason for everything and this latest episode is going to add that much more interest to the story of your car's resurrection.
And by the way, I think the paint looks killer!
Trust me, I get it. These sorts of mishaps make me see red, big time
... BUT:Don't forget the absolutely enormous amount of work you've ALREADY DONE. The amount needed to fix this is a rounding error!
You are so close and you've done such a great job. Stand tall, be proud, stiff upper lip and all that.
Remember, there's a reason for everything and this latest episode is going to add that much more interest to the story of your car's resurrection.
And by the way, I think the paint looks killer!
QUOTE(tygaboy @ Nov 6 2019, 03:48 PM)
Forgive me if now isn't the best time to try and lighten your mood but I laughed out loud when I read "I just caused a LOT more work for myself than I had hoped."
Trust me, I get it. These sorts of mishaps make me see red, big time
... BUT:Don't forget the absolutely enormous amount of work you've ALREADY DONE. The amount needed to fix this is a rounding error!
You are so close and you've done such a great job. Stand tall, be proud, stiff upper lip and all that.
Remember, there's a reason for everything and this latest episode is going to add that much more interest to the story of your car's resurrection.
And by the way, I think the paint looks killer!
Laugh all you want. I don't mind. Had I messed up the base coat, I'd be really pissed. Clear coat can be fixed with sandpaper, polish, and time. I'm a bit annoyed at that shitty pot lid design. Devilbiss should know better.
Worst part is that it may mean more nights of the wife parking her car outside. She was not happy this morning when there was 1/8" of ice coating the whole car. I'm thinking as soon as the paint is hard enough to move the car, I'll get it back on its side of the garage so she can pull hers inside tonight.
Runs and mess ups as described happy to the best painters. The proof of quality is how well you can hide the mistakes.. If your past work hasn't already spoken for itself you will surely solve a few runs.. And yes I got 1 spot on my paint job this weekend that sagged a bit..
It will look fantastic
It will look fantastic
You see the drips and the extra work but I see really straight body panels and nice even panel gaps. And the silver looks great! But I totally get your frustration. One of the many reasons I don't paint anymore.
As far as your wife having to park outside - the lady of the house here has gotten used to that. I keep the peace by doing all of the snow removal and ice scraping on her car as needed. Small price to pay for a garage stall...
As far as your wife having to park outside - the lady of the house here has gotten used to that. I keep the peace by doing all of the snow removal and ice scraping on her car as needed. Small price to pay for a garage stall...
Take a deep breath. You will persevere.
It will be fine when you finish. You have the skill, patience and talent to pull this off.
Now get to work!
It will be fine when you finish. You have the skill, patience and talent to pull this off.
Now get to work!
Brent, man....  yes you had a “spot” of trouble, but ....
You can certainly be so proud of your accomplishments! That paint is looking great in the pics. Obviously you will be your worse critic. That only proves what a perfectionist you are. Home stretch my friend. It’s so close.
I’d be so pissed as well. I think, by you sharing this shit
gets out some frustration. I hope it does at least.
We learned al lot from your endeavor and continue to do so.
I hope ya catch a break in Montana’s weather soon.
Keep at it!!!! & Get those sanding blocks ready!
yes you had a “spot” of trouble, but ....You can certainly be so proud of your accomplishments! That paint is looking great in the pics. Obviously you will be your worse critic. That only proves what a perfectionist you are. Home stretch my friend. It’s so close.
I’d be so pissed as well. I think, by you sharing this shit
gets out some frustration. I hope it does at least.
We learned al lot from your endeavor and continue to do so.
I hope ya catch a break in Montana’s weather soon.
Keep at it!!!! & Get those sanding blocks ready!
Thanks all. I'm not happy about the spill, but not that upset either. It can be fixed without having to buy more of the expensive base coat. Just to be clear though,(okay, let's make that a pun) this wasn't a small splash of paint. The spray pot was turned sideways to spray the underside of the windshield frame when the lid popped off. I'd estimate about 4-6 ounces of paint landed on the hood and splashed across the car. It splashed all the way to the opposite fender. What I have learned is that the camera will make the tiniest little welding flaw look like a disaster, and the most disastrous paint spill look like a few little runs.
I spent about an hour wet sanding with 800 grit and I think this pic shows better what I'm up against.
Click to view attachment
The dull area is about 90% of the area of splashes, sags, and runs but there are big dollops of clear coat spread right across the deck lid and even a couple on the right fender. The sags on the left fender are almost continuous from the door almost to the turn signal opening. There is also a run down the front of the left door but that won't be much of a problem.
In hind sight, my instinct to try to squeegee excess clear off was a bad one, but my second instinct to lay more paint on as thick as I could was a good one. My attempt to squeegee lifted a little bit of pigment and flake from the base coat into the clear. It is only in two small spots and I was able to sand the clear down thin enough that the flaws have all but disappeared. Laying the clear down thick both allow a lot of the splash to flow out and left me with a lot of material to sand to flatten the surface without getting too close to the base. I think 800 grit was the right starting place get the surface flat. Given the extent of the damage, I'm thinking it might be best to sand the whole hood and left fender flat with 800 and then reshoot those panels with clear. The rest of the flaws are more in the realm of normal sags to fix. Still open to suggestions but this seems like it will work.
On a more positive note - I'm also quite pleased with the body work. There are two spots I was never quite happy with but I'm not telling where they are. Even I have to squint and chase the light around to see them so I doubt anyone will ever notice.
Brent Dude....you always make my day shine when you post your adventures here.
I can tell you....I would never try to paint a car myself, so you're way ahead of me.
Your ability to spell out all the gory details is extraordinary.
You've got the "chops" so I know you'll get this all figured out in the end.
I piddle around in the garage doing this and that, but nothing of the stature of what you seem to take on and accomplish.
So keep your chin up.
I've already had a couple of beers in your honor tonight.
Man...and are you cold there or what?
Here in the PNW, we are unseasonably warm and dry.
Never seen anything like it.
The moles are going crazy right now due to the temperate weather.
My back yard looks like the Wind River Range in Wyoming. It's wild!
Take care buddy and hang in there.
You're going to have so much fun assembling the car over the winter that you'll forget about the trauma of getting color on before Thanksgiving. Congratulations, it's looking awesome!
yes og peel would have been cool....ive seen the tv pro clear jobs peeled as shit...dont feel bad ..the last step is always the most painful/satisfying..
I think the silver looks really good and glad its a correctable situation.

Like you said, made more work for yourself, but you'll power through the frustration. Don't let it detract from the milestone of getting color layed down. Keep moving forward.
Also not going to tell you to embrace the process as two years later I still have no idea what that means...
Like you said, made more work for yourself, but you'll power through the frustration. Don't let it detract from the milestone of getting color layed down. Keep moving forward.
Also not going to tell you to embrace the process as two years later I still have no idea what that means...
This is turning out fantastic, sorry to hear about the mishap with the drippage, the rest looks great!
I've seen my painter buddy use a small razor blade plane to shave down runs, says its better than trying to sand them out.
QUOTE(rudedude @ Nov 8 2019, 11:59 AM)
I've seen my painter buddy use a small razor blade plane to shave down runs, says its better than trying to sand them out.
Thanks. I watched several videos demoing that technique and it's what I'll use for the couple normal runs I have plus a few dirt nibs. The paint pot spill is WAY beyond shaving with razors though. I just don't think it can be appreciated from the pics. Anyone who say or felt it in person would say "Holy fuchs batman. What a mess!"
I've made good progress though and need to make a decision. Will post an update very soon.
I just got home from the paint shop to pick up another quart of clear just to be safe. I may not need it but rather to have it and not need it than find myself just a little short in the middle of the respray.
Spent some time last night and a little before work this morning erasing the catastrophe. It isn't really that hard. It's mostly like sanding out really expensive surfacer. I have most of it back to a flat surface. I don't know if you can tell in the pic, but about 3/4 of the lid was covered with splatter and lumpy goo and pretty much all of the fender. Another hour or two with the 800 should finish it up.
Click to view attachment
Click to view attachment
I definitely want to shoot another coat of clear on the fender to restore the film depth, but truth be told, I could probably just continue sanding the lid and cowl to 2000 and buff. However.... there are some flaws on the lid and cowl that are going to haunt me. I'll follow up with another post, but there are three places where flakes of sealer blew onto the base coat just as the first coat of clear was going down. Depending on the angle, they can be seen from a few feet from the car. Not good. Here are the worst two of those with a bit of water sprayed on so you can see:
Click to view attachment
Click to view attachment
In addition, there are two spots I created a mess with my dumb squeegee attempt. They are two lines where I lifted a tiny bit of base into the clear. Being metallic, these really catch the light from certain angles and disappear from others. I can probably make those disappear by sanding most of the clear off but then I'd have uneven thickness.
Click to view attachment
Click to view attachment
Now I'm thinking maybe I should sand the frunk lid and cowl down more aggressively and respray with base. I have plenty of base left to do the job. Then follow with 3 wet coats on the lid and cowl and 1-2 coats on the fender. The tech sheet says 2 wet coats but I'm doing 3 to leave extra for cut and buff. The tech sheet does not specifically list PPG clear coats as a suitable substrate for the DBC base, but it says it can be sprayed over "cleaned and sanded OEM finishes" so I think I'm good there. Any thoughts about that plan?
I'll part with a happier shot of the rear deck lid. More dust nibs to repair than I would like but nothing that screams, "hey dumbass, you left a piece of shit in your paint."
Click to view attachment
Brent - that trunk shot looks AWESOME! Stand proud, young man.
QUOTE(tygaboy @ Nov 8 2019, 04:39 PM)
Brent - that trunk shot looks AWESOME! Stand proud, young man.
I just noticed you can see the reflection of my biggest fan in that shot.
This is a "lo-fi" version of our main content. To view the full version with more information, formatting and images, please click here.