Help - Search - Members - Calendar
Full Version: Intro from Montana: '73 2.0L rustoration thread
914World.com > The 914 Forums > 914World Garage
Pages: 1, 2, 3, 4, 5, 6, 7, 8, 9, 10, 11, 12, 13, 14, 15, 16, 17, 18, 19, 20, 21, 22, 23, 24, 25, 26, 27, 28, 29, 30, 31, 32, 33, 34, 35, 36, 37, 38, 39, 40, 41, 42, 43, 44, 45
Superhawk996
Brent you’ve set a high bar by working with silver metallic. It is notoriously hard to do spot fixes and blending on metallics and even more so on silver.

If you want perfection you likely need to take it back and respray the base coat. However from what I can see in the photos I’d leave it. Given that you’re on a dirt road the first stone chip will cause more grief and trauma if you achieve perfection. If you already have a flaw or two, you’ll feel much more at ease actually driving it. smile.gif

And wasn’t the goal really to drive and enjoy it? Just food for thought.

You’ve made great progress in saving a bad situation. That alone is a reason to stand tall!

Keep at it! cheer.gif
bbrock
QUOTE(Superhawk996 @ Nov 8 2019, 06:23 PM) *

Brent you’ve set a high bar by working with silver metallic. It is notoriously hard to do spot fixes and blending on metallics and even more so on silver.

If you want perfection you likely need to take it back and respray the base coat. However from what I can see in the photos I’d leave it. Given that you’re on a dirt road the first stone chip will cause more grief and trauma if you achieve perfection. If you already have a flaw or two, you’ll feel much more at ease actually driving it. smile.gif

And wasn’t the goal really to drive and enjoy it? Just food for thought.

You’ve made great progress in saving a bad situation. That alone is a reason to stand tall!

Keep at it! cheer.gif


Ha! Don't worry, perfection is not an option. It's hard to photograph but those flecks really are distracting. Worse than a stone chip will look. There are a few somewhat similar flecks on the car, that don't bother me. The hood is kind of the focal point of the car though and those flaws really scream at you.


Surprisingly, I'm not too worried about matching the silver. First, this wouldn't be quite a "spot fix" but a respray of two panels. But here's the thing, spraying that stuff was actually quite easy. Maybe it was because I spent so much time watching Youtubes of spraying silver and knew what to avoid. The first coat goes on mottled and tiger striped, but by the second coat, everything looks nice and even. A third coat to make sure nothing is missed and two drop coats to finish the job. In the course of painting this, I sprayed the engine lid, headlight covers, and blinders off the car. They are a dead match to the other paint. I also made about a dozen spot repairs during the course of laying base coat. The worst were two hose touches that wiped the base off down to the sealer, and one attempt to pick a piece of trash out that went bad and required sanding back a six inch diameter area to smooth things out and spotting in the base. After dusting over the repairs the last time, I defy anyone to find where those repairs were made. I actually regret not being a bit more bold about making repairs before spraying clear. Upshot is, after all the worry and hand ringing of not being able to lay the silver consistently, it turned out not to be much of a problem This DBC was way easier to spray than the cheaper Omni single stage.

There's more than a good chance I'll be breaking out the silver tomorrow. beerchug.gif
sixnotfour
there is always the SEMA option ... blink.gif
PCA7GGR
Hand woven Persian rugs are always made with a flaw. Making it perfect would be an affront to Allah - ;>)
bbrock
Click to view attachment

Click to view attachment

Click to view attachment

Click to view attachment

Click to view attachment

The hood is just resting on a new 914Rubber seal without hinges or latch. That's why it looks misaligned.

Spent Saturday finishing the sanding, then cleaning, masking and prepping. I reshot the hood, cowl, and windshield frame with silver base followed by one wet coat of clear. Then I unmasked the left fender and shot two more wet coats. I did it that way because there was still a good amount of clear left on the fender after sanding, so I guessed it was about one coat's worth and made up the difference. I'm not sure these are in focus, but here's a couple shots after reshooting base before the clear went on.

Click to view attachment

Click to view attachment

I know the flaws in the paint looked kind of minor in the pics, but trust me, they weren't. You could easily tell it was an amateur paint job from 10 feet away because of all the trash on the hood and cowl. I'll follow up with more about that, but I didn't spend the last two and a half years putting the body back together to settle for a half-assed paint job. There's no chance that Allah will be offended, but I'm MUCH happier now. I'm actually glad I spilled the paint because it force me to fix what would have been a very disappointing paint job. I still have some spots that got dry overspray in the chaos following the spill, and there are plenty of dust nibs. Yesterday I ordered this kit to correct those issues.

IPB Image

Superhawk996
Well done! pray.gif That looks great.
doug_b_928
It looks incredible...well done!
defianty
Looks great Brent!
Dion
Fantastic!
BeatNavy
QUOTE(bbrock @ Nov 11 2019, 08:46 PM) *

I didn't spend the last two and a half years putting the body back together to settle for a half-assed paint job.

Brent, this has been and continues to be an epic thread (complete with wildlife!). Congratulations for making it to this point -- what a job smilie_pokal.gif
altitude411
cheer.gif Absolutely fantastic job man! Way to stick with it. It looks bad ass and after a cut and buff you may hear thunder.... blink.gif
You should be very proud Mr. Brent. I hope to see you cruising southwest Montana this summer. Enjoy the fun part of the build and thanks for your time on this thread. beerchug.gif
bbrock
Thanks for the compliments everyone. It really means a lot. The wife approved too. After seeing the paint, she started talking about how fun these cars are to drive. Quite a departure from the ridicule or quiet suffering of this project.

I was asked to share some details on the paint correction (a.k.a. fiasco recovery). I've also had a couple people mention they follow this thread for guidance on their own builds. Seems crazy but maybe most valuable as a guide of what not to do. So here are just a few details on the correction and then a couple other lessons learned the hard way.

There's not that much to say about the correction. I simply wet sanded all the pools, runs, and slobber off using a durablock. I started with 800 grit which seemed like a good grit for bringing the surface flat again. If I were going to just sand and then cut and buff, I would have stopped when there were just shallow low spots left and switched to 1500 grit and progress to 3000 before buffing. In reality, I probably could have just sanded and buffed my way out of my mess, but there were other problems with the paint to correct.

Once I decided I would respray base on the hood and cowl, I switched to 600 grit to speed up the job of flattening the surface. At that point, I wasn't worried about going through the clear as long as I didn't sand through the primer. I did sand through the clear in a couple places but have to say it took a LOT of sanding to get there. Pretty much had to do it on purpose. 600 grit was fine enough for respraying base so I left it at that. On the fender, I stuck with 800 grit since I was only going to respray clear there. Again, that was fine enough so I didn't do anything more than flatten out the runs and sags from the spill, and scuff the whole surface of the panel.

I only did one thing special during the respray. I masked off the whole car, including the left fender that would get clear. I sprayed base and one coat of clear on the hood and cowl (including windshield frame). Oh yeah, I also taped the f-ing lid on the sprayer cup this time wacko.gif After the coat of clear, I pulled the masking off the fender and shot two more coats of clear on all the panels. I just guessed that I had left about 1 full coat of clear on most of the fender, so shooting one less coat there would give me about 3 full wet coats on everything. PPG says to spray 2 coats but since I planned to cut and buff, I sprayed an extra for sanding.

That's pretty much it on the correction. Just a lot of work but nothing fancy.

A couple other tips:

Beware of this masking plastic. I loved it for fast masking and it worked great for primer, but sealer and base coat did not stick to it at all. That blew paint flakes all over the shop and a lot of them wound up in the paint. I was able to deal with it mostly but there are a few flecks here and there that aren't too noticeable. If I do this again, this shit will be banned for the final spray.

IPB Image

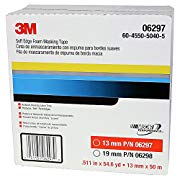
And another 3M product that pissed me off. I f-ing hate this foam tape. I think I just bought the wrong stuff for what I was doing but it was nothing but an expensive PITA. The adhesive is very weak so I would spend hours masking and sealing all my door and deck lid gaps only to find the tape had fallen off an hour later. I even had a piece lying on a horizontal surface that unglued itself overnight and rolled away. I have nothing good to say about this crap. Like I said, I probably just bought the wrong stuff. There are lots of different foam tapes available.

IPB Image

Last tip specific to spraying metallic. It is imperative to have the right vibrations in the air for the flakes to lay properly. You need to play period correct tunes and play them loud. For my 73, I went with tunes from the late 60s through 73 which includes some of the best damn music ever created. And no Bee Gees dammit. Don't be a dick. These aren't disco cars. Disco sucks. A few sentimental pop hits are okay between coats, but you want good classic rock buzzing those flakes into place. Here's a small sample of what was in the air when I sprayed my car.

Click to view attachment Click to view attachmentClick to view attachmentClick to view attachment
bbrock
Okay, back to business. After the paint, I was eager to clear all the crap piled up in the family room out so that dictated what I did next which was to put the dash and seats in the car. Yes, the seats will come out again to install carpet, but at least they are out of the way for now.

Click to view attachment

I also loose fit the carpet but no pic yet. I did glue one piece down up front though.

Click to view attachment

Next was the wiper rack.

Click to view attachment

I painted and installed the headlight mechanisms complete with the correct zip tie.

Click to view attachment

Click to view attachment

I should have spent the weekend color sanding the body but just wasn't in the mood. Instead, I worked on wiring. Got the lower dash wiring done yesterday without much issue. Today, I figured I'd quickly wire up the instruments and maybe glue in carpet. Nope. Wiring instruments took a lot longer than expected. I'm pretty good at reading wiring diagrams but the factory diagrams are a little cryptic when it comes to the instruments. Also, here's a couple tips. Wire the instruments BEFORE installing the steering column if you can. It gives more room to work. I'm stupid, so did it the other way. Also, completely remove the background light harness. Then attach all the instrument wires. Then wire the background lights at the end. That keeps you from getting things tangled up and makes it easier to know which bulbs to put where so everything reaches. No, I was not smart enough to do it that way the first time.

Biggest problem I ran into is that the 914Rubber instrument grommets simply did not work. The silicone rubber is too soft and the fit is too loose. Two of my guages simply fell out from gravity and would not stay in. The speedo barely stayed in but as soon as I hooked up the speedo cable, it popped out. I wound up chipping the paint on two instrument bezels swapping back to my original grommets. My originals are a little ragged, but not noticeable when installed. Most important, they hold the gauges firmly in place. Luckily, I did not crimp my instrument bezels down after replacing the lenses so they won't be too hard to pull off to repaint.

Other problems were a couple space connectors that were brittle and got missed during the harness resto. A little awkward crimping in new ones with the harness partially installed. I also am missing one instrument bulb holder and a connector fell off another during install. I'll have to order replacements.

With all the wiring done, it was time to have some fun. I don't have a battery yet, but I have this.

Click to view attachment

And that led to this.

Click to view attachment

I also tested the wipers and discovered I have a bad switch. I had bench tested the motor and knew it was good, but when I tested, I was getting intermittent at the intermittent and off positions. Slow speed where it should have been, and off with the switch in high position. I rewired the motor to by-pass the intermittent relay to rule out a problem there and found off and slow worked fine, but no high speed. Pulled the switch and discovered the high speed contact was broken out of its mooring and not making contact.

Click to view attachment

I spent a lot of time fixing this, and I managed to get it working properly, but the switch is in really bad shape and putting it back together will requires a weirdly shaped rivet or suitable substitute. I think I'm going to call it a loss and try to source another one.

Finally, The Terminator popped his eyes open under its own power for the first time in over 30 years! I thought about making a video but it seemed like too much work.

Click to view attachment

"I'll be back..."
andrewb
Great stuff Brent - keep it coming. A really inspiring build.
Good point about the music - you can't beat The Stones. Perhaps a bit of George Thorogood tho ....?
bbrock
QUOTE(andrewb @ Nov 18 2019, 01:26 AM) *

Great stuff Brent - keep it coming. A really inspiring build.
Good point about the music - you can't beat The Stones. Perhaps a bit of George Thorogood tho ....?


Ha! For some reason, I never could get into Thorogood, but coincidentally, when my wife saw the Stones back in the late 70s, Thorogood was the opening act. She likes him. He was post 73 though so not appropriate for my car rolleyes.gif
rhodyguy
The Blasters would have had you shaking like crazy. I love silver.
Cairo94507
Great progress Brent. Your car is looking really nice. Silver is a great 914 color for sure. beerchug.gif
dr.tim
QUOTE(bbrock @ Nov 17 2019, 10:43 PM) *

For my 73, I went with tunes from the late 60s through 73 which includes some of the best damn music ever created.


That's funny. I always leave my friend's satellite radio on the Elvis channel when I drive his '69 BMW 2002.


The car looks great Brent. You'll have it done in time for.. staring at it in the garage for 5 months. sad2.gif
bbrock
QUOTE(dr.tim @ Nov 18 2019, 03:24 PM) *

The car looks great Brent. You'll have it done in time for.. staring at it in the garage for 5 months. sad2.gif


av-943.gif You have no idea how many times I though of that. Luckily, a lot of work still ahead, so hopefully my just staring at it time will be shortened.
doug_b_928
The reflections in your paint look good and you haven't even cut and buffed yet!
FlacaProductions
Sh!t's gettin' real now.....
bigkensteele
The paint looks great! I just hope that it holds up even though no Allman Brothers vibes were introduced in the spray area.
poke.gif
Superhawk996
Stand tall my friend. Great job.

Especially love the power supply in there instead of the battery. That is actually a great way to do it since you can do current limiting and prevent any serious Fryage.

This is coming together nicely. piratenanner.gif
bbrock
Thanks all. Totally agree about the Allman Brothers. What I posted is only about 10% of what was on the playlist that day, but sadly, I am missing Allman Brothers from the library and have been thinking I need to remedy that. I noticed that Janis doesn't appear on the sample list, but rest assured, she and her flower-power 356 were with me that day. I believe Cry Baby was playing when "the incident" happened. hissyfit.gif

I thought you might like the power supply @Superhawk996 . Seemed like a good way to contain the magic smoke in case something got wired cross-wise.

Shit is for sure gettin' real smile.gif
brcacti
Great story, welcome to 914 world driving-girl.gif welcome.png
Tdskip
This whole thread has just been fantastic - thanks for the updates.
TravisNeff
Muy, Muy Bueno!
bbrock
Stealing small bits of time here and there to continue work, so small projects continuing with wiring and assembly. Got the ventilation control panel installed. Had to guess on where to put the fan bulb. There are four bulb sockets but only three bulbs. Two back lights go in the lower corners, but for the light that comes on when the fan is on, you have a choice of red on the left, or blue on the right. Blue made more sense both for color, and because it is on the side with the fan contacts. Anyone know if this is how the factory did it?

Looks great, don't it?

Click to view attachment

Then I turned on the lights and it looks like burro.gif

Click to view attachment

Click to view attachment

Well that's an unfortunate surprise. Wish I could have seen that before installing. I guess I'll get a detail brush and magnifier for a bit of touch up. Can't be driving around at night with that monstrosity staring at me. barf.gif

Next was a bit of self-dicovery of my insanity. I wired the door switches for the interior light and buzzer. Such a lovely sound, that buzzer. I told my wife it sounds like a German lullaby. The switch right door switch was a bit worn and wouldn't make contact on one switch leg unless it was depressed slightly. I wired it so the light was on the good leg and buzzer on the jinky one. Having the light work but not the buzzer should have been a good thing, but knowing something wasn't working properly was bugging the shit out of me. Turns out, my OCD is bad enough that I'd rather endure the annoying buzzer than suffer knowing something wasn't working. Then I remembered I bought a bag of switches from @raynekat in his end of project sale. Sure enough, a couple of nice 4-terminal switches. So I switched the bum switch out and wallah! German lullaby yellowsleep[1].gif

Click to view attachment
sixnotfour
who was that other guy from Montana ? idea.gif
rock on..gonna be quite an accomplishment. driving.gif
horizontally-opposed
High compliments—car looks GREAT and I admire your commitment to it. Every mile is gonna mean that much more...

smilie_pokal.gif smilie_pokal.gif smilie_pokal.gif
raynekat
QUOTE(bbrock @ Nov 19 2019, 08:27 PM) *


Brent, I see you haven't gotten to installing the infamous door stay yet.
I'm waiting to see how you "engineer" the squeaks, groans and snaps out of yours.

I'll be starting on the tuning process of mine, and it might get ugly.
The 914Rubber supplied parts are too big (specifically the pin) to easily slide into place.
Either the stay anchor in the doorway will need to be reamed out a bit or some other bit of magic will be needed.
Also the profile (curvature) of the aluminum stay arm will need some tweaking.
When I open and close my door, it sounds like a band of raccoons getting into the garbage cans at night.
Not a winner yet.

That silver car is looking better and better each and every day.
Keep swinging.
FlacaProductions
1/4” reamer run in by hand from below worked for me. Found one that a very small open ended wrench fit on and you just go a quarter turn at a time. Apply pressure from the bottom til it grabs but then it pulls itself thru pretty quickly.
914_7T3
QUOTE(bbrock @ Nov 19 2019, 08:27 PM) *

Stealing small bits of time here and there to continue work, so small projects continuing with wiring and assembly. Got the ventilation control panel installed. Had to guess on where to put the fan bulb. There are four bulb sockets but only three bulbs. Two back lights go in the lower corners, but for the light that comes on when the fan is on, you have a choice of red on the left, or blue on the right. Blue made more sense both for color, and because it is on the side with the fan contacts. Anyone know if this is how the factory did it?

Looks great, don't it?

Click to view attachment

Then I turned on the lights and it looks like burro.gif

Click to view attachment

Click to view attachment

Well that's an unfortunate surprise. Wish I could have seen that before installing. I guess I'll get a detail brush and magnifier for a bit of touch up. Can't be driving around at night with that monstrosity staring at me. barf.gif

Next was a bit of self-dicovery of my insanity. I wired the door switches for the interior light and buzzer. Such a lovely sound, that buzzer. I told my wife it sounds like a German lullaby. The switch right door switch was a bit worn and wouldn't make contact on one switch leg unless it was depressed slightly. I wired it so the light was on the good leg and buzzer on the jinky one. Having the light work but not the buzzer should have been a good thing, but knowing something wasn't working properly was bugging the shit out of me. Turns out, my OCD is bad enough that I'd rather endure the annoying buzzer than suffer knowing something wasn't working. Then I remembered I bought a bag of switches from @raynekat in his end of project sale. Sure enough, a couple of nice 4-terminal switches. So I switched the bum switch out and wallah! German lullaby yellowsleep[1].gif

Click to view attachment


Amazed at how fast you work, such great progress!

smash.gif

Hey is that one of those correct paper air hoses on the left side of the last photo?

laugh.gif
bbrock
I just finished with the first round of cut and buff. Can't say it's fun and I learned that I suck at it. I started with the headlight covers and blinders because those were the cheapest and easiest to fix if I screwed up and went through the clear. Indeed, I did sand through the clear on an edge of one blinder (those things are a PITA because they are all edges. Not a big deal though because I still need to spray the trunk/frunk hinges and trunk torsion bars. I realize this is expensive paint for such things but I figure the expensive paint that I already have will still cost less than the cheap paint I don't. Anyway, I'll respray that blinder when I do the hinges.

Okay, so how did I do? My small part test taught me how difficult it is to sand . The metallic silver hides its scratches well and it is damn hard to tell when you have sanded all the previous grit scratches out. I switched sanding direction between grits to make it easier to see, but even after careful inspection and not seeing any remaining scratches, I'd have scratches reappear after the first polish. On top of that is the paranoia of sanding too much. Eventually, I got the small parts to a satisfactory stage.

Here's a pick of a head light cover after the first cut of polish on top of the uncut hood. You can see that it crisps up the reflection but the roughness of the cut causes a spectrum shift. In other words, not a mirror finish yet.

Click to view attachment

And here's the final.

Click to view attachment

That looks pretty good so moving on to the hood. I didn't take progress pics. There are plenty of Youtube vids showing that process. I started with 1000 grit to knock most of the orange peel and nibs down, then went to flat with 1500, followed by 200, and finally 3000. Looked great and then I buffed with Chemical Guys 32 compound (the coarsest in my kit) and up came thos f-ing scratches. mad.gif I tried to buff them out but no luck. So, I went back to 1500 in those areas and worked back up which add a couple hours to the project. Nothing like starting over again. Let's just fast forward to the end. No, I'm not happy. As the polishing got finer, here came those goddam scratches again. headbang.gif Okay, you have to squint and look really hard to find them, but Fuchs sake what does it take? This silver sure hides its secrets.

Alright, here's the finished product.

Click to view attachment

I'd like to take it outside for pics, but we have average wind speeds of 30 mph right now (which is why I'm in a horrible mood today). The reflection of the shop window with dirty screen will have to substitute.

Click to view attachment

Is it worth the work? Of course. It's way better than before the cut and polish. You have to look hard for the scratches but they do impact the clarity of the finish. And yes, I realize that the paint will accumulate chips and pits as the car is driven, but that's not really the point. I'll just try to improve as I work on the rest of the car. And don't worry, I'm happy with the result so no pep talks necessary, I'm just not completely happy and never will be. rolleyes.gif Here's a shot showing the difference between the hood and uncut cowl.

bbrock
After more inspection, this hood is not acceptable. Pretty big scratches remain and will have to be sanded out. It's looks like I may have gotten some contamination in my sandpaper which is not a surprise considering the filthy condition of the show due to having to park our DD in it after being driven on snowy roads. Not a big deal to fix if I can just figure out a better way to know when I've removed all the previous grit scratches.

Click to view attachment

I almost forgot about the other nice surprise I got yesterday. I noticed the brake reservoir supply lines were different colors thank to one of them being empty. Looked under the car to find a nice puddle of brake fluid. Probably one of those f-ing grommet connection but won't be as much fund to deal with now that the car is on the ground.

Click to view attachment

Oh well, such is life.
tygaboy
Brent - your paint looks so nice. How about I put you and your wife up here in the wine country and you can paint my car! (we need a "Painter" emoji, which I'd insert here...)
KELTY360
Face it, you’re just going to have to stand next to the car at shows with a magnifier so you can point out the scratches. poke.gif Or, never drive below 30 and only park in you garage. shades.gif
bbrock
QUOTE(tygaboy @ Nov 24 2019, 02:18 PM) *

Brent - your paint looks so nice. How about I put you and your wife up here in the wine country and you can paint my car! (we need a "Painter" emoji, which I'd insert here...)


Ha! lol-2.gif i will say it once again, the camera is kind to paint. Note the black dot in the lower part of the last pic I posted. Yep, that's in the paint. In all honesty, I will say that for a guy with practically NO experience painting a car and working in the crappy conditions I had to work with, the end result is going to be remarkable. But in no way does my paint job compare to what a skilled and experienced painter can accomplish in a proper spray booth.

I'll also say that on a fun scale of 0-10, I'd put painting at about minus 2. It isn't that I don't enjoy painting, but the price of these paint materials is well beyond my income bracket and that adds way too much stress. Add to that the frustration of trying to achieve perfection under hillbilly conditions, and the fun factor disappears rapidly. But... this is where I can save serious $$ on this resto to keep it within my budget. I'd say what I've pulled off here is a level above what I've seen the average Joe do in their garage, but definitely a notch or two below what you get from someone who really knows what they are doing. That said, my car is going to be gorgeous and people will have to seek out the flaws to see notice them. I have a lot of satisfaction from doing it myself and am glad that I did. But let's not fool ourselves about what it is.
Superhawk996
Won't be able to see any of the flaws under the dust and the bug debris by the time you get to town. Just don't wash it once you get there. beerchug.gif
bbrock
QUOTE(KELTY360 @ Nov 24 2019, 02:55 PM) *

Face it, you’re just going to have to stand next to the car at shows with a magnifier so you can point out the scratches. poke.gif Or, never drive below 30 and only park in you garage. shades.gif


Yeah, yeah. smile.gif Again, the camera is kind... Those scratches will be obvious when the car is in the sun. Won't be that hard to fix either, but I need to improve my technique to make sure I am sanding all the scratches out BEFORE I start polishing.

Funny thing is that I don't really worry about minor scratches, nicks and chips accumulating through use. Believe it or not, those things really don't bother me. That doesn't mean I want to start off with them. Going for a "new car experience" here. That means starting with a pristine car and watching it age. bye1.gif
bbrock
Aftermarket Junk

Got my new wiper and signal switches from 356devotion today. No good sad.gif
There are problems both cosmetic and mechanical. Very sloppy stamping of the symbols on the signal switch... unacceptable.

Click to view attachment

The wiper switch is better. Not a perfect match, but I could live with it. However, there is a weird crease in the lever above the stamping. If that were the only problem, I could probably overlook that too.

Click to view attachment

Although the photo on ebay showed the metal tubes that the screws feed through and align the two switches, they did not come with tubes. No problem transferring my originals expect the holes in the wiper switch are too small to accept them. In addition,
shoddy installation of the metal plates on both switches causing them to misalign with the screw holes. The worst were too offset for the screws to even pass through. To make these work would require drilling out the wiper holes and grinding metal plates on both switches. Drilling the holes would thing the walls too much. No sir. These switches are going back.

Click to view attachment

The search continues for a suitable replacement wiper switch. NOS are going for $300. Too rich for my blood. Will probably post a WTB and hope someone has a decent switch to sell.

The order from 356devotion wasn't a complete loss though. I also bought their fuse cover which looks nice. I had a little trouble getting it to snap in until I got in the right position and held my mouth right. Then it clicked in nice and tight. I'm a little torn though. I remember playing that fun game of scrambling to find the chicklets in the dark after kicking all the fuses out of the box getting in the car.

Click to view attachment
Superhawk996
QUOTE(bbrock @ Nov 25 2019, 11:27 PM) *

Aftermarket Junk

I remember playing that fun game of scrambling to find the chicklets in the dark after kicking all the fuses out of the box getting in the car.


av-943.gif I forgot that game. Looking forward to playing it again as my legs re-learn the proper muscle memory to prevent that from happening.
tygaboy
Brent - I don't know if the switches are different across MYs but I have a couple sets that I won't be using. Free to you if they'll help.
I don't want to clog your thread but I can post pics of them or you can PM me your email and I'll send the pics. Just let me know what works best for you.
dr.tim
QUOTE(sixnotfour @ Nov 19 2019, 10:04 PM) *

who was that other guy from Montana ? idea.gif


hide.gif
sixnotfour
QUOTE(dr.tim @ Nov 26 2019, 12:53 PM) *

QUOTE(sixnotfour @ Nov 19 2019, 10:04 PM) *

who was that other guy from Montana ? idea.gif


hide.gif

When Brock was well like really ... the initials T.K. came to mind ... :evilgrin:bad joke ..about details
bbrock
QUOTE(sixnotfour @ Nov 26 2019, 01:02 PM) *

When Brock was well like really ... the initials T.K. came to mind ... happy11.gif bad joke ..about details

Class clown jester.gif I was a little slow on the uptake. I get it now. blowup.gif Now back to my manifesto dry.gif

I got a little horny today.

Click to view attachment

I went with Hella Sharptones that are a little deeper than the older Sharptones. My car only had one horn and needs work. This seemed like the quickest, and probably cheapest way to go to dual horns. We'll see how much that yellow shows through the horn grills. If it does, I may have to paint.

I have some trouble shooting to do. Right now all I get is a pathetic buzz from them. I'm hoping the power supply that is substituting for a battery isn't pushing enough amps to drive them. Even connecting one directly to the PS, I had to crank it to 14v before it cut loose to sound its note. Another possibility is that the factory relay isn't quite up to snuff. I really don't want to install Hella relay on these. I have a hard time believing that is necessary since it pretty much just replicates the factory wiring through a different relay. We'll get it figured out.

BTW, PM sent to @tygaboy re: wiper switch. You rock Chris! aktion035.gif
tygaboy
Brent - Again, not meaning to clog your thread, but I figured fellow OCDers and CWs may benefit from or be interested in this.

Here are the two switches I have. These first four pics show one that has the part # on it.
Let's call this one "Switch #1".
tygaboy
Here's "Switch #2". No part # on the stalk.
tygaboy
Importantly (?), the connector block is different. The wire/pin layout is the same, in terms of physical position. Switch #1 is on the lower right.
tygaboy
Let me know which one works for you or if you want both. PM me your shipping address and I'll get it shipped.
I'll also include the turn signal switches.
This is a "lo-fi" version of our main content. To view the full version with more information, formatting and images, please click here.
Invision Power Board © 2001-2024 Invision Power Services, Inc.