Brent - your solution to the door stays is something I’ve been pondering in my head for months. Thanks for posting how you solved the issue. I think I will copy your method exactly. It’s been a few months but I just spent some time catching up on your work - you’re flying along man. The car will be driving in no time.
To echo what’s already been said, so sorry to hear about your furry friend. We just got our first pup a couple months back and I can’t imagine how hard it will hit when that day comes.
Full Version: Intro from Montana: '73 2.0L rustoration thread
Pages: 1, 2, 3, 4, 5, 6, 7, 8, 9, 10, 11, 12, 13, 14, 15, 16, 17, 18, 19, 20, 21, 22, 23, 24, 25, 26, 27, 28, 29, 30, 31, 32, 33, 34, 35, 36, 37, 38, 39, 40, 41, 42, 43, 44, 45
QUOTE(aggiezig @ Jan 15 2020, 05:43 PM) 
Brent - your solution to the door stays is something I’ve been pondering in my head for months. Thanks for posting how you solved the issue. I think I will copy your method exactly. It’s been a few months but I just spent some time catching up on your work - you’re flying along man. The car will be driving in no time.
To echo what’s already been said, so sorry to hear about your furry friend. We just got our first pup a couple months back and I can’t imagine how hard it will hit when that day comes.
@aggiezig
I would suggest going a little oversized on the aluminum bushing. I think a 3/8" O.D bushing would be ideal and would leave more wall around the bushing.
Thanks everyone for the continued condolences. Today was a particularly rough day for some reason but ended well. We put in an application to visit and maybe adopt a malamute in Boise but were informed someone was already in the process and the dog's adoption would be final last weekend. I learned today that the dog was adopted by a friend and colleague of mine who lives there and lost his malamute under similar circumstances as ours a couple years ago. I thought that was really cool and it kind of made my day to know the dog went to a great home and I may get to meet him yet.
Some other small updates to catch up on where I am.
I fixed the clock. It was the standard problem of the thermal fuse opening which is well documented so I want go into much detail. Like @Superhawk996 I could only find 138C low temp solder for sale and not 120C as speced on the clock. I'm sure that would be okay, but I noticed I still had pretty good blobs of solder on both sides of the thermal fuse so I decided to try just remelting the existing solder. It worked and the repair cost me only whatever electricity I bought to heat the soldering iron. Also like Phil, I found the old lubricant had gummed into a waxy substance which no doubt is why the fuse blew. After a bit of fishing in the Internets, I found a couple clock makers recommending brake cleaner as a suitable quick clean. It isn't the "right" way which is to completely disassemble the clock and soak in cleaner, but it should do. The only problem was that some of the cleaner seeped inside the clock face and I was worried it would mar the face or lens. Luckily, it evaporated without leaving more that a barely detectable trace. I may replace all the console gauge lenses with glass though because the plastic is yellowed and fogged.
The clock has been running a bit slow so needs adjusted, but I'll wait until the clock oil I ordered arrives so it is properly re-lubricated before any adjustments.
Click to view attachment
The other accomplishment was to get the door latches installed. I decided to just clean up the latch mechanisms and relubricate. I would like to replate them but they are a complex combination of bright cad and yellow cad pieces riveted together and I decided the chance of screwing them up was greater than the benefit. They cleaned up well. I did replate the catch posts and installed NOS rubber bumpers. here are almost all the parts cleaned and plated, ready to reassemble. One latch had already been installed at this point.
Click to view attachment
The door posts installed. That vent cover is another story I'll tell later.
Click to view attachment
Had a little scare when I couldn't get the pass door to shut flush even with the post adjusted all the way inward. I finally realized it was only closing to the first safety catch and the post actually needed to be adjusted outward. Once I did that, the door closed nice and flush with solid clunk that only German cars seem to have. I need to get the handles and other hardware sent to the chrome platers I guess.
Click to view attachment
Click to view attachment
Looking good Brent!
I almost forgot, I did a little more digging into the 3-speed blower mystery this evening. I've confirmed that the controller switch is working just fine, that the wires are connected properly, and each speed wire has connectivity to the blower. I also deduced that even if I had a couple wires switched on the blower connector, the only symptom would be that I'd get the wrong speed relative to two switch positions. Finally, after carefully listening, I've concluded that I indeed am getting three speeds but the difference between medium and high is VERY subtle. I can only think of four possibilities here. 1) there is a short of some kind across the med speed resistor causing it to run faster, 2) there is resistance in the high speed causing it to run slower, 3) the difference between med and high is not that much anyway, and 4) the battery alone without alternator running is still not enough to push the blower at full speed and I might still find "high" once the motor is running. Of these, I think 2 and 4 are the most likely. I'm inclined to leave it alone until I have a running engine to see if it fixes itself. Can anyone tell me if the fresh air box can be removed an installed with the fuel tank in place? That could definitely influence my choice.
nope
QUOTE(mepstein @ Jan 15 2020, 08:43 PM)
nope
Are you saying that because it's true, or because I bragged about how easy the fresh air box was to install and you want to see me suffer?

QUOTE(bbrock @ Jan 15 2020, 08:53 PM)
QUOTE(mepstein @ Jan 15 2020, 08:43 PM)
nope
Are you saying that because it's true, or because I bragged about how easy the fresh air box was to install and you want to see me suffer?
Is there an answer that you’d trust at his point?

From my memory, the fresh air box cannot be removed with the fuel tank in place. But that's from my memory....and maybe it's not so great anymore. When I had to take my fresh air box out to work on the windshield wiper assembly, I know I was fussing because the fuel tank had to come out as well.
Your mileage may vary....
Your mileage may vary....
Bummer. Mostly just giving Mark a hard time and Marc an excuse to give me one.  Looks like I should plan on pulling the box to give those resistor coils and connections another look. Wish I had a reference of what med and high speed sound/feel like.
Looks like I should plan on pulling the box to give those resistor coils and connections another look. Wish I had a reference of what med and high speed sound/feel like.
QUOTE(bbrock @ Jan 15 2020, 10:22 PM)
4) the battery alone without alternator running is still not enough to push the blower at full speed and I might still find "high" once the motor is running.
It will probably will not run faster with the engine running.
A sound battery can source in excess of 300A-400A to run a starter motor in sub zero weather while still maintaining 11V across the terminals. For the purposes of a blower motor current source the battery is virtually infinite.
What might help ever so slightly is having 13.5-14 of system voltage. The higher voltage potential will tend to make the motor draw a little more current at a fixed motor + speed control winding resistance. The problem is that the resitance relationship between the three speeds won't have changed. Therefore what ever your speed delta is between speeds will remain proportionally the same. I.e. if the speed between medium and high is barely percepable, it would likely stay that way but just at a slightly higer speed due to the increased system voltage.
I can go grab my motor from storage this weekend and report back on what my 3 speeds do via battery unless someone else has easier access sooner.
I think you may be onto something that one of the resistor wire coils doesn't have 2 or 3 coils touching each other.
QUOTE(bbrock @ Jan 16 2020, 08:03 AM)
Bummer. Mostly just giving Mark a hard time and Marc an excuse to give me one.
Looks like I should plan on pulling the box to give those resistor coils and connections another look. Wish I had a reference of what med and high speed sound/feel like.Can you beg, steal or borrow a strobe light ? Put a white paint mark on the fan and measure the relative speeds. You'll need someone else to do likeiwse on a known 'good' car to give a reference. Does seem odd that you can hardly hear a difference although the relationship between the correct relative speeds is not necessarily linear.
If you can't get hold of a strobe you may be lucky and get some data by looking at the marked up and spinning fan under fluorescent light - which is 50 Hz over here. I think you guys have 60 Hz ? Might be worth a try.
The Blue Dot
As usual I've been juggling several projects on the car with plenty of progress but few at an interesting stage to share - except one. It was time to add some tunes to this tub.
I spent a LOT of time trying to figure out a head unit that suited me. For months I had a search alert for vintage Blaupunkt and Becker radios to see if I could snag a bargain. No luck. As everyone knows, those radios have become quite spendy and in the end, I simply couldn't justify if for 1970s electronics and, at best, a clunky interface for incorporating bluetooth and digital streaming capabilities. Next up was looking at the retro style modern radios. The best seem to be from Woody's Custom Radio. Still, they are not cheap and specifics on what you are getting are kind of vague. So what about a modern head unit? Well - they are almost all ugly as shit. The look like the spawn of hip hop and disco on crack. Things were looking bleak.
What about the Blue Dot? I'm not sure how many know that Blaupunkt really no longer exists. It is now owned by an investment conglomerate that simply licenses use of the name and logo. Still, I was curious so checked out their offerings. Nope, I found some of the most hideous looking POS radios yet. Then somehow I discovered the "International" region website for Blaupunkt and finally found head units with much more subdued styling and a bonus of the blue dot logo that looks at home in our cars. They are still made in China radios but I found one that had the features I wanted and styling that didn't make me want to hurl. It isn't going to pass as period correct by any stretch, but it looked like it would fit into the interior without being a glaring eyesore.
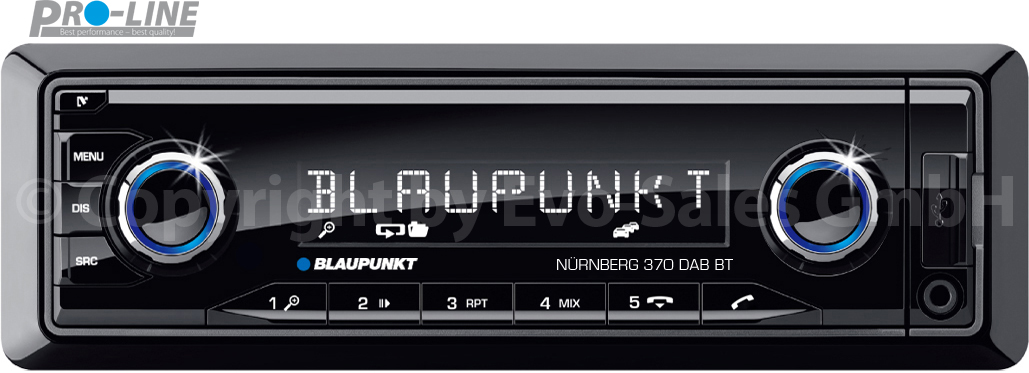
I'm not crazy about the blue ring lights on the knobs when the power it on, but otherwise like the style. I didn't, however, like the stock mounting which leaves the nose sticking too far out of the dash with a bulbous plastic bezel.
Click to view attachment
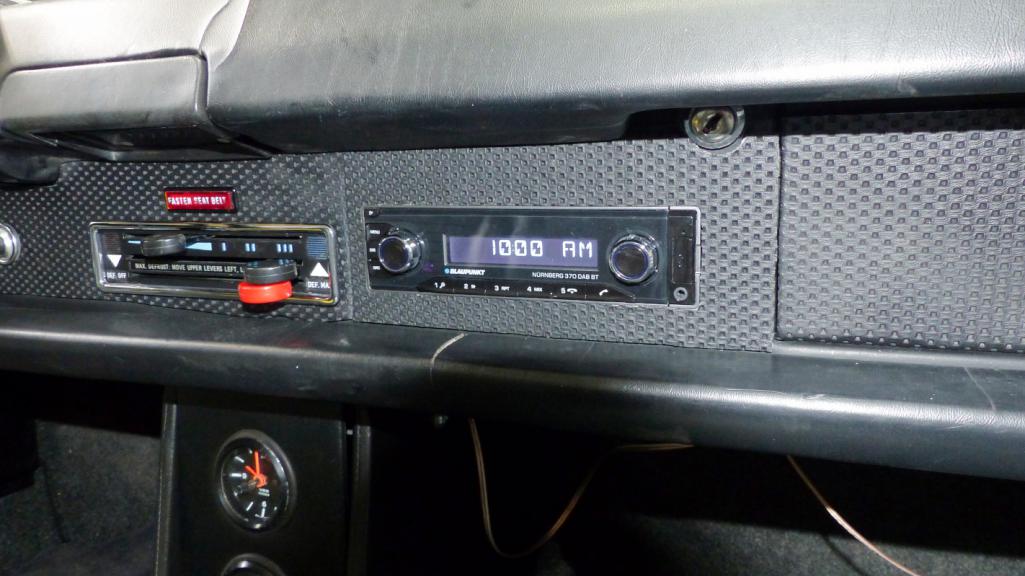
Something had to be done about that so I fabricated a pair of custom brackets that nestle the unit deeper into the dash. I don't have good tools for cutting clean slots in sheet metal so they look pretty amateur, but nobody will see that when installed.
Click to view attachment
I planned to screw the brackets to the chassis but they snap so tightly onto some lugs I decided they weren't needed.
Click to view attachment
Mission accomplished. With the unit mounted just a few mm proud of the dash face, it blends in much better.
Click to view attachment
Next, I built a wire harness to hook it up. I bundled the unused wires near the radio plug outside the main harness so I can access them later if needed. The power antenna wire in that bundle will be tapped for an amplifier turn on wire but I'll wait until I'm certain where the amp will be mounted before adding that.
Click to view attachment
Staying true to the factory radio harnesses, I used AMP dual gender spade connectors so I can plug this harness into appropriate switch terminals on the dash, and plug the original switch wires into the male piggy back spades. Works pretty slick.
Click to view attachment
Finally, I fabricated a custom dash plate using my original as a template. I still had a scrap of the original trunk lid left which is the unobtainable exact gauge as the dash plates. I sure was jealous of @tygaboy 's plasma table while cutting this. I had to do it the hard way with snips, a jig saw, and files. Here's the original plate in the middle, with new plate below and all that remains of the original trunk lid above.
Click to view attachment
Covered in basket weave and installed, I don't think it is too bad. I have one more detail I'll probably add and will update on that later.
Click to view attachment
As usual I've been juggling several projects on the car with plenty of progress but few at an interesting stage to share - except one. It was time to add some tunes to this tub.
I spent a LOT of time trying to figure out a head unit that suited me. For months I had a search alert for vintage Blaupunkt and Becker radios to see if I could snag a bargain. No luck. As everyone knows, those radios have become quite spendy and in the end, I simply couldn't justify if for 1970s electronics and, at best, a clunky interface for incorporating bluetooth and digital streaming capabilities. Next up was looking at the retro style modern radios. The best seem to be from Woody's Custom Radio. Still, they are not cheap and specifics on what you are getting are kind of vague. So what about a modern head unit? Well - they are almost all ugly as shit. The look like the spawn of hip hop and disco on crack. Things were looking bleak.
What about the Blue Dot? I'm not sure how many know that Blaupunkt really no longer exists. It is now owned by an investment conglomerate that simply licenses use of the name and logo. Still, I was curious so checked out their offerings. Nope, I found some of the most hideous looking POS radios yet. Then somehow I discovered the "International" region website for Blaupunkt and finally found head units with much more subdued styling and a bonus of the blue dot logo that looks at home in our cars. They are still made in China radios but I found one that had the features I wanted and styling that didn't make me want to hurl. It isn't going to pass as period correct by any stretch, but it looked like it would fit into the interior without being a glaring eyesore.
I'm not crazy about the blue ring lights on the knobs when the power it on, but otherwise like the style. I didn't, however, like the stock mounting which leaves the nose sticking too far out of the dash with a bulbous plastic bezel.
Click to view attachment
Something had to be done about that so I fabricated a pair of custom brackets that nestle the unit deeper into the dash. I don't have good tools for cutting clean slots in sheet metal so they look pretty amateur, but nobody will see that when installed.
Click to view attachment
I planned to screw the brackets to the chassis but they snap so tightly onto some lugs I decided they weren't needed.
Click to view attachment
Mission accomplished. With the unit mounted just a few mm proud of the dash face, it blends in much better.
Click to view attachment
Next, I built a wire harness to hook it up. I bundled the unused wires near the radio plug outside the main harness so I can access them later if needed. The power antenna wire in that bundle will be tapped for an amplifier turn on wire but I'll wait until I'm certain where the amp will be mounted before adding that.
Click to view attachment
Staying true to the factory radio harnesses, I used AMP dual gender spade connectors so I can plug this harness into appropriate switch terminals on the dash, and plug the original switch wires into the male piggy back spades. Works pretty slick.
Click to view attachment
Finally, I fabricated a custom dash plate using my original as a template. I still had a scrap of the original trunk lid left which is the unobtainable exact gauge as the dash plates. I sure was jealous of @tygaboy 's plasma table while cutting this. I had to do it the hard way with snips, a jig saw, and files. Here's the original plate in the middle, with new plate below and all that remains of the original trunk lid above.
Click to view attachment
Covered in basket weave and installed, I don't think it is too bad. I have one more detail I'll probably add and will update on that later.
Click to view attachment
Of course, the radio needs some place to send its signal so I bought a pair of 4x6 Infinity Kappa speakers and cut adapter plates out of some scrap hardboard I had on hand.
Click to view attachment
I had to glue nylon spacers over the screw holes to provide clearance for the speaker inside the factory grills.
Click to view attachment
Here they are mounted in the pods. I decided to mount them upside down to put the magnets up high where the heater hose is most flexible in case they needed to be push back a little.
Click to view attachment
With new speaker cloth in the grills, it all looks stock.
Click to view attachment
I'll have to say I'm pretty impressed with this system as it is. At first the speakers were really tight and didn't sound very good. But after they loosened up and I streamed some high quality lossless files to the head unit, they actually sound quite good and with decent volume. Of course, these little speakers can't produce respectable bass but the mids and highs are impressively crisp. After adding a subwoofer and amp, this should be a fairly respectable system for crusing. Y'all can say what you want about your engine note being your stereo. We'll just have to agree to disagree about that.
Click to view attachment
I had to glue nylon spacers over the screw holes to provide clearance for the speaker inside the factory grills.
Click to view attachment
Here they are mounted in the pods. I decided to mount them upside down to put the magnets up high where the heater hose is most flexible in case they needed to be push back a little.
Click to view attachment
With new speaker cloth in the grills, it all looks stock.
Click to view attachment
I'll have to say I'm pretty impressed with this system as it is. At first the speakers were really tight and didn't sound very good. But after they loosened up and I streamed some high quality lossless files to the head unit, they actually sound quite good and with decent volume. Of course, these little speakers can't produce respectable bass but the mids and highs are impressively crisp. After adding a subwoofer and amp, this should be a fairly respectable system for crusing. Y'all can say what you want about your engine note being your stereo. We'll just have to agree to disagree about that.
Nice work as usual @bbrock I’m looking at speakers now and think I’ll be able to put something a little bigger in since I don’t have heat and this no heater tubes. Luckily I have a friend that sells car audio stuff and I can borrow speakers to get the best fitment possible.
 Rock On!!
Rock On!!
I think you did a great job- especially with the head unit. That looks really good and actually blends with the dash. Great result. 
I really like what you did with the audio speakers. I’ll be using one of Woody’s hidden Bluetooth devices. Still needs to broadcast to something.
Mind if I copy that speaker set up?
Mind if I copy that speaker set up?
QUOTE(Dion @ Feb 8 2020, 08:38 PM)
I really like what you did with the audio speakers. I’ll be using one of Woody’s hidden Bluetooth devices. Still needs to broadcast to something.
Mind if I copy that speaker set up?
Ha! Not really my idea, I was just copying what others have done. I forgot to mention that I did have to trim the speaker plates a little to clear the OEM grill screw holes. Plates are plastic so it was easy.
Funny about stereos, I just put a cd player in my pos truck...$65.00 ,But hey its a Blaupunkt,,Dallas...  with a remote,,
with a remote,,
Headunit install looks great, like it belongs there.
Looks like I will be in your neighborhood April 25 this year.
Looks like I will be in your neighborhood April 25 this year.
Brent, your car is coming along nicely. Glad to see you're still making great progress. I like the look of those speakers. I have a set of the 914 rubber 6" round pods on hand just in case, but, honestly I'd prefer to keep the stock grilles. Your fit up looks great. I think I'll just copy with pride.
I have a Blupunkt New Orleans MD-70 (thats a mini-disk player!) that came out of my Miata that will slot right into the 914 perfectly with the same DIN housing as you used. Doesn't look as suble though! Does have a RCA line in so I can still use iPod, or other device if I want.
Mini Discs were the recordable small format CD technology of early 1990's that still has a small cult following. Seems appropriate to put in a 914 that also has a small cult following . . . . . . cause I'm crazy like that! Plus, it's just sitting around waiting for a new home.
QUOTE(dr.tim @ Feb 9 2020, 07:04 AM)
Headunit install looks great, like it belongs there.
Looks like I will be in your neighborhood April 25 this year.
Great news! Looking forward to it.
Buckle Up
A nice stepping stone accomplished yesterday getting seat belts installed. Shocking that the belts were nasty and chewed up considering how pristine this car was when the project started
Click to view attachment
After replating the lower anchors and getting a pair of reproduction labels from a member here, I sent the belts off to Safety Restore for re-webbing. Turn around was quite fast. I sent the belts on a Monday and received them the following Monday. They did a nice job at a very reasonable price. The only thing I didn't like was that they only sewed the labels on one side but I'll take the blame on that for not providing more specific instructions on how to attach them.
Click to view attachment
My wife was kind enough to remedy the label problem. I don't think the edges were rolled before sewing on the originals but I think that contributes to them fraying and disappearing so I think this is better.
Click to view attachment
And here's one installed in place. Recievers are just waiting for new stickers before they go in.
Click to view attachment
I'm missing a couple bits though. I need to source one each of these (upper cover and buckle stay). I'll be placing a WTB for these.
Click to view attachment
Good call. I don't like the idea of riding around with 50 year old UV degraded webbing either.
Thank you for forging the road for so many of us on this and finding sources to get this done and then reporting back on lead times and results.
Thank you for forging the road for so many of us on this and finding sources to get this done and then reporting back on lead times and results.
Nice job, Brent.
Did you cut the old belts to re-plate the hardware prior to shipping everything off to Safety Restore?
Did you cut the old belts to re-plate the hardware prior to shipping everything off to Safety Restore?
QUOTE(euro911 @ Feb 10 2020, 08:03 PM)
Nice job, Brent.
Did you cut the old belts to re-plate the hardware prior to shipping everything off to Safety Restore?
Yes I did. I also cut out the chrome guides but decided they were in good enough shape that it wasn't worth the expense to have the plated. I taped everything together with Gorilla tape before sending them i so they could easily see how everything went together.
The only update I have from the weekend is that we took advantage of the 3-day weekend for a very quick trip out to Puyallup to pick up this critical Porsche accessory.
Click to view attachment
In person he has a larger, blockier head and looser skin on the face than Niaquq did, but in photos, he looks so much like him that I'm not sure I could tell them apart. Spooky. I'll have to make sure to carefully label all the pics of him.
Still working on a name for this guy.
Nice!! Congrats to him for landing an excellent caretaker!! Enjoy Brent.
He’s beautiful! Good on ya! Nice companion for the road trips or the hikes & trails 
Looking forward to an update on the 914 from Brent and we get a pic of the new pooch?
Ha
Fantastic and enjoy your new friend.
Ha
Fantastic and enjoy your new friend.
Glad to see you have a new garage buddy. Each is never a replacement for the last, but, a new friend indeed.
Maybe with a little luck, I'll get to meet this one this new pup this summer on the journey out west.
QUOTE(bbrock @ Feb 18 2020, 08:57 PM)
The only update I have from the weekend is that we took advantage of the 3-day weekend for a very quick trip out to Puyallup to pick up this critical Porsche accessory.

When our Sheppard passed away, we tried not having a dog. It only lasted about 3 months and then we knew we needed another. Congrats on the new family member.
Carma and Dogma! A lot of love in that pic...
A quick task here. Once again I appear to have failed at getting a before pic of the corroded, mouse-chewed and pee encrusted original antenna. Could have sworn I snapped a shot. Anyway, here it is after a good scrubbing and applying liquid electrical tape to the chewed sections.
Click to view attachment
While the liquid tape was still wet, I pulled gray shrink tubing over the damaged areas to tidy things up with a waterproof seal.
Click to view attachment
Then 2 minutes after completing that task, I hit the "pay" button on this.
Click to view attachment
Rather than stringing the unswitched power lead all the way back to a source, I modified my radio harness to add a pigtail for power takeoff. I'll need to do something similar for the control wire to split it so I can plug both the antenna and amp in. Exact config is TBD.
Click to view attachment
The fit is a bit tight, especially with the fuel vapor lines that run down that fender but I got it in. I've always fantasized about having one of these so it's hard to resist turning the radio on and off to watch the antenna go up and down.
Click to view attachment
Click to view attachment
The control wire is powered whenever the radio is switched on regardless of input. That is good and bad. Good that it makes it easy to use it as a power on control for the amp. Bad because it means the antenna is up even when streaming music from a phone or other device. I think I'll install a manual switch in the antenna leg of the control wire. Not sure where I'll put the switch. Might do a wireless remote control. Will have to think on that.
Lastly, the new inspector seems to take his job very seriously.
Click to view attachment
Click to view attachment
While the liquid tape was still wet, I pulled gray shrink tubing over the damaged areas to tidy things up with a waterproof seal.
Click to view attachment
Then 2 minutes after completing that task, I hit the "pay" button on this.
Click to view attachment
Rather than stringing the unswitched power lead all the way back to a source, I modified my radio harness to add a pigtail for power takeoff. I'll need to do something similar for the control wire to split it so I can plug both the antenna and amp in. Exact config is TBD.
Click to view attachment
The fit is a bit tight, especially with the fuel vapor lines that run down that fender but I got it in. I've always fantasized about having one of these so it's hard to resist turning the radio on and off to watch the antenna go up and down.
Click to view attachment
Click to view attachment
The control wire is powered whenever the radio is switched on regardless of input. That is good and bad. Good that it makes it easy to use it as a power on control for the amp. Bad because it means the antenna is up even when streaming music from a phone or other device. I think I'll install a manual switch in the antenna leg of the control wire. Not sure where I'll put the switch. Might do a wireless remote control. Will have to think on that.
Lastly, the new inspector seems to take his job very seriously.
Click to view attachment
Love the power antenna. Always have. I had one on my 73 back in the 90's and I took it apart and cut down the plastic toothed insert inside the metal mast that pushes it up so that the antenna didn't (couldn't) go up to full height when automatically triggered.
BTW - did you find the seatbelt pivot covers in the specific style you were looking for? I read your post concerning those just after I bought two off of ebay in that exact style. If you still need, I can pass on the vendor info....
BTW - did you find the seatbelt pivot covers in the specific style you were looking for? I read your post concerning those just after I bought two off of ebay in that exact style. If you still need, I can pass on the vendor info....
QUOTE(bbrock @ Feb 18 2020, 05:57 PM)
The only update I have from the weekend is that we took advantage of the 3-day weekend for a very quick trip out to Puyallup to pick up this critical Porsche accessory.
Click to view attachment
In person he has a larger, blockier head and looser skin on the face than Niaquq did, but in photos, he looks so much like him that I'm not sure I could tell them apart. Spooky. I'll have to make sure to carefully label all the pics of him.
Still working on a name for this guy.
That's a handsome fella!
QUOTE(FlacaProductions @ Feb 21 2020, 08:52 PM)
Love the power antenna. Always have. I had one on my 73 back in the 90's and I took it apart and cut down the plastic toothed insert inside the metal mast that pushes it up so that the antenna didn't (couldn't) go up to full height when automatically triggered.
BTW - did you find the seatbelt pivot covers in the specific style you were looking for? I read your post concerning those just after I bought two off of ebay in that exact style. If you still need, I can pass on the vendor info....
@FlacaProductions Haven't gotten around to posting a WTB yet so if you have that vendor info, I'd love to get it. I looked on ebay but couldn't find this style.
Details Matter
I mentioned there was one more detail on the head unit install I was going to try, so here it is. First, a reminder of what it looked like.
And here it is now.
Click to view attachment
Click to view attachment
It isn't perfect and I'm not confident it will be durable, but I like the look and it is a decent match to the air controls bezel. It wasn't easy, but I found a supplier for 1/8" wide flexible stick-on chrome molding. As a bonus, they send free samples and sell the stuff by the foot which makes it cheap to try. The corner radius is a little tight which puts strain around the bend so I'm not sure how well it will stay. I experimented with relief cuts in the corners but didn't like the result. There is also a bit of waggle across the top because I had to reposition the trim after my first failed attempt. The waggle is where the corner bends were on the first try.
The perfect solution would be to 3D print a bezel and send it off for plastic chroming but I don't have a 3D printer or know anyone nearby with one. I'll see how this works. I might order another piece to at least straighten out the wave.
Brent....you are such a mad scientist. Good job man.
Mystery Solved
I've been putting of tracing down the problem with only two fan speeds on the fresh air blower for obvious reasons. I finally broke down today and removed the hood and fresh air box. Tore it completely apart and yep, there it was. The coil resistors have what must be fail safe bypass switches. Just simple open contacts that I assume are designed to close if the resistor breaks to create a circuit direct to ground and run the fan at full speed. The switch on the medium speed resistor was bent and making contact. Just to be sure, I checked resistance and the low speed resistor read 2.5 ohms exactly the spec stamped on the assembly but the medium side read 0 ohms.
Here you can see the open contact of the low speed resistor in the background and the closed contact for medium in foreground.
Click to view attachment
A bit of a tweak with needle nose pliers to try to match the gap on the other side.
Click to view attachment
After adjustment the coil read 1.1 ohms which is a little higher than the 0.75 ohms stamped on the assembly but after testing the speeds, I think just fine.
Than I had the fun of reinstalling the fresh air box. That makes three times solo now. Following Ian's video tips, it just isn't that hard. Hardest part is connecting that Bowden cable. Glad to have this out of the way. Now I can work on the fuel tank.
Nice work!
Maybe contacts are bi-metallic and close if resistors get too hot and then increase fan speed until it cools?
Maybe contacts are bi-metallic and close if resistors get too hot and then increase fan speed until it cools?
QUOTE(Superhawk996 @ Feb 29 2020, 10:41 PM)
Nice work!
Maybe contacts are bi-metallic and close if resistors get too hot and then increase fan speed until it cools?
I think you just put the pieces together for me! My first thought was that these were indeed bi-metallic and it was for thermal protection but I couldn't figure out why they would want the fan sped up instead of just breaking the circuit. Independently, I was thinking how clever they were to use coil resistors and put them in the air stream to keep them cool. You just put the two together and solved the riddle!
@bbrock
If you haven't already reassembled, it would be interesting to put a heat gun on the contacts and see if they indeed are bi-metallic and move toward closure.
If you haven't already reassembled, it would be interesting to put a heat gun on the contacts and see if they indeed are bi-metallic and move toward closure.
QUOTE(Superhawk996 @ Mar 1 2020, 07:16 AM)
@bbrock
If you haven't already reassembled, it would be interesting to put a heat gun on the contacts and see if they indeed are bi-metallic and move toward closure.
@Superhawk996
I thought the same thing but not until AFTER it was all buttoned up and back in the car. Those contacts look exactly like old fashioned thermostat contacts though.
QUOTE(bbrock @ Mar 1 2020, 10:26 AM)
QUOTE(Superhawk996 @ Mar 1 2020, 07:16 AM)
@bbrock
If you haven't already reassembled, it would be interesting to put a heat gun on the contacts and see if they indeed are bi-metallic and move toward closure.
@Superhawk996
I thought the same thing but not until AFTER it was all buttoned up and back in the car. Those contacts look exactly like old fashioned thermostat contacts though.
@bbrock
Let's roll with that theory rather than have you unbutton it again. Someday when I refresh my fresh air box and make sure the motor is top notch I'll try the experiment.
Okay, here's something that some of you might be interested in. I finished a task that has been bogging down progress for almost a month and a half. My original side glass was pretty scratched up and I really wanted tinted glass anyway. So last year I bought a set for fairly cheap. Unfortunately, they had seen better days; especially the passenger window. It had deep scratches on both sides of the glass along with lots of grinding spatter and the whole glass was badly hard water etched.
Click to view attachment
Click to view attachment
Click to view attachment
Click to view attachment
I tried to convince myself I could live with it but nope, not even close. This would not do. So that sent me on a month long odyssey to try to repair the glass. Spoiler alert, it wasn't easy. There were dead ends and failures and I almost through in the towel a few times, but today I'm declaring victory. I'll spare what didn't work and skip to what did.
The process is basically the same as cutting and polishing paint but with the right abrasives. I used GP-Pro abrasives for the initial grinding to remove scratches and most of the pitting. Then I followed up with polishes I had on hand or that came with the first glass repair kit I ordered that did not work. Here's a video of the grinding process. It starts with the medium abrasive but since my scratches were so deep, I had to order a set of course pads (another week's delay). Also, because the entire window was damaged and needed grinding, I went with 5" discs rather than the 3" shown in the vid.
https://www.youtube.com/watch?v=doYlaQlCloQ
The 5" discs are better for grinding a large surface to keep it even without troughs and worked well for grinding on the exterior surface of the glass, but were a little difficult to work on the concave interior surface. If I had a better foam interface backer pad for my drill, this probably wouldn't have been a problem but I cobbled together the best I could source locally which was a POS. I doubt scratches on the interior are as common as exterior. I got lucky. Here's what it looked like after the first grinding cut.
Click to view attachment
BTW, this all needs to be done with a high speed rotary tool (I used an industrial quality corded drill). A D/A buffer does not work and makes things worse... trust me. Here's how it looks after the fine abrasive cut. I had about 10 hours of labor into it at this point not counting the dead end detours.
Click to view attachment
Then it was time to polish. I started with using Chemical Guys 32 polish on a foam pad followed by their 34 (same stuff used on the paint). Then I switched to cerium oxide pasted. I used a 5" felt pad first and then went over both surfaces with a 2" felt disc.
Click to view attachment
Here's a pic of the complete kit.
Click to view attachment
These abrasive pads were the secret to scratch removal.
Click to view attachment
And the finished result.
Click to view attachment
Click to view attachment
Does it look like brand new glass? No. Is it a thousand times better than it started? You betcha.
Now I get to do the driver's side. Luckily, it isn't as bad and won't require resurfacing the entire window.
Click to view attachment
Click to view attachment
Click to view attachment
Click to view attachment
I tried to convince myself I could live with it but nope, not even close. This would not do. So that sent me on a month long odyssey to try to repair the glass. Spoiler alert, it wasn't easy. There were dead ends and failures and I almost through in the towel a few times, but today I'm declaring victory. I'll spare what didn't work and skip to what did.
The process is basically the same as cutting and polishing paint but with the right abrasives. I used GP-Pro abrasives for the initial grinding to remove scratches and most of the pitting. Then I followed up with polishes I had on hand or that came with the first glass repair kit I ordered that did not work. Here's a video of the grinding process. It starts with the medium abrasive but since my scratches were so deep, I had to order a set of course pads (another week's delay). Also, because the entire window was damaged and needed grinding, I went with 5" discs rather than the 3" shown in the vid.
https://www.youtube.com/watch?v=doYlaQlCloQ
The 5" discs are better for grinding a large surface to keep it even without troughs and worked well for grinding on the exterior surface of the glass, but were a little difficult to work on the concave interior surface. If I had a better foam interface backer pad for my drill, this probably wouldn't have been a problem but I cobbled together the best I could source locally which was a POS. I doubt scratches on the interior are as common as exterior. I got lucky. Here's what it looked like after the first grinding cut.
Click to view attachment
BTW, this all needs to be done with a high speed rotary tool (I used an industrial quality corded drill). A D/A buffer does not work and makes things worse... trust me. Here's how it looks after the fine abrasive cut. I had about 10 hours of labor into it at this point not counting the dead end detours.
Click to view attachment
Then it was time to polish. I started with using Chemical Guys 32 polish on a foam pad followed by their 34 (same stuff used on the paint). Then I switched to cerium oxide pasted. I used a 5" felt pad first and then went over both surfaces with a 2" felt disc.
Click to view attachment
Here's a pic of the complete kit.
Click to view attachment
These abrasive pads were the secret to scratch removal.
Click to view attachment
And the finished result.
Click to view attachment
Click to view attachment
Does it look like brand new glass? No. Is it a thousand times better than it started? You betcha.
Now I get to do the driver's side. Luckily, it isn't as bad and won't require resurfacing the entire window.
Clearly, you've put a new spin on scratching the surface.
Good work! Man what a lot of work...
@bbrock
Coming along great.
Doubt that polish set up would take out the pitting on the inside of my windshield from the PO grinding out the old floorboards.
Coming along great.
Doubt that polish set up would take out the pitting on the inside of my windshield from the PO grinding out the old floorboards.
That’s amazing Brent. Beautiful work. That’s a lot of labor and planning.
Fantastic save.
Fantastic save.
Wow, Brent. I didn’t know that was possible. Do you think that would work on spots where sparks from grinding have hit and melted the glass?
This is a "lo-fi" version of our main content. To view the full version with more information, formatting and images, please click here.