Help - Search - Members - Calendar
Full Version: Intro from Montana: '73 2.0L rustoration thread
914World.com > The 914 Forums > 914World Garage
Pages: 1, 2, 3, 4, 5, 6, 7, 8, 9, 10, 11, 12, 13, 14, 15, 16, 17, 18, 19, 20, 21, 22, 23, 24, 25, 26, 27, 28, 29, 30, 31, 32, 33, 34, 35, 36, 37, 38, 39, 40, 41, 42, 43, 44, 45
KELTY360
QUOTE(bbrock @ May 6 2018, 09:34 PM) *

QUOTE(KELTY360 @ May 6 2018, 10:27 PM) *

Hey Brent, would you like me to bring you a driver's front 1/4 piece with headlight bucket and fender back to halfway thru the wheel well? This is a pay it forward part that I got years ago and need to pass on to someone else. It's not pristine but I think there's some usable segments.


Hey Marc, You are turning out to be the savior of this project! Yeah, if that bucket section is intact, that will be just the ticket. I wish I'd found this before the car was on the rotisserie though. It's going to be interesting to say the least. Looking forward to your visit!

This is what I have. Yours if you want it....including the ride. biggrin.gif Click to view attachment

KELTY360
Back side

Click to view attachment
bbrock
Hi Marc,

Great offer, but my problem is on the passenger side, I should have caught that last night but was apparently too tired... or maybe still in shock over finding that little surprise yikes.gif. Your piece would have opened some options for repair if it was from the other side. I'm going to pick your brain on this one while your here. It's a bit of a head scratcher. smile.gif
KELTY360
QUOTE(bbrock @ May 7 2018, 07:21 AM) *

Hi Marc,

Great offer, but my problem is on the passenger side, I should have caught that last night but was apparently too tired... or maybe still in shock over finding that little surprise yikes.gif. Your piece would have opened some options for repair if it was from the other side. I'm going to pick your brain on this one while your here. It's a bit of a head scratcher. smile.gif


No problem. I'll try to find someone else who needs it. See you Wednesday.
mb911
I have a good passenger side. Yours for cost of shipping..
bbrock
QUOTE(mb911 @ May 7 2018, 01:34 PM) *

I have a good passenger side. Yours for cost of shipping..


Thanks Ben, that's very generous. I think I need to get back in with the blaster and clean the area up nice before deciding how to tackle it. The issue is access. It is the little bulge in the outer wall of the headlight bucket/inner fender that is tucked up under the funnel for the headlight and is where the bumper bracket welds on from the outside. It's really hard to see or I would have found it and addressed it before putting the car on the rotisserie. The rust is clearly cosmetic at this point since that bracket is what a corner of the car has been hanging from for months and nothing has bent, torn, or cracked. It would be easy to bend up a patch from sheet but I don't know if I can get the welder in there to tack it in place from the inside. If I can, this will turn out to be minor, if I can't, going from the outside seems the only other option and that is a can of worms. That will require either pulling the car off the rotisserie, or rigging an alternative support that will let me pull the bumper bracket out. I'm looking at the bolt for the fog light mount as an option. Looks pretty beefy.

The fender piece could open 3 options:

1. A new trunk "ear" that would let me cut out the one I just repaired that might open some access from the inside.
2. Provide a replacement bumper bracket in case the old one can't be removed in reusable condition.
3. Provide a preformed donor patch.

Truth be told, I could probably clean this spot out, treat it with rust converter, protect it with paint, and forget about it. Somehow I don't see that happening... we'll see what I think after blasting.

Anyone have some welder nanobots they could loan me? rolleyes.gif
mb911
QUOTE(ndfrigi @ May 7 2018, 08:40 PM) *

QUOTE(rgalla9146 @ May 7 2018, 07:04 PM) *

My car with the Minilites is 914 043 1095
The other car is 914 043 1208
Thirteen apart.
My chassis 131279
The other car is chassis 131270
Eight chassis apart
My engine is 6404638
The other car has engine 6404639 !!!!!!!! Bingo !
Consecutive engine numbers !!
There's more.
My friend EJ got his 6 # 1208 a few months ago and needed someone to
reassemble it. The car had sat as a stalled restoration since 1991
The engine had been rebuilt but was never started
I'm the lucky guy who did the honors.
Unbelievably, the engine had been rebuilt by Fred Apgar, who I worked for in 1978 !
Here they are in my driveway today.


Probably twin sister of Jim’s 914-6!!!

Click to view attachment


Let me know was gonna start to get rid of the metal for cost of shipping this week that I don't need any more..
bbrock
QUOTE(mb911 @ May 8 2018, 06:07 AM) *

Let me know was gonna start to get rid of the metal for cost of shipping this week that I don't need any more..


Finally got that area blasted tonight. I won't be needing that part but thanks for the offer. I think I can patch this in place. Not worth shipping and tearing up a fender chunk for. It ain't gonna be fun though. I thought that little hump where the hood release attaches was a giant B, this might be worse. pinch.gif
Dion
Brent I like your tactic of tying the copper backing in place.
I’ll need to remember that in my future endeavors. Brilliant.
Glad you’ve found a game plan for the headlite bucket area.
I was having a hard time visualizing the spot but after rotating the
pic I understand now. Yeah that’s a tricky spot for sure.
I know you’ll remedy it!
welder.gif
bbrock
Thanks Dion. I'll admit my copper "hillbilly helper" worked better than I thought.

I wouldn't say I have a game plan yet, just a better idea of worst case scenario. Hoping I can get a patch in there without tearing shit apart. Worst case, I rig up a temporary support to hold the car in the rotisserie, tear out the bumper bracket and patch the wall from the fender side, then replace with new/donor bracket. I hope I don't have to go there. Worst part is none of this will impact the structurally integrity of the chassis or the appearance, but I don't think I could go this far and leave the car like a tobacco chewer with a hole in his lip.
bbrock
Special Delivery
Wednesday was a fun day. Marc (Kelty360) arrived early afternoon hauling some special cargo for my project. We quickly discovered we have a lot more interests in common than just our obsession with Porsche's red-headed step child. I have serious Westy envy and since Marc parked his camp on wheels at our house for the night, it allowed us to talk all afternoon and into the night.

Stowed away in the Westy were a pair of doors from Rich at 914Werke, and a complete set of tinted side glass. The doors need some work to fill holes from aftermarket side mirrors and screw holes from door mounted speakers (luckily they did not cut the structure), and a small repair on one of the seal channels. My original doors would take about 2 weeks to repair with uncertain results, these reduce that work to 2 days. cheer.gif But look at these beauties. They have me rethinking paint and maybe I'll just match these doors. That way, whenever anyone asks the question about what color I'm going to paint it, I could just reply, "All of them." av-943.gif

Click to view attachment Click to view attachment

The other goodies tucked away in Marc's Westy was a full set of tinted side glass, also from 914Werke. I didn't really need these, but my original clear glass has some deep scratches that would have needed replacing eventually and I've always wanted tinted glass. I need to clean these up but they mostly look great. I am concerned about a portion of the passenger window because there appears to be grinding slag embedded int he glass. On my quick inspection, I was able to pop some of it out with a thumbnail so hopefull the rest will do the same and I can polish it out. I've never polished glass before, anyone have suggestions?

Click to view attachment

This is just another example of how great and supportive this 914 community is. Marc generously offered to haul any parts from Seattle I might need. I immediately thought of Chris's suggestion to see if someone passing through might be willing to haul doors. I posted a WTB and withint 15 minutes, Rich had stepped up with what I needed. If I'd listened to Rich, Marc would have been hauling a full windshield in that Westy too! But I didn't want to push my luck. And I could have really pushed it by having him haul a rear trunk lid from Rhodyguy who generously offered to send one along after catching wind that Marc was headed this way. It's just an amazing community and I thank all of you for supporting this crazy project.
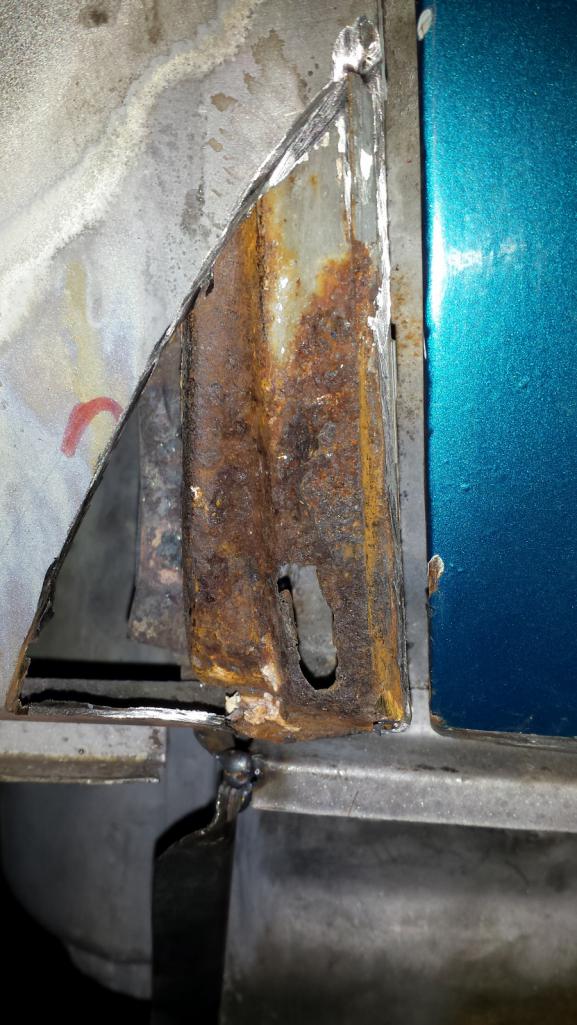
 smiley_notworthy.gif

More Channel
Then yesterday I slipped out to the garage for a couple hours. I set the cancer under the bumper bracket aside for now and wanted to tackle something that was an easy win to boost my psyche. I have one last bit of channel to repair at the upper left corner of the frunk, and there is a hole in the fender behind the antenna mount that needs patched.

Click to view attachment

I started with the channel. It was a pretty small area with some deep pitting, a 10mm hole, and a small nipple of channel wall next to the hole that was eroded away. I decided to try just zapping everything back into shape with the MIG. That actually worked well. It isn't quite finished but close, and that's as far as I've gotten.

Click to view attachment
bbrock
Tackled this nasty spot today.

Click to view attachment

First, cut out the rotten parts, but save what's left of the rocker cover bracket to fab a new one.

Click to view attachment

Then replace the rusted weld flange inside the support.

Click to view attachment

Fabricate a patch.

Click to view attachment

Weld it in.

Click to view attachment

Clean it up and give it a coat of weld-thru primer.

Click to view attachment

Now fabricate a new rocker cover bracket to patch in. That piece was a PITA, but I finally got a good dry fit.

Click to view attachment

I need to cut the holes for the fuel vapor lines before welding it in, but I was getting tired and was afraid I'd F it up. So, I quit for the day and will start fresh tomorrow.

And here's a lazuli bunting that was at the feeder the other day.

Click to view attachment
KELTY360
Since this thread features critters in the wild, here’s Brent with his malamute eying the Westy delivery van. Those doors hardly took up any space! Had a great time checking out Brent’s massive projects and discussing all things under the sun.

Click to view attachment
KELTY360
I’m currently posting laying in bed in my campsite at the foot of Devils Tower in Wyoming. Life is good. Click to view attachment
Dion
Top notch work Brent! welder.gif
Thanks for posting the pics Marc, enjoy Devils Tower.
euro911
QUOTE(KELTY360 @ May 13 2018, 07:48 AM) *
Since this thread features critters in the wild, here’s Brent with his malamute eying the Westy delivery van. Those doors hardly took up any space! Had a great time checking out Brent’s massive projects and discussing all things under the sun.

Click to view attachment
I spy with my little eye: a fuel tank filler location behind the sliding door. Synchro?
bbrock
QUOTE(euro911 @ May 13 2018, 11:29 AM) *

I spy with my little eye: a fuel tank filler location behind the sliding door. Synchro?


I can even answer that one. Yes! That Westy is a sweet ride.

I finished up yesterday's project this morning. Just to make sure everything is in the right place, I put in the plumbing and clamped up the rocker cover before tacking the bracket in. It was a PITA, but everything seems to work. A shout out to BPic for quickly posting a pic for me yesterday so I could fill in the blanks on my rusty bracket. I think I got it right.

Click to view attachment

The rest was easy enough.

Click to view attachment

Nice to have that chore out of the way. Now I can load up my spool of Easy Grind wire and patch some body panels. welder.gif
euro911
I thought about buying a Synchro, but opted for a standard Westy because I already have two Toyota 4x4s. My friend, Randy, called me Friday - 'Eileen's new 2.1L is done and she's ready to come home. I'll be picking her up when I get back from AZ end of June driving.gif

Click to view attachment

Click to view attachment
bbrock
Nice! drooley.gif I had a '74 bus that we really enjoyed and have great memories of, but I got tired blowing up engines. I always wanted a Westy. Marc has a Subie/6 in his. Maybe he'll say more when he's off the road.

Marc, if you need a place to park on the way home, you know where to find me.
KELTY360
QUOTE(bbrock @ May 13 2018, 11:16 AM) *

Nice! drooley.gif I had a '74 bus that we really enjoyed and have great memories of, but I got tired blowing up engines. I always wanted a Westy. Marc has a Subie/6 in his. Maybe he'll say more when he's off the road.

Marc, if you need a place to park on the way home, you know where to find me.

Nice Westy Mark. Two or four wheel drive they’re like nothing else on the road. With all the windows, I call mine a rolling sun porch.

Now, enough Westy love. mad.gif Get back to work on your 914, Brent. BTW I may take you up on that driveway space. Still haven’t figured out my next stop.
bbrock
QUOTE(KELTY360 @ May 13 2018, 05:52 PM) *

Now, enough Westy love. mad.gif Get back to work on your 914, Brent. BTW I may take you up on that driveway space. Still haven’t figured out my next stop.


Stop by. Two moose were hanging out about 20 feet from the house an hour ago.

So here's the rest of the progress for the day... or should I say, some progress and some tail chasing. I spent a fair amount of time stripping more undercoat and seam sealer to clean things up to repair that rust hole near the antenna mount.

I cut out the cancer and treated the hole with phosphoric acid.

Click to view attachment

and the patch was welded, ground, and blended. Not too bad.

Click to view attachment

Then I went back to that channel in the corner near the antenna to grind down the final welds. I noticed a couple pinholes and blew out the bottom trying to fix them. Then I got pissed off and ripped out that section and cut a patch. I wasn't really happy with that repair anyway. The hole I zapped shut was really too big and the patch was brittle. I didn't take pics because it was just a repeat of the other side, only a much smaller piece. Here's the result with a temporary dusting of primer on it and that patch I did earlier.

Click to view attachment

The next patch is going to be interesting. Stay tuned. bye1.gif
bbrock
No progress to report but planning the next task and am would welcome advice so I hope I can explain it well enough. That next task is patching rust at the bottom rear of the front fender.

Click to view attachment

The old door has a matching patch of rot, plus some brazing from the PO's body work.

Click to view attachment

From the get-go of this project, that area had a narrow gap that I assumed (and still hope) is caused by the corrosion pushing the body lines together. The plan is to adjust the gaps as part of the rust repair so the first step was to fit the replacement door and see where things fit. After a lot of fiddling, I got the hinges adjusted for the best fit I could get. The front fender and door line up pretty well with all the surfaces matching along the same straight plane. The rear quarter and door look good at the top but I discovered a problem that the puffiness of the rot in the front of the door and fender was masking. The rear quarter meets the lower part of the door with about a 2 mm offset in the planes.

Click to view attachment

Believe it or not, I'm not too worried about that and here's why.

Click to view attachment

I bullocksed the repair on the bottom of that quarter and it has to be redone. The problem was that I cut and welded the patch along that bottom bend and didn't think about how welding would shrink the gap. The upshot is that the body line along the bottom is shit and has to be cut out and redone. This time, I have a couple of spare doors that happen to have the exact profile I need so I'm going to cannibalize skin off the old door to create a new patch. While I"m doing that, Ill be able to fix the f'd up alignment with the door.

The bigger question is about gaps at the front of the door. Here are pics with gap measurements in millimeters.

Click to view attachment Click to view attachment

As near as I can tell, it must be normal for the gap to widen (almost 1 mm) at the curve between the top of the door and side because I can't think of what problem would cause that. I'm tempted to weld a little material along the edge to even out that gap. I don't really have a plan for the gap at the bottom of the hinge post but hoping one emerges after I cut it open for the rust repair.
bbrock
I did a bit of cutting this morning and more measuring to figure out this gap thing. This is the bottom of the A-pillar with the rotted fender skin removed. I confirmed that the gap remains a steady 4mm down to where the rust begins and then tapers to about 2mm at the very bottom. I'm feeling like somehow the corrosion swelled the metal or allowed it to move to close that gap, or maybe the gap was always narrow there. Either way, it should be easy to correct.

Click to view attachment

I'm stilled a bit confused by the wide gap at the top of the door. I need to play with those hinge adjustments more to see if there that can help. I did think through possibilities of bent or shrunk frame members, but my chassis measurements are spot on and because the doors bolt to the A-pillar, that gap should remain constant even if the pillar moved. I also need to get both sides stripped to bare metal to make sure I'm aligning the actual panels and not body filler.
bbrock
Heading home from Iowa in the morning with a nice 914 trunk lid strapped to the roof. I had a very generous offer from rhodyguy for another lid that needed some minor repair but opted for this one because I feel like I've patched enough holes and not confident in my skills to handle a trunk lid patch.

Click to view attachment
mb911
QUOTE(bbrock @ May 16 2018, 08:21 PM) *

No progress to report but planning the next task and am would welcome advice so I hope I can explain it well enough. That next task is patching rust at the bottom rear of the front fender.

Click to view attachment

The old door has a matching patch of rot, plus some brazing from the PO's body work.

Click to view attachment

From the get-go of this project, that area had a narrow gap that I assumed (and still hope) is caused by the corrosion pushing the body lines together. The plan is to adjust the gaps as part of the rust repair so the first step was to fit the replacement door and see where things fit. After a lot of fiddling, I got the hinges adjusted for the best fit I could get. The front fender and door line up pretty well with all the surfaces matching along the same straight plane. The rear quarter and door look good at the top but I discovered a problem that the puffiness of the rot in the front of the door and fender was masking. The rear quarter meets the lower part of the door with about a 2 mm offset in the planes.

Click to view attachment

Believe it or not, I'm not too worried about that and here's why.

Click to view attachment

I bullocksed the repair on the bottom of that quarter and it has to be redone. The problem was that I cut and welded the patch along that bottom bend and didn't think about how welding would shrink the gap. The upshot is that the body line along the bottom is shit and has to be cut out and redone. This time, I have a couple of spare doors that happen to have the exact profile I need so I'm going to cannibalize skin off the old door to create a new patch. While I"m doing that, Ill be able to fix the f'd up alignment with the door.

The bigger question is about gaps at the front of the door. Here are pics with gap measurements in millimeters.

Click to view attachment Click to view attachment

As near as I can tell, it must be normal for the gap to widen (almost 1 mm) at the curve between the top of the door and side because I can't think of what problem would cause that. I'm tempted to weld a little material along the edge to even out that gap. I don't really have a plan for the gap at the bottom of the hinge post but hoping one emerges after I cut it open for the rust repair.


Yes I believe it is fairly normal. I will be welding in the gaps on mine to make it cleaner.
bbrock
QUOTE(mb911 @ May 22 2018, 09:13 AM) *


Yes I believe it is fairly normal. I will be welding in the gaps on mine to make it cleaner.


Good to know. I made some adjustments that got the top area tighter and will have one more adjustment to try. I'll still need to do some welding but maybe not as much.
bbrock
Spent time during the week working on the driver's door gaps some more. I ended up grinding out the holes for the hinge bolts a little larger to allow more range of adjustment for the doors.

Click to view attachment

After that, I was able to better align the door with the fender and got most of the gap down to about 4.3mm. I'll still have to weld a bit to regap some, but I'm much closer to the end goal now.

I had other projects to work on today so didn't get to the car until about 4 pm this afternoon. I made a start on tackling this mess.

IPB Image

This required a lot of dental work to cut the rotted fender skin where it crimps around a flange on the A-pillar, and cutting out the rusted portion of that flange. After cutting everything out, it got a good treatment with the KleanStrip version of Ospho. Here it is ready to rebuild the inner structure that the skin crimps over.

Click to view attachment Click to view attachment

Amazing how long it took to make this pathetic looking scrap of metal to repair the structure.

Click to view attachment

It didn't take long to weld the little scrap in and grind it down. This will all get buried under the skin and seam sealer, but I still took the time to restore the original profile and look.

Click to view attachment Click to view attachment

Tomorrow I'll see if I can pull off repairing the skin. Wish me luck! blink.gif
tygaboy
Luck... ha and peshaw!

I'm sending you good vibrations for:
- clean and solid parent metal cheer.gif
- perfect welder settings welder.gif
- not welding the wire to the tip (particularly when working in those hard to reach areas) smilie_pokal.gif
- patch pieces that turn out nicely on the first attempt smash.gif
- no weld spatter sparks ending up in your ear pray.gif

Now get back out there! And keep up the great work!

(and I promise, that rear window will get packed and shipped at some point!)
bbrock
Good, Good, Good! Good Vibrations! piratenanner.gif

I don't know what kind of Mojo you were sending me Chris, but I'll take some more please beerchug.gif What a rewarding day!

I started the day with a lot of trepidation because I knew I was in above my head with the task ahead. First up was fitting up the door again to see what adjustments were needed on that inner structure I did yesterday. As expected, there was some, but not bad, just a little bulge below the bottom body line.

Click to view attachment

To fix it, I just cut across the bottom crease line.

Click to view attachment

Then tapped the bulge up into the right line. Amazing how ony 1mm of extra material can throw things out of whack.

Click to view attachment

Then trim off the access and glue it up with a little high temperature metal adhesive.

Click to view attachment

A little grinding and final adjustment, and Bob's your uncle. It still looks a little out of line in this pic, but it isn't.

Click to view attachment

Now for the fun stuff. First, I made a pattern for the skin patch using tracing paper. I started by tracing the existing gap lines, the bottom crease line, and outline of the cutout for the patch. Then I shifted the pattern over so the partial fender side gap line was lined up with the door gap side. That let me trace the front edge of the patch so it would follow the door contour.

Click to view attachment

I retraced the lines with black marker. Solid for cut lines and dashed for bend lines. Here it is repositioned in correct alignment.

Click to view attachment

I cut the patch piece out of the original door since it already has the right contour, including the bends at the bottom.

Click to view attachment

Now for a couple hours making the patch.
bbrock
I used the pattern to cut it out and left 12mm on the door side to bend over a 10mm flange that crimps over that inner structure flange repaired yesterday. There is a subtle curve on that edge so the flange had to be bent a little at a time, then hammered over onto itself, the pried open enough so it could slip tightly over the structure flange. Tedious work just to get the that point,

Click to view attachment Click to view attachment

Then repeatedly fitting it on, grinding a little off the back edge, refitting, more grinding, again and again to sneak up on the perfect fit. The crimp fit is so tight there is no need for clamps.

Click to view attachment

A new scar that needs to heal.

Click to view attachment

And here's the end result. Not too shabby! aktion035.gif

Click to view attachment Click to view attachment

There is still a bit of house keeping to do behind the door, but I want to finish the rear quarter repairs before pulling the door off again. I have an idea for making those adjustments that will be easier than a full repatch. That's on the agenda for tomorrow.
falcor75
Great work, I'm always impressed with the patience of a good repair piece. Is it just me or could you run your welder with less wire feed to reduce the height of the spotwelds and spend less time on grinding? You dont want balls of metal ontop of the weld, they should float out a bit more.
bbrock
QUOTE(falcor75 @ May 27 2018, 11:55 PM) *

Great work, I'm always impressed with the patience of a good repair piece. Is it just me or could you run your welder with less wire feed to reduce the height of the spotwelds and spend less time on grinding? You dont want balls of metal ontop of the weld, they should float out a bit more.


Yeah, I was having fits with the settings today. I dialed back the feed and it helped some but I'm a little worried I have a diode out again as the welder just seems weak. I'm going to mess with it tomorrow and see if I can sort it out. I have easy grind spooled up for this job so at least grinding didn't take long.
tygaboy
Brent - Excellent! You're right to be pleased with that repair! Super-duper awesomeness, for sure. smilie_pokal.gif

Congrats and more of the same. Can't wait to see the next steps.

And here come some more focused vibes re: welder settings:

welder.gif welder.gif welder.gif
mb911
Looking good. Ironically i didn't need to repair that area on mine but the flares must have helped..
bbrock
@#$K!!!
Well, I just ran some test welds and I'm pretty sure the diodes on the welder are burned out again. headbang.gif headbang.gif headbang.gif

I tested butt welding some scraps of 20 gauge and the chart settings of Voltage = 1 and Wire Speed = 6 just sputter and put a little ball on top of the gap. The only acceptable (but not great) weld I could get was cranking both the voltage and wire speed full up. That should have blown holes through the metal like a canon.

I'm going to order a new set of diodes and capacitors but muddle through the repairs today with what I have.

I understand having to replace diodes on a 30 year old welder, but this last set is less than a year old although probably saw as much welding as the old set. But still, they shouldn't be burning out like this. confused24.gif Very frustrating! blowup.gif
mb911
QUOTE(bbrock @ May 28 2018, 07:20 AM) *

@#$K!!!
Well, I just ran some test welds and I'm pretty sure the diodes on the welder are burned out again. headbang.gif headbang.gif headbang.gif

I tested butt welding some scraps of 20 gauge and the chart settings of Voltage = 1 and Wire Speed = 6 just sputter and put a little ball on top of the gap. The only acceptable (but not great) weld I could get was cranking both the voltage and wire speed full up. That should have blown holes through the metal like a canon.

I'm going to order a new set of diodes and capacitors but muddle through the repairs today with what I have.

I understand having to replace diodes on a 30 year old welder, but this last set is less than a year old although probably saw as much welding as the old set. But still, they shouldn't be burning out like this. confused24.gif Very frustrating! blowup.gif


I have never had a set burn out.. You have a 125 handler?
KELTY360
QUOTE(bbrock @ May 27 2018, 10:24 PM) *

I used the pattern to cut it out and left 12mm on the door side to bend over a 10mm flange that crimps over that inner structure flange repaired yesterday. There is a subtle curve on that edge so the flange had to be bent a little at a time, then hammered over onto itself, the pried open enough so it could slip tightly over the structure flange. Tedious work just to get the that point,

Click to view attachment Click to view attachment

Then repeatedly fitting it on, grinding a little off the back edge, refitting, more grinding, again and again to sneak up on the perfect fit. The crimp fit is so tight there is no need for clamps.

Click to view attachment

A new scar that needs to heal.

Click to view attachment

And here's the end result. Not too shabby! aktion035.gif

Click to view attachment Click to view attachment

There is still a bit of house keeping to do behind the door, but I want to finish the rear quarter repairs before pulling the door off again. I have an idea for making those adjustments that will be easier than a full repatch. That's on the agenda for tomorrow.


Look at that! smilie_pokal.gif I saw that nasty section a couple of weeks ago and thought you really had your hands full. Great solution and execution. The other side will be a piece of cake.
Dion
Sorry to hear of the welder diode issues but
that repair patch job looks fantastic.
Really nice Brent! Good homework on your part.
I’m getting quite jealous. :-)
bbrock
QUOTE(KELTY360 @ May 28 2018, 10:50 AM) *

Look at that! smilie_pokal.gif I saw that nasty section a couple of weeks ago and thought you really had your hands full. Great solution and execution. The other side will be a piece of cake.


Thanks Dion and Marc! I remember the look on your face Marc when you looked at that and said, "How are you going to handle that?" I hope the other side will be a piece of cake but the rust is more extensive than this one. The skin patch should be about the same, but the structure repair will be more complicated.

I made some more progress this morning. I wanted to address the alignment of the drivers quarter panel before flipping the car around in the shop to tackle the front fender repair on the other side. The problem being that the quarter stuck out almost 1/4" from the door alignment.

Click to view attachment

My original idea was to cut a patch out of the old door to replace that corner and address the bottom body line F-up at the same time. I had two problems with that plan. One is that it would add another long butt weld across that panel that is Frankenstein enough as it is, and said butt weld would not be possible with the welder in its current crippled state. The second problem is with yesterday's patch fresh in my head, I knew how hard it would be to bend the weld flange with the curve needed to match the door gap, and would probably require building a hammer form.

I decided to try something different and pretended I was a plastic surgeon for the day. The new approach is to just slice the weld flanges of the quarter and lock post open to give the panel a "face lift" to pull it into alignment.

Click to view attachment

While I had the Dremel out, I also trimmed the weld flange on the RD sail panel piece to match the original width.

Click to view attachment

It worked pretty well, my main concern was that the tapered flange width would look goofy, but I don't really think it is noticeable. If it starts bugging me, I have a couple ideas for addressing it. This pic makes the repair look way more ugly than it is. It seems like unless you primer a repair, the camera makes it look a lot better or worse than it actually is. Anyway, the flange looks good and just needs some minor cosmetic cleanup even if you can't tell in this pic.

Click to view attachment

And the new alignment looks good cheer.gif

Click to view attachment Click to view attachment

Up next is to use a similar approach to fix the bottom body line that I FUBARed when I patched the rust down there.

Click to view attachment
bbrock
Well that didn't work

After lunch, I slit open the bend at the bottom of the driver's quarter panel, adjusted the line, and started to weld it back up.

Click to view attachment

But I had blocked out just how sketchy that part of the panel was to begin with but was quickly reminded as melted lead started dripping down. This is the panel that I had patched rust on the bottom (badly), and then fiddle farted with body solder to smoot and strengthen pitting on the inside from too much road salt. I quickly realized this was not going to be acceptable. So, i spent the rest of the afternoon with shrinking disc, hammer, and dolly to straighten the panel in prep for cutting and patching. The closer I got to that corner, the worse shape the panel was in. Cutting that out will be an improvement in many ways. Still a little more panel beating to do, but its really close. Here the outline of about where I'll cut.

Click to view attachment
Lucky9146
Great to watch and see the problem solving and welding. Looking good!
It's nice to see progress beerchug.gif
driving.gif white914.jpg
bbrock
QUOTE(Lucky9146 @ May 28 2018, 09:42 PM) *

Great to watch and see the problem solving and welding. Looking good!
It's nice to see progress beerchug.gif
driving.gif white914.jpg


Thanks, and right back at you. I love your GT project but those seats... well that's a WHOLE other level! drooley.gif beerchug.gif
bbrock
Overdue for an update. I've had a few distractions from the project. Two weeks ago I made a quick trip to Petaluma to visit friends. Turns out my friend lives only a couple miles from Tygaboy so I managed to pay Chris a visit and got to meet the infamous Martin. I really enjoyed visiting with Chris and seeing his amazing project. That hight tech jigsaw puzzle makes a lot of sense when you see it in person. Unfortunately, I wasn't able to attend the fabulous fab workshop at Chris' place the following day. Instead, I was out on Point Reyes with a bunch of other biologist nerds doing biologist nerd things. Here's my friend Tim showing off an aquatic garter snake.

Click to view attachment

When I got home, I had a lot of other chores to attending to that kept me away from the car and enjoying the nice Montana weather.

This Poor Frankenpanel

Finally, I was able to get back to the Porsche around mid-day last Sunday. Some days you go to the shop and everything just seems to click. Last Sunday was not that day. I dug into repairing the lower portion of the left rear quarter. First I made a template tracing the rear door edge so I could match the contour for a perfect match with the patch.

Click to view attachment

Cut the patch from the old door and clamped it in. Looks pretty good.

Click to view attachment

Welded it in and that's when things started going sour. It looks pretty good here.

Click to view attachment

But the bend at the lock post wasn't as crisp as the original and I had pretty good luck sharpening the RD panels up with a body hammer. So I tried that on the bottome and totally F@##d up the gap. headbang.gif I think I can fix it without cutting but it will require a long, thick piece of bar stock that I didn't have on hand so will have to wait. The other problem is that I started getting nasty blowout on the vertical section of butt seam.

Click to view attachment

When I cut that opening, the metal looked nice and solid all around the edge, but after the blowout, I peaked around back to find lead spatter out around pitted metal. Just a reminder, this was the panel I farted around with body solder to fill, smooth, and strengthen some moderately pitted areas. The damn stuff sure works because when I inspected to size the patch, it looked like clean, smooth, shiny sheet metal back there. That is - until the welder hit it. headbang.gif That meant yet another patch had to go in to this poor quilt of a panel. I was really starting to envy those who can just RR the whole quarter with NOS.

Click to view attachment

bbrock
Yesterday I put the patch in and it fit pretty well except the edges were out of alignment by a couple millimeters in a couple spots.

Click to view attachment

Click to view attachment

I could have easily clamped the patch in to match, but I could feel a couple of bulges in the quarter so I pulled out the good 'ol shrinking disc.

After a few passes with the disc, the patch aligned perfectly. There was still a bulge above the first patch that wouldn't shrink out, so I had to make a relief cut in the seam for the first patch.

Click to view attachment

Then the shrinking disc was able to to do it's magic before the switch on my grinder suddenly quit. headbang.gif But today I was able to finish the patch work with a lot of tweaking and cussing. It's still a work in progress as that panel needs a lot of work to straighten it out. I'm pretty sure it will need a bit of bondo, but I'll get it as close to straight as I possibly can.

Click to view attachment
bbrock
Re-hinged

Finally today, I needed a break from tedious panel repair and decided to weld in the trunk hing pivots now that I have a trunk lid to align. First I had to find where I put the dang pivots. That took about 45 minutes. Then aligning the lid just so to get the pivots in the right place. I hit them with 3 plug welds on each side plus 5 tack welds on the edges just to be sure. This picture makes those welds look pretty crappy even though they look nice in life. I'll still grind them down a bit before painting though.

Click to view attachment

My new old trunk lid needs just a little adjustment. There is a low spot along the left edge and just a more subtle one near the hinge on the right. I'm guessing this was caused by reefing the lid down on my roof rack with ratchet straps for the ride home from Iowa. It should be easy to gently persuade the lid back to the right curve and I'd rather have this than having it fly off the roof in transport.

Click to view attachment

The lid actually goes up and down like it is supposed to. That's nice. smile.gif

Click to view attachment
Dion
Perseverance! Nice one Brent. You’ve certainly had some challenges.
Looking great. Those trunk hinges can be tedious.
It’s coming along nicely. Bang on!
tygaboy
QUOTE(Dion @ Jun 18 2018, 04:27 AM) *

Perseverance! Nice one Brent. You’ve certainly had some challenges.
Looking great. Those trunk hinges can be tedious.
It’s coming along nicely. Bang on!

agree.gif
What Dion said.

Brent, it was great meeting you and I hope to make it to your place at some point.
Good to see you back at it. Keep on keepin' on!
bbrock
Thanks guys. It may be more stubbornness than perseverance but I appreciate the encouragement. Whatever challenges I have faced can be chaulked up to two things: I'm a CSOB on a budget so am trying to salvage bits that most people would just remove and replace; and I'm punching way above my weight class with respect to the skills this project demands. I knew that going in and it is what I enjoy about it.

I also forgot to mention that I started last Sunday by replacing the diodes (and both capacitors) on my welder for a second time. It is a total PITA job that set me in a foul mood before diving into that rear quarter bottom. No doubt that contributed to stupid mistakes. beer3.gif

Made a little progress today. First I flipped the car around in the shop which isn't easy, but gives me better access to the passenger side. Time to dive into this mess.

Click to view attachment

Nasty rot at the bottom of the door and fender. Somebody has been in there before to braze in patches (there was one on the door too but it is gone now). Let's see what I can do with that door rot first.

Well that was easy! Thanks to Marc O. av-943.gif A couple bolts and even the gaps and alignment look good. cheer.gif

Click to view attachment
TravisNeff
You have got some serious courage Brent. popcorn[1].gif
bbrock
Metal Origami
Had some distractions be finished up the fender patch this evening. It was largely just a repeat of what I did on the other side so I'll try not to repeat, but the lower hinge post repair was more extensive so I'll give a little detail how I approached it.

That little piece is quite a complicated affair. there is a flat area that fills the space between the fender wall and inner hinge post with a flange that spot welds to the chassis inside the fender, then there is a little bead around the perimeter that makes a little step out to the outer flange where the fender skin crimps on. The step is shallow in depth at the top but tapers to deeper at the bottom, and the whole affair curves around at the bottom to follow the fender contour. That area is not visible with the doors on, even when they are open, so I wasn't concerned with getting an absolutely exact match. I just wanted to match the structural function but get as close to the original as possible. It took some time to figure out how to tackle this with my caveman set of tools. It started with making a cardboard template of the inner flat area.

Click to view attachment

The template was transferred to a metal blank and then the bend line for the spot weld flange was marked and the piece was trimmed leaving plenty of extra metal for the step bead and crimp flange.

Click to view attachment

Then the line for the step bead was marked. It looks goofy here but will make sense later.

Click to view attachment

Next, I dusted off the old hammer form used for fabbing the inner long bottoms and banged out the step.

Click to view attachment

Then into the brake to form the outer wall with step bead and flange.

Click to view attachment

Finally, the bottom was rolled to form the piece. After bending the spot weld flange in the vice, it was ready for trimming.

Click to view attachment

The tricky part was removing the original material but leaving enough of an outline to serve as a kind of wire frame for final fitting and trimming.

Click to view attachment

Then I could clamp the patch in place and use the frame to mark trim lines.

Click to view attachment

Final trim was done but grinding away the original door skin that remained on the wire frame with the patch clamped in place. That brought the edges of the new crimp flange exactly to the depth of the originals.

Click to view attachment

too be continued...

This is a "lo-fi" version of our main content. To view the full version with more information, formatting and images, please click here.
Invision Power Board © 2001-2024 Invision Power Services, Inc.