Overdue for an update again.
As usual, I like to divide time between rustoring the chassis and a more fiddly task I can do while relaxing on the couch, staring at the idiot box. This time, it was re-keying the door locks. I ran into a problem with the pass side door handle when the
outer stud just spun free and detailed in another thread. Probably as a result of trying to get that handle off, I found a hairline crack where the hinge arch meets the mounting tab.
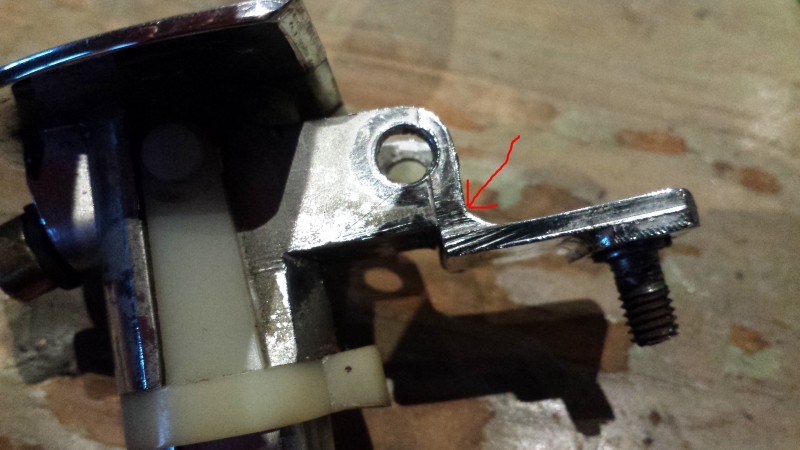
I knew that would bite me in the butt eventually so decided to attempt a solder repair with a propane torch to reinforce the crack to maybe by some time. I figured the handle was toast otherwise so nothing to lose. The repair actually went well and I think I had it... But then I decided to touch it up just a little better...

I wound up blowing out a chunk of the hinge arch with the torch. It didn't blow all the way through, but enough to weaken the piece. Undeterred, I decided to experiment with the limits of cheap pot metal repair. So I melted on a big glob of silver solder and then ground and shaped it back to it original form.
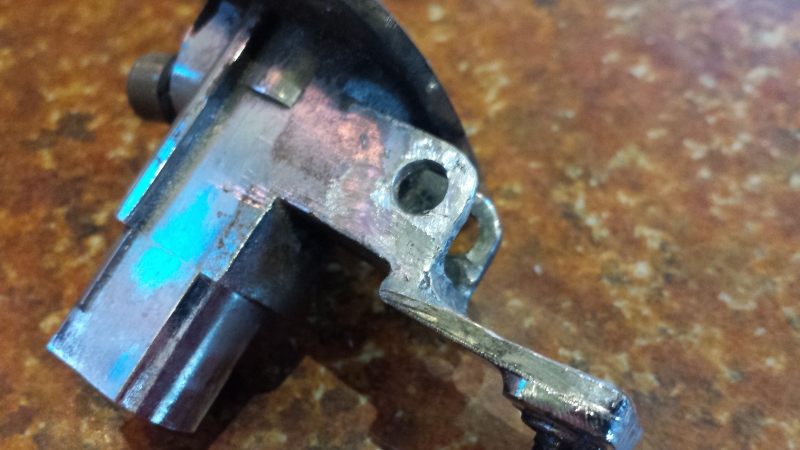
Amazingly, that seemed to actually work! I reassembled the handle with spring and reefed on it a bit to see if it would hold. It did! And then I noticed that the hole on the repaired side was ever so slightly misaligned so the gap with the flapper tapered a tiny bit... like maybe 1/64". I stewed on it awhile and decided I couldn't live with that. So I decided to touch it up to make it perfect.

And here is the result:
Click to view attachment I cry Uncle! If anyone has a handle with a busted flapper but good base they would like to sell....

Anyway, rekeying the locks was a piece of cake. Dan (a.k.a. Tweet) set me up with new tumblers. He actually went way beyond what I expected to get this done with minimum cost. Dan also sold me a nice ignition lock to replace the VW part that I had on the car, and a new key blank that I will have cut to code. Now I have all of my locks working with the original key for this car (glove box lock not shown because it already fit the key so I didn't mess with it). The frunk handle was also refreshed with a new coat of paint.
Click to view attachment Going to hell. Back on the car, it was time to dig into the hell hole. This is the make or break moment for the project. I had peeked inside with a fiber optic scope before, so there were no real surprises when I opened up the long. It's bad.
Click to view attachmentClick to view attachmentClick to view attachmentAnd still bad after a bit of cleanup.
Click to view attachmentAfter gaining insight and inspiration from many previous build threads, my plan is to rebuild the inner wheel well and lower section of inner long with fabbed parts and button up the outside with RD pieces. I believe I can do this without removing that outer suspension console.
I started with the top of the inner long in the wheel well by fabbing a patch made out of one of the sail panels I previously removed for replacement. Before this project, I didn't even know what a metal shrinker and stretcher was. This was my first attempt using one. I like these tools!
Click to view attachment Click to view attachment I carefully gut away just the top layer to keep the inner double layer intact. After cutting around the perimeter with a dremel and cutoff wheel, the layers were easily separated with an air chisel. I drilled the inner wall for rosette welding to the new patch. This should provide a strong reinforcement to the patch. Many thanks to Cary for pointing out the U-Pol copper rich weld through primer!

I had been using Eastwood's self-etching weld-thru and hate it. This copper stuff is fantastic.
Click to view attachmentClick to view attachment Then it was just a matter of clamping the patch in place and welding it up.
Click to view attachment Click to view attachment While I was there, I decided to patch the rust on the firewall.
Click to view attachment I fabbed a couple patches from the other sail panel. So far, all the patches in this car have been made either from metal removed elsewhere on the car, or from unused portions of donor parts from other 914s. For some reason, I think that's kind of cool. The upper piece was my first complex bend on this project. I'm happy with how it turned out and this gave me confidence going forward. Here are the patches loose before cutting out the rust.
Click to view attachment Click to view attachment And here they are, welded in with just a little more grinding to go. I had one spot that blew through over the bend at the lower right of the upper section. I lost the definition of that bend repairing the blowout and the location of the rear engine shelf made it impossible to get a dolly behind to bump the crease back in. So I tried my hand at using body solder. My hat is off to anyone who has the skill to use this stuff
I don't! In the end, I did get the bend somewhat redefined but couldn't get the solder to feather out the way I'd like. You can see my botched solder job just above where the pinch seam runs diagonal.
Click to view attachment I'm still having trouble with that sunken edge around the welds preventing me from being able to grind the weld smooth without grinding away parent material. Do I need to increase my wire speed to get more fill in there? Structurally, it is sound, but it would be nice for all those welds to disappear without using filler.
Click to view attachment And here it is with a temporary coat of primer. Not perfect, but not bad. I think it will look perfect with a very thin skim of FG reinforced filler. The dark spot is wet paint - not a dent. That weld bead in the pinch seam looks worse in these pics. But I think I'll hit it with the grinder anyway.
Click to view attachment Click to view attachment That's how it looks today. Next up is rebuilding the lower part of both layers of that inner wheel well.


 I was thinking the same thing!!!


 and wow... you nailed that gauge cluster, it looks new, well done and gl


 , but not too many. I really struggled over where to make that seam. I wanted to hide it under the center support channel but that looked like it would get involved with the transmission mounts and other stuff. In the end, I'm happy with where things sit. But I was nervous as hell about it. The nice thing about a monster butt joint like this is that there is a lot of real estate to move your tack welds around in and keep things cool. It still took a couple hours of "tack - tack - tack - wait...." though.


 I checked around the car to make sure my gauge was correct and discovered that all of the structural stuff is 19ga. but the body skins are 20. I think that's too thin for fabbing inner long patches so I guess I'm off to buy a sheet of 18ga tomorrow. And here I was feeling smug about the idea of creating all my patches from metal salvaged elsewhere on the car. Oh well, I can still use the lid for some door skin patches at least.
 Someone did try to wave me off but I was already in it. Actually, now that I have some plywood down over the gravel under the tent, they are working pretty well. As long as the car stays fairly level without side loading, they seem to do their job. But I learned that lesson when the left front solid tire tore clean off as I tried to wheel the car around on the gravel. I swapped a pneumatic tire back in on that corner which, on the smoother surface, rolls just as well as the solid tires. So if I sheer any more rubber off, I'll just continue to swap back the pneumatics. Cheap is cheap, but they are getting the job done so far.
 I didn't completely remove the flanges of the original console and welded the new one over the top with globs of filler. Then I slathered a pound of bondo around to pretend that the welding (it was my first welding project) didn't look like
  Terrible workmanship. But I can't be too hard on myself. Crappy or not, for less than $150 and two weekends, I was able to turn my $500 car purchase into an acceptable looking, and very driveable '73 2.0L that gave me many, many, pleasurable miles of driving. Given the crappy workmanship, I wasn't too surprised to find a nest of tinworms lurking under the console that looks like had migrated to the outer console.
 But it complicates the project because I'll have to figure out an alternative way to support the car while I do the repair and make sure the console goes back in the right spot. Anyway, I got the inner long mostly cleaned off.


 Surprise, surprise, the door wouldn't shut when I was done. I had to grind the striker to make it work.
  What I really need is a better selection of dollies, I think.

 and
and 