Help - Search - Members - Calendar
Full Version: Intro from Montana: '73 2.0L rustoration thread
914World.com > The 914 Forums > 914World Garage
Pages: 1, 2, 3, 4, 5, 6, 7, 8, 9, 10, 11, 12, 13, 14, 15, 16, 17, 18, 19, 20, 21, 22, 23, 24, 25, 26, 27, 28, 29, 30, 31, 32, 33, 34, 35, 36, 37, 38, 39, 40, 41, 42, 43, 44, 45
tygaboy
QUOTE(bbrock @ Aug 23 2018, 10:06 PM) *

... integrated the rear window defrost cable I picked up from Mr. Baker into the main harness. Maybe some day he'll ship he window and I'll pay him poke.gif


Yea, yea, I know. I'm just trying to figure out the best way to safely pack it. I plan to get to that this weekend. You'll get my bill soon. happy11.gif
bbrock
QUOTE(aggiezig @ Aug 24 2018, 10:21 AM) *

Great work as usual. There's a lot more time invested in cleaning up that harness than the pics show.


Ain't that the truth? I need to go back and look, but I'm sure I started this last year. But honestly, the biggest time suck was the time spent sourcing parts and materials. There is no one stop shop, that's for sure. Finding small quantities of the necessary tracer wire is the worst. I used five sources in 3 countries and 2 continents just for the wire! I think there would be a market for someone to supply customized kits for people repairing these old harnesses. smash.gif
bbrock
QUOTE(tygaboy @ Aug 24 2018, 02:44 PM) *

QUOTE(bbrock @ Aug 23 2018, 10:06 PM) *

... integrated the rear window defrost cable I picked up from Mr. Baker into the main harness. Maybe some day he'll ship he window and I'll pay him poke.gif


Yea, yea, I know. I'm just trying to figure out the best way to safely pack it. I plan to get to that this weekend. You'll get my bill soon. happy11.gif


Please do! You can see that I'm just a week or so away from being ready to install it! av-943.gif No hurry my friend, no hurry at all. beerchug.gif
Dion
I know how much work you put in that harness. I saw Dave’s all apart
when he was doing his. It scared me off from tackling mine!
Beautiful job Brent!
porschetub
QUOTE(bbrock @ Aug 25 2018, 02:53 AM) *

QUOTE(76-914 @ Aug 24 2018, 08:41 AM) *

Looks good Brett. Have you thought about adding a little solder to those terminals? idea.gif @McMark got me hooked on soldering crimp fittings. beerchug.gif


Jeff Bowlsby said (and I've read it other places) that soldering crimp connections is frowned upon and not allowed in aviation standards. The rationale is that terminal connections are subject to vibration flex and a rigid solder connection can fatigue and fail. I don't know how important that is in the real world of a 914 and suspect it isn't an issue, but that's why I spared the solder. That said, I did solder a few flag connections because I couldn't justify $40 for a special crimper just to do a couple connections. So I massaged the best crimp I could with the tools I have and then added a little solder for good measure. I'd be interested about other people's thoughts and opinions on this.

Someone wiser than me said to sweat the solder in to the ends then crimp,so I do that to the limits of my soldering iron,any joints are soldered and glued heatshrink anyway...do it once and do it right.
bbrock
Woo @#$%ing HOO! - Blasting is DONE!

Chassis is finally stripped.. I think. I spent a couple days digging out as much of the remaining seam sealer as I could. It was really tempting to leave sealer that looked in good shape alone, but pretty much every batch I dug out had rust hiding under it.

Crap removal in progress and after. Shiny areas are where I used an abrasive disc.

Click to view attachment Click to view attachment

Some of these after pics look a little gross because it has been cool and rainy here so I sprayed areas that were flash rusting with phosphoric acid.

Click to view attachment Click to view attachment

Click to view attachment Click to view attachment Click to view attachment

How much trouble will the remaining seam seal make? I'll shoot PPG epoxy primer then new seam sealer.
bbrock
This box of Cracker Jacks had a couple more toy surprises inside. Stripping off sealer on the door jambs, I found a little more rot hiding in the passenger side.

It's a little hard to see, but the pinch weld has rusted through here.

Click to view attachment

I'll probably just treat this one with rust converter and forget about it. There is supposed to be a hole here anyway, just not quite this big. It will be encapsulated in seam sealer on both sides again anyway.

Click to view attachment
aggiezig
Speaking from experience, that is hands down the worst job on this car. You did an awesome job and everything looks super clean now. Are you going to seam seal back over these areas? I left some bare and seam sealed others. No real rhyme or reason other than what I thought "needed" it.

Keep up the pace, you're killing it.

-Cole
Lucky9146
Keep at it, looks like you are doing all the right stuff! One benefit of going to this level is you know exactly what you have. beerchug.gif
driving.gif white914.jpg
bbrock
QUOTE(aggiezig @ Aug 27 2018, 01:47 PM) *

Speaking from experience, that is hands down the worst job on this car. You did an awesome job and everything looks super clean now. Are you going to seam seal back over these areas? I left some bare and seam sealed others. No real rhyme or reason other than what I thought "needed" it.

Keep up the pace, you're killing it.

-Cole


Thanks guys. Yes, I will be going back over with seam sealer but using a little more finesse in the areas where the factory gobbed it on to form rust traps. I'm still not sure what the best sequence is. My initial thought was to spray PPG epoxy primer first, then put sealer on top of that followed by another coat of primer but maybe the sealer should go down on bare metal first?

I was also thinking about using brush on sealer on all seams and then spraying beige bedliner over appropriate seams like Kent did on Cairo's build to replicate the sprayed seam sealer look. I haven't seen a more affordable way to get that factory look.
bbrock
Back to patching

I cleaned all the blasting grit out of the cracks and crevices... then I cleaned out the car. laugh.gif I've seen a lot of complaints about how hard it is to get blasting media out of the chassis, but honestly, it wasn't that hard. It did take a few hours. Before blasting, I taped off all of the holes and stuffed plastic bags to minimize what got inside boxed cavities. After blasting, I spent about 3 hours using a combination of the shop vac and compressed air cranked up on full to suck and blow the media out all the holes. When I was done, I couldn't hear anymore grit rattling around when I rotated the car, nor did more than a half teaspoon fall out. I'll go through it again before painting, but it seems pretty clean.

Yesterday I started on patches for all the nice surprises revealed after blasting. First up was that left fender that was hiding under Bondo.

Click to view attachment

The fender had been hit, somewhat straightened, hogged out with some death tool to roughen the steel before hiding everything with Bondo. To add insult, the side wart was stuck on with sheet metal screws instead of the proper clips. The plan was simple, straighten the panel, weld up the slide hammer holes, then patch the rusted metal around the wart. Spent almost a full day with shrinking disc and hammers and dollies to get the panel straight and smooth. Welding the holes went well until I worked toward the front and everything started blowing out just waving the welder nozzle toward it. Closer inspection showed dumbasses at the body shop had hogged down the steel to about the thickness of aluminum foil in spots. Time for plan B:

Click to view attachment

I tried to cut out all the metal that was either thin or rusted without getting into the curve at the top of the fender that I thought would be hard to match, or the rim around the turn signal bucket. I measured the piece I cut out and the thinnest spots were down to 27 gauge!!!

Here it is ready for welding.

Click to view attachment

Things went pretty well except right under the turn signal where I hit some thin metal I hadn't noticed. I thought about cutting another patch but fueled by stubbornness, I was able to use a copper spoon to bridge the patch to good solid steel. After grinding, I sprayed a guide coat and block sanded with 80 grit. After just an hour of hammer and dolly, I had the panel looking pretty decent. It will take a few more hours with shrinking disc and hammers, but I think this is only going to need a very thin coat of filler to mainly fill the shrink around the welds. After the hard fight, I'm ecstatic how it is turning out. And look, no wart hole. aktion035.gif

Click to view attachment

Then I took the wife and dog into town for a late lunch. After I got back, I tackled the fender patch next to the hood.

Click to view attachment

This one was pretty easy.

Click to view attachment Click to view attachment

One last thing. With all the grinding still ahead of me to get this thing ready to paint, I decided to splurge and bought two boxes of 3M Cubitron II Roloc grinding discs. On box each of 36 grit and 80 grit. For some reason, you have to swear you are a professional when you buy these. screwy.gif I love these discs! The discs last about 4X longer than the 3M green discs I've been buying and the edges don't wear out. Definitely the biggest bang for the buck I've found.
bbrock
IPB Image

First, let's make a template in case warts become a fashion statement in the future and I need to put them back.

Click to view attachment

After guide coat, block sanding, and banging on it a bit. If I had a bullet pick, I think I could bring those last few low spots around the welds up. Not sure it is worth it, a tiny bit of filler is all it will need.

Click to view attachment

Cairo94507
Really looking nice. beerchug.gif
bbrock
Harnesses done.... oh so close anyway.
Got the last bit of gray sleeving yesterday so I was able to build the last harness for my car. The old temperature sender harness was beat to hell and crispy as a pretzel stick.

Click to view attachment

It's just a single wire, so easy to do. Good thing I special ordered the correct green/black wire so I could hide it under the sleeving where nobody will see it. I cleaned and straightened the brackets, gave them 3 coats of high temperature satin black and baked them in the oven for 15 minutes at 400F. I don't know if high temp was necessary but just to be safe. Should work anyway.

Click to view attachment

Had to take a shot of all my brand new and completely restored harnesses together.

Click to view attachment

I mentioned the minimum buy on wire left me with extra, so I built a couple extra alternator harnesses. If anyone is looking for one for cheap, let me know.

Click to view attachment

And there's still one incredibly annoying loose end. Literally. I still don't know the correct length for the coil wires on the ignition harness so can't crimp the terminals on. If anyone has an ignition harness handy and can get that measurement, I'd be a happy dude!

Click to view attachment

Regardless, after months of having wiring crap junking up the family room, I should score points with the wife when I box up all the harnesses and clean up this mess.
bbrock
Spent this week chasing down all the little rust holes revealed during blasting. I think showing them all would get pretty tedious, so here's just a couple representatives.

Click to view attachment Click to view attachment

Click to view attachment Click to view attachment

Click to view attachment

Click to view attachment Click to view attachment

The last patch was the one I said I was going to ignore, but I think we all knew I couldn't dry.gif I didn't get too crazy with it though, it will be sandwiched between layers of seam sealer.

IPB Image Click to view attachment

That is the absolute LAST rust repair! rocking nana.gif monkeydance.gif rocking nana.gif monkeydance.gif rocking nana.gif monkeydance.gif

Now for the long slog of grinding, pinhole filling, and metal finish on the way to paint. smash.gif welder.gif
burton73
Hi Brent,

When does the weather start to turn for you up there?


Bob B
defianty
Looking good Brent!
bbrock
QUOTE(burton73 @ Sep 9 2018, 02:05 PM) *

Hi Brent,

When does the weather start to turn for you up there?


Bob B


Hi Bob,

Although we usually get our first dusting of snow at the house sometime in August (which is late this year), the serious snow typically doesn't start until end of October to end of November although I've seen 2 feet of the white stuff dump on Oct. 1. So I'm looking at anywhere from 1-3 months of good weather in front of me before Mother Nature shuts me down. And by good weather, I mean awesome weather for painting. Highs in the 70s, low humidity, and very few bugs.
bbrock
Doing cleanup
Up until now, my priority has been getting fresh metal onto the car. The longer a part sat in my overly cramped shop, the more likely for it to get stepped on, tripped over, or lost. That meant leaving a lot of metal finish work for later and a lot of embarrassing rough edges on the car. Now I finally get to clean up all the ugly crap that has been bugging the stromberg.gif 
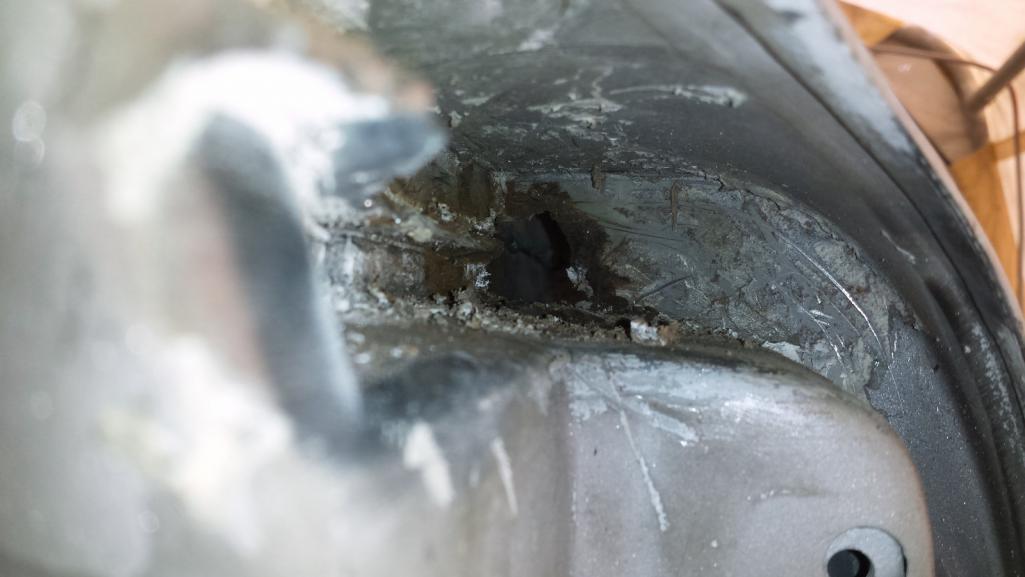
out of me. I'm starting from the front moving back: grinding welds, chasing pinholes, smoothing snaggle-toothed flanges, and stuff like that.

Plan is to straighten, grind, and smooth as much as I can, then give the whole chassis phosphoric acid treatment inside and out. Then I will go over all weld seams with the kevlar reinforced and zinc enriched filler that Ben ( @mb911 ) turned me on to for final finishing.

Click to view attachment


Click to view attachment


Click to view attachment

I need to figure out a way to mimic spot welds on those flanges. I've seen a few techniques on restoration forums but none that jump out as a great solution on flanges like these. One guy made a custom dimpler with vice grips which looks slick, but so much of these flanges are welds that I think the flange is too hard to dimple that way. I think I'll experiment with a small carbide burr to see if I can just grind little divots that will mimic spot welds when painted.


bbrock
A few more pics. If you've followed from the beginning, you might remember the front trunk floor was the first patch on the project. Boy was I a shitty welder then. Still am, but less so. No surprise I had a lot of shrink around this weld but it isn't half bad either. It will only take a thin bit of filler to smooth out.

Click to view attachment

Welded up holes drilled for the fuel pump relocation above the steering rack. I'll be moving it to a late model access cover. Also had a half dozen rot holes from mouse and weasel piss to fill. If you can't see them, then I'm happy. smile.gif Left a couple boogers down in the bottom that I can't get to with tools. They will be buried under sealer anyway.

Click to view attachment

One last one for the road.

Click to view attachment
bbrock
Picking Boogers

I've been busy but unfortunately, this is probably the most boring part of the project for you all, but gratifying for me because the chassis is finally starting to look in life like it has looked in my mind for a long time. I've been meticulously going over all chassis front to rear cleaning all the boogers and turds off: making sure every plug weld is completely filled and ground flat, tuning the flanges so they are straight and even, all butt welds are light tight and ground flat, and generally getting the metal as close to perfection as my limited skills will allow. It's looking really good but sadly, phone pics don't do it justice and it won't be acceptable until I've applied a little filler to smooth welding shrink lines that seem to pop out like huge zits in photos. Here's just a few pics but I'll keep them to a minimum so it doesn't get to tedious.

Click to view attachment Click to view attachment

Click to view attachment Click to view attachment

Click to view attachment Click to view attachment
bbrock
I discovered some piss perforations providing unwanted ventilation to the foot well.

Click to view attachment

I decided to gamble with just trying to zap the holes shut. Well that didn't work.

Click to view attachment

Just the slightest tap of the welding trigger on low left me chasing holes around. This will need a patch, but it was getting late in the day and I need to be fresh for it.

Details Matter

Instead, I finished the day yesterday on a little detail that has been bugging me.The RD door jambs don't have the same detail connecting them to the rear quarter as the originals. Here's how they look.

Click to view attachment

Sorry I've forgotten who's thread I stole this from, but I latched on to this pic as a reference.

Click to view attachment

I'm not sure what's different with the RD piece, but I couldn't replicate that detail exactly. Instead, I tried to capture the essence with my own interpretation.

Click to view attachment

I'm not sure why I was getting contamination in that weld, but I'll be able to fill those pits. Not only does this look nicer, but I'm sure it is essential to restore the proper aerodynamics to the car. biggrin.gif
bbrock
Another Detail

This evening I went to the shop with the intention of patching that footwell, but decided I wasn't in the right mood so went for something easier and more fun. You may recall that I had to fabricate and patch the driver's end of the cabin cross member. It originally looked like this. barf.gif

Click to view attachment

When I soaked the original e-brake switch in rust remover, it disintegrated, leaving me with no pattern for replicating the mounting hole until I got a new switch. Among some parts I bought from @raynekat 's end of project bargains was a collection of door switches and pieces. I bought them hoping there might be a single pole switch in the batch. There was! Now I could lay out to finally finish the cross member repair.

Click to view attachment

After a bit of drilling and filing, I had what I was after.

Click to view attachment Click to view attachment

It even works beer3.gif

Click to view attachment
Yasha7fold
Awesome man. I’m in Billings. What part of Montana are you in?
bbrock
QUOTE(Yasha7fold @ Sep 17 2018, 10:39 PM) *

Awesome man. I’m in Billings. What part of Montana are you in?


Just down the road half way between Livingston and Bozeman beerchug.gif
Dion
Look at all that clean metal!! Wow.
Nice Brent. Let the next chapter begin.
I’m storing key pics from your repairs.
Great reference. Carry on....... welder.gif

beerchug.gif
bbrock
QUOTE(Dion @ Sep 18 2018, 09:43 AM) *

Look at all that clean metal!! Wow.
Nice Brent. Let the next chapter begin.
I’m storing key pics from your repairs.
Great reference. Carry on....... welder.gif

beerchug.gif


Thanks Dion. beerchug.gif If there is ever a spot you'd like a picture of, let me know. I have a crapload of pics that I don't post. I think I'm at overkill as it is.

I forgot to mention the most important part of my latest work. I rewelded any areas of seams on the floor pan and longs that didn't get full penetration due to the failing diode problems. i wanted to make darn sure those members got complete metal fusion. For example, you can see panel edges in a few spots in the left pic. Those have been welded through and ground down.

Click to view attachment Click to view attachment

The only sucky thing is that it means I burned through some of the epoxy primer inside my longs, but I'll be spraying inside with Eastwood Internal Frame Coating followed by 3M cavity wax soon, so they should be well protected.
TravisNeff
I had to grind and reweld my floor seam as well. You just can't get things clean enough.
76-914
If you don't get hung up on the paint work, I'm thinking you and that teener will be at the next WCR. You will never get nominated for the "Slackers Thread" at this pace. beerchug.gif
bbrock
Not much happening with work right now (I'll never get used to the feast or famine life of a self-employed consultant), but that means more time to work on the car. Yesterday I started on the foot well patch and I just finished it. I think this was the hardest patch of the whole project only because I thought I was done with these @#$% things. Access was a bit tricky but not the worst. I didn't document the process - same as the dozens of other patches. It came out decent enough. I wound up with a nasty oil can from putting too much heat in the panel stubbornly trying to zap those holes shut before resigning myself to make another patch. A few passes with the trusty magic shrinking disk had that panel straight and TOIT again!

Click to view attachment

Backside isn't too bad either. Photo doesn't do just to how narrow that crevice at the bottom is. If it wasn't going to be buried under spray-on seam sealer, I'd get in there with a carbide burr and clean it up more.

Click to view attachment

It did extract its pound of flesh though. Floor pan looks like a crime scene.

Click to view attachment

I couldn't work in that cramped space without the cable ties on the tunnel digging into my arm. No biggie.

Click to view attachment

I've said I'd completed my last patch before, so I won't jinx it - just quietly hoping. unsure.gif
bbrock
Moved on to the engine bay today. Plenty of boogers to clean up in there.

Click to view attachment Click to view attachment

Still a work in progress so no "after" shots yet.

The day I finished blasting was cool and rainy so the engine bay flash rusted right away. Thought this was interesting; can you pick out the RD Galvanneal panels?

Click to view attachment

I got a package from Belmetric today which let me take care of that yellow tag on the battery tray. Nice to have that done.

Click to view attachment

I wasn't going to grind the plug welds under that battery tray, but now that I see this photo, I've changed my mind. barf.gif
mepstein
I use some old foam pads, the kind that interlock with different colors, saved from when my kids were young and used them as an indoor playground. Throw one or two in the car when you have to sit or lay down on the floor. Cardboard works but the foam is actually comfy.
euro911
QUOTE(bbrock @ Sep 19 2018, 01:22 PM) *
... I couldn't work in that cramped space without the cable ties on the tunnel digging into my arm. No biggie.

Click to view attachment

...
'Tis a mere flesh wound ... it'll buff out poke.gif

Hell, simply looking at my arms long enough seems to rip the skin open these days dry.gif
bbrock
QUOTE(euro911 @ Sep 20 2018, 09:52 PM) *

QUOTE(bbrock @ Sep 19 2018, 01:22 PM) *
... I couldn't work in that cramped space without the cable ties on the tunnel digging into my arm. No biggie.


...
'Tis a mere flesh wound ... it'll buff out poke.gif

Hell, simply looking at my arms long enough seems to rip the skin open these days dry.gif


Yep. It'll buff out alright. A smart person would use padding or put some tape on the sharp edge like Mark said. Honestly, I didn't notice it was poking me until I saw the lovely painting on the floor pan. Then I ignored it and went back to work. If I'm not bleeding from something at the end of the day, I wonder what's wrong.
bbrock
Had an hour to kill before a conference call this morning which was just enough time to sneak out to the shop and mostly knock off an item on the task list (a great luxury of working from home). When I welded up the outer longs from RD, there were nuts welded in the bottom for the rocker covers on the passenger side, but I neglected to check the driver's side and nope, holes but no nuts. headbang.gif It would have been easy to weld those nuts in BEFORE the panel went on, but we're beyond that now. The solution was these weld-on nutserts:

Click to view attachment

I was a little bummed to see the threaded portion sunk kind of deep in the tube. It would work, but would require a longer bolt than OEM spec and that's the kind of thing that would drive me screwy.gif So instead of sinking them all the way, I mounted them so the threaded portion starts just to the inner side of the hole.

Click to view attachment

I ground them off and think that should work.

Click to view attachment Click to view attachment

I said almost completed the task because there is supposed to be a third nut on each side on the inner wheel well section. The RD panel isn't drilled or fitted with a nut (maybe because there is too much variance in how that piece gets fitted to the car) and subsequently, none on the driver's side where I fabricated a patch using the RD piece as a template. So I will have to mount the rocker covers to locate those holes tomorrow to drill and fit with inserts.

Click to view attachment

At least it was a little progress for the day.
bbrock
FUCH!!!

I was making great progress today and was on track to finish the metal work by the end of the day when I heard air compressor kick on and then quickly off again. The motor was hot as hell so I pulled the cover off to inspect. Found the start of a mouse nest over part of the intake but it didn't seem like it should have blocked air flow that much. Let the motor cool down and started up again. In about 20 seconds, it shut off again. Shit! Tore it completely apart, hoping to find more of that nest inside the motor to explain the problem.

Click to view attachment

No luck. Things looked pretty clean inside. No sign of scorched wires and bearing still spun freely. The only things I found were some carbon buildup on a pair of relay contacts that I assume are part of the thermal protection circuit, and the main blower on the compressor was loose but still spinning. I cleaned the contacts and put the damn thing back together, still not sure what the problem is. By this time, I'd lost half a day of work and it was too dark to mount the compressor back on the tank. I'll do that in the morning and hope for the best.

Click to view attachment

Not sure what the plan will be if it's still not working. Just when I thought I might actually beat winter and get some paint on the car. headbang.gif hissyfit.gif
tygaboy
As if just the work on the car wasn't enough... I know you know this but, once you're car is "done", it's these sorts of things that add a richness to the story of the build.
That and bad dioeds, etc...!
Chin up, my friend. You're getting it done!
first.gif cheer.gif aktion035.gif
bbrock
Well, I put the compressor back together this morning and fired it up. It made 122 psi so we'll see how it goes. It bothers me that I never found anything definitive wrong. One possibility is our shitty power supply out here in the sticks. Our power flickered off while I had the motor open and torn up. I suppose it's possible we weren't getting full voltage on both phases which could explain a hot running motor. Keeping fingers crossed. blink.gif
bbrock
Compressor has been running well the last 3 days. Still a mystery why it was overheating on Saturday. Continued with tidying up, including replacing a few of the metal tab cable hold downs. This little bastard is the one that finally made me lose my shit but I got it in bootyshake.gif

Click to view attachment

Why Do Something the Hard Way When There's an Even More Difficult Option?

Today I was down to the last yellow tag.

Click to view attachment

Started by making a cutout template.

Click to view attachment Click to view attachment

Got everything marked out and ready to cut but couldn't find a good reference photo of the opening so put out an S.O.S. on the World. @bretth came to my rescue with a good shot of his car which confirmed my suspiscion. There is supposed to be a flange bend surrounding the fuel pump opening. That changed thing a bit. I set my compass to 7mm (a common flange width on the car) and scribed lines inside the final opening dimensions. These would be my cut lines.

Click to view attachment

Now I was ready to cut.

Click to view attachment

To be continued...
bbrock
After the cuts were made, I hammered over the 7mm flanges using a steel bar clamped to the back to form a bending brake. The photo shows a wood brake because the metal bar wouldn't fit in this bottom area. It worked just as well.

Click to view attachment

After finishing these with hammer and dolly and a little file work, the looked like factory work, and these little flanges really help add stiffness back to that panel. After cutting the opening, the panel drummed really loud when thumped. After bending the flanges, it sounded very solid.

Last step was to weld in some small tabs in the corners and grind everything smooth. Now here's the frustrating part. The finished product actually looks pretty amazing, but every picture I take of these bare metal areas wind up looking like a bag of buttholes. You'll just have to trust me it looks better in life. Can't wait to have primer on so photos don't all look like ass.

Click to view attachment

Click to view attachment

And one with the cover on.

Click to view attachment

Now the only welding left is to reinstall the frunk braces. I'm waiting until closer to primer for that as I want to spray under the headlight buckets and backsides of the reinforcements with epoxy before they go on. Everything else has been gone over, ground, straightened, massaged, and sometimes cussed. Time to step back and admire her in total before she goes out to the tent for an acid bath. She's solid, clean, and dead sexy!

Click to view attachment

Click to view attachment

Click to view attachment
Dion
“This little bastard is the one that finally made me lose my shit but I got it in “ lol-2.gif
popcorn[1].gif loving this. Get em Brent !
914_7T3
I am amazed at the amount of detailed work that you are knocking out.

If my car needed that level of work, I would never be able to bring it back. It'll be so worth it when its done! Keep going!!!

beerchug.gif
bbrock
QUOTE(914_7T3 @ Sep 25 2018, 09:13 PM) *

I am amazed at the amount of detailed work that you are knocking out.

If my car needed that level of work, I would never be able to bring it back. It'll be so worth it when its done! Keep going!!!

beerchug.gif


I'm just hoping it looks half as nice as yours when its done. drooley.gif
bbrock
QUOTE(Dion @ Sep 25 2018, 09:12 PM) *

“This little bastard is the one that finally made me lose my shit but I got it in “ lol-2.gif
popcorn[1].gif loving this. Get em Brent !


Yep, a kanipchen was definitely had! The cramped and cluttered shop space really gets on my nerves and was particularly getting on them Sunday. It gets even worse when I think about this 2,000 sq ft. shop that I built with my own two hands specifically to restore this car decades ago, but for some reason, got the itch to move to Montana before the shop was even finished.

Click to view attachment

Click to view attachment

Click to view attachment

Okay, it was a good move. Just today I watched a bear walk across the neighbors lot, almost ran into a bull moose stepping out the front door to check on the dog, and listened to elk bugling from my porch. I have no reason to complain. beerchug.gif
bbrock
One Last Thing

Was getting ready to wheel the tub out for a full Ospho treatment but I was never happy with my repair of the tricky area where the frunk cable pull attaches to the bulkhead. The butt welds were Swiss cheese and rough.

Click to view attachment

I close up all the welds, did a better job of grinding, and welded and redrilled one of the screw holes. This is yet another bag of buttholes looking photo, but the repair looks much better. Still not great, but they best I can expect working in an inaccessible place with surface pitted metal that wants to blow out, and a welder with mediocre skills at best... but it's strong.

Click to view attachment
altitude411
How do we get from this...


QUOTE(bbrock @ Sep 27 2018, 09:17 PM) *


Okay, it was a good move. Just today I watched a bear walk across the neighbors lot, almost ran into a bull moose stepping out the front door to check on the dog, and listened to elk bugling from my porch. I have no reason to complain....

Brent B.


To...

QUOTE


This is yet another bag of buttholes...


'''in ONE day?!? Have you been drinking the water from the beaver pond again? biggrin.gif

Awesome work my friend. Very much enjoying watching the build. I hope you are enjoying the beautiful fall colors on the "hill" before it all turns to white. beerchug.gif
bbrock
QUOTE(altitude411 @ Sep 27 2018, 11:29 PM) *

How do we get from this...


QUOTE(bbrock @ Sep 27 2018, 09:17 PM) *


Okay, it was a good move. Just today I watched a bear walk across the neighbors lot, almost ran into a bull moose stepping out the front door to check on the dog, and listened to elk bugling from my porch. I have no reason to complain....

Brent B.


To...

QUOTE


This is yet another bag of buttholes...


'''in ONE day?!? Have you been drinking the water from the beaver pond again? biggrin.gif

Awesome work my friend. Very much enjoying watching the build. I hope you are enjoying the beautiful fall colors on the "hill" before it all turns to white. beerchug.gif


lol-2.gif What can I say? I'm a mercurial fellow... like the weather. Did you get any of this stuff last night?

Click to view attachment

altitude411
Yuck! barf.gif No. I'm a lowlander... only 4914 (shades.gif) above, but like your paint job, I can see it from here dry.gif


* sigh* guess its time to winterize the boat
Dion
QUOTE(bbrock @ Sep 28 2018, 05:37 AM) *

QUOTE(altitude411 @ Sep 27 2018, 11:29 PM) *

How do we get from this...


QUOTE(bbrock @ Sep 27 2018, 09:17 PM) *


Okay, it was a good move. Just today I watched a bear walk across the neighbors lot, almost ran into a bull moose stepping out the front door to check on the dog, and listened to elk bugling from my porch. I have no reason to complain....

Brent B.


To...

QUOTE


This is yet another bag of buttholes...


'''in ONE day?!? Have you been drinking the water from the beaver pond again? biggrin.gif

Awesome work my friend. Very much enjoying watching the build. I hope you are enjoying the beautiful fall colors on the "hill" before it all turns to white. beerchug.gif


lol-2.gif What can I say? I'm a mercurial fellow... like the weather. Did you get any of this stuff last night?

Click to view attachment

Now that’s a pretty scene. That view I’m sure helps with tasks on hand.
Nice work as usual.
bbrock
Let's Drop Some Acid
Timothy Leary had his preference, but I went with phosphoric to turn on, tune in, and drop out. Started Friday afternoon by spraying the insides of all boxed frame members that weren't opened up and sprayed with epoxy during the few minor rust repairs I've done on the chassis. I left those to steep overnight to give plenty of time to convert any rust lingering in there. I may repeat that treatment depending on what a boroscope inspection shows.

Saturday morning I sprayed the rest of the chassis with a 25% solution of acid according to label directions for etching metal. I'm not convinced that's better than full strength. I let that sit for about an hour because it was chilly in the tent so I allowed more time. Then the whole tub got rinsed with water inside and out. I left it in the tent for a few hours to drip while I did some cleaning and reorganizing in the shop.

After rolling the tub into the shop, I went over every seam or area with overlapping metal with a heat gun to bake any moisture out. Same for enclosed frame members. I also left cranked the thermostat up on the garage just to make sure the car is completely dry. After it was dry, it left an ugly scene.

Click to view attachment

Next I set about scuffing all the loose coating left behind with red Scotch Brite pads. It's hard work and the hot garage makes it more so. Here's a comparison shot. Drivers side untouched, passengers side scuffed, vacuumed, and wiped down with wax and grease remover.

Click to view attachment

Here's a look at a full side done.

Click to view attachment

I'm working up quite a sweat today working over the rest of the tub. So those minor rust repairs? Here's a pic of whats left of the original rear deck lid on my car. Most of it is back in the car in various places, and that only counts for the patches in non-structural areas!

Click to view attachment
This is a "lo-fi" version of our main content. To view the full version with more information, formatting and images, please click here.
Invision Power Board © 2001-2024 Invision Power Services, Inc.