Help - Search - Members - Calendar
Full Version: Intro from Montana: '73 2.0L rustoration thread
914World.com > The 914 Forums > 914World Garage
Pages: 1, 2, 3, 4, 5, 6, 7, 8, 9, 10, 11, 12, 13, 14, 15, 16, 17, 18, 19, 20, 21, 22, 23, 24, 25, 26, 27, 28, 29, 30, 31, 32, 33, 34, 35, 36, 37, 38, 39, 40, 41, 42, 43, 44, 45
bbrock
QUOTE(TravisNeff @ Oct 21 2018, 08:39 PM) *

This is turning out really great Brent! I wouldn't lose a second of sleep over the two wad piles.


Thanks. I'm just glad the goof wasn't a dip where I cut off the rear valance mounts on the tail. Now THAT would be embarrassing! poke.gif @Dion
tygaboy
Brent - That's looking killer! Awesome job... smilie_pokal.gif wub.gif
Dion
Dude that car is rocking! Brilliant work. beerchug.gif
I’ll do my utmost best not to do anymore embarrassing, shoddy work,promise.
biggrin.gif
Looking forward! aktion035.gif
andrewb
QUOTE(bbrock @ Oct 22 2018, 02:55 AM) *


And here's my big fuch up ....................... I guess I can live with it.

Click to view attachment


Stuff like that would have happened in the factory - and on a production line could well have been left. I think they add a human touch.

Think of them as your signature - Brent woz 'ere. smile.gif
mb911
Looks great.. My challenge spraying the underside was I used white primer with black bedliner so I could see little speckles where it didn't cover.
bbrock
Shut the F Up Donny!

Yep, we're talking about sound deadener - the one task left before I take a brief hiatus from this project. Objective here was to replicate what the factory did but with more modern materials. I went with 80 ml Noico which seems to be the best value in sound deadener out there. I used a bunch of reference pics I took and stolen from others to replicate the original 6-piece pattern as best I could. Wasn't too hard so here is yet another pic of shiny foil deadener in a teener.

Click to view attachment

I'm not a fan of the Mercury spaceman look. I was quite surprised that I found virtually nothing in the Googlesphere about painting this stuff. A couple people asking the question, but no examples of it being done. I guess most people are proud of their anti-alien tinfoil armor. It's just aluminum, so I saw no reason why it couldn't be painted. Then I read Noico's own literature about their black version of the product. It is just black paint. So here I go, make more work for myself again...

After the install, I painted it with phosphoric acid to etch the surface and promote paint adhesion.

Click to view attachment

I let that sit for about an hour and, rinsed it twice with a wet cloth, and left it to dry. Then it was out to the tent for a coat of epoxy primer, or more correctly, sealer. PPG instructions call for adding acetone reducer for spraying on flexible surfaces, so I did that. That is also their instructions for using the paint as a sealer. It was a bit chilly in the tent (56F) so I just left the car out there long enough to clean my gun and let the paint flash, then I wheeled it back in the heated garage to cure. It wound up looking a lot more like the factory tar than I thought. I like it! aktion035.gif

Click to view attachment

While I was at it, I mixed enough to also spray the spray sealer/bed liner in both trunks so I have a uniform base to spray color over.

Click to view attachment

Click to view attachment

Click to view attachment

I mentioned a hiatus. My race against winter has left me with a long backlog of projects I've neglected. Wife's DD needs new rear wheel bearing, the pickup needs tires, the water softener is leaking, siding to patch on the house, and general preparation for winter that is a necessary annual ritual for mountain living. So progress reports will likely be scarce for a few weeks, but I will get back to it with a vengeance. bye1.gif

euro911
When it comes to adding some deadener to the interior of your doors, it only needs to be a medium size piece to take the tin can sound out - don't need to do the entire door(s).
bbrock
QUOTE(euro911 @ Oct 23 2018, 05:25 PM) *

When it comes to adding some deadener to the interior of your doors, it only needs to be a medium size piece to take the tin can sound out - don't need to do the entire door(s).


Good to know, thanks for the tip. I assume this medium sized piece would go below the side crash reinforcement? beerchug.gif
bbrock
A Little Progress
Last weekend I completed the least fun thing I've done all year - replacing rear wheel bearing on our Honda CRV.

Click to view attachment

The bearing replacement itself wasn't too bad, but things went the opposite of smooth. Here are the highlights, but bear (pun) with me because this connects back to the Porsche eventually.
  • ABS Sensors on both sides worked perfectly fine, but were corroded into their bores and had to be drilled out and destroyed before the bearings could be pulled. That tripled the cost of the project.
  • Called every FLAPS in town before NAPA saied they had both sensors in stock. Drove a half hour into town to hear, "Whoops. My mistake. I only have one." Turned around and drove a half hour home with no sensors. Was I in a good mood. NO!
  • Cam bolts on both hub mounts were seized. Fought them for hours. Got the passenger side loose, but driver's side wouldn't budge. Lost my paint marks for the rear alignment in the process. Probably needs aligned anyway but still pissed me off and I'm sure getting that adjuster bolt loose won't be free.
  • Got the passenger bearing replaced without furhter incident. Somehow managed to get the axle out of the driver's side without removing that seized bolt and got that bearing replaced. It was late at night before I got the car buttoned up enough for the wife to drive to work the next morning. Wouldn't have been a big deal but I had to make a 200 mile round trip for work in the other car the next day. Car drove okay despite the alignment being whacked and every warning light making the dash look like Christmas.
  • Ordered new ABS sensors on Monday and installed them Wednesday. There's some mysterious box (looks to be emissions related) that has to be removed just to access the plug for the driver's size. Put a wrench on the first bolt and SNAP. Took 30 minutes to replace the sensors and 6 hours to drill out that fucking bolt.
  • Noticed a busted drop link on the rear sway bar while I was in there. Probably from the idiot that ran my wife off the road on the Interstate last winter and made her hit the shoulder so hard it knocked the wheel weights off. That's tomorrow's project.

Enough about that PITA project. Since I had a slide hammer axle puller set on loan from my FLAPS, I figured I should finish tearing down the trailing arms on the Porsche. There's a separate thread on this, but the bearings came out easily and I was hopeful they could be reused.

Click to view attachment

I thought I had replaced those bearings shortly before the Iran-Contra Hearings and about a year before the car was sidelined so decided to pull them apart for inspection to see if they could be repacked and reused. No luck. Found mild galling on one bearing and severe on the other. I was shocked that pulling the bearings with the slide hammer didn't seem to do any damage though. Pics are of the best one. Must have been one of the other 914s I owned back in the day that got the bearings.

IPB Image

IPB Image

The dissapointment was offset by a pleasant surprise on the CV joints. With the stub axles out, I was finally able to crack the outers open and take a look. I assumed they'd be as horrible as the inners were, but I found pretty minor wear. I'll just flip these to the tranny side and run them awhile longer.

IPB Image

http://www.914world.com/bbs2/uploads/post-...-1541171754.jpg

End of a Season
Last night, the wind beat the hell out of the tent garage. I knew I was just one winter storm away from a repeat of the Wizard of Oz incident I had last year. Decided to pull it down today despite the miserable weather. Last year I left the frame standing but it was a PITA for plowing snow. Took the whole thing down this year. Where the hell am I going to store that media blaster?

Click to view attachment

In other news, this came in the mail this week. It is the key to the whole project av-943.gif

IPB Image IPB Image IPB Image

Finally, got these from member @tomrev this week. Nice to have them checked off the shopping list.

Click to view attachment
KELTY360
QUOTE(bbrock @ Nov 3 2018, 06:04 PM) *

Took the whole thing down this year. Where the hell am I going to store that media blaster?


Guess it's time to build that shop you were talking about. That would be perfect timing....after you've got the 914 in primer! poke.gif

Way to go on your progress this year Brent. You must be drooling drooley.gif at the thought of driving it down that gravel road next year. idea.gif Or, you could build a trailer and tow it down to paved road, idea.gif or, you could just pave that 3 mile long road. shades.gif

Kind of like the guy who builds a boat in his basement and has to tear the house down to get it out. dry.gif
bbrock
QUOTE(KELTY360 @ Nov 4 2018, 09:06 AM) *

QUOTE(bbrock @ Nov 3 2018, 06:04 PM) *

Took the whole thing down this year. Where the hell am I going to store that media blaster?


Guess it's time to build that shop you were talking about. That would be perfect timing....after you've got the 914 in primer! poke.gif


I think about that every day. I just need to win the lottery first. I had money to restore the car, or build the shop. Had to make a choice. The nice thing is that I'm almost at a place where parts start going back on the car to free up storage space.

QUOTE
Way to go on your progress this year Brent. You must be drooling drooley.gif at the thought of driving it down that gravel road next year. idea.gif Or, you could build a trailer and tow it down to paved road, idea.gif or, you could just pave that 3 mile long road. shades.gif

Kind of like the guy who builds a boat in his basement and has to tear the house down to get it out. dry.gif


av-943.gif When you were here, that road was, BY FAR, in the worst shape it has been in the 15 years we've been here. Since then, it has gotten even worse. Can't even call it gravel anymore. More of a mud trail. The road maintenance funds got eaten up by massive grader repair and other expenses last year. Poor choices were made but the bottom line is there is a lot of road repair/maintenance to catch up on and little money to do it. Yeah, it is going to suck. But I drove a lot of gravel roads in this car before, and will do it again.

But as for paving, I will fight to my last breath to prevent it. I lived through that nightmare once. Lived in a rural subdivision with a mile of gravel road connecting it to pavement. Always thought it would be great to have that mile paved, and when they paved it, it WAS great for a little while. But then weanies started moving in and turned our quiet rural neighborhood into a noisy, nasty suburb. Tallgrass prairie replaced by lawn. Bird song replaced by mowers and leaf blowers. When we moved in, we could sit on our deck and watch the starlight sparkle off the lake below. By the time we left, we couldn't even see either the lake or the stars thanks to all the light pollution from the people afraid of the dark who moved in after the road was paved. I learned the value of a stretch of unpaved road for preserving rural life and a small price to pay IMO. Now back to building that boat! beerchug.gif
Dave_Darling
QUOTE(KELTY360 @ Nov 4 2018, 07:06 AM) *

Kind of like the guy who builds a boat in his basement and has to tear the house down to get it out. dry.gif


I've seen that multiple times with airplanes. I used to "help" my grandfather inspect home-built planes for the FAA while they were still under construction. I lost count of how many I saw that were in basements and were already far too large for any existing doors or windows...

--DD
Lucky9146
Catching up on your thread and your interior work with the sound deadener looks good and is a great idea to paint it. Wish I'd thought of that as I can see it a little here and there with the "Mercury spaceman look". Sorry you have to shut down for a while I enjoy watching you progress and the conditions with which you are producing good results. beerchug.gif
driving.gif white914.jpg
bbrock
Took the Rubber Off

Knock it off you potty brains! I'm obviously talking about the rubber suspension bushings! I figured while I had these parts spread on the floor, I might as well take them apart for media blasting. They definitely had seen better days. The A-arm bushings were leaking and causing the torsion bars to rust, and the pivot points were way off center. Three of the four trailing arm bushings looked pretty good at first glance, but closer inspection showed that they too had worn off center. One of them was really bad and leaking water onto the pivot bar. Not good.

@cuddy_k 's videos on replacing A-arm bushings were a big help in taking them apart. Those aren't too hard. You just have to heat the bushings up enough to soften them and then twist the pieces apart. It takes some muscle, but I got all 4 bushings out in about 45 minutes. The trailing arm bushings are a different story. You pretty much have to completely burn those suckers out. I think it took almost an hour to get the first trailing arm done, and about half that for the second one benefiting from experience of the first. This picture says it all. The original A-arm bushings are between the A-arms, and that pile of black crap between the trailing arm is what is left of those bushings. I have a set of new bushings and SS pivot bars from 914rubber to put in after the parts are cleaned and painted. Truth be told, I would prefer to put rubber bushings back in the trailing arms but Elephant Racing is the only game in town for those and the price is a bit steep. I'm sure the Delrin 914rubber bushings will be fine, but maybe some day they'll offer a rubber bushing as a stock replacement.

Click to view attachment

I'm going to spend the rest of the day sanding the primer in the trunks and cockpit to prep for spraying some color. beerchug.gif
sixnotfour
ya I voted..
bbrock
QUOTE(sixnotfour @ Nov 9 2018, 10:14 AM) *

ya I voted..


Ha! Thanks! biggrin.gif Maybe I should demand a recount. I didn't vote though. I honestly could choose among the other fantastic builds going on. Cool stuff. beerchug.gif

Kind of scattered on my project right now. Lots of work on different things but nothing too interesting to report. Hope to have a couple really cool things to share soon.
76-914
I've done 3 set's of rear trailing arm rubber bushings and everyone was a GD bitch. The last set was on Ravi's car and even with the the help of another, a bench press, the Tool which came with the bushings and several new cuss words, it was a battle. I don't know if this will work (most of my ideas don't) but the next set I do I'll attempt to pull them in place with the aid of my vacuum pump. Might be a cluster sheeplove.gif but something has to be easier than pressing them in. beerchug.gif
bbrock
QUOTE(76-914 @ Nov 9 2018, 04:58 PM) *

I don't know if this will work (most of my ideas don't) but the next set I do I'll attempt to pull them in place with the aid of my vacuum pump. Might be a cluster sheeplove.gif but something has to be easier than pressing them in. beerchug.gif


Take video! Wouldn't that be cool if it works? cheer.gif

I asked Mark about rubber trailing arm bushings when he announced the GB on the delrin. He said because installing them required a press and was such a giant B, they abandoned the idea and went the easy to install route.
bbrock
Not much to report but I don't want you to think I've been slacking. I've been working my butt off on the car but not much to photograph and share.

I went over the entire interior with 400g sandpaper, then washed it with soap and water, followed by wax and grease remover. Of course, this revealed some issues that needed to be addressed. I'll just show a few.

One was a big run in the fuel tank compartment. In my rush to beat Old Man Winter to spray primer and undercoat, I neglected to clean up a drip from the internal frame coating. That had to be sanded down and re-primed.

Click to view attachment

Click to view attachment

The seam where I patched the inner long through the e-brake indent was still a bit rough, so that got worked with some FG filler followed by 2K glazing compound, and finally primer.

Click to view attachment

Click to view attachment

Click to view attachment

Then there was a patch seam between the battery tray and firewall that I missed when filling those joints.

Click to view attachment

Click to view attachment

Click to view attachment

Another thing I've been working on is getting all the hardware ready to send for replating. This entails taking every part out of their organized boxes and carefully labeled ziplock bags and photographing and cataloging them in a spreadsheet. Here's a pic of airbox hardware. I was perfectly happy with these until some showoffs started posting pics of their polished boxes with freshly plated bling. I sure hope I took good enough reference shots to put these all back together.

Click to view attachment

After cataloging, all those nicely labeled parts wind up here to be cleaned, wire brushed, and derusted. It's very intimidating.

Click to view attachment

That's pretty much it, Lotta work without much to show. Since this is boring, here a cute picture of a bear.

Click to view attachment
TravisNeff
Holy crap! I wasn't expecting to see this until next year. Looks good Brent, real good.
altitude411
shades.gif That looks be-utiful. Nice work! You should be very proud of all your accomplishments and dedication. Now go fuel up the snow blower... beerchug.gif ( I drove over the pass today... looks white at your house) * with a nice silver over spray thumb3d.gif
bbrock
Thanks guys. I just wish I could figure out how to take better pics. I even broke out the good camera but it still looks more like shiny primer. It's pretty sweet in person. We had quite a bit of snow but most has melted off or our south-facing side.
mepstein
QUOTE(bbrock @ Nov 15 2018, 10:30 PM) *

Thanks guys. I just wish I could figure out how to take better pics. I even broke out the good camera but it still looks more like shiny primer. It's pretty sweet in person. We had quite a bit of snow but most has melted off or our south-facing side.

Garage lights play hell with the camera sensors.

Looks great.
bbrock
QUOTE(mepstein @ Nov 15 2018, 08:31 PM) *

QUOTE(bbrock @ Nov 15 2018, 10:30 PM) *

Thanks guys. I just wish I could figure out how to take better pics. I even broke out the good camera but it still looks more like shiny primer. It's pretty sweet in person. We had quite a bit of snow but most has melted off or our south-facing side.

Garage lights play hell with the camera sensors.

Looks great.


Yeah, I think the first pic I posted is the best one and for that, I shut off all the lights and took the pic in the dark with the flash.
Dion
Nice! Laying down colour in stealth mode. shades.gif
That looks great Brent. Glad Mother Nature gave ya some slack.
Good luck with that airbox. That bugger tests your patience.
Fluorescents & LED are tough on car pics. I actually try use the iPhone
with lites off when I can. Relying on its sensors to pick up colour and shades.
Keep at it!
bbrock
I suppose I should say a little about the painting. I did this in the garage. I just laid a big tarp on the floor and covered my table saw with plastic. Using HVLP with the car on its side really limits the overspray to make it doable. No way could I spray the exterior like this, but I wanted to get the interior sprayed so I can start putting some parts back on the car so we stop tripping over them every time we open a shed.

To recap, I wanted to spray PPG DBC but it isn't available in this color. I had to spray PPG Omni MTK. I don't have anything to compare it to yet but it was pretty tricky to spray. It actually covered surprisingly well although spraying silver over gray primer probably helped with that. The issue was the metallics. I know silver metallic is notoriously difficult but this seemed worse. It is cheap paint so low solids. The issue I had was if I laid on the paint in a heavy wet coat, the metallic particles would float around and cluster. The result was like wave washed sand.

IPB Image

It was easy enough to fix by letting if flash and respraying a lighter coat followed by a drop coat. Took a little practice to get laying down a wet enough coat for the paint to lay down but not so much that the flakes went flaky.

I bought 2 quarts of paint which is mixed 4:1:1 s 3/4 gallon of sprayable. This was plenty of paint. I sprayed 3 coats (4 in some areas) and have almost a half quart of paint left. I did get a couple of runs but in hidden PITA pockets. One in the bottom of a headlight bucket and one under the top lip of the headlight motor mount that will be under the plastic cover. I'm not going to sweat either of those. There's also a drip on top of the left side long near the firewall. That's going to get sprayed with adhesive and covered by carpet so not worth fussing with. I'm sure I'll find some other spots after the paint dries and I really poke around. Overall, not bad for someone who doesn't know what he's doing. beerchug.gif
TravisNeff
Can you explain what a drop coat is? I assume its where you hold your gun a bit farther back and dust the top. I saw that trick to fix if you get tiger stripes on a youtube vid.
bbrock
QUOTE(TravisNeff @ Nov 15 2018, 09:34 PM) *

Can you explain what a drop coat is? I assume its where you hold your gun a bit farther back and dust the top. I saw that trick to fix if you get tiger stripes on a youtube vid.


Yep, that's it. I think Kevin Tetz explained it best on a vid. Supposedly it allows the droplets to be a little larger which allows the metallic flakes to spread out and "relax" as he calls it. He recommended doing it just to get uniform metallic cover rather than as a fix. The trick seems to be to do it fairly quick after laying down the last coat soe the drops melt in and spread out. He also claimed that tiger striping was caused by not enough overlap. I did 50% overlap as best I could with all the nooks and crannies you have to hit spraying trunks and engine bay and such. Overall, I thought the paint was fairly forgiving. I think in a spray booth with excellent light, I could have done better, but I'm really pleased with how it turned out.
TravisNeff
HA! Yeah, it was the Tetz video i watched. The reality that I will have to get some paint on mine is fast approaching. I appreciate you sharing the details and challenges. This kind of stuff makes this site great.
defianty
Great work Brent, a huge step in the right direction. Car is looking fantastic.
tygaboy
DUDE! piratenanner.gif cheer.gif aktion035.gif

That looks awesome! smilie_pokal.gif
76-914
Well done. What was the garage temp when you sprayed? beerchug.gif
bbrock
QUOTE(76-914 @ Nov 16 2018, 08:06 AM) *

Well done. What was the garage temp when you sprayed? beerchug.gif


Thanks again guys. Garage temp was 64-65F during the spray. I wanted it a tad on the cool side because I was using a fast hardener and wanted a little more time. After I was finished with the spray, I cranked the heat up to 70F for curing. I'll leave it that high through tonight and then will return to the normally scheduled heating program. beerchug.gif
bbrock
A little post-operative examination and some things to fix. I intended to adjust the mask over the serial number stamp before painting but forgot. headbang.gif The unpainted area around the stamp is too large. I can't possibly drive the car like that, it would be too embarrassing. I doubt the car will even run with it like that. That will have to be fixed.

Click to view attachment

Here's the worst mess of the paint job. These bucket are a pain because paint just blows back in your face when you point a gun at them. Kind of shooting blind and I wound up with way too much paint in there which ran badly. I grabbed a shop towel soaked with reducer and wiped the run out but left a bunch of trash from the towel. It's in the bottom of the bucket so I don't really care, but since I'll be shooting more of this single stage paint anyway, I might as well fix it.

Click to view attachment

There are a few other googes with small runs or trash in the paint that don't bother me because they will be covered, but I'll fix a number of them just for practice. Better to screw up these hidden spots than a fender.

Huge Mile Stone!

Yesterday was an important day but this morning was when the real milestone of this car was crossed. It started with applying cavity wax to the longs.

Click to view attachment

The longs have now been treated with epoxy primer, Eastwood Internal Frame Coating, and 3M Cavity Wax Plus. Some of the primer got burned off by later welding. Although I think the internal frame coat is good stuff, I consider it experimental because I have yet to see long term results. Cavity wax has a proven record and I've seen firsthand how well it protects even bare metal.

Click to view attachment

Now for the big moment.......

Click to view attachment

The first non-welded part to go BACK on the car!!!! cheer.gif monkeydance.gif mueba.gif cheer.gif

And here's a shot across to the other side with both of these critical parts installed.

Click to view attachment
tygaboy
Waxed and plugged! That's gotta feel good.

(Wait... That sounds a little bit dirty... lol-2.gif )
bbrock
QUOTE(tygaboy @ Nov 16 2018, 09:30 AM) *

Waxed and plugged! That's gotta feel good.

(Wait... That sounds a little bit dirty... lol-2.gif )


av-943.gif You really get me!
KELTY360
So you reconstruct the entire body of the car with one hand while fighting off invading bears and moose with the other.....and you're intimidated by a bucket of semi-crusty parts?? confused24.gif
bbrock
QUOTE(KELTY360 @ Nov 16 2018, 10:33 AM) *

So you reconstruct the entire body of the car with one hand while fighting off invading bears and moose with the other.....and you're intimidated by a bucket of semi-crusty parts?? confused24.gif

lol-2.gif Organization is not my strong suit. biggrin.gif
dan10101
Very nice.

I would have guessed you were a pro doing your own job.

You're actually a few steps ahead of me on my project though I'm only doing the front end, not the complete overhaul. I will probably end up painting the whole car, but right now (yesterday) I primed the same areas you painted.

I really need to go back and see how you did some of the repair work and especially welding.

Thanks for posting. I'll be following..
bbrock
QUOTE(dan10101 @ Nov 16 2018, 12:00 PM) *

Very nice.

I would have guessed you were a pro doing your own job.

You're actually a few steps ahead of me on my project though I'm only doing the front end, not the complete overhaul. I will probably end up painting the whole car, but right now (yesterday) I primed the same areas you painted.

I really need to go back and see how you did some of the repair work and especially welding.

Thanks for posting. I'll be following..


Uhhh.... I'm humbled and dumbstruck by this, but thanks. blink.gif I've been following your build in awe and you are in a completely higher league. "only doing the front end" is a bit of an understatement, don't you think? smile.gif BTW, I think your car was/will be, one of the most beautiful teeners I've seen, and this from a guy who leans heavily toward originality. thumb3d.gif
bbrock
Click to view attachment

I might wind up fixing that sploosh in the bed liner undercoating after all. I just walked by the car and it was sitting at just the right angle with the light just so to see I was looking at primer grey under the right wheel well. I really like the way this silver metallic shows over the grey primer but the contrast between bare metal, primer, and top coat is not great and the light inside the tent was poor when I was spraying Raptor. I obviously failed to get complete coverage on this area.

Click to view attachment

Since epoxy primer is a water seal, I'm not too worried about function, but I think we all know this isn't going to fly. I think I'll see how shooting some urethane over that area looks. If I don't like it, I guess I'll have to buy another liter of Raptor. In which case, I'll fix that other booger too. This wouldn't be that big of a deal except Raptor smells like Evil's rotting butthole and I really don't want to spray it in the garage. We'll see how this plays out.
Dave_Darling
Oh lord--anyone who has attended a transmission clinic can attest to how bad it can be to stand anywhere near the back of the Doc!!!


biggrin.gif

--DD
bbrock
I've been holding out about a little side project I've been working on. It starts with a ratty old standard plastic steering wheel that has seen better days.

Click to view attachment Click to view attachment

First step was to take it apart, strip the old adhesive off, and sand it down.

Click to view attachment

Now it's time to paint. I used SEM satin trim black. A PC7 can was just the right size to mask off the unpainted circle under the horn pad. A canning jar served the same purpose for the wheel.

Click to view attachment Click to view attachment

With fresh paint on the wheel, the fun was about to begin. I bought an Alan Gun 914RS kit which is the kit to convert a standard wheel to padded leather wrap. I've read lots of review about Alan Gun, mostly bad, but somewhat mixed. Some say the kits are good but his resto service sucks. Others say he just sucks. I couldn't find another kit for adding padding to an other OEM looking wrap so decided to roll the dice. unsure.gif I got about what I expected, a big pain in the ass.

I took a month to get the kit because they were waiting for a correct hide, then supposedly sent the package but didn't, then sent me a tracking number for the wrong package, then I finally sent the right package. Every email exchange was similar. He is very nice and seems sincere in trying to get you what you ordered. Every email is also sent at crazy hours of the night and contains complaints about how busy and rushed he is trying to get orders filled. You can find forum exchanges from him going back a decade that is exactly the same. My take is that he is an honest and stand up guy but doesn't quite have his stromberg.gif together. Whatever, I got the kit.

Click to view attachment

It looks pretty good. You get a precut piece of felt padding, what appears to be a nice precut piece of leather, a generous amount of contact cement, a generous amount of thread spooled on a piece of foam, an acid brush to apply the cement, and a pair of rubber gloves. Everything you need, but don't worry, there is a bag of dogshit hiding in there.

Let's start with the minor thing. That little card of thread looks neat and tidy, but card is short and has no ears to hold the thread on. As soon as you start pulling thread off, the wiry thread shoots off the end of the card into a tangled black witch's pubis. That was good for over an hour trying to untangle the mess to get enough thread to finish the project.

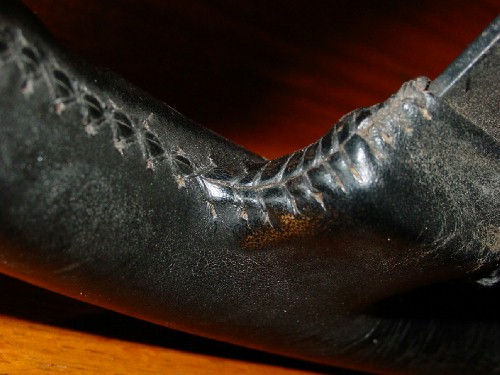
Click to view attachment

The real problem with the kit is the pre-punched holes. They were okay along the main wheel part although somewhat inconsistent in the distance they were punched from the edge. The holes near and out the spoke areas looked like someone handed a leather awl and a bottle of moonshine to a monkey and told them to have at it. In no way did the holes match from one side to the other. On the first one I tried to stitch, there were 12 holes on one side of the spoke and 7 on the other. Many holes were so close to the edge they just tore out. Never having done this before, I spent (and I shit you not) three hours on the first section stitching, pulling the thread out, and stitching again until I finally figured out that I just needed to punch my own holes. That's how what otherwise would be a very nice kit winds up being a piece of dogshit. My patience was spent and I thought aobout sending the whole thing back and demanding my money back, but that's when stubbornness kicked in, so I persevered....
bbrock
Okay, with my rant about the piss-poor quality of that kit out of the way, let's move on. For completing this project, I found this tutorial post from @Montreal914 very helpful and followed his example. In addition, I found this reference pic posted by @dlkawashima that shows the stitching very helpful.

IPB Image

That's what I tried to replicate - baseball stitch on spokes with chevrons pointing down, and cross stitch on the wheel. For doing the stitches, I watched plenty of Youtube vids but be warned that the difference between those bench top demos and working on an actual wheel is like the difference between getting a massage and kicked in the balls. Oh, I forgot to mention the AGLA kit also comes with a set of instruction that is borderline incomprehensible gibberish interpersed with an occasional nugget of useful information.

Anyway... The felt padding went on without a hitch.

Click to view attachment

After my 3 hour orientation of what not to do, I eventually had the two short sections done. I did wind up ripping the first section out one last time at the end of the project and doing it again. At this point, I did not tie off the spoke ends because it is really hard to get those stitches tight without opposing tension. A smart person might figure out a way to clamp things, but I just went back at the end and restitched the spoke ends to both tighten them up, and benefit from my experience with ignoring the pre-punched holes in those areas.

Click to view attachment

Three cans of Pepsi and many hours of TV later, I'm almost done with the stitching.

Click to view attachment

After trimming and gluing down the spoke ends, I ran a heat gun over the whole deal to shrink the leather, being careful not to melt the thread. Then I needed to spruce up that old faded horn pad.

Click to view attachment

I had another thread on vinyl die but wound up going a different route and decided to try Forever Black on it since I'd read good things about it on this forum. I also though I might use some vinyl repair to try to fill some small fissures on top of the pad caused by crazing from sun exposure. After experimenting, I decided this was not the stuff to use and might cause more harm than good. The crackes are barely noticeable but are still there if I ever find something to use to fill them. The Forever Black, however, worked like a charm.

Click to view attachment

And here is the final result. No, it isn't a Dallas Custom Wheels restoration but I think it turned out pretty nice. It's very soft and comfortable and looks very good.

Click to view attachment

The baseball stitch looks okay but the chevrons would have been without drunken monkey factor.

Click to view attachment

Here is the cross stitch.

Click to view attachment

Remember I complained about inconsistent distance of the pre-punched holes from the edge? Look how wide the stitches on this section are. Good thing I'm not going for concours here.

Click to view attachment

Okay then, that's a wrap! lol-2.gif
mepstein
You are a more patient man than me. I went through the same email bullshit 8 years ago, took 3 months to receive it, looked at all the mispunched holes and threw it away.
bbrock
QUOTE(mepstein @ Nov 19 2018, 04:11 PM) *

You are a more patient man than me. I went through the same email bullshit 8 years ago, took 3 months to receive it, looked at all the mispunched holes and threw it away.


No, you are just smarter than me. I saw your post about that kit on another thread and it should have waived me away, but sometimes I just have to touch the stove to see if it is really as hot as people say. screwy.gif

I forgot to include this pic of installing the OEM rubber horn cup that has been in my parts stash waiting for this day to come for 35 years.

Click to view attachment

euro911
QUOTE(bbrock @ Nov 19 2018, 03:10 PM) *
...

Remember I complained about inconsistent distance of the pre-punched holes from the edge? Look how wide the stitches on this section are. Good thing I'm not going for concours here.

Click to view attachment

Okay then, that's a wrap! lol-2.gif
Looks great, actually. If anyone even mentions anything negative about your the stitching, you could save that 'kick in the balls' for them laugh.gif
bbrock
QUOTE(euro911 @ Nov 19 2018, 04:50 PM) *

Looks great, actually. If anyone even mentions anything negative about your the stitching, you could save that 'kick in the balls' for them laugh.gif


av-943.gif

IPB Image
bbrock
Aside from the wheel cover, the weekend was a mixed bag for the car project. I decided to top coat the longs and while I was at it, fix the serial number stamp and trashy headlight bucket. You ever have one of those days where your brain isn't quite working and you know you shouldn't be doing what your are doing, but you do it anyway? So anyway, prepped and masked everything and sprayed the first coat. Waited about the same time between coats as what worked before, but didn't factor that the garage temp was about 8F degrees cooler than last time. Paint went on great on the P-side long and frunk areas, but sagged on the D-side long. Also, because it went on heavy, the metal flake did that funky thing.

P-side

Click to view attachment

D-side

Click to view attachment

Headlight bucket looks much better which is a good thing since nobody will ever see it.

Click to view attachment

Now here's where I really F'd up. I don't know what I was thinking when I masked off this wide area.

Click to view attachment

If I had just masked the little raised rectangle around the stamp, I'd have be done with it. But NOooo, I'm a moron. Herer's the predictable result.

Click to view attachment

I was able to wet sand out the edge, but there is a very slight difference in the new paint area. I'm going to respray the whole frunk. headbang.gif

Another big milestone. Ideally I'd have the whole car painted before starting any reassembly, but that would delay things considerable since I can't spray the exterior until next summer. Assembling stuff that will be easy to protect from overspray will give me a big jump on reassembly, and more importantly, remove a lot of clutter from storage spaces. I started with the last major item to come out on disassembly. The wire harness.

Click to view attachment

Most of the original plastic covers for the metal wire wraps are brittle or covered in overspray, so I'll be pulling the trigger on the big 914rubber restoration kit soon. Locking the harness into final position will wait until then.

The snorkel.

Click to view attachment

Trunk

Click to view attachment

The fuel compartment is as far as I went on the front. The rest will wait until I respray the frunk.

Click to view attachment

Nice to see that freshly restored wire against the new finish. piratenanner.gif
This is a "lo-fi" version of our main content. To view the full version with more information, formatting and images, please click here.
Invision Power Board © 2001-2024 Invision Power Services, Inc.