Made some progress on the rear axle. This morning I got the rear sway bar painted. It's just finger tight mounted for storage until I get a consensus on what to grease the rubber bushings with since "glycerine paste" doesn't seem to exist. I thought I had a set of drop link bushings but apparently not. I'll have to order some.
Click to view attachment
After work, I put the trailing arms together. Installed new SS pivot rods from 914Rubber and their hard bushings. Nothing exciting about the install so I didn't take any pics. I'm hopeful they'll offer OEM style rubber bushing soon so I can swap these out. They fit well though. After that, I moved to the hub. The HF Front Wheel Bearing kit makes installing the bearings and hubs easy work.
Click to view attachment
Sorry I didn't take a pic of the bearing going in, but here's the setup. Pretty simple. Choose the correct sized discs to pull the bearing in without pressing on the fragile parts, and suck it in with an impact driver. With frozen bearings and a thin smear of grease in the polished hub, it takes less than a minute.
Click to view attachment
Bearing is in nice and flush.
Click to view attachment
I put a very thin smear of anti-seize compound on the bare metal flange before bolting on the replated cover and torquing to 18 ft-lbs.
Click to view attachment
The procedure for installing the hub is a repeat of the bearing except with different sized discs. Most important is to choose a disc that fits inside the bearing housing and rests on the bearing itself. That way you don't put pressure on the bearings as the hub pulls in. I stopped with the hub a millimeter or two of being seated so the final seating will be done when I torque the stub axle down. I'm still waiting to hear from Porsche about the CV joints so I can't install stub axles or make the car a roller until I have that taken care of. Here's the hub in place.
Click to view attachment
Two rebuilt trailing arms. Took less than an hour including dicking around just admiring them. I guess I should plate up some hardware so I can bolt all this on the car.
Click to view attachment
Full Version: Intro from Montana: '73 2.0L rustoration thread
Pages: 1, 2, 3, 4, 5, 6, 7, 8, 9, 10, 11, 12, 13, 14, 15, 16, 17, 18, 19, 20, 21, 22, 23, 24, 25, 26, 27, 28, 29, 30, 31, 32, 33, 34, 35, 36, 37, 38, 39, 40, 41, 42, 43, 44, 45
The trailing arm inspector stopped by today with his special little stamps. He rated my trailing arms Special K, just like they were originally. 
Click to view attachment Click to view attachment
Click to view attachment
With the trailing arms certified, there was nothing to do but bolt them on.
Click to view attachment
This did not come without some drama though. My worst fear has been that somehow I didn't get the suspension parts back in the right spot. When I went to bolt the passenger side arm on, I couldn't get it to go into place. I discovered there wasn't enough clearance between the outer pivot end and the quarter panel. I had to cut the little brace when I pulled that off during the rust repair and just had to guess about position when I welded it back. I knew that would bite me in the ass. I had to cut the brace again so I could pull the fender out. Hate to do that after there is paint on the car, but had no choice. I laid a wet towel down to protect against sparks.
Click to view attachment
I'll have to go back and reweld that, but want to see if I can get a better sense of what that clearance should be. Might need to adjust the other side too. That let me get the outer control arm bearing in there, but my troubles weren't quite over. The arm was a little long and overshooting the holes. Oh shit! That's the worst fear It was off by about 3/16". Part of it was not having the pivot nuts torqued down to compress the bushings. I tightened those up but I was still off by a little less than 3/32". This was not good at all. I had bolted the trailing arm up when I tacked the inner console ear in place so I know they aligned at that time. Only thing I can think is the metal must have shrunk some when I welded in the reinforcement gussets. Where was McMark's suspension ear jig when I needed it? But what to do....
  Well, the 914Rubber SS pivot rods come with a couple toothed washers for each rod. They don't provide instructions but I assumed these were to compensate for the lack of locking serrations on the ends of the pivots that the factory pieces had.
Click to view attachment
They are pretty thick and with both installed, push the outer bearing out about 1/8". So my solution was pretty simple, take those out. I'm not sure how critical they are, but I think Schnorr washers would be a closer match to the original rods and would be much thinner. Anyway, with the toothed washers removed, the trailing arm bolted in and I was still able to move the arm through the full range of toe adjustment. We'll see if I have problems getting a good alignment.
Anyway, here's a little more eye candy. Another big pile of rusty crap restored and bolted back onto the car.
Click to view attachment
I wasn't sure what the proper finish on that bearing bracket. The yellow chromate adds some bling, but I wonder if I should do like the Stones and paint it black.
Click to view attachment
Click to view attachment
Click to view attachment Click to view attachment
Click to view attachment
With the trailing arms certified, there was nothing to do but bolt them on.
Click to view attachment
This did not come without some drama though. My worst fear has been that somehow I didn't get the suspension parts back in the right spot. When I went to bolt the passenger side arm on, I couldn't get it to go into place. I discovered there wasn't enough clearance between the outer pivot end and the quarter panel. I had to cut the little brace when I pulled that off during the rust repair and just had to guess about position when I welded it back. I knew that would bite me in the ass. I had to cut the brace again so I could pull the fender out. Hate to do that after there is paint on the car, but had no choice. I laid a wet towel down to protect against sparks.
Click to view attachment
I'll have to go back and reweld that, but want to see if I can get a better sense of what that clearance should be. Might need to adjust the other side too. That let me get the outer control arm bearing in there, but my troubles weren't quite over. The arm was a little long and overshooting the holes. Oh shit! That's the worst fear
It was off by about 3/16". Part of it was not having the pivot nuts torqued down to compress the bushings. I tightened those up but I was still off by a little less than 3/32". This was not good at all. I had bolted the trailing arm up when I tacked the inner console ear in place so I know they aligned at that time. Only thing I can think is the metal must have shrunk some when I welded in the reinforcement gussets. Where was McMark's suspension ear jig when I needed it? But what to do.... Well, the 914Rubber SS pivot rods come with a couple toothed washers for each rod. They don't provide instructions but I assumed these were to compensate for the lack of locking serrations on the ends of the pivots that the factory pieces had. Click to view attachment
They are pretty thick and with both installed, push the outer bearing out about 1/8". So my solution was pretty simple, take those out. I'm not sure how critical they are, but I think Schnorr washers would be a closer match to the original rods and would be much thinner. Anyway, with the toothed washers removed, the trailing arm bolted in and I was still able to move the arm through the full range of toe adjustment. We'll see if I have problems getting a good alignment.
Anyway, here's a little more eye candy. Another big pile of rusty crap restored and bolted back onto the car.
Click to view attachment
I wasn't sure what the proper finish on that bearing bracket. The yellow chromate adds some bling, but I wonder if I should do like the Stones and paint it black.
Click to view attachment
Click to view attachment
Got several things done, or at least made progress over the weekend, but the main focus was a final push to get the hardware ready to ship for plating. I'm spending way too much time plating parts and the temptation to "just do a short run" is too great. Those "short runs" always stretch into several hours. Also, I've been frustrated by inconsistent results on the yellow chromate finish and haven't been able to figure out the problem. Sometimes, even within the same run, I get beautiful finishes on some parts while the chromate just rubs off of others even after several days curing. Plain zinc and black chromate is no problem but that yellow is a bitch. What I have learned is that I'm not alone and even commercial platers can have trouble with it.
I'm waiting on some price estimates from a plater in Salt Lake City but I need to decide whether to ship my wheel bolts for clear cad plating, which I'm told was the original finish. I did a small test today to see what I could do with zinc. I wish I was a better photographer, but from left to right is: before cleaning, how it comes out of the zinc bath after drying, and finally, after a light polish with Mother's.
Click to view attachment
Click to view attachment
Looks pretty good but I don't know how it would compare to a clear cad piece. What do you think?
Looks great 
Maybe you can leave one sit out in the elements for a while to see how the finish holds up?
Maybe you can leave one sit out in the elements for a while to see how the finish holds up?
QUOTE(euro911 @ Mar 17 2019, 10:55 PM) 
Looks great
Maybe you can leave one sit out in the elements for a while to see how the finish holds up?
Good idea. I think if I go this route, I'll plate a little longer than I did on this test to make sure there is a good coat of zinc. These are probably okay, but a thicker layer would be better. Main thing is I'm not sure what they are supposed to look like. The pic of original Porsche bolts looks even a little duller than the plated but not polished bolt. Maybe I should skip the Mother's.
Coming together nicely Brent. Love the 'K' stamp.
QUOTE(defianty @ Mar 18 2019, 05:58 AM)
Coming together nicely Brent. Love the 'K' stamp.
About that... Yesterday the wife took a rare interest in the car project and for the second time commented that she thought I needed to replace the cracked dash. I explained what they cost and that it wasn't in the budget for now. Then I took her over to show her "something really cool" and showed her the 'K'. She said, and this is a direct quote, "I knew it would be something I don't give a shit about." Women!

QUOTE(bbrock @ Mar 18 2019, 01:55 PM)
She said, and this is a direct quote, "I knew it would be something I don't give a shit about." Women!
 My wife would have said exactly the same after she had raised her eyebrows in disbelief.
 I think you should go and order a new dash as she doesn't give a shit about it


QUOTE(bbrock @ Mar 18 2019, 05:55 AM)
QUOTE(defianty @ Mar 18 2019, 05:58 AM)
Coming together nicely Brent. Love the 'K' stamp.
About that... Yesterday the wife took a rare interest in the car project and for the second time commented that she thought I needed to replace the cracked dash. I explained what they cost and that it wasn't in the budget for now. Then I took her over to show her "something really cool" and showed her the 'K'. She said, and this is a direct quote, "I knew it would be something I don't give a shit about." Women!
Pm sent
QUOTE(bbrock @ Mar 18 2019, 06:55 AM)
QUOTE(defianty @ Mar 18 2019, 05:58 AM)
Coming together nicely Brent. Love the 'K' stamp.
About that... Yesterday the wife took a rare interest in the car project and for the second time commented that she thought I needed to replace the cracked dash. I explained what they cost and that it wasn't in the budget for now. Then I took her over to show her "something really cool" and showed her the 'K'. She said, and this is a direct quote, "I knew it would be something I don't give a shit about." Women!
LOL. And I thought it was only my wife that did that.
When I was 21 I was Wasn't what I wanted to hear but damn if it didn't ring true for me. 
Brent - If you used the correct font (logo) she may have been impressed. Mine would have at least looked longer.
Click to view attachment
Click to view attachment
You guys are too funny. Maybe I should have stamped them with a Jackie Treehorn logo (only the cool kids will get that joke).
BTW, I'm done with the 'K' stamp. Let me know if anyone else wants to try to impress their wife and I'll send it. Or I can send the artwork and where to have one made for $3 plus postage.
BTW, I'm done with the 'K' stamp. Let me know if anyone else wants to try to impress their wife and I'll send it. Or I can send the artwork and where to have one made for $3 plus postage.
A few more progress pics from the weekend.
First, my attempt at an artsy-fartsy pic proving that I'm not very artsy-fartsy.
Click to view attachment
For my "watchin TV project" I'm refreshing the headlight motors.
Click to view attachment
One just needed a good scrubbing. The other has scars from the plague de rodentia that needs repaired.
Click to view attachment
After scrubbing the easy one, repainting the mounting discs last weekend, and replating the cap screw fastener TWICE because the #$%@ing yellow chromate didn't stick the first time, I mounted it up. You can see my reminder that I'm not quite done there.
Click to view attachment
Click to view attachment
Yesterday was long, hard shaft day These were the last major trip hazard laying on the shop floor. Forgot to snap a before - my shafts were rough and rusty. Now a sleek shiny black.
Click to view attachment
Now where to store them? Best place is on the car. I've made several attempts to plate the bushing holder for the front sway bar but can't get a satisfactory result. Too many crevices creating "shadows" for the electric field. My stop gap was to wrap the bar ends in bubble wrap to prevent rubbing against the chassis, and snap the new 914Rubber bushings on to keep them from sliding out when I rotate the car on the rotisserie.
Click to view attachment
Click to view attachment
For the other, I first lubed up the bushing and slid the rod slowly in from the rear. The rubber is for protection.
Click to view attachment
A bungee to prevent the rod from dangling down.
Click to view attachment
Just the tip.
Click to view attachment
First, my attempt at an artsy-fartsy pic proving that I'm not very artsy-fartsy.
Click to view attachment
For my "watchin TV project" I'm refreshing the headlight motors.
Click to view attachment
One just needed a good scrubbing. The other has scars from the plague de rodentia that needs repaired.
Click to view attachment
After scrubbing the easy one, repainting the mounting discs last weekend, and replating the cap screw fastener TWICE because the #$%@ing yellow chromate didn't stick the first time, I mounted it up. You can see my reminder that I'm not quite done there.
Click to view attachment
Click to view attachment
Yesterday was long, hard shaft day
These were the last major trip hazard laying on the shop floor. Forgot to snap a before - my shafts were rough and rusty. Now a sleek shiny black.Click to view attachment
Now where to store them? Best place is on the car. I've made several attempts to plate the bushing holder for the front sway bar but can't get a satisfactory result. Too many crevices creating "shadows" for the electric field. My stop gap was to wrap the bar ends in bubble wrap to prevent rubbing against the chassis, and snap the new 914Rubber bushings on to keep them from sliding out when I rotate the car on the rotisserie.
Click to view attachment
Click to view attachment
For the other, I first lubed up the bushing and slid the rod slowly in from the rear. The rubber is for protection.
Click to view attachment
A bungee to prevent the rod from dangling down.
Click to view attachment
Just the tip.
Click to view attachment
QUOTE(bbrock @ Mar 18 2019, 11:45 AM)
One just needed a good scrubbing. The other has scars from the plague de rodentia
After scrubbing the easy one, I mounted it up. You can see my reminder that I'm not quite done there.
Yesterday was long, hard shaft day
my shafts were rough and rusty. Now a sleek shiny black.For the other, I first lubed up the bushing and slid the rod slowly in from the rear. The rubber is for protection.
A bungee to prevent the rod from dangling down.
Just the tip.


....and spring fever has hit its peek here in Montana...

QUOTE(76-914 @ Mar 18 2019, 08:54 AM)
QUOTE(bbrock @ Mar 18 2019, 06:55 AM)
QUOTE(defianty @ Mar 18 2019, 05:58 AM)
coming together nicely Brent. Love the 'K' stamp.
About that... Yesterday the wife took a rare interest in the car project and for the second time commented that she thought I needed to replace the cracked dash. I explained what they cost and that it wasn't in the budget for now. Then I took her over to show her "something really cool" and showed her the 'K'. She said, and this is a direct quote, "I knew it would be something I don't give a shit about." Women! When I was 21 I was Wasn't what I wanted to hear but damn if it didn't ring true for me. Reminded me of that old joke:
"A young man was walking along one of Southern California's sandy beaches with his surf board. He suddenly spots this bottle which has recently washed up on the beach. It's obvious it's been tossed around for a long time. He picks up the bottle and notices that it still has the cork intact. So, being curious as to what may be inside, he manages to get the cork out and out pops a Genie.
After expressing profound appreciation for having been let out of the bottle, the Genie grants his benefactor the classic, "one wish" and it will be yours. Being an avid surfer, it doesn't take him long to say, "I've always wanted to surf Hawaii, but I get seasick on ships and I'm afraid to fly. Would you build me a bridge to Hawaii?"
The Genie replies: "Do you know what you are asking for? Do you know how long the bridge would have to be? Think of the enormous challenges for that kind of undertaking. The supports required to reach the bottom of the Pacific! The concrete and steel it would take! It will nearly exhaust several natural resources. And the maintenance of that bridge! No, think of another wish."
The man said OK and tried to think of a really good wish. Finally, he said, "I've been married and divorced four times. My wives always said that I don't care and that I'm insensitive. So, I wish that I could understand women ... know how they feel inside and what they're thinking when they give me the silent treatment ... know why they're crying, know what they really want when they say nothing ... know how to make them truly happy ... I really want to understand women and how they think!"
After a long sigh, the Genie responds: "Would you like that bridge with two lanes or four?"
QUOTE(bbrock @ Mar 17 2019, 10:17 PM)
The pic of original Porsche bolts looks even a little duller than the plated but not polished bolt.
I bought some lugs at the dealer in the 90s, and they looked somewhere between your "plated" and "after Mother's" pictures. The 17mm-head (aftermarket) bolts had a finish more like the dull one in the dealer pic that you posted.
I think the current ones are a different specification than the original parts.
--DD
QUOTE(Dave_Darling @ Mar 18 2019, 02:19 PM)
QUOTE(bbrock @ Mar 17 2019, 10:17 PM)
The pic of original Porsche bolts looks even a little duller than the plated but not polished bolt.
I bought some lugs at the dealer in the 90s, and they looked somewhere between your "plated" and "after Mother's" pictures. The 17mm-head (aftermarket) bolts had a finish more like the dull one in the dealer pic that you posted.
I think the current ones are a different specification than the original parts.
--DD
Wonderful!
 So zinc and then just a little polish to add sort of a satiny sheen it sounds. That's what I was thinking would look the best anyway. The one I polished with Mother's is way too shiny for my taste.
Last night I tackled this literal rat's nest (well... mouse nest anyway).
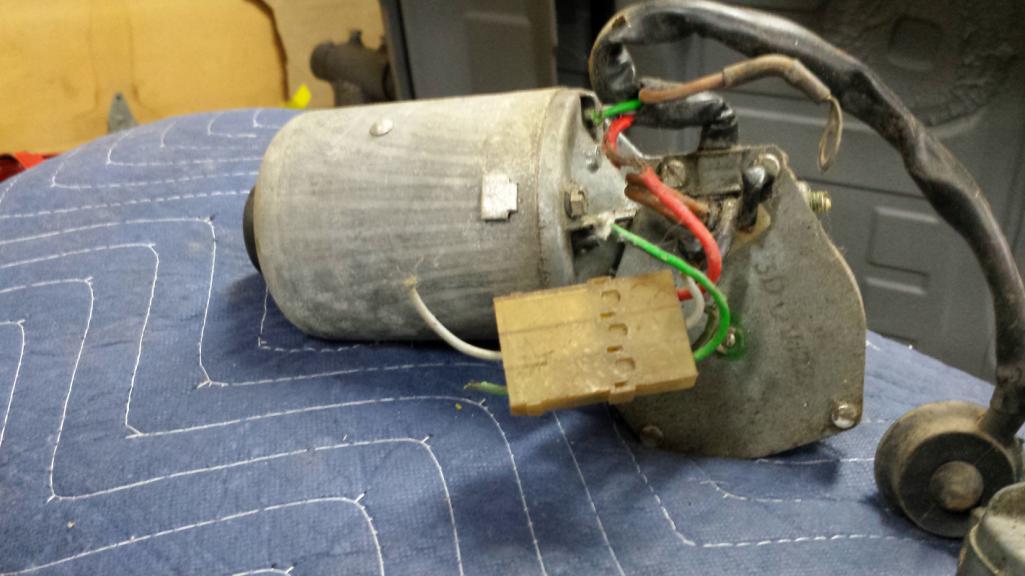
I was able to completely replace three of the chewed wires so only the red wire that runs to the relay plug had to be spliced. I had to be a little careful because two of the wires have to be soldered to diodes, and the one that runs into the motor housing solders to the brush housing. Came out pretty good I think.
Click to view attachment
Click to view attachment
This morning I bolted it (finger tight) onto the car. Nice to see both motors back in place.
Click to view attachment
Click to view attachment
Okay, it's time to talk about the elephant in the room. I'm quite embarrassed by what I posted yesterday. I'm talking, of course, about this pic of a headlight motor mounted int he car with a pee-tarnished housing clamp and screw. Shameful!
Click to view attachment
This morning I fired up the Zinc-O-Matic machine and fixed this for both motors. This is much better.
Click to view attachment
My apologies if that disturbed anyone.
QUOTE(bbrock @ Mar 19 2019, 04:49 PM)
No worries - the rawl plug however

Somebody told me that you're having all the "Lock Wafers and Springs" Nikasiled. When were you going to tell us?
QUOTE(76-914 @ Mar 19 2019, 04:20 PM)
Somebody told me that you're having all the "Lock Wafers and Springs" Nikasiled. When were you going to tell us?
![popcorn[1].gif](http://www.914world.com/bbs2/style_emoticons/default/popcorn[1].gif)
QUOTE(76-914 @ Mar 19 2019, 06:20 PM)
Somebody told me that you're having all the "Lock Wafers and Springs" Nikasiled. When were you going to tell us?

QUOTE(defianty @ Mar 19 2019, 10:53 AM)
QUOTE(bbrock @ Mar 19 2019, 04:49 PM)
My apologies if that disturbed anyone.
No worries - the rawl plug however
I thought that was stock  and I learned a new term today. I'm going to file rawl plug alongside bonnet, boot, and pissed.
Here's another. Yesterday these tubular rivets arrived for the accelerator stop on the pedal board. A normal person would just pop rivet that back on, but do I have to say it? That's not what the Germans did
Click to view attachment
Here's a tip, don't be an idiot like me. When I removed the accelerator stop, I did my best to measure for replacement rivets that I found for a few buck on ebay. Then I waited a month for them to take the slow boat from China. Of course they were the wrong size. I adjusted and order again. A month later - closer but still not right. The third time I felt confident I had the size right but a couple days later, I was looking in the PET and noticed those goddam rivets have a part number and the size is listed clear as can be in the catalog.
Luckily, I had gotten it right on the third go so a mere 3 months later, I was ready to install. I really had no clue how to install rivet and I didn't want to spend $ on special tools. I had to destroy a few to figure it out, but used a large center punch and very light taps with a hammer to flare the opening. Not too far or it will split. The lowest one here is how it looked when finished with the punch. The others have already been set but gently driving them down with the ball end of a ball peen hammer.Click to view attachment
It isn't absolutely perfect, but close to original but this isn't the money shot anyway. This is the important side. Looks just like stock.
Click to view attachment
Of course the clutch stop got a fresh coat of zinc. If I can figure out what stupid thing I did with the funky little washer on the right side of the board, it will be back in business.
Click to view attachment
All the cool kids have these
Click to view attachment
The day after I bought my first car (a 70 914), I had to take the shift linkage apart for my very first repair. After fighting those f-ing cone screws for a couple hours, I was convinced they were about the dumbest thing Porsche could do so I had a local machinist make these for me for about 5 bucks. They've served me well through 3 914s but it was time for an update. @Dave_Darling recently pointed out on another thread that I should use locktite on them since the originals had nylon inserts so they don't vibrate out. As you can see, I did one better and added nylon inserts. Pretty simple. Just cross-drill with 1/8" bore, drive in a nylon screw, and trim it off.
Click to view attachment
Click to view attachment
Here's one in the shift coupler.
Click to view attachment
Pull the boot over it and the CW will never know, but they'll come out without all the drilling and cussing.
Click to view attachment
Click to view attachment
The day after I bought my first car (a 70 914), I had to take the shift linkage apart for my very first repair. After fighting those f-ing cone screws for a couple hours, I was convinced they were about the dumbest thing Porsche could do so I had a local machinist make these for me for about 5 bucks. They've served me well through 3 914s but it was time for an update. @Dave_Darling recently pointed out on another thread that I should use locktite on them since the originals had nylon inserts so they don't vibrate out. As you can see, I did one better and added nylon inserts. Pretty simple. Just cross-drill with 1/8" bore, drive in a nylon screw, and trim it off.
Click to view attachment
Click to view attachment
Here's one in the shift coupler.
Click to view attachment
Pull the boot over it and the CW will never know, but they'll come out without all the drilling and cussing.
Click to view attachment
It's a good thing those ugly hex heads won't show that would be unacceptable to the date coders and the Germans.
If you don't tell, I won't.

Absolutely looking great. I'll start gathering up all my rusty bits to be shipped your way for the Montana Hot Springs Chromate Spa treatment.
If you don't tell, I won't.
Absolutely looking great. I'll start gathering up all my rusty bits to be shipped your way for the Montana Hot Springs Chromate Spa treatment.
Cool idea on the cone screws. Your attention to detail is inspirational!
You could also safety-wire them...
--DD
--DD
QUOTE(bbrock @ Mar 20 2019, 05:27 AM)
I thought that was stock and I learned a new term today. I'm going to file rawl plug alongside bonnet, boot, and pissed. Well done Brent - you're almost bi-lingual.

I did wonder if Steven's use of that term would cause confusion - what is the Americanese for a rawl plug ? I thought y'all just used nails ?
I'll take these in order.
It's a good thing those ugly hex heads won't show that would be unacceptable to the date coders and the Germans.
If you don't tell, I won't.
Absolutely looking great. I'll start gathering up all my rusty bits to be shipped your way for the Montana Hot Springs Chromate Spa treatment.
Ha! This being able to plate yourself is a bit like a crack habit. Every time, you convince yourself you are going to quit but.... just this once more won't hurt.
Cool idea on the cone screws. Your attention to detail is inspirational!
Thanks, but this kind of comment only encourages the insanity.
You could also safety-wire them...
--DD
Could I substitute dental floss? We seem to have a lot of that around here for some reason.
Mebs! Mebs! UNACCEPTABLE! I'm from France.
I thought that was stock and I learned a new term today. I'm going to file rawl plug alongside bonnet, boot, and pissed.
Well done Brent - you're almost bi-lingual.
I did wonder if Steven's use of that term would cause confusion - what is the Americanese for a rawl plug ? I thought y'all just used nails ?
Complete bollocks!
We call it a drywall anchor BTW.![whistle[1].gif](http://www.914world.com/bbs2/style_emoticons/default/whistle[1].gif)
QUOTE(Superhawk996 @ Mar 21 2019, 04:50 PM)
It's a good thing those ugly hex heads won't show that would be unacceptable to the date coders and the Germans.
If you don't tell, I won't.
Absolutely looking great. I'll start gathering up all my rusty bits to be shipped your way for the Montana Hot Springs Chromate Spa treatment.
Ha! This being able to plate yourself is a bit like a crack habit. Every time, you convince yourself you are going to quit but.... just this once more won't hurt.
QUOTE(johnlush @ Mar 21 2019, 04:50 PM)
Cool idea on the cone screws. Your attention to detail is inspirational!
Thanks, but this kind of comment only encourages the insanity.
QUOTE(Dave_Darling @ Mar 21 2019, 10:32 PM)
You could also safety-wire them...
--DD
Could I substitute dental floss? We seem to have a lot of that around here for some reason.
QUOTE(raynekat @ Mar 21 2019, 10:54 PM)
Mebs! Mebs! UNACCEPTABLE! I'm from France.
QUOTE(andrewb @ Mar 22 2019, 01:11 AM)
QUOTE(bbrock @ Mar 20 2019, 05:27 AM)
I thought that was stock and I learned a new term today. I'm going to file rawl plug alongside bonnet, boot, and pissed. Well done Brent - you're almost bi-lingual.
I did wonder if Steven's use of that term would cause confusion - what is the Americanese for a rawl plug ? I thought y'all just used nails ?
Complete bollocks!
We call it a drywall anchor BTW.
QUOTE(bbrock @ Mar 22 2019, 04:42 PM)
I'll take these in order.
QUOTE(Superhawk996 @ Mar 21 2019, 04:50 PM)
It's a good thing those ugly hex heads won't show that would be unacceptable to the date coders and the Germans.
If you don't tell, I won't.
Absolutely looking great. I'll start gathering up all my rusty bits to be shipped your way for the Montana Hot Springs Chromate Spa treatment.
Ha! This being able to plate yourself is a bit like a crack habit. Every time, you convince yourself you are going to quit but.... just this once more won't hurt.
QUOTE(johnlush @ Mar 21 2019, 04:50 PM)
Cool idea on the cone screws. Your attention to detail is inspirational!
Thanks, but this kind of comment only encourages the insanity.
QUOTE(Dave_Darling @ Mar 21 2019, 10:32 PM)
You could also safety-wire them...
--DD
Could I substitute dental floss? We seem to have a lot of that around here for some reason.
QUOTE(raynekat @ Mar 21 2019, 10:54 PM)
Mebs! Mebs! UNACCEPTABLE! I'm from France.
QUOTE(andrewb @ Mar 22 2019, 01:11 AM)
QUOTE(bbrock @ Mar 20 2019, 05:27 AM)
I thought that was stock and I learned a new term today. I'm going to file rawl plug alongside bonnet, boot, and pissed. Well done Brent - you're almost bi-lingual.
I did wonder if Steven's use of that term would cause confusion - what is the Americanese for a rawl plug ? I thought y'all just used nails ?
Complete bollocks!
We call it a drywall anchor BTW.
Rawl plugs were the precursor to that new fangled plastic wall plug...they were a solid fibrous plug that you screwed into , and the expansion supplied the grip...young whippersnappers !
QUOTE(ablesnead @ Mar 22 2019, 03:28 PM)
Rawl plugs were the precursor to that new fangled plastic wall plug...they were a solid fibrous plug that you screwed into , and the expansion supplied the grip...young whippersnappers !
Really? Not horse hair?

Okay, maybe it's time to fix that.
Click to view attachment
Click to view attachment
Now let's not have you crazy Brits coming in calling those heli-fiddlers or some nutty thing like that.

Moving on. I realized that when this thing becomes a roller, I'm going to need a way to steer it so I dusted off the old steering column. The tear down was a quick lunch break thing and I forgot to take pics. The steering action was horrible. It felt like the bearings had turned to gravel. I was convinced the rear bearing was so far gone that I placed a quick ebay order for an SKF sealed replacement before I even tried to clean it. To my surprise, after a soak in gasoline and getting all the old waxy greasy out, both bearings were silky smooth.
Click to view attachment
The only part I really need to install right now is the steering tube. This may be a surprise, but I chose not to replate it. It's in pretty good shape and the size and shape made me doubt I could do a good job with my setup. It looks just fine.
Click to view attachment
I did replate the cap screws and replace the lock washers. Note: yellow cap screws and black lock washers. That's the way mine came anyway. You can put your own together however you like, but don't blame me when your steering wheel fall off because you used the wrong color washers.

Click to view attachment
Slippery slope warning: I had decided to not replate the steering shaft bolts and Fuji nuts because they were also in good shape... except for one
 If you are going to plate one, might as well plate them all. So the steering shaft is naked right now.
While the dash was out, I installed new rubber washers on the mounting bolts. Porsche sent me an extra set, so if anyone wants a set, PM me.
Click to view attachment
And WA-la! We have a steering wheel. Oh look at that, Gomer got the pedal board installed.
Click to view attachment
QUOTE(ablesnead @ Mar 22 2019, 11:28 PM)
Rawl plugs were the precursor to that new fangled plastic wall plug...they were a solid fibrous plug that you screwed into , and the expansion supplied the grip...young whippersnappers !
Oh yeah - I vaguely remember my Dad having some of those. (No offence
) But over here the name has transferred to the plastic variety which - IMO - are vastly superior to those old fibrous things.Anyway back to cars and critters before Brent gets more annoyed - how do these keep appearing, Mr Biologist sir, dead, in the middle of my workshop floor ?
Click to view attachment
Are they sky diving off the ceiling ? (For the non-biologists it's a newt - which I think you call a gingrich ?)
Oh and great work on the car btw. Inspiring and educational. Really looking forward to seeing it on its wheels.
For someone with such an advanced case of OCD (and trust me, I'd know), I have to say I'm surprised you can tolerate seeing the steering wheel on there without the turnsignal/washer housing. Please correct that immediately and PM me once it's done. I can't risk seeing that again.
QUOTE(andrewb @ Mar 22 2019, 05:59 PM)
Anyway back to cars and critters before Brent gets more annoyed - how do these keep appearing, Mr Biologist sir, dead, in the middle of my workshop floor ?
They like to squeeze into moist crevices like the smallest gap under a wall sill, between the slab and foundation, under a garage door seal, etc. Then they crawl across the garage floor where their shelf-life becomes very short before drying out. Imagine your garage floor is the Sahara and that poor little guy crawling toward a mirage.
QUOTE(tygaboy @ Mar 22 2019, 06:26 PM)
For someone with such an advanced case of OCD (and trust me, I'd know), I have to say I'm surprised you can tolerate seeing the steering wheel on there without the turnsignal/washer housing. Please correct that immediately and PM me once it's done. I can't risk seeing that again.
You? OCD? I'm sorry but I just don't see it.
I've been working on the housing and it should get a fresh coat of paint tomorrow. I think you'll get more eye-rolling fodder there. I don't want to get too far ahead of myself though because I want to be able to easily take the dash out and safely tucked away before I mask and get back to blocking the exterior. Same reason I haven't put the shift lever back in. Trust me, I REALLY want to but I don't need it poking through masking plastic and getting over spray.
Sweet Sixteen
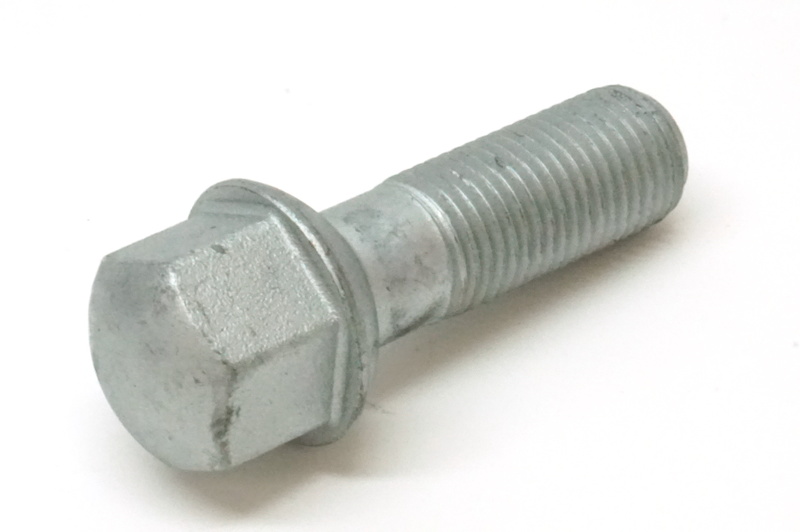
Got the wheel bolts plated. I think these look pretty good straight from plating. Difference between these and my test is that they have a much thicker coat of zinc and I flash dried them with compressed air after rinsing. Plating time was about 7X what I did for the test. I don't know if that equals 7X the thickness of zinc but there should be plenty on these for protection. Flash drying is key for a uniform sheen. I'm really happy with both the sheen and uniformity. I don't think I'll bother with polishing as I don't want them overly shiny. What do y'all think?
Click to view attachment
Click to view attachment
Click to view attachment
I think the factory should have done them that nice!

They look spectacular
It's official. You're nuts.
Oh, and:
Your nuts!
Come for a visit and teach me how to plate.
Oh, and:
Your nuts!
Come for a visit and teach me how to plate.
QUOTE(tygaboy @ Mar 24 2019, 08:20 AM)
Oh, and:
Your nuts!
Oh my!
Thanks, I guess?
This pic is special for @tygaboy 
Click to view attachment
Okay, let's fix that before you blow a fuse.
A couple very important things to deal with in restoring the column housing. First is this critical stamping. Lose that, and the car will always pull to the right.
Click to view attachment
I don't know what this green splotch does but I really don't want to find out what happens if it is removed.
Click to view attachment
Trying to be careful, I started cleaning the piece with warm solution of Dawn dish soap and water and a soft toothbrush thinking that was safe. To my horror, the white stamping started wiping right off! I finished cleaning CAREFULLY and just scuffed the original paint with 400 grit as it was still adhering well. I also sanded out some key nicks around the ignition lock housing. I didn't get them all out as I didn't want to sand that deep, but it's better. I rolled the masking around the stamping to soften the spray edge and help the paint blend.
Click to view attachment
Boy, I sure hope there is enough of that stamp left. I don't really want to have to visit the stamp man again. Paint looks good though. You can't even see where the old meets the new. The flash really catches those key nicks though. It doesn't look that bad in life. Black is the correct color for that clamping bolt. Don't get that wrong or you will be sorry.
Click to view attachment
Green splotch is intact. That's a relief.
Click to view attachment
And here it is in place. I hope Mr. Baker appreciates that I dug the plastic collar out of storage just for him. It's a bit faded. I'll see what a treatment with Forever Black does for it. I suppose I'm going to hear about the missing switch levers though. Maybe later.
Click to view attachment
Click to view attachment
Okay, let's fix that before you blow a fuse.
A couple very important things to deal with in restoring the column housing. First is this critical stamping. Lose that, and the car will always pull to the right.
Click to view attachment
I don't know what this green splotch does but I really don't want to find out what happens if it is removed.
Click to view attachment
Trying to be careful, I started cleaning the piece with warm solution of Dawn dish soap and water and a soft toothbrush thinking that was safe. To my horror, the white stamping started wiping right off!
I finished cleaning CAREFULLY and just scuffed the original paint with 400 grit as it was still adhering well. I also sanded out some key nicks around the ignition lock housing. I didn't get them all out as I didn't want to sand that deep, but it's better. I rolled the masking around the stamping to soften the spray edge and help the paint blend.Click to view attachment
Boy, I sure hope there is enough of that stamp left. I don't really want to have to visit the stamp man again. Paint looks good though. You can't even see where the old meets the new. The flash really catches those key nicks though. It doesn't look that bad in life. Black is the correct color for that clamping bolt. Don't get that wrong or you will be sorry.
Click to view attachment
Green splotch is intact. That's a relief.
Click to view attachment
And here it is in place. I hope Mr. Baker appreciates that I dug the plastic collar out of storage just for him. It's a bit faded. I'll see what a treatment with Forever Black does for it. I suppose I'm going to hear about the missing switch levers though.
Maybe later. Click to view attachment
Oh my gosh... Thank you!
QUOTE(bbrock @ Mar 24 2019, 03:57 PM)
Lose that, and the car will always pull to the right.
Admins, cleanup on aisle 3 please. Clearly a blatant political statement.
QUOTE(KELTY360 @ Mar 24 2019, 04:10 PM)
QUOTE(bbrock @ Mar 24 2019, 03:57 PM)
Lose that, and the car will always pull to the right.
Admins, cleanup on aisle 3 please. Clearly a blatant political statement.
luv it!Oh and nice work there Brent.
 pour yerself one.
QUOTE(KELTY360 @ Mar 24 2019, 06:10 PM)
QUOTE(bbrock @ Mar 24 2019, 03:57 PM)
Lose that, and the car will always pull to the right.
Admins, cleanup on aisle 3 please. Clearly a blatant political statement.
Okay, that's a good one. You get points for that.
One more little side project before posting the main project for the weekend. I had to pull and prep the wiper assembly bracket to send off for plating. That area was ground zero for the mouse and weasel apocalypse that hit my car so... Eww!!!! I didn't take proper "before" pics but you can get a little sense here. Note the hair on the motor from dead animals.
Click to view attachment
The pan was to just clean, blast, and wire wheel the bracket and leave the rest for later, but there are so many fiddly parts that I wanted to get them back together while my memory was fresh.
Click to view attachment
After a lot of scrubbing off the grease and pee crust and replating all the parts, here's where it sits now.
Click to view attachment
It's hard to believe this, but it's time to get tires for this tub. First I need to clean up this stack of wheels.
Click to view attachment
I tried @mepsteins trick of cutting off the tire and then using a pair of bolt cutters to cut the bead and remove the remainder. Cutting the tires was a piece of cake so, bein the idiot that I am, I plowed through three of them before thinking maybe I should make sure I could cut the beads. Needless to say, I could not. After 35 years, the rubber had hardened and cemented so tight to the rims that no about of pounding or prying would bet them loose enough to use the bolt cutters. Even worse, my closest neighbor has a hydraulic tire machine but I didn't want to bother him. Well, I got over that. Even with his machine, we had to fight to get the two intact tires off and only one side of each of the ones I had cut. I got the remainder off this morning by first grinding the rubber away with a paint stripping wheel and then cutting the bead cord with a cutoff wheel on a drill.
Click to view attachment
Click to view attachment
Then prying with a pry bar.
Click to view attachment
I finally had five naked and grungy rims.
Click to view attachment
Click to view attachment
I picked one out and scrubbed it with dish soap and fine steel wool. The results are less than spectacular. There's a lot of scrapes, scratches and stains on these and I'd really like to send them off to one of the wheel wizards for professional restoration, but my bank account says otherwise so I'll have to clean them the best I can and live with them for awhile. Still, it's an improvement.
Click to view attachment
Click to view attachment
Click to view attachment
I tried @mepsteins trick of cutting off the tire and then using a pair of bolt cutters to cut the bead and remove the remainder. Cutting the tires was a piece of cake so, bein the idiot that I am, I plowed through three of them before thinking maybe I should make sure I could cut the beads. Needless to say, I could not. After 35 years, the rubber had hardened and cemented so tight to the rims that no about of pounding or prying would bet them loose enough to use the bolt cutters. Even worse, my closest neighbor has a hydraulic tire machine but I didn't want to bother him. Well, I got over that. Even with his machine, we had to fight to get the two intact tires off and only one side of each of the ones I had cut. I got the remainder off this morning by first grinding the rubber away with a paint stripping wheel and then cutting the bead cord with a cutoff wheel on a drill.
Click to view attachment
Click to view attachment
Then prying with a pry bar.
Click to view attachment
I finally had five naked and grungy rims.
Click to view attachment
Click to view attachment
I picked one out and scrubbed it with dish soap and fine steel wool. The results are less than spectacular. There's a lot of scrapes, scratches and stains on these and I'd really like to send them off to one of the wheel wizards for professional restoration, but my bank account says otherwise so I'll have to clean them the best I can and live with them for awhile. Still, it's an improvement.
Click to view attachment
Click to view attachment
All of them have a fair amount of curb rash. I should at least be able to do something about that.
Click to view attachment
Here's how it looks after one pass with 220 grit on a random orbit palm sander. This is actually not bad. I can't get the deepest gouges out but I think if I take this to about 800 to 1000 grit, it should match the original sheen pretty close. I had to throw some bolts on there just to see how they look.
Click to view attachment
Some of the other damage I'll be dealing with on these wheels. Looks like somebody used sandpaper and scratched through the anodizing.
Click to view attachment
Click to view attachment
and deep stains and marks left by adhesive wheel weights.
Click to view attachment
These wheels won't be perfect but they should be okay 10 footers. I'll do some research, but if anyone has tips or suggestions to share, I'm all ears. Ultimately, I think they'll need professional restoration but I can't swing that financially right now so I'll get them as good as I can and be happy with it.
Click to view attachment
Here's how it looks after one pass with 220 grit on a random orbit palm sander. This is actually not bad. I can't get the deepest gouges out but I think if I take this to about 800 to 1000 grit, it should match the original sheen pretty close. I had to throw some bolts on there just to see how they look.
Click to view attachment
Some of the other damage I'll be dealing with on these wheels. Looks like somebody used sandpaper and scratched through the anodizing.
Click to view attachment
Click to view attachment
and deep stains and marks left by adhesive wheel weights.
Click to view attachment
These wheels won't be perfect but they should be okay 10 footers. I'll do some research, but if anyone has tips or suggestions to share, I'm all ears. Ultimately, I think they'll need professional restoration but I can't swing that financially right now so I'll get them as good as I can and be happy with it.
This is a "lo-fi" version of our main content. To view the full version with more information, formatting and images, please click here.