Nice that they are still available although mine doesn't whistle or chirp without them. I suppose you could fill the the void with something besides a gasket if you had the chirp.
Full Version: Keep Dellorto DRLA 45s and Bosch 009?
Problem is with what?
If it ever did fail you'd have a nice chunk of whatever go down your intake.
If it ever did fail you'd have a nice chunk of whatever go down your intake.
QUOTE(Mark Henry @ Dec 17 2017, 02:06 PM) 
Just googled I was thinking dellorto "Jet Doctor" which was made to solve a dell jet issue,
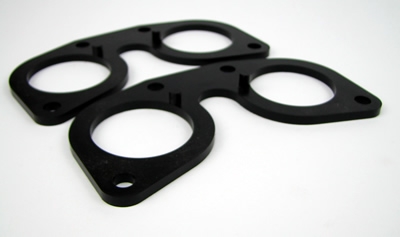
Below is the gaskets I'm talking about, MarkV here's where you can get them and many other dell parts.
http://vwparts.aircooled.net/Dellorto-DRLA...stle-gasket.htm
I noticed that site says:
QUOTE
correct torque for the 4 mount nuts is 10-15 INCH lbs. We also suggest tightening in a criss-cross pattern and bring the nuts down slowly to torque. Lastly, we recommend running a spring style lock washer under your nuts
Maybe those instructions weren't followed in this case?
Click to view attachment
Nyloc nuts are probably not what I would use but no big deal. The problem with them is they may want to unscrew the stud from the manifold when you go to loosen them. I would just snug them evenly.
Looks like you have the dellorto upgrade kit because you have the longer idle jet holders. Look inside and see if you have a fuel rail that goes across. These upgrade kits are good. I would start by removing the idle jets and the pump jets that are on the sides of the carbs and blowing them out with air. When reinstalling them, make sure the notch on the pump jet is pointing up. You'll need patience when reinstalling them so take your time. Then drive it and see how it responds. If that doesnt work, I would suspect the rubber gaskets which were used to stop the dellorto whistle
I don't get how it could bow down that much.
So the gaskets weren't leaking (at least at idle). It does seem that the right side of the engine is pulling harder than the left off of idle. So I think I need to adjust the linkage.
https://www.youtube.com/watch?v=wTxJsuCn5JQ
https://www.youtube.com/watch?v=wTxJsuCn5JQ
Check to make sure the linkage arms both come off the stops at the same time. You can do this by placing your finger where it comes of the stop on one side and looking at the other side. Also the linkage arm rods should have the same angle from the linkage to the carb base area, if not they will open at different rates. Also it sounds like it running on three cylinders, check the idle jets and pump jets. Try lowering the idle half a turn at a time on each carb. I think what might have happened is that one linkage arm came loose and moved over and is causing the high idle by jamming the linkage arm. Both throttle arms have to be resting on the stops at idle
QUOTE(type2man @ Dec 23 2017, 02:48 PM)
Check to make sure the linkage arms both come off the stops at the same time. You can do this by placing your finger where it comes of the stop on one side and looking at the other side.
Thank you! I tried this tonight and was able to detect that the right carb was coming off the stop before the left. The trick of feeling one while watching the other was the clue I was missing before.
I adjusted the linkage rod and got them much closer. And now the engine responds SO MUCH BETTER coming off of idle. Previously it was very rough when you just barely put your foot on the gas, and now it's great ... up until the next flat spot. I'm excited that I was able to make some progress.
I checked again with the air flow meters and observed it was much improved, but still far from perfect. I guess an experienced mechanic could get the linkage right without the meters. But for me they're fun.
Does anyone happen to know the wrench sizes of those CB Performance linkage rod lock nuts? Are they metric? I don't own many tools yet and I'm afraid of cornering them with my crescent wrench.
QUOTE(type2man @ Dec 23 2017, 02:48 PM)
Also the linkage arm rods should have the same angle from the linkage to the carb base area, if not they will open at different rates.
Mine do not have the same angle, and I don't see how to adjust it. The angle on the right carb (the second photo) looks especially awkward to me.
Click to view attachment
Click to view attachment
QUOTE(type2man @ Dec 23 2017, 02:48 PM)
Also it sounds like it running on three cylinders, check the idle jets and pump jets. Try lowering the idle half a turn at a time on each carb. I think what might have happened is that one linkage arm came loose and moved over and is causing the high idle by jamming the linkage arm. Both throttle arms have to be resting on the stops at idle
OK, I will look into this. It looks like I can still buy carb cleaner tomorrow.
As it arrived from previous owner, it starts instantly and idles at 800-900 when cold. When it's finally warm, the idle is way up there: 1200 or more.
I does sound like it running on three cylinders. I would clean the idle jets. Those brass tubes that are sticking up with the slot head next to the carb throats are the idle jet holders. You unscrew them and pull the jet off the end of the holder and spray carb cleaner through them. You can hod the jet up to the light to see if it the orifice is clear. They are small so be careful not to lose one or drop it down the carb throat. I usually do it one at a time.
As for the angle of the linkage the actuator arm has a set screw that tightens into the hex bar. You can move the actuator from left to right so that they both have the same angle and are parallel. The swivel rod is also adjustable so that they both have the same slack. You want to make sure one of them isn't opening faster than the other.
The linkage is not metric. It set nut takes a 3/8" wrench but I use a small crescent wrench so that I can adjust it small enough to adjust the rod.
If you look at my photo you can see that my actuator arms are all the way at the end of the hex bar. Yours look like they are more inboard which doesn't really mater as long as they are both the same.
Click to view attachment
QUOTE(MarkV @ Dec 23 2017, 07:36 PM)
If you look at my photo you can see that my actuator arms are all the way at the end of the hex bar. Yours look like they are more inboard which doesn't really mater as long as they are both the same.
Click to view attachment
Yes, mine are definitely further inboard ... but different distances for some reason. I'll try to buy Allen wrench to readjust and carb cleaner to clean the jets tomorrow.
Click to view attachment
Click to view attachment
Perhaps the allen screws backed off and the linkage arms moved? Also the linkage bar that goes across shouldn't move from carb to carb. It should have the smallest amount of play so it doesn't bind and it should not move up or down. At this point, I would either buy a new CB linkage or the CSP linkage and have a VW shop install it.
QUOTE(type2man @ Dec 25 2017, 08:23 PM)
Perhaps the allen screws backed off and the linkage arms moved? Also the linkage bar that goes across shouldn't move from carb to carb. It should have the smallest amount of play so it doesn't bind and it should not move up or down. At this point, I would either buy a new CB linkage or the CSP linkage and have a VW shop install it.
Some updates since the last post: Among my bicycle tools I found the allen wrench that would loosen the linkage arms. Both of them were locked down tight. However, moving the arms along the hex bar didn't seem to correct the angle discrepancy.
Click to view attachment
Click to view attachment
Also when I loosened the linkage arms, there seemed to be a spring missing from the right side end of the hex bar. Per the CB Performance book, there are supposed to be springs in both ends to keep the hex bar centered.
With family Christmas activities and every store being closed, I wasn't able to obtain carb or brake cleaner, so I blew out the idle jets using the Lewinsky method. It idles at 800 when it's cold and my subjective impression is that it's smooth at idle.
The good news is that tomorrow I have an appointment with a VW shop that was recommended by a local 914World member.
Merry Christmas all, and thanks for your continued help!
It looks like the hex bar is adjusted all to way to one side for some reason. The pivots for the hex bar that hold tension on the springs are adjustable. In one of the photos the pivot is almost all the way inside the hex bar and in the other photo the pivot is adjusted most of the way out.
The angles you have highlighted in green are pretty much fixed. The angle from side to side is the angle that you want to make sure is symmetrical. If one of those bars has a different angle than the other the carbs aren't going to open in unison. I have a cheap magnetic base angle finder/gauge from Harbor Freight that I used when I set my carbs up that helped me get it right.
Click to view attachment
Different intake manifolds created the width difference. Your manifolds have a sharper turn into the head, whereas the cb manifolds have a gentler turn. The cb manifolds are also taller. I use those dell carb gaskets as a soft mount of sorts, though i cut them apart so they fit flat. The cb crossbar for type4/914 is longer, for type1 shorter. The ball ends supporting the crossbar look cobbled together which led me to think that's a type1 length bar made to work. Check the part numbers on your air cleaner base plates and see if they are for type1 or 4 with cb. Good luck, have fun.
QUOTE(MarkV @ Dec 25 2017, 09:44 PM)
It looks like the hex bar is adjusted all to way to one side for some reason. The pivots for the hex bar that hold tension on the springs are adjustable. In one of the photos the pivot is almost all the way inside the hex bar and in the other photo the pivot is adjusted most of the way out.
Tonight I didn't detect a spring on the right side of the hex bar, only on the left.
Click to view attachment
Click to view attachment
QUOTE(MarkV @ Dec 25 2017, 09:44 PM)
The angles you have highlighted in green are pretty much fixed. The angle from side to side is the angle that you want to make sure is symmetrical. If one of those bars has a different angle than the other the carbs aren't going to open in unison. I have a cheap magnetic base angle finder/gauge from Harbor Freight that I used when I set my carbs up that helped me get it right.
Click to view attachment
I'm 60% sure I understood the part about angle from side to side, but I'm spacially challenged so please bear with me as I confirm: the angles of the two linkage rods (the funny-threaded rods with heim joints at each end) against the carbs when viewed from above the engine lid?
I could be wrong but I think he has all of the correct parts they just need to be setup correctly. unless I am missing something in the photos I think I would start by centering the hex bar in the left and right pivots.... if he is missing an inner spring find a replacement. After the hex bar is centered then move the arms so that they are symmetrical and then adjust the length of the drop rods. Last move the accelerator arm so that it lines up with the cable and maybe remove that extra spring that is on the outside of the accelerator cable.
There are two angles to check. There is a front to back angle that is pretty fixed and there is a left to right angle. You have to set the left to right before you set the front to back. If you have the left to right set the same on both sides the front to back cant be off although you may have to adjust the length of the rods.
Take to spring you have to the hardware store and see if you can find something close that will work. My local Ace Hardware has a plastic bin with multiple assorted springs.
Take to spring you have to the hardware store and see if you can find something close that will work. My local Ace Hardware has a plastic bin with multiple assorted springs.
Here is a photo from directly above. See how there is an angle from the pivot arm to the carb? The pivot on the pivot arm is closer to the center of the photo than the pivot on the carb. One is not directly over the other....that angle need to match on both carbs. The pivot arm is more inboard than the pivot on the carb.
Click to view attachment
Click to view attachment
The CB linkage should be spring loaded on both sides. You'll be fighting that old setup for eternity.
From what I can see in post #43 the thick intake gasket is deformed and leaking air. It looks to me like you can see the inner edge of the gasket has been squeezed out. The carbs will never sync up if you have a big intake gasket leak.
Click to view attachment
Ditch the hex cross bar and get a CSP bellcrank. I found a CSP type 4 kit at Mid-America Motorworks for $125, even if you paid another $50 it's worth it. Think of the CB cast hex bar as a linkage from a Yugo, and the CSP as from a Porsche. There's that much of a difference. https://www.csp-shop.com/en/engine/type-4-b...ida-23951b.html
So you're saying my car is a Yugo because it has a cross bar linkage. 
Both linkages do the same thing one is just easier to set up than the other.
Both linkages do the same thing one is just easier to set up than the other.
The pictured linkage has been around. Stuff wears out. Heim joints get sloppy. Fix the gasket/nut/lockwasher issue before you do anything else.
The CSP products are higher quality, that will give you better and much easier adjustment as well as smoother throttle actuation, that's what I'm saying MarkV.
You can make a linkage from coat hanger and welding rod if you want to, it's your car, do whatever you want.
You can make a linkage from coat hanger and welding rod if you want to, it's your car, do whatever you want.
QUOTE(Perry Kiehl @ Dec 26 2017, 11:20 AM)
The CSP products are higher quality, that will give you better and much easier adjustment as well as smoother throttle actuation, that's what I'm saying MarkV.
No doubt the CSP is a better set. I was just trying to get him up and running with what he has in his engine bay.
QUOTE(MarkV @ Dec 26 2017, 10:34 AM)
No doubt the CSP is a better set. I was just trying to get him up and running with what he has in his engine bay.
Thanks Mark. I appreciate the time and attention you've put into helping me out. I owe all you guys many rounds of beer (or maybe tequila if we're in Tucson).
This morning Franklin's, a local air-cooled VW shop, showed me a new engine with the hex bar linkage working properly, so no doubt it can be done well. He also showed me an engine with the CSP setup.
I've lost some more confident in the condition of my linkage after seeing how much play mine has is in the transition from idle to light throttle (which is also where I've started getting the rough running again).
Click to view attachment
I think mine could be gotten to work, but the CSP linkage is so cheap and I like the way it unclutters the engine compartment. It's probably worth the $150 just to have people stop blaming the hex bar linkage.
A new linkage and maybe some new carb base gaskets will certainly help.
If you cant get the linkage locally here is a link that might be closer to you:
http://www2.cip1.com/ProductDetails.asp?Pr...C31-129-941-400
If you cant get the linkage locally here is a link that might be closer to you:
http://www2.cip1.com/ProductDetails.asp?Pr...C31-129-941-400
I ordered parts from CIP and they showed up two days later and I live across the country. My mailmans feet were on fire. You just need to make sure your throttle cable will reach the CSP setup which bolts onto the case at the lowest point and closest to the trans housing
QUOTE(type2man @ Dec 26 2017, 07:11 PM)
I ordered parts from CIP and they showed up two days later and I live across the country. My mailmans feet were on fire. You just need to make sure your throttle cable will reach the CSP setup which bolts onto the case at the lowest point and closest to the trans housing
I put in a request to CIP to find out when it will be back in stock. Failing that, order from CSP-shop.com in Germany I guess.
In other news, at the VW shop I finally got a glimpse of the current venturi size for these DRLA 45s:
Click to view attachment
He thought this size venturi might restrict the top end. The engine is 2366cc (71mm stroke with 103mm pistons) Web street cam, stock 2 liter valves. It has a lot of power already, so I'm not sure going to a bigger venturi than this would make sense since I also want it to be drivable.
Oh, I also put in the 123 Bluetooth distributor with a conservative curve for now. It will be fun to experiment with that once the carbs are sorted.
I'm trying to put the CSP Type 4 Porsche kit onto my DRLA 45s. The instructions at https://www.csp-shop.com/technik/pdf/deeng/18236.pdf are for IDFs and I made the mistake of following the step about removing the throttle return spring. This seems to have been unnecessary given the way the previous hex bar was installed.
Anyway, I'm a klutz and the spring has more tension than I expected and I'm wondering if anyone has any special trick for getting it wound up again.
Click to view attachment
Anyway, I'm a klutz and the spring has more tension than I expected and I'm wondering if anyone has any special trick for getting it wound up again.
Click to view attachment
There's usually only about a half turn on that.
Needle nose pliers or small set of vice-grips. Put it back together and leave everything loose and then wind up the spring and get it in place last before you tighten the nut.

QUOTE(MarkV @ Jan 4 2018, 06:21 PM)
Needle nose pliers or small set of vice-grips. Put it back together and leave everything loose and then wind up the spring and get it in place last before you tighten the nut.
Following Mark's advice, and considering Perry's experience that half a turn is enough, I managed to get the spring this far. I don't have a fish scale to measure the exact force, but it snaps back smartly and intuitively feels like the right amount of force for throttle return.
Per the CSP instructions for Weber IDF, I torqued the SW11 throttle control shaft nut to 4 ft/lbs. I'm guessing the right number for DRLA would be similar, and doubt the previous owners bothered with a torque wrench anyway. The lock tab wasn't done up before. I guess I should do that.
Maybe you tall guys could do all this with the carbs in place on the engine? I don't see how I could have done it without pulling the carb.
Click to view attachment
Click to view attachment
Click to view attachment
I had to use more like 8 ft/lbs of torque (twice the amount in the instructions) to get the SW11 throttle control shaft nut to align with the lock tab. I hope The Maker will forgive my transgression.
Click to view attachment
UPDATE: I found this picture of "properly installed tab washer" online. I do not see how my tab washer can perform its function on the CSP throttle lever, and wondering if I should just replace it with a conventional washer.
(Or ignore this as a trivial issue and keep going with the CSP installation since it's taking longer than I expected.)
Click to view attachment
Click to view attachment
UPDATE: I found this picture of "properly installed tab washer" online. I do not see how my tab washer can perform its function on the CSP throttle lever, and wondering if I should just replace it with a conventional washer.
(Or ignore this as a trivial issue and keep going with the CSP installation since it's taking longer than I expected.)
Click to view attachment
QUOTE(porschetub @ Nov 25 2017, 02:03 PM)
In your carb pic the vacuum advance port isn't capped off ??
It turns out porschetub was right. The distributor vacuum port was NOT sealed internally as I'd assumed. Also my water-spraying vacuum leak test hadn't detected this.
Perhaps someone felt the need to drill it out in the past. What's the best way to cap this off?
I never would have found this with the carb in situ. Would a mechanic have found it?
Click to view attachment
I unscrewed the pushrod (why is it called that when it actually pulls?) and attached the little ball socket to the CSP lever, using 8mm and 7mm spanners. I guess the next step is to put this left carburetor back on the engine and pull the right one.
Click to view attachment
Click to view attachment
On a set of 45s I have, that open port has a small brass tube inserted in it with a rubber(?) cap on it. Big time vacuum leak below the throttle plate on yours.
I'd look to see if I could find a brass tube to fit, maybe off of an old carb.
If you have a vac advance dizzy that's the first place I'd try to pull vac from. I'd also tee it with the one from the other carb.
If you have a vac advance dizzy that's the first place I'd try to pull vac from. I'd also tee it with the one from the other carb.
A thin 8mm open end wrench is the thing to snap off the ball ends. You want to take both long rods and adjust them so they are the exact same length. There are two different ball socket ends, left and right threads. It's made like that so you can turn them when installed. When you get them installed,put a sharpie mark on the top of both pull rods so you can count the turns if you have to adjust, remember you have to turn them both the same number of turns.
As long as you've got a tab bent up to keep the nut from backing out, you're good
As long as you've got a tab bent up to keep the nut from backing out, you're good
QUOTE(Mark Henry @ Jan 5 2018, 07:29 AM)
If you have a vac advance dizzy that's the first place I'd try to pull vac from. I'd also tee it with the one from the other carb.
Yes, good idea. I have a 123 Tune+ (Bluetooth), currently not using the vacuum advance. In the 123 group buy thread I've discussed hooking it up, and no one there seems to understand why I think it would be a good idea.
My one reservation is that I think I'd rather have the manifold vacuum signal, as I've read the port vacuum signal won't be strong at idle. As I understand it this was done to make combustion hotter at idle to reduce emissions. But this is probably still better than no vacuum advance at all + two carbs with 3.5mm vacuum leaks.
There's also an inop vacuum gauge in the dash. I haven't investigated what it's connected to, if anything. I'm assuming it would be difficult and painful to run a vacuum line from the engine compartment to the gauge.
Click to view attachment
QUOTE(98101 @ Jan 5 2018, 12:37 PM)
QUOTE(Mark Henry @ Jan 5 2018, 07:29 AM)
If you have a vac advance dizzy that's the first place I'd try to pull vac from. I'd also tee it with the one from the other carb.
Yes, good idea. I have a 123 Tune+ (Bluetooth), currently not using the vacuum advance. In the 123 group buy thread I've discussed hooking it up, and no one there seems to understand why I think it would be a good idea.
My one reservation is that I think I'd rather have the manifold vacuum signal, as I've read the port vacuum signal won't be strong at idle. As I understand it this was done to make combustion hotter at idle to reduce emissions. But this is probably still better than no vacuum advance at all + two carbs with 3.5mm vacuum leaks.
There's also an inop vacuum gauge in the dash. I haven't investigated what it's connected to, if anything. I'm assuming it would be difficult and painful to run a vacuum line from the engine compartment to the gauge.
Click to view attachment
Yes, good idea. I have a 123 Tune+ (Bluetooth), currently not using the vacuum advance. In the 123 group buy thread I've discussed hooking it up, and no one there seems to understand why I think it would be a good idea.
Never said it wasn't a good idea, I was wondering if it was necessary or worth the trouble porting a bunch of hoses around the engine.
If there are vaccum leaks in FI or carburetors, fixing those would be first order of business.....linkage....sync....jetting.....timing. More or less.
I'm just wondering that with a programmable dizzy....why augment the curve with vaccum when you can put it on a dyno and program it with your phone.
Am I missing something here?
The 123 I have has the vaccum advance port hooked onto the dizzy and it does work. There are two ports for the stock throttle body that were discussed. The model for D-jet is switched only so I can't use blue tooth to change it. Basically it is pre-programmed.
Do both and see what happens.
QUOTE(914_teener @ Jan 5 2018, 01:33 PM)
I'm just wondering that with a programmable dizzy....why augment the curve with vaccum when you can put it on a dyno and program it with your phone.
Am I missing something here?
If a distributor ignores vacuum, the only information it has is RPM. This will work, but not as well as possible for street use. The best time to fire the sparkplug cannot be determined only from RPM because an engine running at 2000RPM at cruise benefits from an earlier spark and an engine running at 2000RPM at WOT -- with more stuff going into the cylinders -- benefits from a later spark. Manifold vacuum can give the distributor additional information it cannot get otherwise. Turbo guys take this even further by retarding the ignition sensitive to boost pressure.
The phone app cannot tell the distributor how much load the engine is under, but through the programmable MAP table it can tell the distributor how to respond to that load.
I have to do *something* about these open vacuum ports on the carbs, so running them to the distributor and setting up a MAP curve seems like an interesting experiment. I'm off to the hardware store with the carb to make sure they give me the right size.
For some reason the right carburetor wasn't as covered with muck like the left one was. I still tried to clean it up a little with carb cleaner, aka wife repellent. Next time I would probably buy brake cleaner instead.
The right side was way easier since I didn't make the mistake of undoing the spring.
I noticed the other (front) end of the throttle shaft had an unlocked lock tab.
Click to view attachment
So I locked it. I'm curious how often these have actually fallen off.
Click to view attachment
The kit for IDF had another feature I didn't seem to need, as far as I can tell.
Click to view attachment
Engine compartment is much tidier without the hex bar. (I'm still wondering why there's oil spewed all around the filler.)
Click to view attachment
Cork gasket under the fill Tower assembly? You can change out the carb filter bases now. No need for the ones with the cross bar pivots.
I didn't try adjusting the CSP linkage until the next day. I used both the fingertip technique I learned from you guys (touching one while looking at the other), and also tried using paper as a feeler gauge, like a zero-lash valve adjustment. From the photo you'll see I used the CSP installation instructions for paper. This was the only use I got from the instructions, as they were written for IDFs not DRLAs.
When I tested with the air-flow meters later, the left and right carb were more in sync than I had ever gotten them before. (But there were other, much worse problems I'll describe next.)
Click to view attachment
When I tested with the air-flow meters later, the left and right carb were more in sync than I had ever gotten them before. (But there were other, much worse problems I'll describe next.)
Click to view attachment
Once the linkage was dialed in, I started the car, looking forward to it running better than ever. Instead, it ran worse than ever. It wouldn't idle, and sounded like it was running on two cylinders. I was alone (without a remote starter), so couldn't get up from the driver's seat to view the engine running after starting it. The iPad was within reach from the driver's seat, so out of desperation I tried the "TUNE" button on the 123 Ignition app.
I was surprised to discover it *would* idle (though not very well) when I bumped the advance from 12º (at 1000RPM) to 20º.
BEFORE (wouldn't idle):
Click to view attachment
AFTER (would idle):
Click to view attachment
Later I found it idled even faster with the advance at 1000RPM at 40º!
I was surprised to discover it *would* idle (though not very well) when I bumped the advance from 12º (at 1000RPM) to 20º.
BEFORE (wouldn't idle):
Click to view attachment
AFTER (would idle):
Click to view attachment
Later I found it idled even faster with the advance at 1000RPM at 40º!
I couldn't see how changing the linkage and adjusting it better than it ever had been before would cause these problems. Maybe I had messed something up when I had the carbs out, using carburetor cleaner on the jets (should I have used brake cleaner?), trying to get the muck off of the exterior, or installing the new throttle arms? Or had I altered the mixture when I closed off the vacuum advance ports that had been wide open before? Had I knocked a spark plug wire loose?
The weirdest thing was the airflow into cylinder #3. It had always been slightly less than #4 on the same carb. But now it was *very* different. I believed it wasn't just a measurement error because spraying carb cleaner into #3 had much less effect than spraying into #4. Note that #4 was perfectly in sync with #2 on the other carb.
Click to view attachment
The next morning I limped the car (with frequent bangs from the carbs and sometimes the exhaust) to a VW shop that had been recommended by a 914World member. When I showed the owner the picture of the mismatched throats he expressed his opinion the carburetor was damaged, possibly by a backfire. He also didn't think the mismatch was bad enough to explain how awfully my car was running.
We spent a couple hours fiddling with the tuning. We noticed that all four air bypass screws were open. Closing them had no effect though. Re-open the vacuum ports... no effect. Inspected all the jets. Checked the jet sizes -- they were the original ones that come with the carb. We even tried changing back to the Bosch 009 distributor. No effect. Tamper with the CSP linkage.... no effect. The engine would idle (with soft pops every few seconds), but wouldn't run at 2000RPM. At open throttle it would run faster than 2000RPM though. At higher throttle settings I noticed gasoline splashing and sputtering from the left carburetor -- the leaky one that's generally covered by muck, not the one with the mismatched airflow.
The shop owner admitted that he was stumped. I thought that he would want to open up the carburetors to see what was happening inside, but I guess he sends them to another shop for that.
He did have *another* pair of DRLA 45s, new old stock. We installed those, made a few adjustments, and the engine idled more smoothly than I had ever heard it. At this point we had worked through lunchtime into the afternoon. Once I heard that new-car idle, I had zero desire to put my old scratched, dented, leaky carburetors back on. He called his contact at CB Performance for pricing advice, and suggested he'd sell them for $750. (No, he didn't have any new Webers lying around.) It took me about half a second to decide: YES.
I'm pretty sure y'all will give me some flak for this decision. I'm 80% sure my leaky left carb and my bent right carb could have been fixed, slowly by me, or quickly by a carburetor shop. But I really feel I'm done with those old carbs. The previous owner was using those foam air filters, letting everything in around the edges. He'd left two vacuum ports and four bypass screws open. He had them mounted on deformed gaskets. In one case there was a paper gasket stuck on top of the squishy one. In my care they'd experienced at least a thousand explosions. Who knows what hell these carburetors have been through in their life?
(However, my carb problems weren't over yet! Continued next post ....)
Click to view attachment
The Road Test
VW shop owner asked me to drive around to test the new carburetors in action. At first it seemed great. It drove smoothly out of the parking lot and pulled hard when I floored it pulling onto the street. A few blocks later I noticed popping sounds and sneezes! But only in some conditions, typically cruising around 3000RPM. Not wide open. And much less often than before. Idle was still perfect. He looked really sad and confused when I told him. I suggested we call it a day.
Today (Tuesday) I wondered how to find out what was in the exhaust at cruising speed. I don't know how hard it is to run the wires for a wideband air-fuel meter, or whether I'd like a gauge that doesn't match the others. I called a local dyno shop (with a sniffer) and found out they weren't very busy. I suggested I should drive the car on the dyno because an ordinary person cannot operate my linkage and worn syncromesh. The car was backfiring even while driving onto the test stand. While setting up, a technician noticed that the left carb's main jet stack was just flopping around in its holder, not screwed in! They screwed that in properly, and I don't think I've heard a backfire since. That was the problem I'd gone there to solve.
We did some dyno tuning, as you can see here (or in the other thread I started). Air/fuel ratio was lean on the first run and OF COURSE they didn't have Dellorto jets, so I asked him to ream out the existing 165 main jets. (I see that CB Performance sells them.) They had never seen a Bluetooth tunable distributor before. We advanced the overall timing a bit from what I had, which improved the bottom end but detracted from the top end. So we backed down just the top end. I really like the 123 distributor. We didn't explore using vacuum advance to improve drivability... still think there's a lot of potential here since this style of dyno run is only optimizing for wide open throttle.
Car ran fantastically while driving home. Unfortunately it's really raining here so didn't get to play with it.
According to another thread, this dyno result isn't impressive and now it's time to fix the clutch.
Click to view attachment
Click to view attachment
Thanks for sharing this! I'm also in the midst of hooking up a CSP linkage on a set of old carbs, but the -30C weather has stopped progress.
This is a "lo-fi" version of our main content. To view the full version with more information, formatting and images, please click here.