Hi Guys,
Just finished restoring my gauge cluster and installing the LED upgrade described by Timothy_nd28. Here's the vid...
https://www.youtube.com/watch?v=r3xJxEiIlIQ
And here's Tim's step by step post...
http://www.914world.com/bbs2/index.php?sho...=212130&hl=
Full Version: Gauge restore and LED upgrade
Thank you for posting, this mod is on my bucket list for sure.
Does the dimmer still work?
Easy to follow, clear audio, nice close up shots, really well done video!
QUOTE(pete000 @ Jan 31 2018, 12:59 PM) 
Does the dimmer still work?
Thanks guys.
the dimmer worked on my '73 with this upgrade. haven't installed this new cluster in my 74 yet, but no reason to think it wouldn't work as well.
QUOTE(cuddyk @ Feb 1 2018, 07:51 AM)
QUOTE(pete000 @ Jan 31 2018, 12:59 PM)
Does the dimmer still work?
Thanks guys.
the dimmer worked on my '73 with this upgrade. haven't installed this new cluster in my 74 yet, but no reason to think it wouldn't work as well.
Done this myself and yes it is very effective,I purchased 3 x 300mm LED strips already to go in,on the tach I found that was a little short but didn't have any effect as there was plenty of light.
My dimmer is bypassed as with my headlight switches both had dimmers fail one after the other
 .
.Great video
 .
.Click to view attachment
Very nicely done and one handed nonetheless!
I nominate this procedural video for the classic section! Pictures don't do these upgrades any justice, however your video of the gauges being lit up did the trick.
Since doing these conversions for other members, I did learn something not good since my original writeup, a electrical short. The flexible LED strip has a sticky adhesive on the back end. For whatever reason, when sticking the LED's inside the gauge can, the bottom of the flexible PCB shorted to the metal. Not taking any chances on future conversions, I have been applying a layer of double sided sticky foamy tape to the interior of the gauge can, then appling the LED strip ontop of this tape. The tape acts as a good electrical insulator and it also doubles as something to grab ahold of any loose light bulbs that happen to fall out of its lamp holder
Thanks for the heads up Tim!
Happen to measure the thickness of the glass?
I've got a guy that will cut glass cheap but my later gauge, with the plastic lens, is about half as thick. Same thing with my 944 combo gauge, only 1/16" or so thick.
I've got a guy that will cut glass cheap but my later gauge, with the plastic lens, is about half as thick. Same thing with my 944 combo gauge, only 1/16" or so thick.
Nice video! FYI, you can solder leads to any of the copper pads on the cut lines of the LED tape. it doesn't have to be just at the soldered ones.
Nice!
QUOTE(Chris914n6 @ Jan 31 2018, 09:05 PM)
Happen to measure the thickness of the glass?
I've got a guy that will cut glass cheap but my later gauge, with the plastic lens, is about half as thick. Same thing with my 944 combo gauge, only 1/16" or so thick.
Here ya go... this is original glass. 2.92mm / .115 inches (or 7/64). I replaced the ones on my gauges and just told the glazier to match the thickness. keep in mind that if you powder coat the rings you may need a slightly thinner glass. These lenses are installed under surprisingly tight tolerances and if the glass/ring combo is too thick, there won’t be enough metal left to re-crimp.Click to view attachment
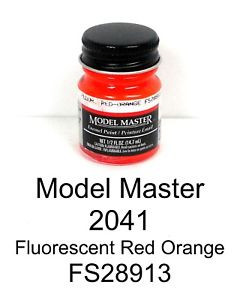
I found Model Masters 28913 Red Orange to be a near perfect match for needles. Should be found at your local hobby store with models.
Dimmable LEDs makes this awesome! 
QUOTE(Chris914n6 @ Jan 31 2018, 08:02 PM)
I found Model Masters 28913 Red Orange to be a near perfect match for needles. Should be found at your local hobby store with models.

Hi Ian. Video is amazing. Can someone recommend the LED strips from Amazon that will work?
Thanks.
Thanks.
QUOTE(Chris914n6 @ Jan 31 2018, 07:05 PM)
Happen to measure the thickness of the glass?
I've got a guy that will cut glass cheap but my later gauge, with the plastic lens, is about half as thick. Same thing with my 944 combo gauge, only 1/16" or so thick.
I see the OP posted above in the thread (post #12) the measured thicknesses. Its worth noting that if you do replace the plastic lenses with glass, then either use a bezel that came with OG glass lens, OR match the thickness of the plastic with the replacement glass. If you don't, re-crimping the bezel will be a bear of a task.
Ask me how I know.....

- Tony
PS. @Iankarr Excellent video there!
Just a comment regarding the LED strips. Palo Alto Speedometer suggested I use LED bulbs because the LED strips emit different lighting for each gauge because each housing is different. YMMV
Since we are revisiting the past, where does one source the bulbs for an upgrade? My son was just asking if I was going to do this mod?
I replaced all the bulbs with blue LED's except the generator bulb.
QUOTE(NARP74 @ Aug 19 2022, 08:52 PM)
Since we are revisiting the past, where does one source the bulbs for an upgrade? My son was just asking if I was going to do this mod?
http://carmagic.us
QUOTE(JamesJ @ Aug 19 2022, 01:00 PM)
Just a comment regarding the LED strips. Palo Alto Speedometer suggested I use LED bulbs because the LED strips emit different lighting for each gauge because each housing is different. YMMV
Could be but prepared to live with that,I had the led lamps but wasn't 100% impressed but certainly an improvement over stock lamps.
The lamps were a patchy light , the strips are a fully lit housing and no shadowing ,had the same effect with my tacho ,I really liked the end result and little effort as I had both gauges apart anyway.
This is a "lo-fi" version of our main content. To view the full version with more information, formatting and images, please click here.