Full Version: How Best to Get to Know a New 914
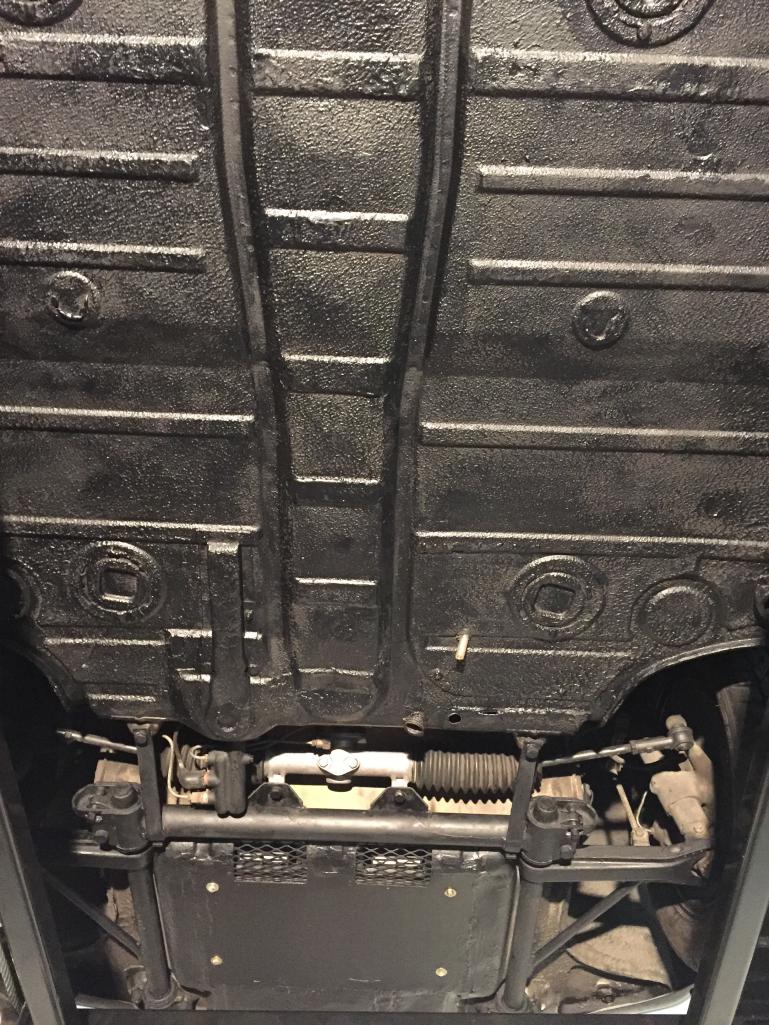
Call me sick, but I put my "new" '73 on a lift and spent the last 3 days carefully cleaning and detailing the undercarriage of it. While cleaning parts with 45 years of gunk and build-up was a filthy challenge, I learned a lot about my car. There is definitely a lot of history under there. Fortunately, I didn't find any major rust. Whew! I liked seeing the VW stamp and "914" codes on several of the components. Here are some photos of it for those that like photos. All feedback appreciated.
QUOTE(fishgeckos @ Feb 6 2018, 09:56 AM) 
Call me sick, but I put my "new" '73 on a lift and spent the last 3 days carefully cleaning and detailing the undercarriage of it. While cleaning parts with 45 years of gunk and build-up was a filthy challenge, I learned a lot about my car. There is definitely a lot of history under there. Fortunately, I didn't find any major rust. Whew! I liked seeing the VW stamp and "914" codes on several of the components. Here are some photos of it for those that like photos. All feedback appreciated.
QUOTE(fishgeckos @ Feb 6 2018, 09:57 AM)
QUOTE(fishgeckos @ Feb 6 2018, 09:56 AM)
Call me sick, but I put my "new" '73 on a lift and spent the last 3 days carefully cleaning and detailing the undercarriage of it. While cleaning parts with 45 years of gunk and build-up was a filthy challenge, I learned a lot about my car. There is definitely a lot of history under there. Fortunately, I didn't find any major rust. Whew! I liked seeing the VW stamp and "914" codes on several of the components. Here are some photos of it for those that like photos. All feedback appreciated.
QUOTE(fishgeckos @ Feb 6 2018, 08:56 AM)
Call me sick, but I put my "new" '73 on a lift and spent the last 3 days carefully cleaning and detailing the undercarriage of it. While cleaning parts with 45 years of gunk and build-up was a filthy challenge, I learned a lot about my car. There is definitely a lot of history under there. Fortunately, I didn't find any major rust. Whew! I liked seeing the VW stamp and "914" codes on several of the components. Here are some photos of it for those that like photos. All feedback appreciated.
Nice job!

That probably helped you to find things needing attention too. BTW, the black undercoating was a dealer or other aftermarket treatment for cars.
Also - unless you removed it for cleaning & didn't put it back for the pix, you're missing the steering rack cover/seals to protect the steering gear.
There are a few sources where you can get a nice used cover pan, & new OEM &/or repro edge seals & screws (download the free pdf Porsche 914 PET Parts Manual at the Porsche website's Classic section - Documents, for the parts & numbers).
Congratz on a nice 2L!

Tom
///////
very nice! , looks well taken care of and afew upgrades as well, - you might want to get the belly pan that covers the stearing rack area, it will keep it clean and protected from debris - 914rubber has the seals for it, and if you don't have the original one, Bruce Stone can probably get you one.

Phil
Phil
Nice job, looks very clean. Don’t forget to re fit the rear shift console plastic cover correctly to keep dirt out of the side shift mechanism- cover with zip tie is askew in the picture. Btw placing the zip tie around the circumference works better to keep it in place. Good luck with the car.
Awesome. Thanks for the advice. I didn't even know the cover was missing. I'll certainly purchase and add it. Thanks again.
Call me sick, but I put my "new" '73 on a lift and spent the last 3 days carefully cleaning and detailing the undercarriage of it. While cleaning parts with 45 years of gunk and build-up was a filthy challenge, I learned a lot about my car. There is definitely a lot of history under there. Fortunately, I didn't find any major rust. Whew! I liked seeing the VW stamp and "914" codes on several of the components. Here are some photos of it for those that like photos. All feedback appreciated.
Nice job!
That probably helped you to find things needing attention too. BTW, the black undercoating was a dealer or other aftermarket treatment for cars.
Also - unless you removed it for cleaning & didn't put it back for the pix, you're missing the steering rack cover/seals to protect the steering gear.
There are a few sources where you can get a nice used cover pan, & new OEM &/or repro edge seals & screws (download the free pdf Porsche 914 PET Parts Manual at the Porsche website's Classic section - Documents, for the parts & numbers).
Congratz on a nice 2L!
Tom
///////
QUOTE(Tom_T @ Feb 6 2018, 10:07 AM)
QUOTE(fishgeckos @ Feb 6 2018, 08:56 AM)
Call me sick, but I put my "new" '73 on a lift and spent the last 3 days carefully cleaning and detailing the undercarriage of it. While cleaning parts with 45 years of gunk and build-up was a filthy challenge, I learned a lot about my car. There is definitely a lot of history under there. Fortunately, I didn't find any major rust. Whew! I liked seeing the VW stamp and "914" codes on several of the components. Here are some photos of it for those that like photos. All feedback appreciated.
Nice job!
That probably helped you to find things needing attention too. BTW, the black undercoating was a dealer or other aftermarket treatment for cars.
Also - unless you removed it for cleaning & didn't put it back for the pix, you're missing the steering rack cover/seals to protect the steering gear.
There are a few sources where you can get a nice used cover pan, & new OEM &/or repro edge seals & screws (download the free pdf Porsche 914 PET Parts Manual at the Porsche website's Classic section - Documents, for the parts & numbers).
Congratz on a nice 2L!
Tom
///////
Thanks. I see that now. I'll make sure the cover fits properly. Thanks again.
Nice job, looks very clean. Don’t forget to re fit the rear shift console plastic cover correctly to keep dirt out of the side shift mechanism- cover with zip tie is askew in the picture. Btw placing the zip tie around the circumference works better to keep it in place. Good luck with the car.
QUOTE(Firstcar @ Feb 6 2018, 10:12 AM)
Nice job, looks very clean. Don’t forget to re fit the rear shift console plastic cover correctly to keep dirt out of the side shift mechanism- cover with zip tie is askew in the picture. Btw placing the zip tie around the circumference works better to keep it in place. Good luck with the car.
QUOTE(Tom_T @ Feb 6 2018, 11:07 AM)
Also - unless you removed it for cleaning & didn't put it back for the pix, you're missing the steering rack cover/seals to protect the steering gear.
QUOTE(Philip W. @ Feb 6 2018, 11:09 AM)
... you might want to get the belly pan that covers the stearing rack area, it will keep it clean and protected from debris - 914rubber has the seals for it, and if you don't have the original one, Bruce Stone can probably get you one.
I think the rack cover was removed on purpose. The trunk floor has been modified and includes a couple of screened vents at the bottom. Is there an A/C condenser bolted to the floor?
pan looks like this, with seals - this is the picture from 914rubber website
QUOTE(tomeric914 @ Feb 6 2018, 11:18 AM)
QUOTE(Tom_T @ Feb 6 2018, 11:07 AM)
Also - unless you removed it for cleaning & didn't put it back for the pix, you're missing the steering rack cover/seals to protect the steering gear.
QUOTE(Philip W. @ Feb 6 2018, 11:09 AM)
... you might want to get the belly pan that covers the stearing rack area, it will keep it clean and protected from debris - 914rubber has the seals for it, and if you don't have the original one, Bruce Stone can probably get you one.
I think the rack cover was removed on purpose. The trunk floor has been modified and includes a couple of screened vents at the bottom. Is there an A/C condenser bolted to the floor?
I saw those vent holes and thought the samething - if it were me I would modify the belly pan accordingly but reinstall it for the protection of the steering rack etc.
Phil
Well done!
Great job, welcome to the madness.
Yes. Correct. My car has a relatively new dealer-installed a/c (I live in Dallas and need the a/c to drive it in summer).
Also - unless you removed it for cleaning & didn't put it back for the pix, you're missing the steering rack cover/seals to protect the steering gear.
... you might want to get the belly pan that covers the stearing rack area, it will keep it clean and protected from debris - 914rubber has the seals for it, and if you don't have the original one, Bruce Stone can probably get you one.
I think the rack cover was removed on purpose. The trunk floor has been modified and includes a couple of screened vents at the bottom. Is there an A/C condenser bolted to the floor?
QUOTE(tomeric914 @ Feb 6 2018, 10:18 AM)
QUOTE(Tom_T @ Feb 6 2018, 11:07 AM)
Also - unless you removed it for cleaning & didn't put it back for the pix, you're missing the steering rack cover/seals to protect the steering gear.
QUOTE(Philip W. @ Feb 6 2018, 11:09 AM)
... you might want to get the belly pan that covers the stearing rack area, it will keep it clean and protected from debris - 914rubber has the seals for it, and if you don't have the original one, Bruce Stone can probably get you one.
I think the rack cover was removed on purpose. The trunk floor has been modified and includes a couple of screened vents at the bottom. Is there an A/C condenser bolted to the floor?
Good advice. I will look into buying and then modifying the belly pan as you suggest. Thank you.
Also - unless you removed it for cleaning & didn't put it back for the pix, you're missing the steering rack cover/seals to protect the steering gear.
... you might want to get the belly pan that covers the stearing rack area, it will keep it clean and protected from debris - 914rubber has the seals for it, and if you don't have the original one, Bruce Stone can probably get you one.
I think the rack cover was removed on purpose. The trunk floor has been modified and includes a couple of screened vents at the bottom. Is there an A/C condenser bolted to the floor?
I saw those vent holes and thought the samething - if it were me I would modify the belly pan accordingly but reinstall it for the protection of the steering rack etc.
Phil
QUOTE(Philip W. @ Feb 6 2018, 10:21 AM)
QUOTE(tomeric914 @ Feb 6 2018, 11:18 AM)
QUOTE(Tom_T @ Feb 6 2018, 11:07 AM)
Also - unless you removed it for cleaning & didn't put it back for the pix, you're missing the steering rack cover/seals to protect the steering gear.
QUOTE(Philip W. @ Feb 6 2018, 11:09 AM)
... you might want to get the belly pan that covers the stearing rack area, it will keep it clean and protected from debris - 914rubber has the seals for it, and if you don't have the original one, Bruce Stone can probably get you one.
I think the rack cover was removed on purpose. The trunk floor has been modified and includes a couple of screened vents at the bottom. Is there an A/C condenser bolted to the floor?
I saw those vent holes and thought the samething - if it were me I would modify the belly pan accordingly but reinstall it for the protection of the steering rack etc.
Phil
Thank you for the diagram labels on the photo. Very helpful. The vents near the steering rack Click to view attachmentare for the dealer-installed a/c compressor, so I'll modify the bellypan once I have it to work around the vents.
Here's photo of the interior of my car - you can see the dealer-installed a/c vents in it. The a/c works great actually! Glad to have it when driving in Dallas!
[quote name='malcolm2' date='Feb 6 2018, 10:49 AM' post='2575703']
Great looking car. How about more photos?
Click to view attachment
Here's photo of the interior of my car - you can see the dealer-installed a/c vents in it. The a/c works great actually! Glad to have it when driving in Dallas!
[quote name='malcolm2' date='Feb 6 2018, 10:49 AM' post='2575703']
Great looking car. How about more photos?
Click to view attachment
Nice looking car and none of the boys with think this is madness. Welcome to the world. You are going to be happy you have found it.
Bob B
Bob B
Great car! Keep 'em clean. Makes our cars much more pleasanter to use.
To answer your original question, I think you got it. Slowly clean and poke around in dark spaces.
If you haven't, I suggest that you take off the threshold covers and the longitudinal covers (rocker covers).
Dirt can get under the Long covers and accumulate and soak up water. You will be able to see how your jack point will also fill with dirt. Take an ice pick or screwdriver to the small hole in the jack mount and get all the dirt out thru what the Germans thought would be a drain hole.
Remove the black cover here and poke around. Your AC lines might run under one side.
Click to view attachment
Here is a visible jack point. Tuff to see, but there is a small hole in the bottom of the pyramid shape.
Click to view attachment
I will certainly remove these panels and explore. Thanks for the good advice.
Such cool and fun cars.
To answer your original question, I think you got it. Slowly clean and poke around in dark spaces.
If you haven't, I suggest that you take off the threshold covers and the longitudinal covers (rocker covers).
Dirt can get under the Long covers and accumulate and soak up water. You will be able to see how your jack point will also fill with dirt. Take an ice pick or screwdriver to the small hole in the jack mount and get all the dirt out thru what the Germans thought would be a drain hole.
Remove the black cover here and poke around. Your AC lines might run under one side.
Click to view attachment
Here is a visible jack point. Tuff to see, but there is a small hole in the bottom of the pyramid shape.
Click to view attachment
Such cool and fun cars.
QUOTE(malcolm2 @ Feb 6 2018, 01:11 PM)
To answer your original question, I think you got it. Slowly clean and poke around in dark spaces.
If you haven't, I suggest that you take off the threshold covers and the longitudinal covers (rocker covers).
Dirt can get under the Long covers and accumulate and soak up water. You will be able to see how your jack point will also fill with dirt. Take an ice pick or screwdriver to the small hole in the jack mount and get all the dirt out thru what the Germans thought would be a drain hole.
Remove the black cover here and poke around. Your AC lines might run under one side.
Click to view attachment
Here is a visible jack point. Tuff to see, but there is a small hole in the bottom of the pyramid shape.
Click to view attachment
Very unusual dash, I'd love to see a pic of it. Also on the rear shift linkage, I have the correct bands if you care, you need to use it or a large band clamp to hold the black plastic cover in place.
Yes I have the OCD too. I'm waiting to get out to Carrys' to get mine on a rack and do the same thing.
Yes I have the OCD too. I'm waiting to get out to Carrys' to get mine on a rack and do the same thing.
Pardon my ignorance (which is curable) but what exhaust system is that?
Nice, clean car!
Nice work. The bolts that hold the pan on look like they are in the holes, but not tightened. If so, please tighten them. They hold the things together other than just the pan.
Nice job, looks very clean. Don’t forget to re fit the rear shift console plastic cover correctly to keep dirt out of the side shift mechanism- cover with zip tie is askew in the picture. Btw placing the zip tie around the circumference works better to keep it in place. Good luck with the car.
[/quote]
A home clothes dryer vent hose clamp works great.
This is a "lo-fi" version of our main content. To view the full version with more information, formatting and images, please click here.