Help - Search - Members - Calendar
Full Version: Widebody LS6 rebuild.
914World.com > The 914 Forums > 914World Garage
Pages: 1, 2, 3, 4, 5, 6, 7, 8, 9, 10, 11, 12
dan10101
QUOTE(Mike Bellis @ Jul 22 2018, 03:22 PM) *

My new vote is for drug dealer green metal flake. Heavy 1070's disco speed boat metal flake.

You will be unique and the only 914 ever painted this color. piratenanner.gif

Hell, put some 26" dubs on it too! aktion035.gif

Click to view attachment


Mike, I like you, but I sense that you've gone off on the whole what color will it be discussion. Did you imbibe in some gin and tonics early this afternoon?
Andyrew
QUOTE(dan10101 @ Jul 22 2018, 02:12 PM) *

QUOTE(JRust @ Jul 22 2018, 01:25 PM) *

I vote for Phoenix Red


That's like "Soylent Green is PEOPLE!"

"Phoenix Red is ORANGE!" said everyone everywhere.

It also happens to be the same color as my car. Or well at least what my Vin says it is (it's actually painted Hugger Orange)

For some reason dad has something against Orange for his cars and has this affinity towards RED.

So Dad, let's see what's been occupying your time and what the 914 is replacing? I know your just about to start working on it.
Mike Bellis
QUOTE(dan10101 @ Jul 22 2018, 04:43 PM) *

QUOTE(Mike Bellis @ Jul 22 2018, 03:22 PM) *

My new vote is for drug dealer green metal flake. Heavy 1070's disco speed boat metal flake.

You will be unique and the only 914 ever painted this color. piratenanner.gif

Hell, put some 26" dubs on it too! aktion035.gif

Click to view attachment


Mike, I like you, but I sense that you've gone off on the whole what color will it be discussion. Did you imbibe in some gin and tonics early this afternoon?

Actually, margaritas... first.gif

I get it. You're afraid if you go heavy metallic green you will get profiled as the old man king pin of the cartel. I understand... biggrin.gif
dan10101
QUOTE(Mike Bellis @ Jul 22 2018, 06:33 PM) *

QUOTE(dan10101 @ Jul 22 2018, 04:43 PM) *

QUOTE(Mike Bellis @ Jul 22 2018, 03:22 PM) *

My new vote is for drug dealer green metal flake. Heavy 1070's disco speed boat metal flake.

You will be unique and the only 914 ever painted this color. piratenanner.gif

Hell, put some 26" dubs on it too! aktion035.gif

Click to view attachment


Mike, I like you, but I sense that you've gone off on the whole what color will it be discussion. Did you imbibe in some gin and tonics early this afternoon?

Actually, margaritas... first.gif

I get it. You're afraid if you go heavy metallic green you will get profiled as the old man king pin of the cartel. I understand... biggrin.gif


I'm probably the only person in the Rogue valley that isn't using his 4 acres growing weed. Well, i grow weeds, but not Weed.

dan10101
Ok here's the video you've all been waiting for. Well, a couple of you, ...at least one of you....

I finally got the BMW off the rack so i could put the Porsche on it and check it out from underneath.
https://youtu.be/5pAHh21VGpw


To answer Andrews question.
I'm replacing a 2001 BMW 330ci that once looked like this.
Click to view attachment

and now looks like this after going flipity flopety...
Click to view attachment

Rand
Just another opinion that's worth nothing, but to keep this true to the OG and put your touch on it... Keep the paint scheme and replace the highlights with YOUR color. Don't do a full color change.
Mike Bellis
Looking at the video. You should buy a new tub. It will be cheaper in the long run just to transfer the drivetrain over. Look like you may need to replace from the doors forward.

Cheaper and faster to transfer everything into a good body.
dan10101
QUOTE(Mike Bellis @ Jul 22 2018, 09:39 PM) *

Looking at the video. You should buy a new tub. It will be cheaper in the long run just to transfer the drivetrain over. Look like you may need to replace from the doors forward.

Cheaper and faster to transfer everything into a good body.


Unfortunately, this is on a budget that is likely to double before I even get started. The rear fenders are bonded to the tub. It would be near impossible to change those and too expensive start over. I'll make it work. My fall back is to go tube frame on the front and tie it into the roll cage.
dan10101
QUOTE(Rand @ Jul 22 2018, 09:06 PM) *

Just another opinion that's worth nothing, but to keep this true to the OG and put your touch on it... Keep the paint scheme and replace the highlights with YOUR color. Don't do a full color change.


Rand,
Honestly, I'm leaning that way. But with the new information tonight about additional bodywork needed, It may take a full repaint. If that happens all bets are off.
Andyrew
That's about what I was expecting body wise. And one reason I keep saying we need to pull it out is to get that front end back into alignment and not just move sheet metal.

I see a straight donor chassis will leave you with not only good measurements to pull from but good steel.

Even if you cut everything off and replaced I still think it needs some pulls to bring the tension out of the chassis. And once you have a good few pulls out you might find that it's not so bad.

I'll give you a call tomorrow after work on my drive home.


sawzall-smiley.gif smash.gif welder.gif wub.gif
mgp4591
QUOTE(Mike Bellis @ Jul 22 2018, 07:33 PM) *

QUOTE(dan10101 @ Jul 22 2018, 04:43 PM) *

QUOTE(Mike Bellis @ Jul 22 2018, 03:22 PM) *

My new vote is for drug dealer green metal flake. Heavy 1070's disco speed boat metal flake.

You will be unique and the only 914 ever painted this color. piratenanner.gif

Hell, put some 26" dubs on it too! aktion035.gif

Click to view attachment


Mike, I like you, but I sense that you've gone off on the whole what color will it be discussion. Did you imbibe in some gin and tonics early this afternoon?

Actually, margaritas... first.gif

I get it. You're afraid if you go heavy metallic green you will get profiled as the old man king pin of the cartel. I understand... biggrin.gif

I thought it was DOPE!! Or maybe they just deal dope.... I get those confused... smoke.gif
Cracker
Congrats...welcome to the club.

Cracker
dan10101
QUOTE(Cracker @ Jul 23 2018, 05:53 AM) *

Congrats...welcome to the club.

Cracker


Thanks

That's, hmm quite a stable you have there...
Mike Bellis
QUOTE(dan10101 @ Jul 22 2018, 09:56 PM) *

QUOTE(Mike Bellis @ Jul 22 2018, 09:39 PM) *

Looking at the video. You should buy a new tub. It will be cheaper in the long run just to transfer the drivetrain over. Look like you may need to replace from the doors forward.

Cheaper and faster to transfer everything into a good body.


Unfortunately, this is on a budget that is likely to double before I even get started. The rear fenders are bonded to the tub. It would be near impossible to change those and too expensive start over. I'll make it work. My fall back is to go tube frame on the front and tie it into the roll cage.

Long term the cheaper route is a new tub. It's also faster to completion.

You can pull and push yourself but eventually it will need to go on a frame bench. To do that you have to remove all the suspension and drivetrain. You have to do this with a new tub as well. No loss in time or money yet. But the frame bench will cost you the same as a tub. Frame straight still needs a bunch of welding and patch panels. A good tub needs less work(=less money). Paint is the same cost. The sheridan body will cost you but you already need a front end. You would have to buy the rear stuff.

End result is a better chassis for about the same cost +/-...

Plus you could have the entire unibody slightly tweaked. Look for the thread when Sir Andy corner balanced his bent tub. One wheel was all jacked up in the air. All due to a slight bend in the unibody. He had to cut his cage out to fix it. Rapid deceleration (wreck) moves metal all over the place and you might not see it.

Think long term and not short term payouts. I know you are dying to carve corners in this thing but if it's unstable at speed because it's bent, it could be your last drive...
dan10101
Well, you're full of cheery thoughts...
Mike Bellis
QUOTE(dan10101 @ Jul 23 2018, 08:53 PM) *

Well, you're full of cheery thoughts...

I'm a pragmatist. I've built a ton of cars and made plenty of bad choices...

I think both options is a close wash in cost. New tub gets you driving with less overall effort and disappointment.
Cracker
Ha! Definitely too many (at once) with my space limitations!

Regarding your project - I too have some thoughts. I am not trying to be a "Debbie Downer" but I also would not want you to kill yourself in an ill-handling car!

I would encourage you to strongly consider all of your options before doing anything but parking your car in the garage at this point. For what its worth, which is probably not much, I am more than happy to discuss what I have learned over the years with you - PM me your contact info if interested.

My experience with adding substantial power to a teener and the challenge of making the package work properly leads me to believe a new chassis would be the best decision (at least to strongly consider).

From what I have seen over the years, your car was never finely tuned to adequately perform - not a poke - just reality. Repairing the chassis, as Mike has stated, would require a precise and enormous effort with no guarantees of the desired result. I realize all of these projects have "budgets" but to me - you essentially purchased a drivetrain - not so much a car.

If I were in your shoes, I would have budgeted for a newly prepped chassis with a cage that ties into the windshield frame (A-pillar). Once a 914 has over 400 hp (and more importantly torque), the benefit of further strengthening the very weak center section of the car is paramount. Night and day difference in my experience - I have gone both ways on a few different teener projects.

As a few can attest, a properly balanced build will pay huge dividends in the end. My car for instance, is remarkably tame and balanced with a good margin of increased power beyond your project. A teener can be built to be both a monster and pussy cat but it just doesn't happen throwing parts together.

Best wishes!

Cracker


QUOTE(dan10101 @ Jul 23 2018, 04:20 PM) *

That's, hmm quite a stable you have there...
My 914
agree.gif

I think this is some excellent advice.
ValcoOscar
Having a V8 914 in the past, I also agree with Tony.

It's obvious that you have some solid feedback from some knowledgeable experienced members here. You have a lot of thinking to do. idea.gif

I understand budget constraints but I have never finished a car within budget. Shit happens and Murphy rears his head at every opportunity.

In either case, you purchased a sweet project, just relax and enjoy the journey.

I'm looking forward to what you decide.

Oscar


dan10101
Thanks for all your thoughts, but enough talk about body swaps. You guys are really bringing me down.
There is so much work done to this body/chassis, I just don't want to start over.

This car is fixable. And it will be right when its done.

All that said, I am getting a donor car. And I've ordered my Sheridan front end.
Things could change as I get down the road a bit as the car itself will determine how the repair is done. I just need it to talk to me a bit, right now I think it's still in shock...


Cracker
Dan - I certainly am not trying to bring you down...sorry it came across that way. I look forward to seeing you restore your car - enjoy the process. I know you will appreciate the end result. beerchug.gif

Cracker
914forme
I would start buy building a nice solid level frame jig that at least marks all your suspension points. You would want to build this off a know good chassis. Even if that is using pieces from the donor car to build the jig. This will allow you to take the front and back sections and make them one with out much going wrong.

It can still go wrong but at least you have a solid base to measure off of and work from.

A few sticks of steel and you will be a much happier person doing this reconstruction project. Best of luck.

Jeff Hail's cart is a very nice one. I have a set of jigs from Tangerine Racing that I will also use to build one they pickup the rear suspension points. Use a steal cross bar for the front, and build the jigs from there to the front Arm points.

Or find a Bench and 914 fixtures. icon8.gif

I think it can be saved, I would just do the foundation work first.
dan10101
QUOTE(Cracker @ Jul 24 2018, 07:10 PM) *

Dan - I certainly am not trying to bring you down...sorry it came across that way. I look forward to seeing you restore your car - enjoy the process. I know you will appreciate the end result. beerchug.gif

Cracker


Not at all, That's all on my end. You all are just giving your best opinion and I do appreciate it.

I am enjoying this. Thanks
dan10101
Actually I will have a doner car that looks pretty solid. We planed on doing measurements, but a jig won't be hard to create and a lot more accurate. I think someone else mentioned this as well. Thanks for the tip. I'm already drawing it up as I write this. I've got a great scrap metal place a couple miles away.
Thanks

QUOTE(914forme @ Jul 24 2018, 07:34 PM) *

I would start buy building a nice solid level frame jig that at least marks all your suspension points. You would want to build this off a know good chassis. Even if that is using pieces from the donor car to build the jig. This will allow you to take the front and back sections and make them one with out much going wrong.

It can still go wrong but at least you have a solid base to measure off of and work from.

A few sticks of steel and you will be a much happier person doing this reconstruction project. Best of luck.

Jeff Hail's cart is a very nice one. I have a set of jigs from Tangerine Racing that I will also use to build one they pickup the rear suspension points. Use a steal cross bar for the front, and build the jigs from there to the front Arm points.

Or find a Bench and 914 fixtures. icon8.gif

I think it can be saved, I would just do the foundation work first.

dan10101
I'm a bit late in getting an update out. But at least I've been busy.
We made a 1800 mile trip to pickup a donor car in LA and stopped by Roger Sheridan's place in Paso Robles to pickup the fiberglass front end. Quite the trip, but except for smoke virtually everywhere along the way, and taking GPS routes the weren't always the smartest choice, the trip was uneventful. (the way I like it.) My wife decided I should not embark on this journey by myself, so she came along to keep me company. And aside from asking every couple of hours "Tell me again, Why are you getting this car??" She didn't see the beauty of a pristine body. I look at bodies all the time, I know a good one from a bad one. We'll this one is just what the dr ordered. So, I'm going to cut it up and fix mine. Yeah, I know, I'm a bad person. sawzall-smiley.gif

So there is a method to my madness. The rear of the Screamcicle has a lot of work done to it. Custom work that I don't want to redo. The side vents don't come with Rogers kit. They are beautifully molded into the side. The firewall is custom and done to mm of the engine rotating components. the roll cage is custom incorporated into the front and rear sections as well as fit into the dash. The fiberglass work is bonded to the tub and worked in nicely to make it look like it's always been there. The rear deck lid has a custom spoiler that molds into the rear fenders.

Enough of my rationalizing.
Here's my plan of attack.
Corner balance check blue car - done, it looks to be what I expected from a stock car without drivetrain. No huge variances.
Inspect for previous damage - No damage whatsoever.. Ok, the paint is faded...
Put blue car on the rack and remove suspension - today I hope, (it's gonna be hot and smokey)
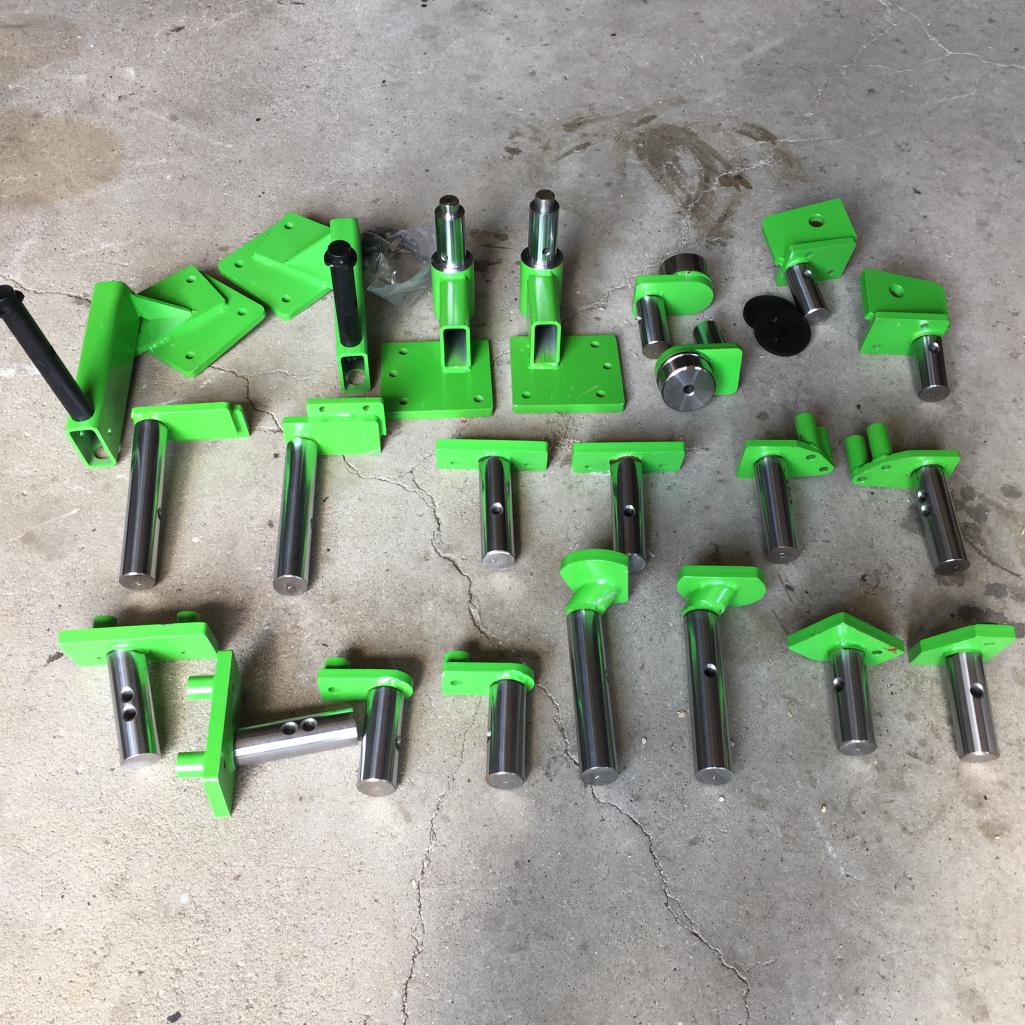
Build chassis jig - got the major parts to construct the jig. more on that
Bolt to front and rear bumper mounts, could be a challenge to unbolt, I need to work that out.
Add arms that locate the mounting points.
Check and adjust for gaps
Bolt together jig and blue car
Unbolt blue car
Put the suspension back on the blue car so I can roll it out.
Put white car on rack
Pull engine and trans
Unbolt suspension
Move chassis jig into place
Cut nose off white car leaving a couple inches for overlap
Measure and cut nose off blue car leaving a couple of inches for overlap
Mount nose to the jig and body leaving overlap
Connect both pieces are in place and mated using coleco connections
Measure and mark for cutting line
Plasma cut thru both pieces leaving a clean line on which to butt weld. welder.gif
Possibly do this in sections leaving sections always connected. still working this out.
Once the nose is in place and the suspension point are where they should be, then I'll cut out the bad A pillar and do that repair. sawzall-smiley.gif

I know I'm leaving things out, but you get the jist.

Oh, my wife had a great idea for the rear end. Make a tire trailer for it. The white car already has a receiver hitch.

Click to view attachment
dan10101
Well it didn't take long to remove the suspension, brakes etc.
After doing some cleanup, I started working on the Jig or at least the frame.
And i need to do more research for removable or at least adjustable arms.
Andyrew
PICS?

thisthreadisworthlesswithoutpics.gif

Lets see your drawing for the jig your looking to make!

I think you should build the jig base, then have the pieces that will bolt to the 914 go straight up. You could do round tube arms with a center peg. Have about 6 inches of fixture that bolts to your welded bench arm. That way you can pull with it still if you need to.

This is the Celette fixtures for the 914...
IPB Image
dan10101
Nag nag nag..

Ok, here's a picture.

Welded the 3" 1/4" square tube together. It's pretty square and flat.
note: welding thick metal is fun...

Click to view attachment

I'm thinking of this kind of leg with a fixed adjustable portion and another that will roll. I really am having trouble moving it around so it need to be easier.

not my picture but someone doing something similar.
Click to view attachment

horizontally-opposed
There was a 996 GT2 near here years ago, that was clipped. Whole front end. Really nice job, and the car was great.

There was a 997 GT3 RS that came over the Corkscrew and t-boned a car that spun. Also clipped—from the fuel tank~ forward. A friend selling that car disclosed it, and the buyer's PPI guys called to say "Are you sure? Because we can't find ANY evidence."

It can be done well. welder.gif
dan10101
QUOTE(horizontally-opposed @ Aug 6 2018, 11:16 PM) *

There was a 996 GT2 near here years ago, that was clipped. Whole front end. Really nice job, and the car was great.

There was a 997 GT3 RS that came over the Corkscrew and t-boned a car that spun. Also clipped—from the fuel tank~ forward. A friend selling that car disclosed it, and the buyer's PPI guys called to say "Are you sure? Because we can't find ANY evidence."

It can be done well. welder.gif


Thanks for the encouraging words.

The goal is to make it straight and strong.
Chris H.
I remember a race prepped narrow body 914 that was re-clipped in the Chicago area. It was white with a Japanese flag on the hood in case anyone remembers it. The owner said something in the suspension gave way and he hit a wall straight on at fairly high speed. It was really smashed but had a cage in it. The bent stuff was cut off and the front clip was swapped out. He seemed happy with the repair and was still driving it and racing it years later.
tazz9924
How much did you get that whole fiberglass front clip for?
dan10101
QUOTE(Chris H. @ Aug 7 2018, 08:27 AM) *

I remember a race prepped narrow body 914 that was re-clipped in the Chicago area. It was white with a Japanese flag on the hood in case anyone remembers it. The owner said something in the suspension gave way and he hit a wall straight on at fairly high speed. It was really smashed but had a cage in it. The bent stuff was cut off and the front clip was swapped out. He seemed happy with the repair and was still driving it and racing it years later.


Love a happy ending.
dan10101
QUOTE(tazz9924 @ Aug 7 2018, 12:38 PM) *

How much did you get that whole fiberglass front clip for?


It's a Sheridan nose. On their website for 1200.
http://sheridanmotorsports.com/porsche_parts_pricing.html
No shipping, I picked it up and saved several hundred.

It's just the nose, front bumper, and fenders. Hood is extra.
I'm going to try to make mine work, it's got a lot of custom work done to it as well.

burton73
Dan,

I feel very hopeful on the reworking of your car. We are all watching and in your corner.

The very best of luck on it.

Be safe my friend.

Bob B
sawzall-smiley.gif welder.gif wub.gif
dan10101
QUOTE(burton73 @ Aug 7 2018, 02:06 PM) *

We are all watching


Eeekk
Well, I guess that's good. In case I do something really stupid.

Maybe I should share my shop camera. That way if I fall over someone can call 911.


dan10101
Ok, here is an updated drawing of the very homemade chassis jig I'm building.

Basically it's 3x3" 1/4" thick square tube.
13' long, but the working rectangle is 10' x 42"

in this drawing I've added a second set of 3' bracing. When I start adding arms I'll determine where those should ultimately go.

This is not designed to be multiple use. When I'm done, I'll probably cut the ends off it and turn it into a welding table. Unless someone else wants it for 914 jig use, then I might consider selling it.

I'm working on the legs right now. Making the plates that will insert and weld into the legs that will contain the 3/4" bolts that will allow leveling adjustments. They will raise it approx 15" off the concrete allowing me to get under it to make the initial connections.

Next to the fixed legs will be roller legs with bracing between the 2 for strength. Found some heavy duty rollers similar to the picture in the above post for a reasonable price. They should serve well. I may have to trailer it out of the shop, ( I don't have a flat parking area next to the shop)

The hard part will be getting the arms in place. I found some 1 1/2" square tubing and some 1 1/4 square tubing that slide into each other snugly. I'll begin by creating plates for each of the mounting areas, such as the rear bumper mounts, suspension pickup points, trans mounts. I want to keep those holes very snug to the bolts. Then do some initial tack welds to where the arms will connect to the jig. Depending on how sturdy the arms are, I may brace them somehow. To each other, or to the jig.

It will likely become a spaghetti nest of arms. There are 6 in the rear on each side, 5 in the front on each side. That's 22 arms sticking up all over the place. If I add the jacking points it becomes unruly. I welcome thoughts on that and anything else...

Click to view attachment
Andyrew
I think you need to at least pick up the transmission mount as well as the upper front suspension bolts.

You will essentially be holding the chassis in place with only the rear suspension when you cut off the front end so at least having a point for the pinch weld to rest in the front would be ideal. It would also be a good place to clamp the body while your welding to prevent the main chassis from moving.

The more you do the better, especially up front. You can always just leave the pieces off and put them on if you find you need to fit the chassis more precisely.
dan10101
I will be doing all the front pickup points. I'll try to do the rears as well. The engine mount is kinda a floating point. But I could make it fixed with a big tube of some sort to fill the hole rather than let it float around. Anyway, I'll try to do them all, we'll see.
ChrisFoley
I like the way you're doing it Dan.
There is so much custom work on the chassis that full replacement would be a much larger project.
ChrisFoley
Some pics of the attachment points on my frame table (Slutty Bench).
Each pair is connected with a heavy crossmember bolted to the main frame. (spot welds holding crossmember to frame were removed after construction)
The main frame is bolted together so it can be disassembled for long term storage.
I currently have the table anchored to the floor with large turnbuckles so some chassis pulling can be done without the frame twisting.

Click to view attachment

Click to view attachment

Click to view attachment

dan10101
Thanks Chris.
I forgot about your front swaybar when I was rationalizing on keeping the chassis. It would be an easy swap, but another thing to do.

I really like your frame pictures. Especially mounting both pickup points together then attaching to the main frame.
I'm going to do some more research before I start making arms. That way seems to be as solid as it gets.

Do you have any pictures of pulling in action? I'm curious how you attach on jig side. I'm assuming you bolt to the pickup points on the car side to pull.

I'm hoping not to need that, but I'm realistic.
ChrisFoley
QUOTE(dan10101 @ Aug 8 2018, 10:42 AM) *


Do you have any pictures of pulling in action? I'm curious how you attach on jig side. I'm assuming you bolt to the pickup points on the car side to pull.


Haven't done any hard pulls yet, but the chassis on the table is in need. We're too busy with other work to invest the time right now.
I'll need to make anchor points on the floor to do the pulling since the table isn't built to attach heavy duty cantilever structures.
Many years ago when I had to straighten my race car I took it to a shop that had a proper frame table. They let me do the work myself and just charged a small fee for the "rental".
ChrisFoley
QUOTE(dan10101 @ Aug 8 2018, 10:42 AM) *

I forgot about your front swaybar when I was rationalizing on keeping the chassis. It would be an easy swap, but another thing to do.

I don't remember installing one of my anti-swaybars but it makes sense. The car previously had a 911 non-adjustable underbody bar.
I did find pics from when we installed the de-cambered ball joints though.
dan10101
Chris, (or anyone) I would love to see any pictures you find of the Screamcicle.

One of my decisions is whether to repair the drivers side lower control arm or replace it. I know you made some changes to the ball joints and there are also elephant bushings I would like to save.

I see the bottom cover is off the passenger lower ball joint and can't tell if it's bad or just missing the cover. I'll have a better idea once I pull it apart.

The update for today is that I was able to mount the legs to the jig frame structure.
Working upside down, I mounted the fixed legs on the inside of the laterals. then it was obvious that I should put the wheeled legs on the outer side of the laterals. Then later I'll add a bracing between the 2 legs which should be plenty strong for whichever leg is in use.
Click to view attachment
I also need to add some welds to the topside, now that it's flipped over and on it's feet. That was a challenge with to guys with bad backs. We were able to make it happen with jacks and leverage.
Click to view attachment
My cheap jig wheels from the metal scrap yard work excellent, All I had to do is cut the welds that kept them from turning 360 degrees. They even have zert fittings and do roll very smoothly.

Well, reducing the size fixed the picture upload. They were less than 4mb, but smaller fixed it.
Andyrew
Photos have to be under 4mb. you'll need to resize them. I use Ifranview.

Resize to 1920x....
dan10101
QUOTE(Andyrew @ Aug 8 2018, 09:02 PM) *

Photos have to be under 4mb. you'll need to resize them. I use Ifranview.

Resize to 1920x....


Well, smaller fixed it. I was less than 4mb, but oh well, I'll resize. Thanks

Andyrew
With the bracing you mentioned I think it'll be good. I do think that maybe a 1"square tube as a diagnal brace along the jig might help.

Also what about doing two more feet in the middle of the jig? I know it's heavy duty 1/4", but I still worry about sagging.
Andyrew
Also how about a sliding "L" bracket that bolts to the leg and allows for the jig to be more stable? It could also be boolted to the floor. I worry about it toppling with the chassis on it or at least not being perfectly stable.

With this you could still level the jig with the feet, but then attach these L brackets after all is said and positioned.
dan10101
QUOTE(Andyrew @ Aug 9 2018, 06:24 AM) *

With the bracing you mentioned I think it'll be good. I do think that maybe a 1"square tube as a diagnal brace along the jig might help.

Also what about doing two more feet in the middle of the jig? I know it's heavy duty 1/4", but I still worry about sagging.


I'll think about the diag..

Another leg will be a problem when I roll it out of the shop. i may have to to drag it up the hill and 4 legs would make it much easier. Most of the attachment points will be right where the legs are, so the weight in the middle will be minimal.
This is a "lo-fi" version of our main content. To view the full version with more information, formatting and images, please click here.
Invision Power Board © 2001-2024 Invision Power Services, Inc.