Full Version: Adjusting Brake Regulator
I just finished rebuilding my brake regulator with the PMB DIY rebuild kit and it looks like new. Only thing left is to set the switch to 525 psi. I'm guessing I could send it to PMB to have them set it, but wondering if this could be done locally at a brake shop. Anyone know?
QUOTE(bbrock @ Feb 6 2019, 04:35 PM) 
I just finished rebuilding my brake regulator with the PMB DIY rebuild kit and it looks like new. Only thing left is to set the switch to 525 psi. I'm guessing I could send it to PMB to have them set it, but wondering if this could be done locally at a brake shop. Anyone know?
I'd send to PMB. In fact, I just packed mine up to go off for the very same service. You can't beat PMB's price to rebuild, replace old seals, and then to set it.
I used to be a brake design & release engineer among my many former jobs. You don't want to mess with rear bias. Especially so on mid-engine low polar moment of inertia vehicles. Personally I don't know of any retail brake shops with the hydraulic test equipment to attempt setting it and/or to accurately measure it. The consequences of getting it wrong could be catastrophic. Personally, I'll just pay the guy with the right equipment that has done it a time or two rather than risk training someone.
Not saying it couldn't be done but I can't tell you how many pads I've found installed backwards over the years when someone was complaining of noise.

I've toyed with the idea of putting ABS on . . . that would be sweet! Would just add weight and more complexity which defeats why I want to get back to 914's in the first place.
QUOTE(Superhawk996 @ Feb 6 2019, 04:59 PM)
QUOTE(bbrock @ Feb 6 2019, 04:35 PM)
I just finished rebuilding my brake regulator with the PMB DIY rebuild kit and it looks like new. Only thing left is to set the switch to 525 psi. I'm guessing I could send it to PMB to have them set it, but wondering if this could be done locally at a brake shop. Anyone know?
I'd send to PMB. In fact, I just packed mine up to go off for the very same service. You can't beat PMB's price to rebuild, replace old seals, and then to set it.
I used to be a brake design & release engineer among my many former jobs. You don't want to mess with rear bias. Especially so on mid-engine low polar moment of inertia vehicles. Personally I don't know of any retail brake shops with the hydraulic test equipment to attempt setting it and/or to accurately measure it. The consequences of getting it wrong could be catastrophic. Personally, I'll just pay the guy with the right equipment that has done it a time or two rather than risk training someone.
Not saying it couldn't be done but I can't tell you how many pads I've found installed backwards over the years when someone was complaining of noise.
I've toyed with the idea of putting ABS on . . . that would be sweet! Would just add weight and more complexity which defeats why I want to get back to 914's in the first place.
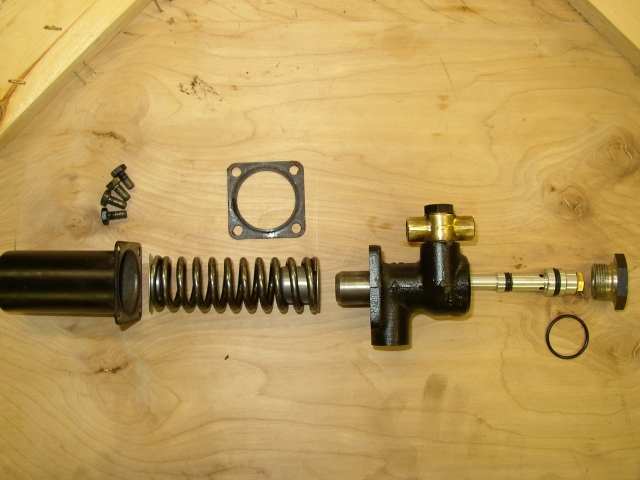
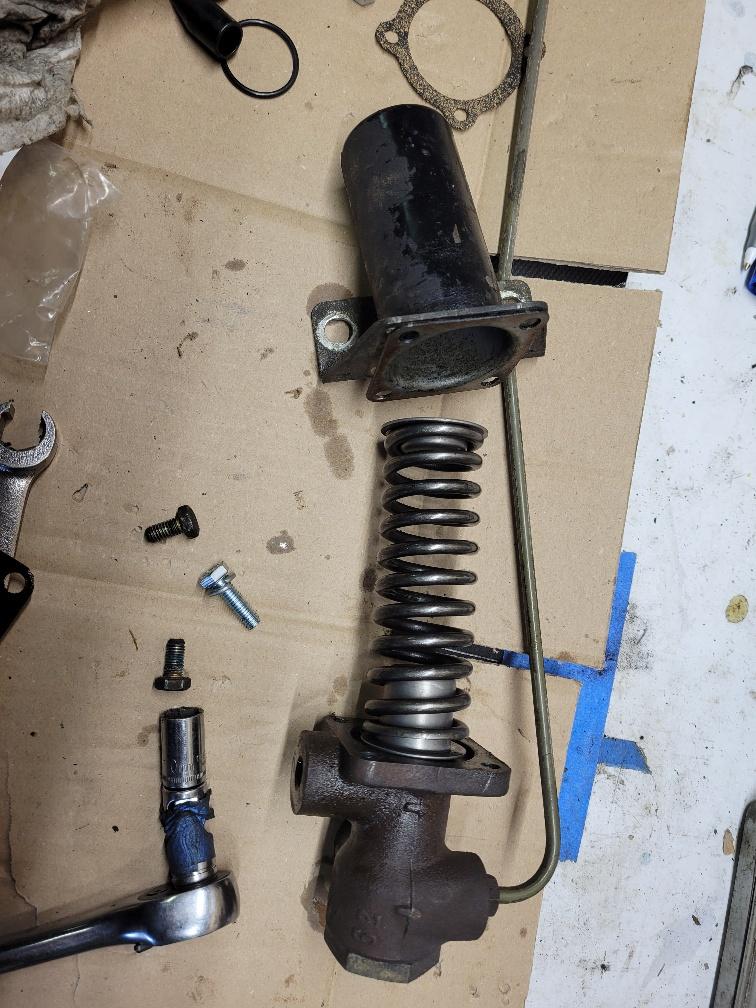
That may be what I'll do. Rebuild is already done though. My regulator looks just like Eric's pic on the PMB site now. It's a pretty simple procedure. Most of the work is cleaning and painting. Mine was really gunked up inside. I went ahead and zinc plated the valve body and spring housing too, but that didn't take long. The actual rebuild is a 20 minute task.
The factory manual has a procedure for testing and adjusting the regulator while installed in the car. The procedure is to install high pressure gauges in the front and rear circuit and then adjust the regulator to get the proper bias pressure. They don't provide a procedure for bench testing though.
I didn't realize the Factory Manual had the procedure. That is sweet. May need to spring for a real factory manual one of these days.
For Bench you could basically use any old master cylinder and rig up the lines and gauges to get pressure into the system. You'll need some sort of fixture to get the mechanical advantage to push in the master cylinder.
You would want to keep the bench lines pretty close to actual length to account for pressure drop across the lines but honestly it will be negligible if the hydraulic pressure apply is slow. The flow restriction is substantially higher in a rapid apply panic stop situation.
I suspect the cost for two high pressure gauges with good accuracy plus miscellaneous tubing and fittings, plus fixture materials will be at least 1/2 the PMB cost but I haven't priced high pressure gauges lately and could be way off.
However since you just need a pressure set point, maybe PMB will do for less? Call them and see. However, their lead time may be an issue for you since you're already on to final assembly steps.
Bottom line, I've been watching your thread. You have the skills and the jack of all trades mindset to get it done if you want to do it yourself. The work you've done is awesome. I'd trust you before I trusted any random "brake shop" though.
Just a question of time and money and which one is more valued at the given moment.
Thanks for the vote of confidence  That's good thinking about bench testing. You are right about cost of equipment being more than just paying to have it done. I'm mainly wondering if this is the sort of equipment any good brake shop would have. If I went that route, I would expect it done with my supervision. A lot of shops around here are good about that sort of thing. My only reluctance for sending it out to be set is that I have to factor in about $30 for postage to get the part there and back. I'm sure you are aware how quickly shipping costs eat into the budget of a full car restoration.
The other thing about these regulators explained in the factory manual and also mentioned on the PMB site, is that they operate as a spring loaded on/off valve. The spring pressure is supposed to be set so that the valve activates (turns off) when it sees 525 psi at the inlet. That suggests to me that a bench test would only require one gauge to measure the pressure where the valve activates, but they don't give a procedure for that.
Time is not an issue on this. It looks like I'm in final assembly on my resto, but I'm not. I still have to block and paint the exterior of the car but can't do that until early summer when the weather turns favorable here. I'm spending the winter trying to turn the car into a roller and assembling as much as I can without interfering with the final painting. Still many months of toil ahead.
That's good thinking about bench testing. You are right about cost of equipment being more than just paying to have it done. I'm mainly wondering if this is the sort of equipment any good brake shop would have. If I went that route, I would expect it done with my supervision. A lot of shops around here are good about that sort of thing. My only reluctance for sending it out to be set is that I have to factor in about $30 for postage to get the part there and back. I'm sure you are aware how quickly shipping costs eat into the budget of a full car restoration.The other thing about these regulators explained in the factory manual and also mentioned on the PMB site, is that they operate as a spring loaded on/off valve. The spring pressure is supposed to be set so that the valve activates (turns off) when it sees 525 psi at the inlet. That suggests to me that a bench test would only require one gauge to measure the pressure where the valve activates, but they don't give a procedure for that.
Time is not an issue on this. It looks like I'm in final assembly on my resto, but I'm not. I still have to block and paint the exterior of the car but can't do that until early summer when the weather turns favorable here. I'm spending the winter trying to turn the car into a roller and assembling as much as I can without interfering with the final painting. Still many months of toil ahead.
Any pic of the internals and the valve assembly in the manual or from when you rebuilt yours?
I've been curious about whats in the "box" and thought about disassembling mine before sending. That lasted about a minute before I concluded I need to focus on the more important structural repairs.
Most proportioning valves in old school cars and trucks (i.e. pre-ABS) are set up such that they build a pressure at a fixed rate (gradient) in proportion to the fronts and then they level out at a set pressure and then flat line at that pressure. In a sedan this is usually set so the rear brakes don't lock up in a light load condition once weight is transferred to the front axle under braking. There are other versions with mechanical linkages to try to vary that proportioning relative to load and/or body position. Example I have a MotoGuzzi that changes rear proportioning when a rider or heavy load is on back of the bike. Many trucks ran setups like this to account for the big swing between driver only and max Gross Vehicle Weight (GVW) with payload and trailers.
I assume the 914 valve is doing something similar but since the vehicle doesn't have a big weight delta between light load (i.e. driver only) and GVW at 2 passengers + luggage it is probably less "conservative" in that gradient is steeper and the 525 psi max limit is very plausible to keep from locking the rears.
However, back to your point most proportioning valves really aren't a rebuildable affair on any modern (say late 70's to mid 90's) vehicles. I certainly haven't seen everything that is out there but in my experience the 914 valve is a bit unique in that its adjustable outside of the plant. Most that I've seen in mass production are just a check valve set via spring forces and orifice size at the time of manufacture.
QUOTE(Superhawk996 @ Feb 7 2019, 02:52 PM)
Any pic of the internals and the valve assembly in the manual or from when you rebuilt yours?
I've been curious about whats in the "box" and thought about disassembling mine before sending. That lasted about a minute before I concluded I need to focus on the more important structural repairs.
Most proportioning valves in old school cars and trucks (i.e. pre-ABS) are set up such that they build a pressure at a fixed rate (gradient) in proportion to the fronts and then they level out at a set pressure and then flat line at that pressure. In a sedan this is usually set so the rear brakes don't lock up in a light load condition once weight is transferred to the front axle under braking. There are other versions with mechanical linkages to try to vary that proportioning relative to load and/or body position. Example I have a MotoGuzzi that changes rear proportioning when a rider or heavy load is on back of the bike. Many trucks ran setups like this to account for the big swing between driver only and max Gross Vehicle Weight (GVW) with payload and trailers.
I assume the 914 valve is doing something similar but since the vehicle doesn't have a big weight delta between light load (i.e. driver only) and GVW at 2 passengers + luggage it is probably less "conservative" in that gradient is steeper and the 525 psi max limit is very plausible to keep from locking the rears.
However, back to your point most proportioning valves really aren't a rebuildable affair on any modern (say late 70's to mid 90's) vehicles. I certainly haven't seen everything that is out there but in my experience the 914 valve is a bit unique in that its adjustable outside of the plant. Most that I've seen in mass production are just a check valve set via spring forces and orifice size at the time of manufacture.
These are from this thread on the Pelican site showing the guts of the thing and are better than the pics I took.
You are correct that it is just a spring-loaded check valve, but the spring force adjustment is external. PM me your email and I'll send you the relevant parts of the factory manual. They have a pretty good diagram and description of operation. I don't know if this was common for these devices of the era, but valve can oscillate on and off when the pressure exceeds the regulating force to pulse pressure to the rear brakes kinda sorta like an abs. I thought that was cool.
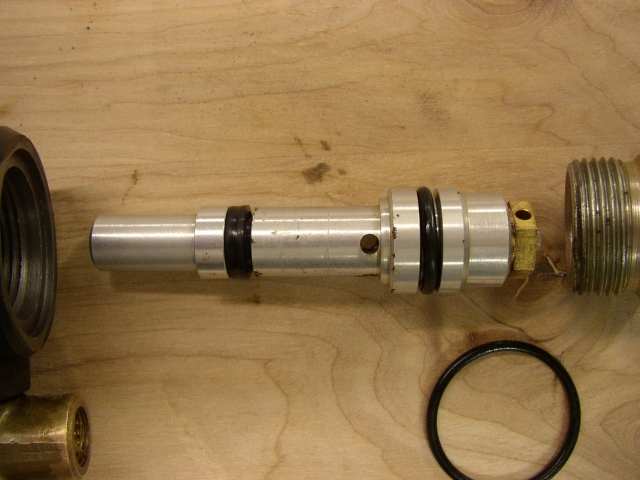
The "rebuild" just consists of cleaning everything up and replacing seals. Two o-rings, one on the valve body and one to seal the cap nut, a wiper seal in the valve body, and a gasket between the valve and spring housings. Nothing else to do in there. Setting the pressure on the large spring is the only adjustment. This is interesting though. The manual gives different changeover pressures where regulation begins for the /6 vs /4 which makes me think the valves are different.
QUOTE(bbrock @ Feb 7 2019, 08:37 PM)
QUOTE(Superhawk996 @ Feb 7 2019, 02:52 PM)
Any pic of the internals and the valve assembly in the manual or from when you rebuilt yours?
I've been curious about whats in the "box" and thought about disassembling mine before sending. That lasted about a minute before I concluded I need to focus on the more important structural repairs.
Most proportioning valves in old school cars and trucks (i.e. pre-ABS) are set up such that they build a pressure at a fixed rate (gradient) in proportion to the fronts and then they level out at a set pressure and then flat line at that pressure. In a sedan this is usually set so the rear brakes don't lock up in a light load condition once weight is transferred to the front axle under braking. There are other versions with mechanical linkages to try to vary that proportioning relative to load and/or body position. Example I have a MotoGuzzi that changes rear proportioning when a rider or heavy load is on back of the bike. Many trucks ran setups like this to account for the big swing between driver only and max Gross Vehicle Weight (GVW) with payload and trailers.
I assume the 914 valve is doing something similar but since the vehicle doesn't have a big weight delta between light load (i.e. driver only) and GVW at 2 passengers + luggage it is probably less "conservative" in that gradient is steeper and the 525 psi max limit is very plausible to keep from locking the rears.
However, back to your point most proportioning valves really aren't a rebuildable affair on any modern (say late 70's to mid 90's) vehicles. I certainly haven't seen everything that is out there but in my experience the 914 valve is a bit unique in that its adjustable outside of the plant. Most that I've seen in mass production are just a check valve set via spring forces and orifice size at the time of manufacture.
These are from this thread on the Pelican site showing the guts of the thing and are better than the pics I took.
You are correct that it is just a spring-loaded check valve, but the spring force adjustment is external. PM me your email and I'll send you the relevant parts of the factory manual. They have a pretty good diagram and description of operation. I don't know if this was common for these devices of the era, but valve can oscillate on and off when the pressure exceeds the regulating force to pulse pressure to the rear brakes kinda sorta like an abs. I thought that was cool.
The "rebuild" just consists of cleaning everything up and replacing seals. Two o-rings, one on the valve body and one to seal the cap nut, a wiper seal in the valve body, and a gasket between the valve and spring housings. Nothing else to do in there. Setting the pressure on the large spring is the only adjustment. This is interesting though. The manual gives different changeover pressures where regulation begins for the /6 vs /4 which makes me think the valves are different.
Here’s a thread with more info - http://www.914world.com/bbs2/index.php?sho...re+regulator”
Thanks guys that is brilliant. Now you've got me going down the rabbit hole. The engineer in me always wants to know what is in the box.
Lots of great links for me to waste time on. I've always been curious and those are great pictures and the links to the theory of operation are superb.
Bottom line w.r.t. the pressure difference between a /6 and the 4 cylinder is likely related to:
1) the six has a bit more weight on rear and therefore can take more pressure all other things held constant.
2) The six had different rear calipers. I'm not up to speed on all the details but I'm sure piston size, and effective radius (off the pad/rotor interface) will be slightly different.
One last thought for the morning -- don't cheap out for the sake of $30 shipping here or there. You've put endless hours into your restoration. I've spun 914's more times than I care to count. They can spin very quickly especially if doing a lift throttle while braking mid corner. Don't make it worse by getting bias wrong. Don't risk getting your rear bias wrong by being cheap to the tune of $30 shipping (or even $200 or $500 for that matter). It is all trivial if you end up with a car on the side of a tree assuming we walk away!
If you put in the time and effort to adjust it by the factory manual, you'll be fine.
The broader point is keep the big picture in mind. There are some things to go cheap on (trust me I understand - I'm a cheap SOB) but brakes aren't one of them.
Lots of great links for me to waste time on.
I've always been curious and those are great pictures and the links to the theory of operation are superb. Bottom line w.r.t. the pressure difference between a /6 and the 4 cylinder is likely related to:
1) the six has a bit more weight on rear and therefore can take more pressure all other things held constant.
2) The six had different rear calipers. I'm not up to speed on all the details but I'm sure piston size, and effective radius (off the pad/rotor interface) will be slightly different.
One last thought for the morning -- don't cheap out for the sake of $30 shipping here or there. You've put endless hours into your restoration. I've spun 914's more times than I care to count. They can spin very quickly especially if doing a lift throttle while braking mid corner. Don't make it worse by getting bias wrong. Don't risk getting your rear bias wrong by being cheap to the tune of $30 shipping (or even $200 or $500 for that matter). It is all trivial if you end up with a car on the side of a tree assuming we walk away!
If you put in the time and effort to adjust it by the factory manual, you'll be fine.
The broader point is keep the big picture in mind. There are some things to go cheap on (trust me I understand - I'm a cheap SOB) but brakes aren't one of them.
QUOTE(Superhawk996 @ Feb 8 2019, 05:42 AM)
One last thought for the morning -- don't cheap out for the sake of $30 shipping here or there. You've put endless hours into your restoration. I've spun 914's more times than I care to count. They can spin very quickly especially if doing a lift throttle while braking mid corner. Don't make it worse by getting bias wrong. Don't risk getting your rear bias wrong by being cheap to the tune of $30 shipping (or even $200 or $500 for that matter). It is all trivial if you end up with a car on the side of a tree assuming we walk away!
Not to worry. I'm cheap, but you've seen my build, I don't cheap out. The point of this thread is just to get more info. If setting the spring is a simple procedure, using common tools that could be completed locally, that's great. But if it requires sending it out to make sure the job is done right, that's what I do. I've easily spent over a thousand dollars just on shipping on this project and staying in budget requires scrutinizing every purchase to make sure I'm not spending money unwisely. Not compromising on quality and definitely not safety though.
As for spinning. BTDT... twice. Yes, it happens VERY fast. Luckily they are low to the ground and like to spin flat without flipping. First time I spun one was my first Spring day drive. Sprinted down a backroad to an unmarked sharp 90 turn and hit a patch of sand left over from the winter on bald tires. Spun like a top right off the road and into a farmers field while he was plowing for spring planting. Car stalled but fired right back up and I drove it back onto the road and on my way. I could see the farmer shaking his head from his tractor seat as I sped away. Cleaned the shit out of my seat when I got home.

Just to close this out, I emailed PMB about setting the regulator or sending it in to have them do it. I got an email from the man himself saying that if I didn't have a gauge and hydraulic pump, I could just adjust the adjuster so it protrudes 10mm out of the spring housing as that's close to where they all seem to be set from the factory.
I'm going to take it to the local European car specialist that does most of the German car work around here and see it they can set it. If not, I'll just follow Eric's suggestion.
I'm going to take it to the local European car specialist that does most of the German car work around here and see it they can set it. If not, I'll just follow Eric's suggestion.
Out of curiosity I did find some 1-1000 psi hydraulic gauges for about $20 each on Amazon . . . . tubing is relatively cheap.
I know you're gonna build a test rig given quality of your workmanship and attention to detail.


I know you're gonna build a test rig given quality of your workmanship and attention to detail.
QUOTE(Superhawk996 @ Feb 28 2019, 01:31 PM)
Out of curiosity I did find some 1-1000 psi hydraulic gauges for about $20 each on Amazon . . . . tubing is relatively cheap.
I know you're gonna build a test rig given quality of your workmanship and attention to detail.
Hmmm...

QUOTE(bbrock @ Feb 28 2019, 01:02 PM)
QUOTE(Superhawk996 @ Feb 28 2019, 01:31 PM)
Out of curiosity I did find some 1-1000 psi hydraulic gauges for about $20 each on Amazon . . . . tubing is relatively cheap.
I know you're gonna build a test rig given quality of your workmanship and attention to detail.
Hmmm...
Hey Brent,
How did things turn out? Did you end up setting per Eric's advice?
QUOTE(14carrot @ Jul 14 2019, 12:22 AM)
QUOTE(bbrock @ Feb 28 2019, 01:02 PM)
QUOTE(Superhawk996 @ Feb 28 2019, 01:31 PM)
Out of curiosity I did find some 1-1000 psi hydraulic gauges for about $20 each on Amazon . . . . tubing is relatively cheap.
I know you're gonna build a test rig given quality of your workmanship and attention to detail.
Hmmm...
Hey Brent,
How did things turn out? Did you end up setting per Eric's advice?
Yes, right now I have it adjusted per Eric's rec but haven't epoxied the setting yet. I talked to the owner of the best European car repair shop in the area. He is a full on Porsche guy and his son's 914 was in the shop. He said he just sets them by road testing but taking the car up to a decent speed and stopping on the brakes to make sure the rears don't lock up during a hard brake but actuate otherwise. Seems like a reasonable extra check so I'll do that if/when my car is back in driving condition before dabbing the adjuster with epoxy... Or, I might get some guages yet and follow the factory procedure. Regardless, I'm betting the 10mm suggestion is pretty darn close.
@bbrock Brent, I just came across this thread. FYI, as more datum, below is a pic of my pressure regulator (that has probably never been adjusted, and certainly hasn't been adjusted for 35 years) and the adjuster appears to be at about 11mm.
Click to view attachment
Click to view attachment
QUOTE(doug_b_928 @ Dec 15 2019, 08:25 PM)
@bbrock Brent, I just came across this thread. FYI, as more datum, below is a pic of my pressure regulator (that has probably never been adjusted, and certainly hasn't been adjusted for 35 years) and the adjuster appears to be at about 11mm.
Good info. I should have measured mine before I took it apart.

I just rebuilt mine with the PMB kit. Access with engine in and on jack stands leaves a fair bit to be desired.
Even after having bled my brake 3 times this summer, there was still crap in the regulator even as lines bled perfectly clear. Part of it likely was moisture given some of the small areas of pitting on the plunger.
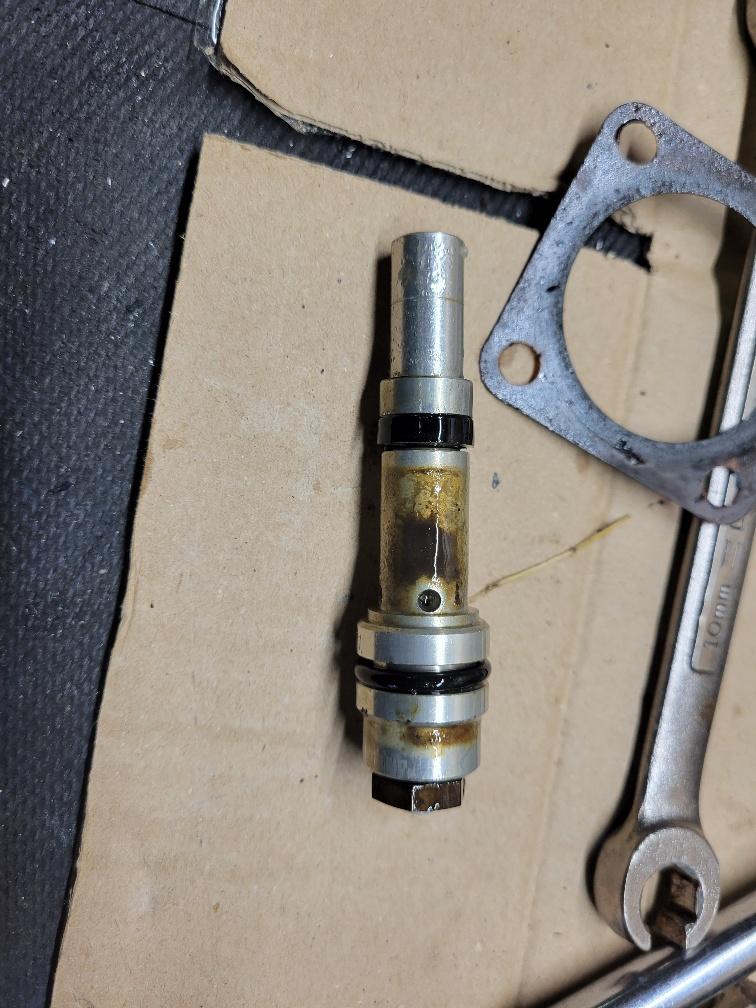
It is amazing how tight the scraper seal is. It was a major PITA to install. We'll see if any pedal pressure changes in a few weeks when it's back on the road.
Even after having bled my brake 3 times this summer, there was still crap in the regulator even as lines bled perfectly clear. Part of it likely was moisture given some of the small areas of pitting on the plunger.
It is amazing how tight the scraper seal is. It was a major PITA to install. We'll see if any pedal pressure changes in a few weeks when it's back on the road.
This is a "lo-fi" version of our main content. To view the full version with more information, formatting and images, please click here.