I did not see a thread just on replacing the motor mounts without already having the engine out. Thanks to Brad Mayeur and Michael for some advice along the way.
1. Put the car up safely, I used 10" Race Ramps in the back and 10" Race Ramps cradles in the front. Good working height for me.
2. You will need to remove the shifter bar from the firewall to the transmission. Pull the rubber boot off the front. Remove the 4mm conical screw that connects it.
3. Go to the back, remove the plastic cover from the side shift mount. It probably is held on with some kind of band. Use a screw driver to loosen it and pull it away.
4. Remove the conical screw. I stripped mine, what an awful thing to happen. EZ Outs did not work. If I had to do it again, I would drill through the center and try to dislodge the cone from the dimple in the shift rod. My drill bit was too big and temporarily I'm making do with rethreading the connector. M8 x 1.25.
5. Pull the rod out of the car. Shift into third or fifth, disconnect the front, then push forward on the rod, shimmy it out.
6. Support the engine securely. I used a scissor jack and some blocks of wood so I did not depend on hydraulics to seep overnight.
7.There are 13mm nuts where the rubber mounts are located; two below and two above. My mounts were broken at the engine so I retrieved the nuts after the engine bar was lowered. First I took out the bottom nuts.
8. Get ready to lower the engine bar by holding the nut on top of the outer mounts and loosening the bottom. Be sure to insert the replacement bolt "bottoms up" in case you strike a curb, you won't be looking at buggered up nuts on a buggered up bolt.
9. Before you go further, support the engine bar. It's heavy and puts stress on the clutch cable. I used bungee cords around the bar and the heat exchangers.
10. Remove the outer engine bar bolts. You can move the bar out of the way and get to the upper bolts for the motor mounts.
11. Remove the oil filter. Otherwise I think it's impossible to get to the passenger side nuts. After a lot of cursing, you can snake a socket onto the nut and loosen and remove it.
12. Get the new motor mounts. New nuts and lock washers! Out of the four nuts for the old mounts, all I had was a sorry looking wavy lock washer. I put the upper engine ones in first and hand tightened. Torque spec is 21.7 ft-lb but good luck getting a torque wrench up there.
13. Push the engine bar onto the long motor mount screws. I used a jack on the mount to start raising it into position. New washers and Nylok nuts. The replacement nuts were 17mm, as was the bolt but the original bolt had 17mm nuts with 15mm bolt.
14. Tighten everything up, all four bolts across. On the outer engine bar nuts, I was able to snake a 17mm combination wrench to hold the nut while I tightened below.
15. REPLACE THE OIL FILTER
16. Slide the engine bar forward through the oblong hole in the motor mount. Then bring it through the hole in the rear side shifter mount, then through the transmission mount piece. It's real name is something like "head shift rod."
17. Put in a BRAND NEW CONICAL SCREW 901 424 229 00. Torque to 10.8 ft-lb. Not even my 1/4 inch drive torque wrench goes that low.
18. Reconnect up front, put in the new conical screw. Shimmy the front rubber boot back in place. Go back to the rear and put the plastic rear cover back up. Throw some grease around the moving parts for good measure.
19. Drive it like you stole it!
Paul
Full Version: Replacing Motor Engine Mounts, Side Shifter, Engine In
Nice write up but I replaced them without removing anything but the engine mount brackets.

QUOTE(Valy @ Aug 11 2019, 09:15 PM) 
Nice write up but I replaced them without removing anything but the engine mount brackets.
That's what I get for not finding a How To thread!! I have three more cars, so who knows...
Paul
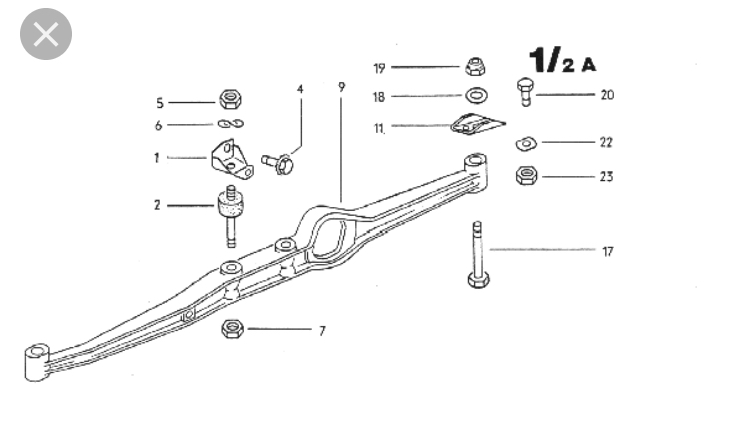
Does anyone know the torque value for the two nuts that hold the engine support bar? They're number 19 in the diagram in post #2.
Thanks.
Thanks.
Two bolts, one on each side. I thought I saw a torque spec in either the parts manual or repair factory manual, forgot the number but it was TOO HIGH. So I torqued the hell out of the first one, stripped the nut and rescued the situation by putting one of the old nuts on top of the new and was able to get a good purchase on the remaining threads.
The second nut was tightened by hand...
Paul
The second nut was tightened by hand...
Paul
This is a "lo-fi" version of our main content. To view the full version with more information, formatting and images, please click here.