Full Version: Rebuiding Inside-out
Pages: 1, 2, 3, 4, 5, 6, 7, 8, 9, 10, 11, 12, 13, 14, 15, 16, 17, 18, 19, 20, 21, 22, 23, 24, 25, 26, 27, 28, 29, 30, 31, 32, 33, 34, 35, 36, 37, 38, 39, 40, 41, 42, 43, 44, 45, 46, 47, 48, 49, 50, 51, 52, 53, 54, 55, 56, 57, 58, 59, 60, 61, 62, 63, 64, 65, 66, 67, 68, 69, 70, 71, 72, 73, 74, 75, 76, 77, 78, 79, 80, 81, 82, 83, 84, 85, 86, 87, 88, 89, 90, 91, 92, 93, 94, 95, 96, 97, 98, 99, 100, 101, 102, 103, 104, 105, 106, 107, 108, 109, 110, 111, 112, 113, 114, 115, 116, 117, 118, 119, 120, 121, 122, 123, 124, 125, 126, 127, 128, 129, 130, 131, 132, 133, 134, 135, 136
With just a bit of time, I decided to mount the muffler shield. I modified this to bolt in, and had the shield powder-coated with high-temp material.
Here are the receiving studs, on the underside of the trunk, on custom Z-brackets.
A bit too much paint on the studs, so...
I ran a die over the threads.
Shield in place. I may redo the fasteners with hi-temp anti-seize.
Nice job on modifying the muffler shield. I was looking at mine last weekend wondering how I can strip the trunk floor beneath it - is it originally spot welded on?
That looks great Bob.
I coated my heat shield with the same ceramics that are put on mufflers.
Time will tell if it helps with heat into the rear trunk.
Mine is also easily removable with a couple of nuts.
There's mine lurking back there in some kind of silver ceramic color....
Your car is looking so good (incredible).
Will you ever drive it I wonder?
Click to view attachment
QUOTE(john77 @ Feb 5 2021, 07:57 PM) 
Nice job on modifying the muffler shield. I was looking at mine last weekend wondering how I can strip the trunk floor beneath it - is it originally spot welded on?
Originally, the shield was attached with C-shaped brackets, welded to the shield and floor. I wanted to be able to remove mine, so made it bolt-in.
QUOTE(raynekat @ Feb 5 2021, 08:33 PM)
That looks great Bob.
I coated my heat shield with the same ceramics that are put on mufflers.
Time will tell if it helps with heat into the rear trunk.
Mine is also easily removable with a couple of nuts.
There's mine lurking back there in some kind of silver ceramic color....
Your car is looking so good (incredible).
Will you ever drive it I wonder?
Thanks, Doug. I sure hope I can drive it (i.e. first get it running, and then get myself to take it on the road). I already have an almost garage queen.
A bit out of order, but I installed the rear sway bar. Just enough room to sneak it past the muffler shield.
I also temporarily mounted the left trailing arm, mostly to check on hardware (and decided to order new M14 lock nuts).
And then got ready to assemble the rear shocks and springs. First I decided to drill holes in the spring perches so I can tie the springs if necessary.
I am still getting used to my new mega drill press. I am also trying to be more precise about drilling, and use my vise mounted to the press table.
I am still getting used to my new mega drill press. I am also trying to be more precise about drilling, and use my vise mounted to the press table.
Spring perches with holes chamfered and smoothed.
Now I am trying to get the hardware order sorted out.
I moved the shock spring perch up to the second groove from the bottom, but that leaves some slack space below the spring. I might try the 3rd groove.
A bit more work on the dash today. I decided to delete the seat belt warning light, and so need to block the small rectangular hole.
Some quick snips with the metal shears.
Here's the filler piece glued to a backing plate.
And both glued to the dash front plate. Glue means the mod should be easily undone.
I also got a replacement rubber boot for the right headlight mechanism, and so worked on that.
One more detail. I plan to use all LED replacement bulbs, and so replaced the flasher unit with one compatible with LEDs.
Bob, are you installing individual LED turn signal bulbs/lamps (instead of Spoke's LED boards)?
Just wondering if one would need the 'LED compatible' flasher unit if using Spoke's boards (like I'll be doing - hopefully, some day)
Just wondering if one would need the 'LED compatible' flasher unit if using Spoke's boards (like I'll be doing - hopefully, some day)
My plan right now is for individual LED "bulbs". That keeps things more easily reversed.
I don't know about what different flasher requirements (and other mods) might be.
I don't know about what different flasher requirements (and other mods) might be.
I have the seat belt light hole blocked (at least until I want to undo it).
After a quick clean, prime and paint, all the dash pieces are ready. Note that I took the photo right after spraying the last coat. I used a satin finish, so the gloss should dry down.
I dug out the frunk lid springs. Like everything else on this car, these had undercoating on top of overspray on top of original paint, and a bit of rust. I removed the crud, paint, and rust, and got them ready for paint.
But to paint the spring winds, I needed to open the spring a bit. Here's my solution, with the springs stretched about 3/4 of an inch on a frame, and shot with self-etching primer.
And then black.
One more detail today: the gas cap. I stripped off the PO's beloved red paint, and pried out the crumbling original gasket.
New gasket installed.
More parts arrived, so I finished the right head light assembly.
Ready for lamps and trim. I got some LED head lights to try.
I also got parts and hardware for the rear suspension, except for the rubber bump stops. (See my other thread). So I decided to install one shock without the spring to see about dimensions and spacing for the bump stop. Since the Bilsteins are gas-charged, I used a floor jack to move the trailing arm up.
I checked the clearance at the top of the shock, and set it at 2 inches.
Here's where the trailing arm sits with the 2 inch spacing.
And then 3 inch spacing.
Trailing arm position.
Here's the hardware I needed to complete the rear suspension installation, including new M14 lock nuts for the pivot shaft.
With everything laid out, I decided to install the springs and shocks. Once I get the bump stops I can R&R the shocks.
With the rear suspension in place, I can finish up the brake system. Here are all the new and rebuilt components.
QUOTE(bkrantz @ Feb 6 2021, 09:16 PM)
I moved the shock spring perch up to the second groove from the bottom, but that leaves some slack space below the spring. I might try the 3rd groove.
I think you need to go a lot higher, like two or three from the top.
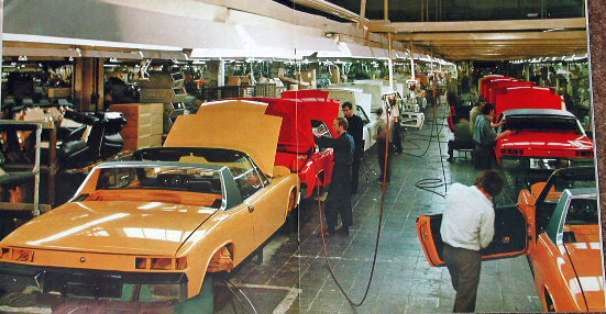
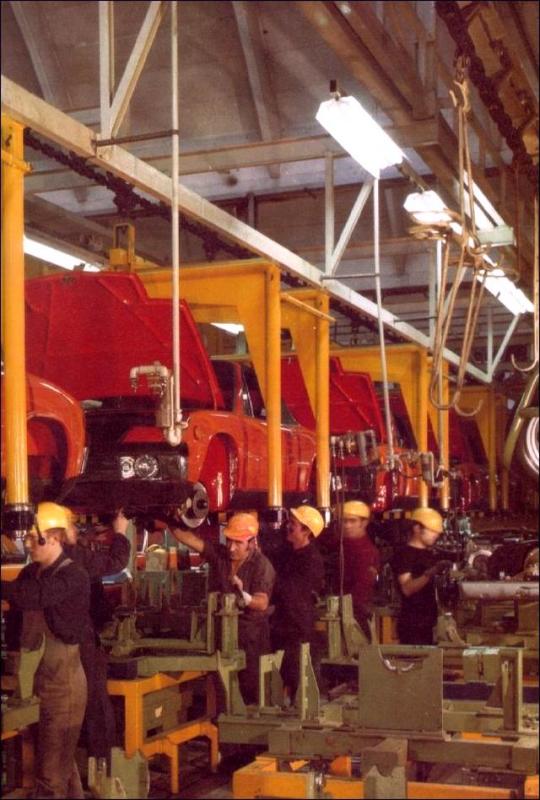
You're doing what the guys in the factory did +/- 50 years ago ... and doing an amazing job - all by yourself 
QUOTE(mepstein @ Feb 10 2021, 07:27 PM)
QUOTE(bkrantz @ Feb 6 2021, 09:16 PM)
I moved the shock spring perch up to the second groove from the bottom, but that leaves some slack space below the spring. I might try the 3rd groove.
I think you need to go a lot higher, like two or three from the top.
Thanks--you might be right. I will have to take the springs off to add the bump stops and can adjust the preliminary height again.
QUOTE(euro911 @ Feb 11 2021, 02:19 AM)
You're doing what the guys in the factory did +/- 50 years ago ... and doing an amazing job - all by yourself
Thanks, Mark. I think they got more beer breaks than me. And they have cooler hats.
I got to play with the rear brakes today. Step 1, clean residue from the new disks.
Then remove the powder coating from the mounting ears.
Mounted the backing plate. More new, re-plated, and powder-coated parts--shiny stuff.
The new disk (with old retaining screws--I forgot to order new ones).
A rebuilt caliper from PMB.
Plumbed with the last sections of hard line and flex line.
This is a "lo-fi" version of our main content. To view the full version with more information, formatting and images, please click here.