I have some trouble with setting the depth of my pilot bearing.
According to the Haynes manual the bearing should be seated recessed 3.2 mm from the clutch side of the flywheel. This info is the same in the repair manual document. On the Pelican board it says to seat the bearing flush with the crank side of the flywheel. I am guessing the data in the Haynes and workshop manual are the correct info but it still doesnt align with my reality (more info below)
The picture below is from the repair manual and it shows the bearing recessed from the clutch side. But it also shows the gearbox input shaft going thru all of the pilot bearing.
Click to view attachment
When I install the bearing recessed as above in my flywheel and bolt everything up the input shaft does not go thru the whole bearing, in fact it doesnt reach all the way thru the bearing at all....? Se below.
Click to view attachment
This feels wrong to be since the input shaft barely will be supported by the pilot bearing and either my input shaft is too short (god I hope not) or something else is wierd in my combination of parts.
Should I change my pilot bearing position to support more of the input shaft?
Edit: Also part nr 7 doesnt exist at all in my crank (78 mm DPR crank installed by the engine builder)
Full Version: Pilot bearing setting depth
picture of how the other side should look
I’m not an engine or trans expert like @Mark Henry or @dr evil , but the pilot bearing’s job is just to keep the input shaft centered. So it prob doesn’t matter if it isn’t 100% fully in the bearing. The recess I believe is to accommodate the felt washer and keep it just proud enough to compress and seal. If the bearing is flush, the felt would bulge a bit, but that also probably doesn’t matter much. I just replaced my flywheel and kept the bearing recessed per the Germans.
the holes in the flywheel look weird to me, the pilot bearing should be flush with the side of the flywheel that goes towards the engine, so you have enough room for the felt washer. Then the five hoe flywheel washer goes on flush and the five bolts are attached and torqued
I have some trouble with setting the depth of my pilot bearing.
According to the Haynes manual the bearing should be seated recessed 3.2 mm from the clutch side of the flywheel. This info is the same in the repair manual document. On the Pelican board it says to seat the bearing flush with the crank side of the flywheel. I am guessing the data in the Haynes and workshop manual are the correct info but it still doesnt align with my reality (more info below)
The picture below is from the repair manual and it shows the bearing recessed from the clutch side. But it also shows the gearbox input shaft going thru all of the pilot bearing.
Click to view attachment
When I install the bearing recessed as above in my flywheel and bolt everything up the input shaft does not go thru the whole bearing, in fact it doesnt reach all the way thru the bearing at all....? Se below.
Click to view attachment
This feels wrong to be since the input shaft barely will be supported by the pilot bearing and either my input shaft is too short (god I hope not) or something else is wierd in my combination of parts.
Should I change my pilot bearing position to support more of the input shaft?
Edit: Also part nr 7 doesnt exist at all in my crank (78 mm DPR crank installed by the engine builder)
QUOTE(falcor75 @ Jan 4 2020, 01:32 AM) 
I have some trouble with setting the depth of my pilot bearing.
According to the Haynes manual the bearing should be seated recessed 3.2 mm from the clutch side of the flywheel. This info is the same in the repair manual document. On the Pelican board it says to seat the bearing flush with the crank side of the flywheel. I am guessing the data in the Haynes and workshop manual are the correct info but it still doesnt align with my reality (more info below)
The picture below is from the repair manual and it shows the bearing recessed from the clutch side. But it also shows the gearbox input shaft going thru all of the pilot bearing.
Click to view attachment
When I install the bearing recessed as above in my flywheel and bolt everything up the input shaft does not go thru the whole bearing, in fact it doesnt reach all the way thru the bearing at all....? Se below.
Click to view attachment
This feels wrong to be since the input shaft barely will be supported by the pilot bearing and either my input shaft is too short (god I hope not) or something else is wierd in my combination of parts.
Should I change my pilot bearing position to support more of the input shaft?
Edit: Also part nr 7 doesnt exist at all in my crank (78 mm DPR crank installed by the engine builder)
#7 spacer is a 914/901 only part (IIRC), the bus doesn't use this as the pilot bearing mounts in the crank.
You do need this part as it stops the pilot bearing from migrating into the crank. You can find one in an old 914 crank, they are fairly easy to pull out, friction fit not a press fit.
I think the input shaft goes in a bit further than your measurement, but the race surface might not be fully into the pilot bearing.
Yes the pilot bearing sticks out towards the crank, this is normal.
Just an FYI you can't mount a pilot bearing into a bus flywheel hole, T4 into beetle conversion guys have to enlarge the hole to use a stock bus flywheel with the pilot bearing. They would also have to source the #7 spacer.
Part number 7 is a spacer that is inside the crank. On a bus/411 the pilot bearing is pressed into the crankshaft to support the pilot shaft of the tranny. On a 914 the spacer must be there to stop the bearing from being pushed into the crank from the flywheel where it is located as in the pic above
Do you have a spacer in the crankshaft?
Do you have a spacer in the crankshaft?
QUOTE(dr914@autoatlanta.com @ Jan 4 2020, 11:55 AM)
the holes in the flywheel look weird to me, the pilot bearing should be flush with the side of the flywheel that goes towards the engine, so you have enough room for the felt washer. Then the five hoe flywheel washer goes on flush and the five bolts are attached and torqued
The crank has been modified for 5 dowel pins, that's why it looks odd.
QUOTE
the pilot bearing should be flush with the side of the flywheel that goes towards the engine
I disagree, it sits proud towards the crank.
I mounted the flywheel to the crank and bolted the gearbox up and then measured the distance from the starter motor mating surface to the flywheel toothed surface and it was 35,5 mm. Then I took the gearbox and flywheel off again and set the flywheel to the same distance on the input shaft and took the picture. So yes, that is how much (or little) support the pilot bearing gives my input shaft.
I'm thinking to get another pilot bearing and just seat it deeper to get more support. If the felt washer gets more compressed I'll just have to live with that.
I'll have to look in the crank of my original 2.0 engine if I have a spacer in that otherwise I'll have to make one. Does anyone have the dimensions of it?
Well there wasnt any spacer on my stock 2.0 crank either so I'll just skip that bit. the pilot bearing is seated very firmly in the flywheel so it wont move anyway.
I will reduce the recess depth from 3,2 to 1,2 to get a bit more contact surface between the bearing and the input shaft, I will also split the felt washer to half the thickness.
New Sabo seal is in place so its just a matter of putting everthing back together again. I will also need to check the clutch arm position once the gearbox is back on. I can see there is a washer under the ball for the pivot point. Maybe a previous owner as put it in?
Don't forget the "O" ring recessed inside the flywheel....
Don't ask me how I know..
Don't ask me how I know..
QUOTE(falcor75 @ Jan 8 2020, 01:47 AM)
I can see there is a washer under the ball for the pivot point. Maybe a previous owner as put it in?
Mats, please read this thread:
http://www.914world.com/bbs2/index.php?showtopic=342397
It discusses the role that washer plays in determining the throw of the clutch release lever ("fork").
On my car, when I removed the washer, the release lever was very close to interfering with the transmission case/differential cover. Replacing the washer pretty much centered the release lever in the hole.
Hope this helps!
I'll have to look in the crank of my original 2.0 engine if I have a spacer in that otherwise I'll have to make one. Does anyone have the dimensions of it?
Part is still available and not super expensive:
https://www.mittelmotor.de/cms/de/10-1-moto...lle/3968/0-1192
Cheers, Frank
Part is still available and not super expensive:
https://www.mittelmotor.de/cms/de/10-1-moto...lle/3968/0-1192
Cheers, Frank
QUOTE(anderssj @ Jan 8 2020, 02:54 PM)
QUOTE(falcor75 @ Jan 8 2020, 01:47 AM)
I can see there is a washer under the ball for the pivot point. Maybe a previous owner as put it in?
Mats, please read this thread:
http://www.914world.com/bbs2/index.php?showtopic=342397
It discusses the role that washer plays in determining the throw of the clutch release lever ("fork").
On my car, when I removed the washer, the release lever was very close to interfering with the transmission case/differential cover. Replacing the washer pretty much centered the release lever in the hole.
Hope this helps!
I have already had my eyes on that thread and its the reason for me wanting to check the position of my clutch arm. My clutch disengages fully but my pedal goes all the way to the floor (and no the arm does not touch the case at full depression)....the feel could be improved
Down and dirty quick check.
Virgin OE flywheel 3mm+ = no shim
Reground fly or new aftermarket 3mm or less = shim
You measure the step of the inner circle, clutch friction surface to the flywheel body, most new flywheels and reground are not as thick in this area as OE.
Also once below 3mm you'll have to machine the raised ridge off the flywheel bolts, you can take the ridge right off with no ill effect even on big engines. But don't go further than the ridge as you will run into issues with not having enough meat for the socket to grab.
QUOTE(Mark Henry @ Jan 8 2020, 10:30 PM)
Down and dirty quick check.
Virgin OE flywheel 3mm+ = no shim
Reground fly or new aftermarket 3mm or less = shim
You measure the step of the inner circle, clutch friction surface to the flywheel body, most new flywheels and reground are not as thick in this area as OE.
Also once below 3mm you'll have to machine the raised ridge off the flywheel bolts, you can take the ridge right off with no ill effect even on big engines. But don't go further than the ridge as you will run into issues with not having enough meat for the socket to grab.
Thanks Mark, I'll check when I get home tonight.

From the clutch friction surface down to the surface that the large flat washer that goes under the flywheel bolts mates to I have 5 mm.
Click to view attachment
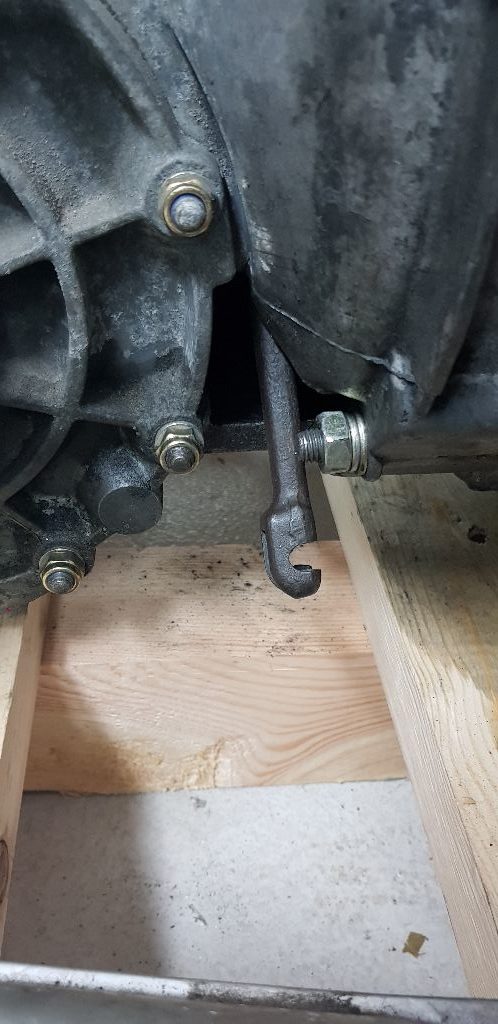
So this is the position of the clutch arm when pushed as far rearwards as it will go.
Not quite the middle but to my eyes not too far off either?
So this is the position of the clutch arm when pushed as far rearwards as it will go.
Not quite the middle but to my eyes not too far off either?
Washer under the pivot arm ?
Yes there is one washer that I can see under the pivot arm. Its been there since I bought the car.
Took the gearbox off again today and removed the pivot ball screw.
There was two washers under it with a total thickness of 3 mm (1+2)
I removed the 2 mm washer and put the gearbox back on and it looks a bit more centered now. I'll get a picture up soon for comparison.
There was two washers under it with a total thickness of 3 mm (1+2)
I removed the 2 mm washer and put the gearbox back on and it looks a bit more centered now. I'll get a picture up soon for comparison.
This is a "lo-fi" version of our main content. To view the full version with more information, formatting and images, please click here.