So just a hello and introduction.
I am Daryl - sorta old and have been working on cars since 1969. Mostly Chevy's and Dodge's - then a 30 years or so I got my first taste of German engineering with a BMW E21 320i we were given as our Dd died on us.
So I am here because a friend of a friend needed help with a project. We thought it just needed some carb work and a couple of leaks sorted out.
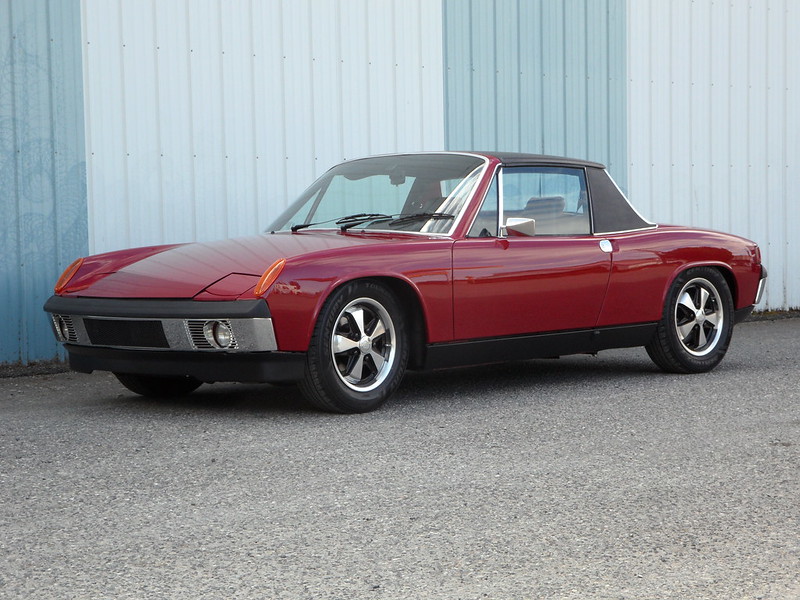
The project have taken on the project of working out some issues with a chevy 350 converted 1973 914, the conversion is most likely 10 plus years old. I believe the kit is a Renegade kit.
Some of the issues were it bleeds fluid very where the tranny and engine can. Most of the leaks have been addressed and stopped "I hope".
Heads were replaced because both were cracked.
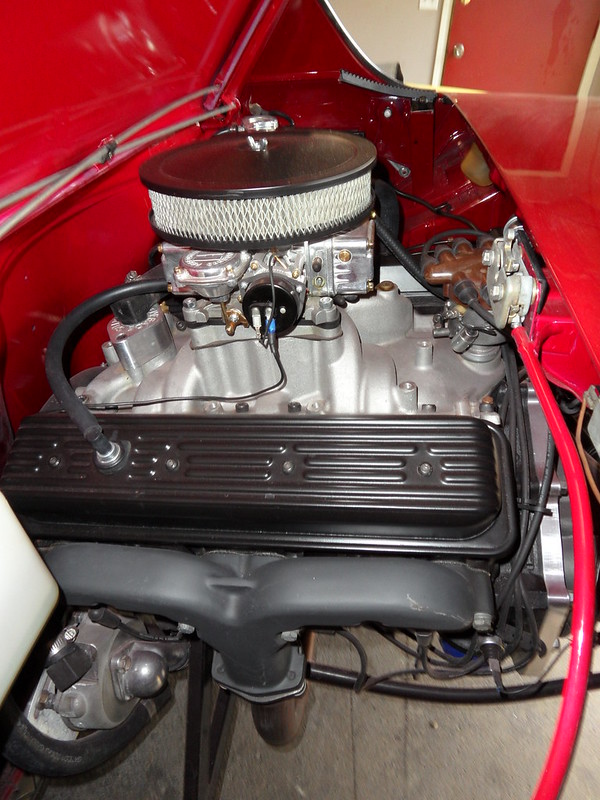
New Holley carb will go on with new intake with square bore pattern for more choices in carbs.
New electric water pump
Lots of bent and rusty parts blasted and powder coated or replaced.
Now that all this is done I need to fix the wiring and try to put it all back together.
I can find lots of pictures of Chevy v8's from the top seating in the cars, But I could use some good pictures of the bottom of the car.
Shiftier issues I need to address.
Fuel line placement to carb
Thorttel cable placements with carb facing forward.
Where did you run your wiring harness to the engine bay?
I am sure I will have more questions by the day.
Click to view attachment
Click to view attachment
Click to view attachment
Click to view attachment
May work bench - sorta.
Click to view attachment
Full Version: New here and need some help 914/8 Chevy 350 refurbish

I'm sorta old too...but still playing with cars.

I finished my SBC conversion this summer. Mostly Renegade conversion parts. Mine has their belt driven water pump set up.

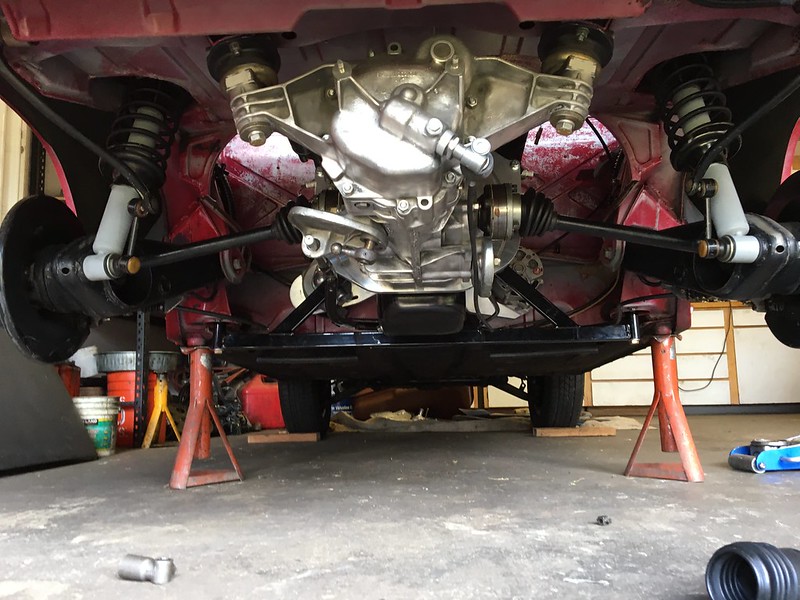
Here's a few underneath shots...

Describe your shifter issues. You should have the side shift trany in your 73 which actually shifts quite nicely with new shifter bushings all the way through and adjusted correctly.
I replaced the FI fuel pump with a lower pressure one for a carb. Used the stock fuel lines back to the engine compartment. Short piece of hose from it to the carb.
Off the shelf aftermarket throttle linkage holder and stock throttle cable.
Stock 914 wiring harness with just a few simple mods to run the fuel pump without the ECU and to light the alternator idiot light.
Plenty of help available here on the World. I could not have done mine without this forum.
QUOTE(DickSteinkamp @ Jan 14 2020, 04:13 PM) 
I'm sorta old too...but still playing with cars.
I finished my SBC conversion this summer. Mostly Renegade conversion parts. Mine has their belt driven water pump set up.
Dick thank you so much for the pictures and reply!!!!

You have an amazingly clean car!
I will be going over these and most likely asking a lot more questions.
And to start:
What distributor are you using? An old Mallory?
And is that a Moroso carb wedge?
What about air cleaner to hood clearance.
One last one for now, did you close off the open expanded metal hood? Chevy v8 do not like to get wet, or do you just drive it on sunny days?
Shifting issues are simply very hard to shift. I was thinking some of the issue is due to the "U" bend in the shifter rod from the tranny shift pivot to the connection at the firewall. Thinking the rod weight is per loading the shifter to the second and third gear side? I am thinking I may make it worse to get it to go around the new racing oil pan?
The bushing at the firewall seems new, I will check it again when I get back under the car.
The stick in the car does not appear to be a stock 914 piece. I need to get a picture of it to post up.
The bushing at the firewall seems new, I will check it again when I get back under the car.
The stick in the car does not appear to be a stock 914 piece. I need to get a picture of it to post up.
QUOTE(Daryl32 @ Jan 14 2020, 04:40 PM)
And to start:
What distributor are you using? An old Mallory?
And is that a Moroso carb wedge?
What about air cleaner to hood clearance.
One last one for now, did you close off the open expanded metal hood? Chevy v8 do not like to get wet, or do you just drive it on sunny days?
Yes it is a Mallory dual point marine dizzy. Centrifugal only advance. It's the only dizzy I could find that didn't require a hole cut in the front of the rear trunk.
I don't know who made the wedge. I probably got it from Summit.
Minimal air cleaner to hood clearance.
Rain tray and part of the structure of the engine cover was removed for air cleaner clearance. My first outing with the car was from my home to Seattle (90 miles). Hard rain both ways but the car didn't mind any.

Sorry I saw this earlier today, WELCOME to 914World
Dicks v8 car is one of the cleanest V8 914 I have ever seen.
Bob B Los Angeles
Dicks v8 car is one of the cleanest V8 914 I have ever seen.
Bob B Los Angeles
QUOTE(Daryl32 @ Jan 14 2020, 04:50 PM)
Shifting issues are simply very hard to shift. I was thinking some of the issue is due to the "U" bend in the shifter rod from the tranny shift pivot to the connection at the firewall. Thinking the rod weight is per loading the shifter to the second and third gear side? I am thinking I may make it worse to get it to go around the new racing oil pan?
In mine, the shift rod from the firewall to the trans is stock...except it has been lengthened 1.25 inches since the engine and trans is set back 1.25". You can see in the picts that there is a stock U shaped bend in it. If you have the Hanes manual, there is a procedure for adjusting the shifter. You may want to give that a try.
The one in this car has been cut sleeved and welded back together also but seems to have a lot more bend in it then yours.
QUOTE(burton73 @ Jan 14 2020, 05:05 PM)
Sorry I saw this earlier today, WELCOME to 914World
Dicks v8 car is one of the cleanest V8 914 I have ever seen.
Bob B Los Angeles
Thank you.
Dick's car is very clean and straight - a great example of how to do it right!
Which is what I need moving forward with this refurbish for my customer - new friend.
So I have a couple more questions for the 914 V8 owners / builders.
#1 how big do the vents you cut out in the front wheel wells need to be?
This is what this 914 has.
Click to view attachment
Click to view attachment
As for the radiator and fan I believe they are good. The radiator is a double pass through piece, water goes from one side into a large tank on the other and back again to the first side. Radiator has two core in it.
Click to view attachment
As mentioned above we have gone with an electric water pump for the refurbish. It is a Davis Craig unit out of Australia, we also bought the Davis Craig water manifold that mounts to the stock water pump position.
As a mechanic and car builder I am VERY IMPRESSED with these parts!
Click to view attachment
Click to view attachment
This water pump came with an electronic controller. That with a temp sending unit, lets you set the temp when the pump turns on and off as well as the electric fan. Thinking this might be a really nice feature!
Just a quick up date on the re-build
As they were when pulled out transmission and engine:
Click to view attachment
Click to view attachment
Click to view attachment
As the engine is today - once refurbished wiring harness is in car I can assembly engine and transmission and get them back into car.
Click to view attachment
Click to view attachment
Click to view attachment
Davis Craig water pump and header/manifold installed and along with alternator and new finished support bracket for it.
Made an engine wiring harness so that the engine and trans wires can be unplugged one place and both removed / installed pre-wired. Except for battery cables and alternator power wire.
Mostly need to work on the car now - Wiring - fuel delivery - tank and fuel pump placement.
And flywheel clutch and transmission assembly to engine
Click to view attachment
Click to view attachment
Click to view attachment
Click to view attachment
Click to view attachment
Click to view attachment
Very nicely done. Looking forward to seeing pictures of it installed and running.
QUOTE(Cairo94507 @ Jan 28 2020, 06:17 AM)
Very nicely done. Looking forward to seeing pictures of it installed and running.
Thank you!
I am looking forward to seeing it installed and running also. Going to have to have an adult beverage drink - consumption BBQ to celebrate!
Back in Oct. when the owner brought it over we were only going to clean up and tune the carb!

Got a little closer today after some prolonged - pushing, shoving, pulling, jerking then shoving, pulling, pushing and pushing and pulling and .... so on.
The wiring harness is sorta back in the car, pushed it into and through the stock position with a lot of
But it is in and positioned.
Click to view attachment
Click to view attachment
Click to view attachment
Click to view attachment
Click to view attachment
Click to view attachment
Click to view attachment
Some more work in the engine bay - fuel filters and pump. Also secured all the wiring harness branches with rubber lines clamps. Today i need to cut off the screw ends inside the interior of the fire wall.
Bent and installed a steel fuel line for the V8 Carburetor.
Click to view attachment
Click to view attachment
Click to view attachment
Bent and installed a steel fuel line for the V8 Carburetor.
Click to view attachment
Click to view attachment
Click to view attachment
Just please make sure all of the fuel line clamps are the correct clamps for rubber lines - we definitely don't want to see any engine compartment fires.
Are those the original plastic fuel lines going through the tunnel?
QUOTE(nihil44 @ Jan 31 2020, 03:47 PM)
Are those the original plastic fuel lines going through the tunnel?
Yes owner wants to wait to change them out at his shop, my hours are getting up there.
I really wanted to change them out, but they are on the suck side of the pump so they are not under any pressure. And he drove it down from SF in Oct. with no fuel leaks. Just a lot of engine oil and water along with the trany leaking really bad.
QUOTE(Cairo94507 @ Jan 31 2020, 10:18 AM)
Just please make sure all of the fuel line clamps are the correct clamps for rubber lines - we definitely don't want to see any engine compartment fires.
Not sure the stores you have in Australia but here I like to shop at NAPA for things like clamps. I like the ones that have extensions under the screw.
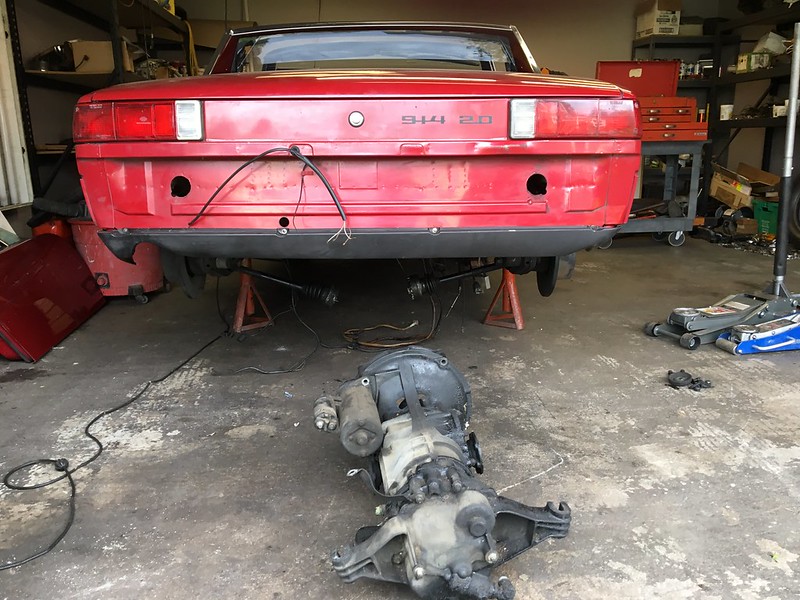
Engine and Transmission moved closer to home today.!
What do you use to paint the trans case, shop washed it but this Magnesium case looks really bad.
Click to view attachment
What do you use to paint the trans case, shop washed it but this Magnesium case looks really bad.
Click to view attachment
So just thinking out load.
With some sawzall work I can just push the engine and tranns into place easy-peasy?
What you think?
Click to view attachment
Click to view attachment
With some sawzall
work I can just push the engine and tranns into place easy-peasy?What you think?
Click to view attachment
Click to view attachment
QUOTE(Daryl32 @ Jan 31 2020, 06:00 PM)
Engine and Transmission moved closer to home today.!
What do you use to paint the trans case, shop washed it but this Magnesium case looks really bad.
After I degreased mine, I hit it with a fine wire wheel on my drill...

QUOTE(DickSteinkamp @ Feb 3 2020, 06:54 PM)
QUOTE(Daryl32 @ Jan 31 2020, 06:00 PM)
Engine and Transmission moved closer to home today.!
What do you use to paint the trans case, shop washed it but this Magnesium case looks really bad.
After I degreased mine, I hit it with a fine wire wheel on my drill...
VERY NICE!!!!!
QUOTE(DickSteinkamp @ Feb 3 2020, 09:54 PM)
QUOTE(Daryl32 @ Jan 31 2020, 06:00 PM)
Engine and Transmission moved closer to home today.!
What do you use to paint the trans case, shop washed it but this Magnesium case looks really bad.
After I degreased mine, I hit it with a fine wire wheel on my drill...
That looks fantastic!! And that's just the effects of the wire brushing? No paint or polish?
QUOTE(TargaToy @ Feb 4 2020, 08:54 AM)
That looks fantastic!! And that's just the effects of the wire brushing? No paint or polish?
Yes. Just brushing. Being magnesium I doubt if it will look bright and shiny for long, however.
I know Dr. Evil sprayed some type of coating on my transaxle to keep it from corroding or oxidizing. Also, it will be easier to keep clean too.
Click to view attachment
Click to view attachment
QUOTE(Cairo94507 @ Feb 4 2020, 04:26 PM)
I know Dr. Evil sprayed some type of coating on my transaxle to keep it from corroding or oxidizing. Also, it will be easier to keep clean too.
Dang. That looks great too. Inspirational.
I used a wire wheel as well on my drill and it ended up beautifully. I covered up everything I wanted protected and then shot it with a light coat of clear to try and maintain some of the shine.
QUOTE(Cairo94507 @ Feb 4 2020, 02:26 PM)
I know Dr. Evil sprayed some type of coating on my transaxle to keep it from corroding or oxidizing. Also, it will be easier to keep clean too.
Click to view attachment
Looks like Teflon
Those all look great!
With help I got the engine and trans put in on Monday.
But had to take them back out Tuesday morning as the Davis Craig header (water manifold) on the front f the engine was up against the heat shield shelf on the fire wall.
So after pulling the engine and trans back out I cut the shelf down, moved the wiring and put some reinforced rubber edging on the cut edge.
Was able to get the engine and trans back in and all bolted up by 4:30 pm.
Here are some pictures for you to go over. I did not do anything to the trans case as I am getting a lot of hours in this project and need to get it buttoned up.
Click to view attachment
Click to view attachment
Click to view attachment
Click to view attachment
Click to view attachment
Click to view attachment
QUOTE(Gearup @ Feb 4 2020, 05:32 PM)
QUOTE(Cairo94507 @ Feb 4 2020, 02:26 PM)
I know Dr. Evil sprayed some type of coating on my transaxle to keep it from corroding or oxidizing. Also, it will be easier to keep clean too.
Click to view attachment
Looks like Teflon
@Dr Evil Can you tell us what you normally use?
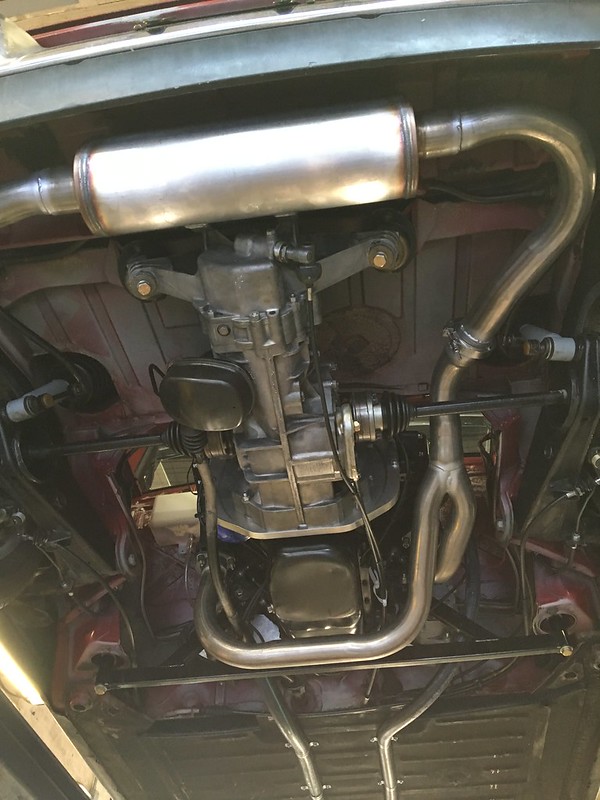
Got some more done today.
Got the half shafts installed on trans, finished up the exhaust - with new stainless steel welded together mufflers, readjusted shifter linkage - seems better (thanks for the advise in the over thread).
Lots of little things to do still, do two things on the punch list and add two more!
Click to view attachment
Click to view attachment
Click to view attachment
Click to view attachment
We were able to get the engine to fire up and run for a couple of minutes Friday afternoon.
Had help from the owner and a good friend of ours.
I have some minor issue to work out with the operation of the engine and a good bit of wiring to still deal with. But it will run!!1
Carb is a new Holley 570 CFM Street Avenger.
Click to view attachment
Click to view attachment
Click to view attachment
Click to view attachment
Click to view attachment
Click to view attachment
So it has been awhile since I posted an update on the car.
Had to fix my personal truck which took a better part of three weeks.
I did do some work on the Porsche during that time and the last two weeks more. I have not been taking as many pictures as the work is small back wrenching things. Centered in the interior and to do with wiring, clutch cable, throttle cable issues. Like pushing the clutch in and having it push on the throttle cable.
Removed a clutch pedal - cable arm extension. It was in contact with the throttle cable causing a few issues. I ended up taking it out of car as I could not get it to stop touching the throttle cable.
Trying to get the wires tucked up under the dash and get the gauges and Davis Craig controller all wired up and permanently installed.
At the point with the wiring where I am down to getting a fuse panel in the car the wired.
Click to view attachment
Click to view attachment
Click to view attachment
Click to view attachment
Click to view attachment
The car came with some interior parts that needed install so I have been working on these.
#1 an aftermarket center console. NOTE: it does not fit well at all with the short shift lever and spacer in the car. Made it work as well as possible.
#2 an older used under dash pad, it is incorrect one for the dash outer speakers. It comes into the face of dash too much. Again made it / installed anyway.
#3 A Cloth glue on dash cover. Personally thinking paint the dash would have looked better in the long run.
#4 A set of four older VDO gauges, they needed cleaning and a home. The center console supplied piece for gauges had three large holes 25/8" or so. VDO gauges more like 2". So I made a new piece out of some 3/16" white birch plywood I had.
#5 Installed the pedal cover board.
I also took apart, cleaned and regressed the shift leveler.
Seeing the engine is water cooled and the stock heater-blower is no long working. I made a circuit breaker/switch panel out of 1/6" aluminum to go the heater control position. The circuit breakers are for the fuel pump, electric water pump, Davis Craig controller hot lead and the fan hot to the relay. Easier to see and push then finding the fuse and replacing.
Click to view attachment
Click to view attachment
Click to view attachment
Click to view attachment
Click to view attachment
Click to view attachment
Click to view attachment
The VDO water temp sender has a dual function. It works the gauge and has a warning light function also. So the red light next to the water temp gauge is the warning light.
The red light above the Davis Craig fan/water pump controller is a test light for it.
Click to view attachment
Click to view attachment
Click to view attachment
Click to view attachment
Click to view attachment
Click to view attachment
Click to view attachment
The red light above the Davis Craig fan/water pump controller is a test light for it.
Click to view attachment
Click to view attachment
Click to view attachment
Click to view attachment
Click to view attachment
Click to view attachment
Click to view attachment
Couple more progress pictures.
Click to view attachment
Click to view attachment
Click to view attachment
Click to view attachment
Click to view attachment
Click to view attachment
Click to view attachment
Click to view attachment
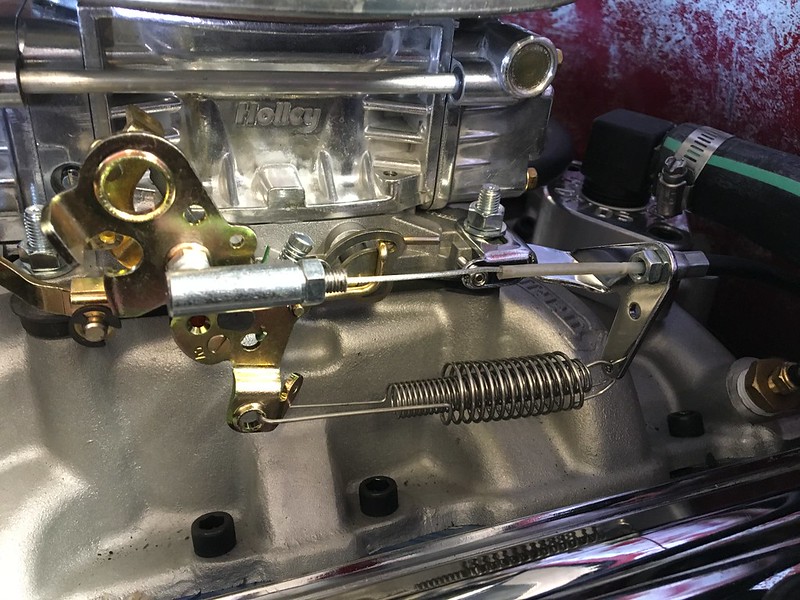
While working on my truck I needed to weld some things to the frame - so I welded up a throttle cable mount for the engine. I modified the Renegade piece for the stock cable. Then I used their idea to make another one for a second cable.
I just could not stop thinking of the position of the carb and the angle it sat in the car at. We added a 5.5 degree angle wedge to level the carb on the engine in the car.
Need to get the engine to start without a pump and start the tuning of it. Timing - carb mixtures and ideal speed. Also need to make sure the throttle pedal works with the carb, Meaning flooring it opens the carb ALL the way!
Here are some pictures of the throttle cable and stuff.
Click to view attachment
Click to view attachment
Click to view attachment
Click to view attachment
Click to view attachment
Looking at the pictures of the carb I remembered the work in bracing the Renegade water filler.
Also mounted the overflow tank and a piece of aluminum / shelf in the engine bay drivers side.
Click to view attachment
Click to view attachment
Click to view attachment
Click to view attachment
Also replaced all the 1.5" water lines in the whole car. Added 1.5" bent aluminum tubes in the front by the radiator. Bending the rubber hose in the front was causing them to kink and close off.
I ending up using one 90 degree piece and one 45 degree piece.
Click to view attachment
Click to view attachment
I like the tweeter in the vent idea - I made need to copy that idea
QUOTE(FL 000 @ Mar 20 2020, 06:07 PM)
I like the tweeter in the vent idea - I made need to copy that idea
The tweeter is just held in by the foam, seems to be a good mount for the little thing!

I have a 327 300 hp in mine, plenty of pulling power and the engine runs perfectly and is actually very cool running. Kept it all stock with points and condenser and the original Holley carb. It idles very smoothly and has INSTANT pickup. Never though of changing the engine to a 350 or anything largerClick to view attachment Click to view attachmentClick to view attachment
Why don’t 914 V8 builders use fuel injection? Might have better clearance.
QUOTE(Jett @ Mar 21 2020, 11:31 AM)
Why don’t 914 V8 builders use fuel injection? Might have better clearance.
Cost and complexity. They are usually looking for easy and cheap. Not all but at least in the past, it was a common reason for the swap.
We did an LS swap with FI into a 928 track car. 525HP in a mostly gutted out, track ready car really made it move. It took more time than the owner expected to make it all run and look right.
QUOTE(mepstein @ Mar 21 2020, 08:42 AM)
QUOTE(Jett @ Mar 21 2020, 11:31 AM)
Why don’t 914 V8 builders use fuel injection? Might have better clearance.
Cost and complexity. They are usually looking for easy and cheap. Not all but at least in the past, it was a common reason for the swap.
We did an LS swap with FI into a 928 track car. 525HP in a mostly gutted out, track ready car really made it move. It took more time than the owner expected to make it all run and look right.
Makes sense. The new LS7 in this configuration is expensive but would look cool in a 914. That said, the 928 v8 seems like a better choice if money is not the primary concern.
QUOTE(dr914@autoatlanta.com @ Mar 21 2020, 08:05 AM)
I have a 327 300 hp in mine, plenty of pulling power and the engine runs perfectly and is actually very cool running. Kept it all stock with points and condenser and the original Holley carb. It idles very smoothly and has INSTANT pickup. Never though of changing the engine to a 350 or anything largerClick to view attachment Click to view attachmentClick to view attachment
Every nice Vette!!!!!!!
I have a non-stock 327 (331) in my 65 wagon.
Click to view attachment
Click to view attachment
Click to view attachment
Click to view attachment
This is a "lo-fi" version of our main content. To view the full version with more information, formatting and images, please click here.