
Full Version: Irish Green '71 "Resto"
You are doing a nice job and that 914 is going to be on the road soon enough.
Tuesday update.
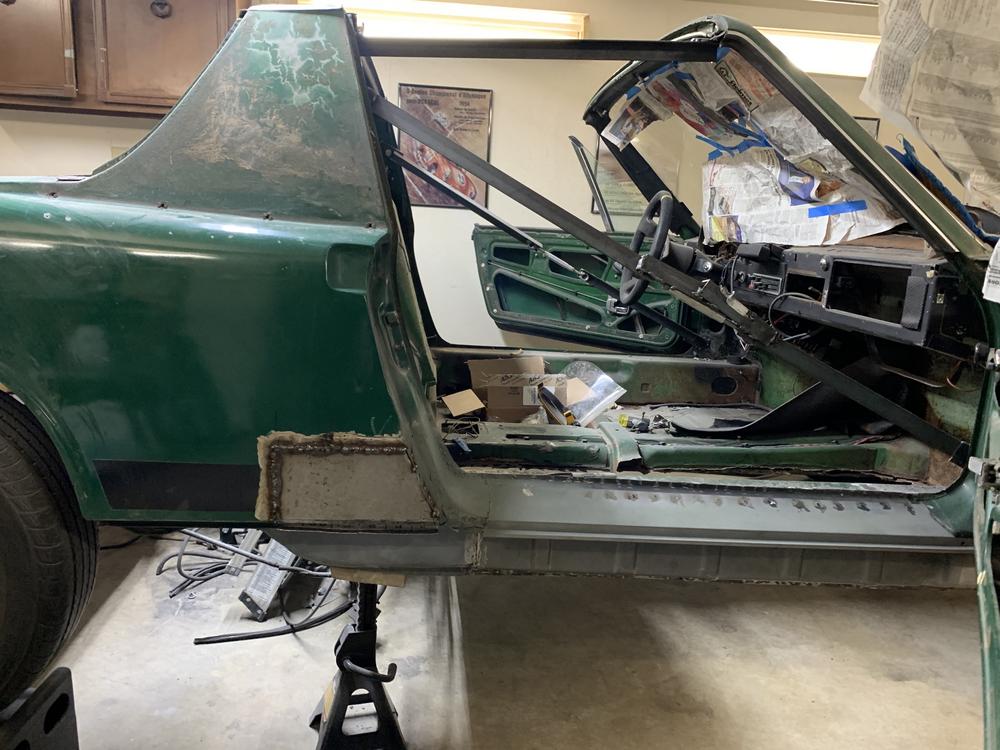
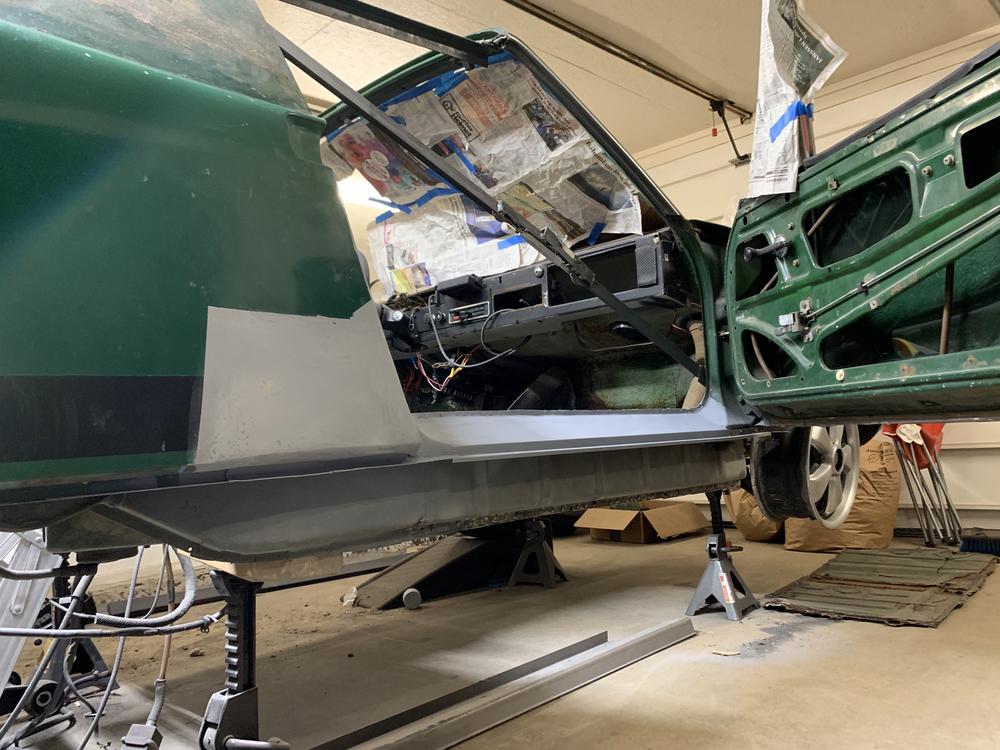
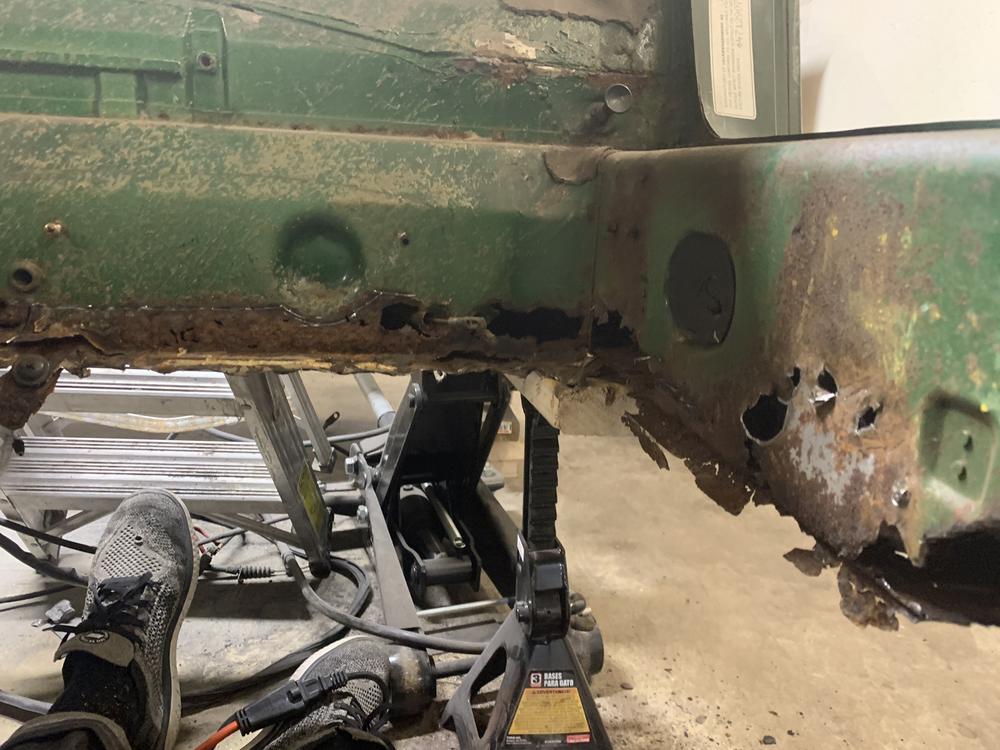
I'm ready to weld the sill back in - so I need to get that lower jamb and body section figured out.
I sandblasted my cut-out section, found a ton of rust, body filler (like .25") rivets, and old brazing. Really just a bad repair at some point in the cars life.
Best to just replace the whole section, right?
I made a few threads and posts in that last month+ asking if anyone has a car they are cutting up, but no luck.
I will try and make my own, before I drop $90-$120 on a jamb section.
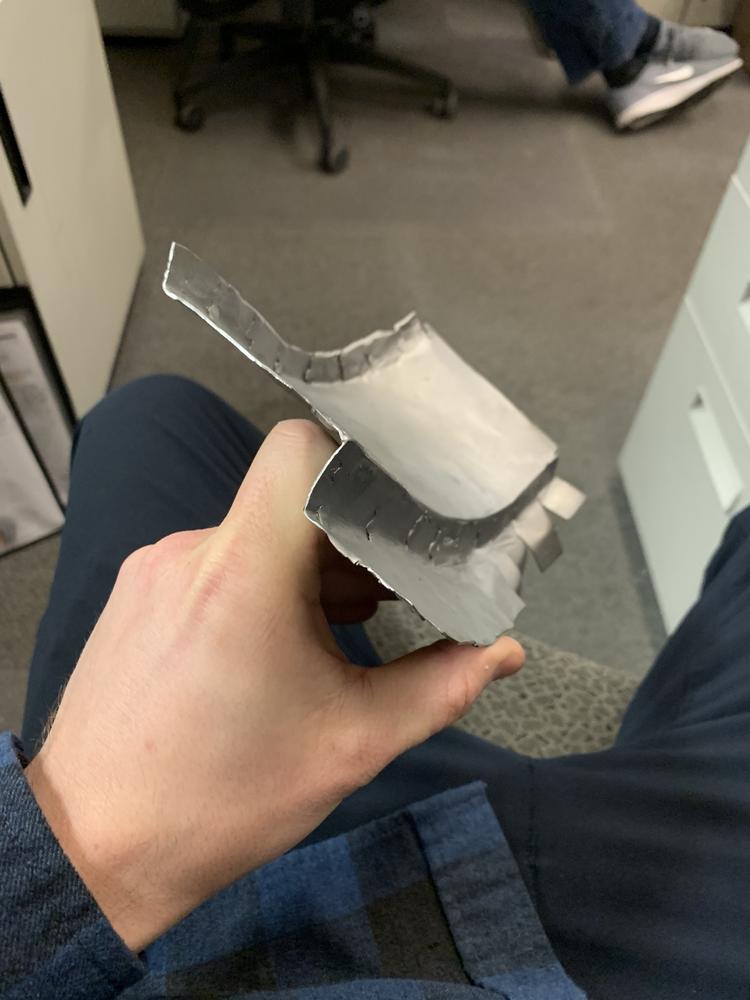
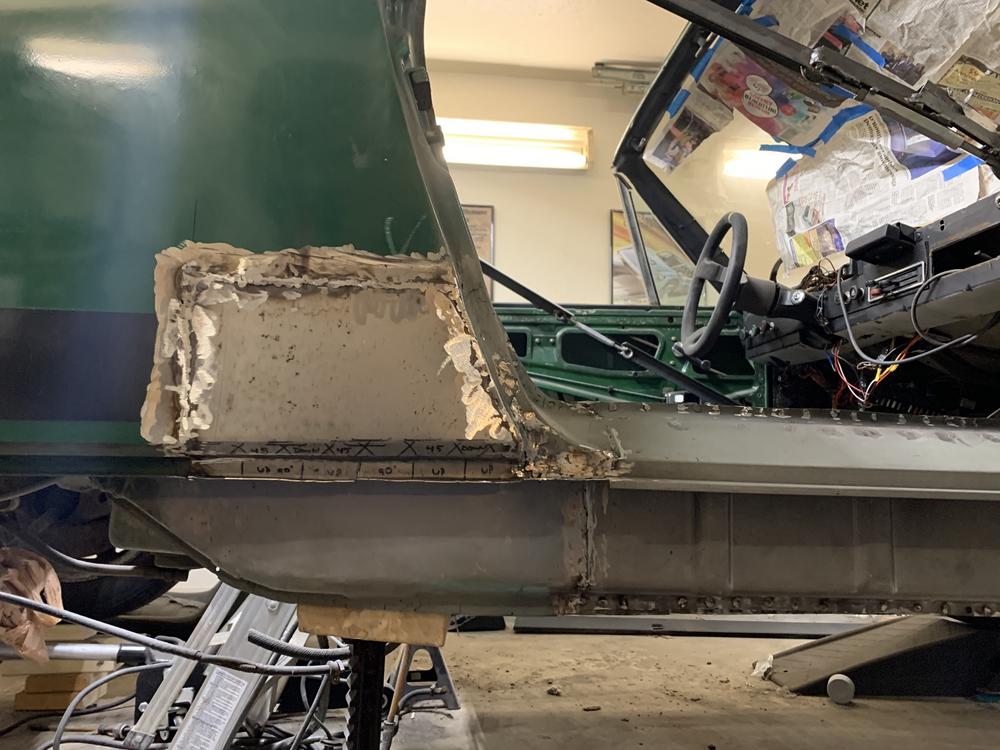
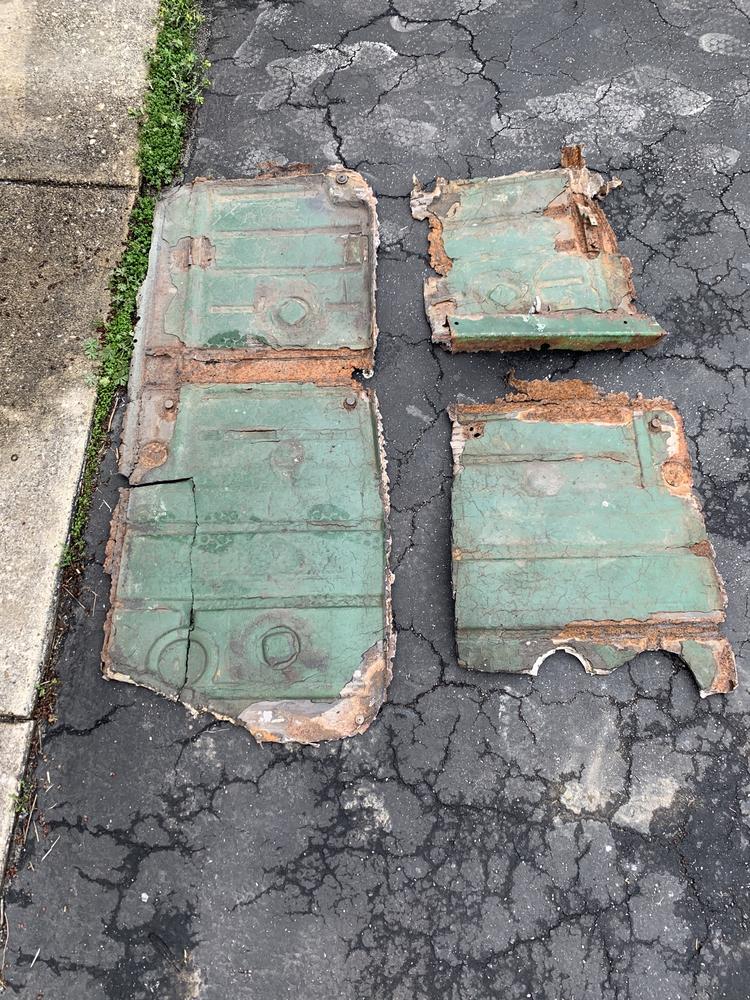
I got started on this today. Here's the old section that I do not want to reuse.
Rear. Its like 5 pieces stuck together.
I will try to make my own, and see how it turns out. Cave man scribbles...
Pain in the butt to bend with my little HF Brake.
On the right track in a bit under an hour. Jamb will be a different story.
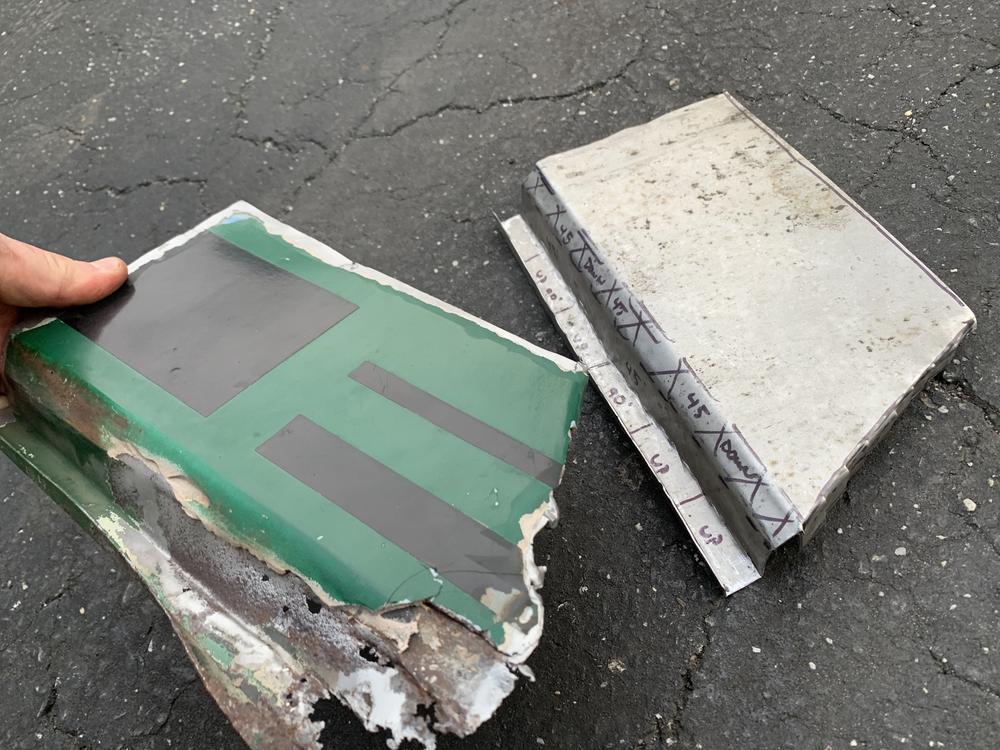
Definitely close! With some tweaking, I think this could be a good part.
Other bits:
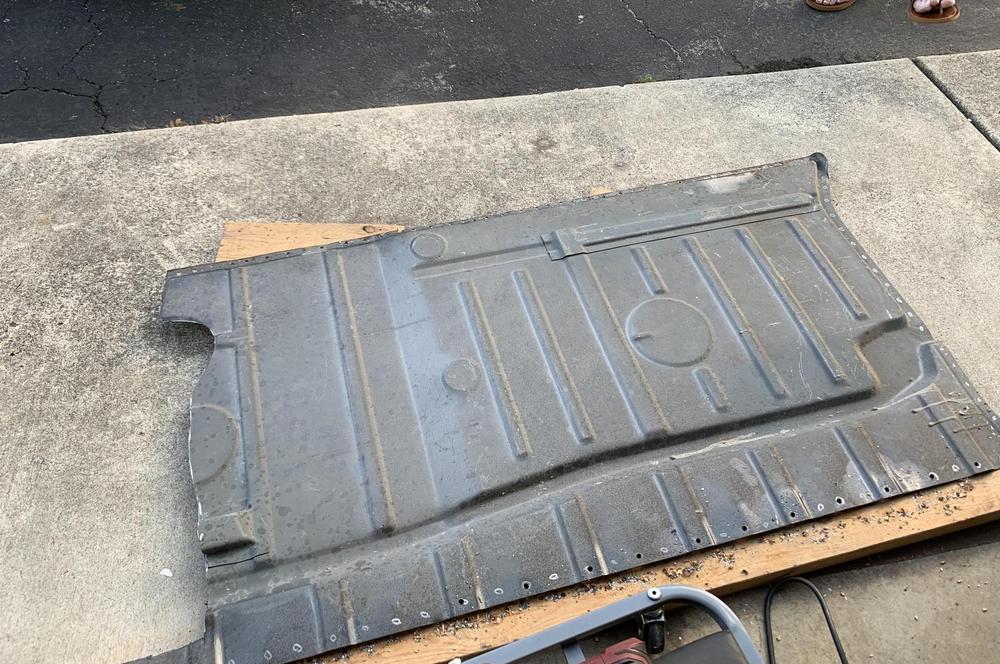
Got the passenger side floor out.
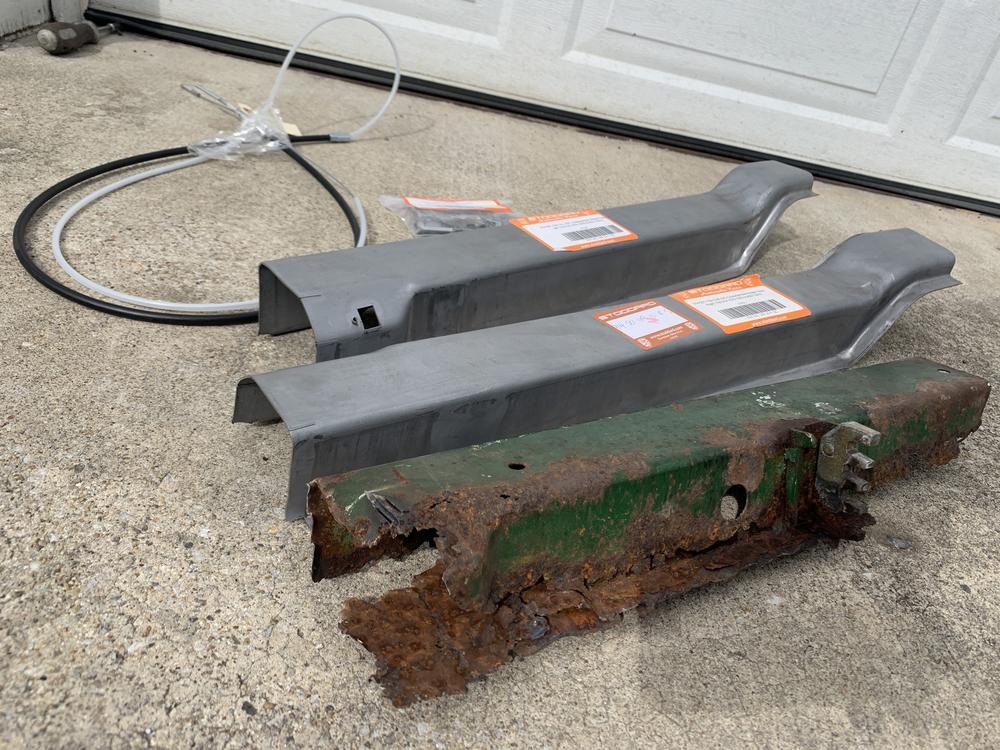
Received this beautiful part from Auto Atlanta.
Had a celebratory brew on the defeated carcass of a floor.
And a final pic, because the light was nice.
Also serves as a summary of some of this weeks accomplishments, so far.

I'm ready to weld the sill back in - so I need to get that lower jamb and body section figured out.
I sandblasted my cut-out section, found a ton of rust, body filler (like .25") rivets, and old brazing. Really just a bad repair at some point in the cars life.
Best to just replace the whole section, right?
I made a few threads and posts in that last month+ asking if anyone has a car they are cutting up, but no luck.
I will try and make my own, before I drop $90-$120 on a jamb section.
I got started on this today. Here's the old section that I do not want to reuse.
Rear. Its like 5 pieces stuck together.
I will try to make my own, and see how it turns out. Cave man scribbles...
Pain in the butt to bend with my little HF Brake.
On the right track in a bit under an hour. Jamb will be a different story.
Definitely close! With some tweaking, I think this could be a good part.
Other bits:
Got the passenger side floor out.
Received this beautiful part from Auto Atlanta.
Had a celebratory brew on the defeated carcass of a floor.
And a final pic, because the light was nice.
Also serves as a summary of some of this weeks accomplishments, so far.
Nice progress. And that jamb section could have a place in the 914 PO botched repair hall of fame.
Of all the horrors I witnessed on my car, I don't think any were as nasty as that jamb. It's one thing when Mother Nature Fs up the car, but... Are you sure that's even filler? Looks like somebody poured concrete.  You patch is pure artistry. That took guts to even attempt.
You patch is pure artistry. That took guts to even attempt.
Edit: Seriously thanks for the kind words guys, it gives me a ton of motivation.
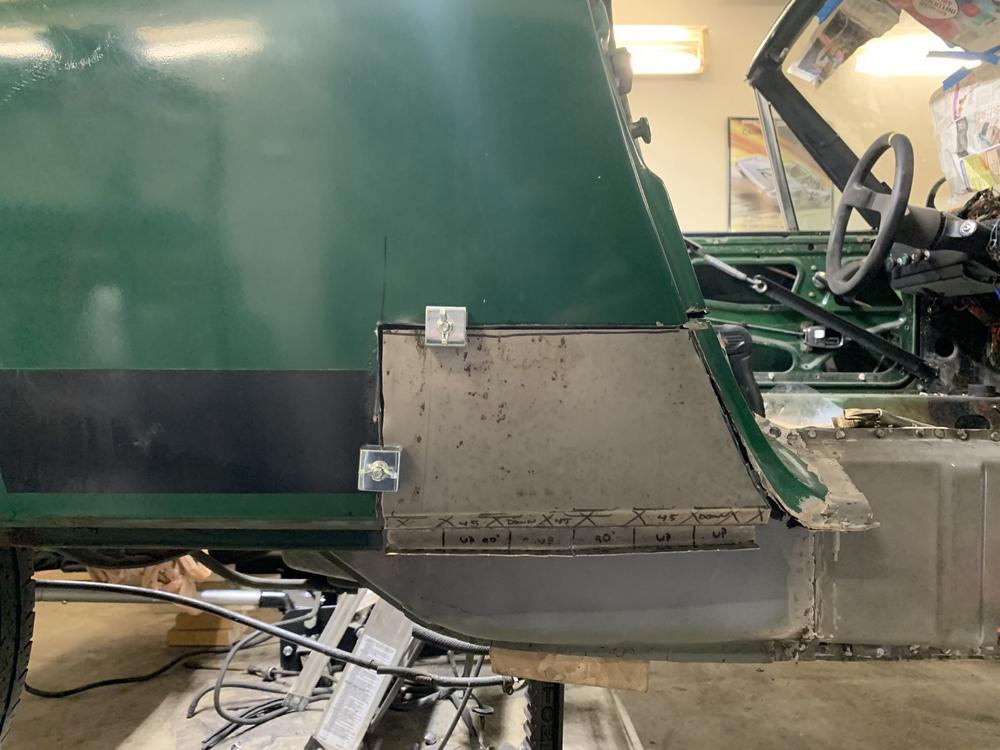
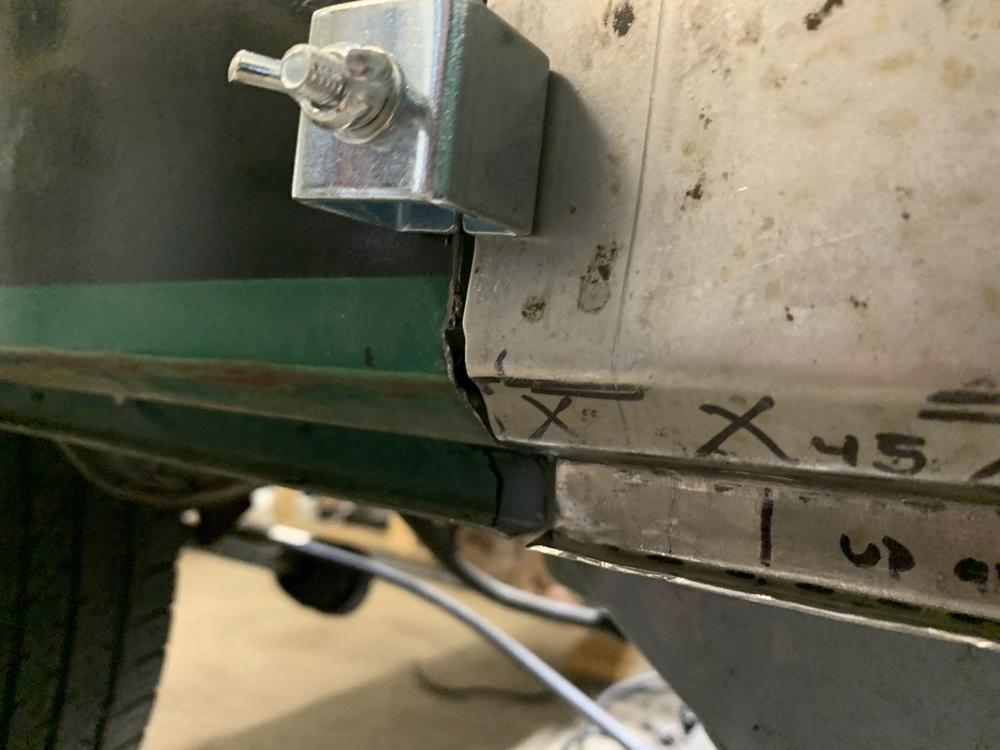
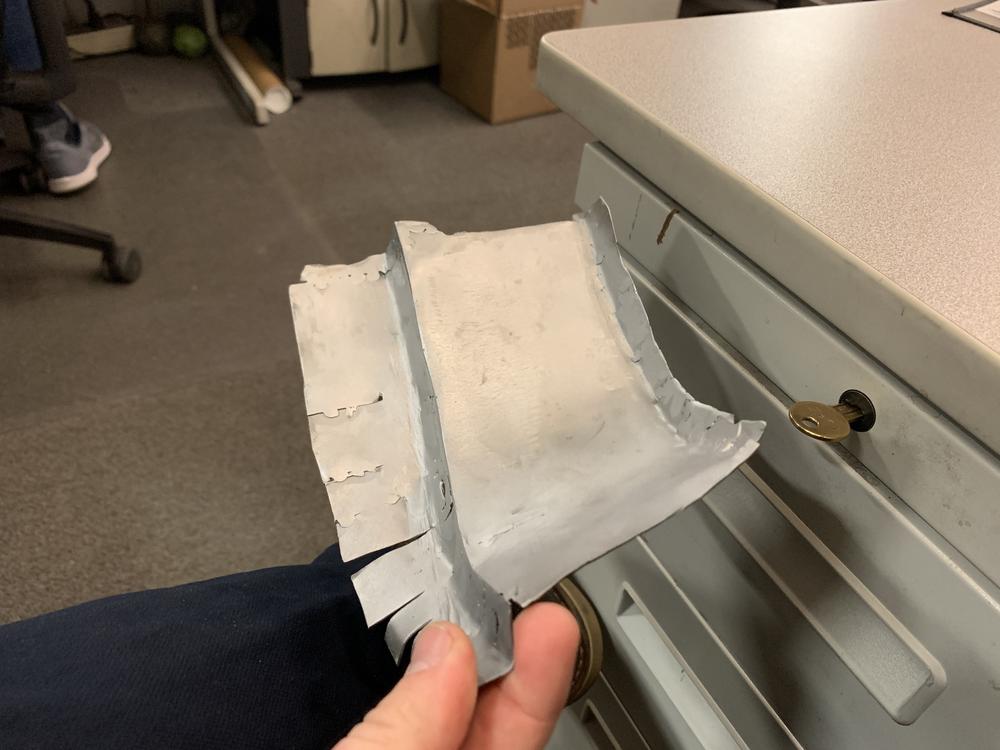
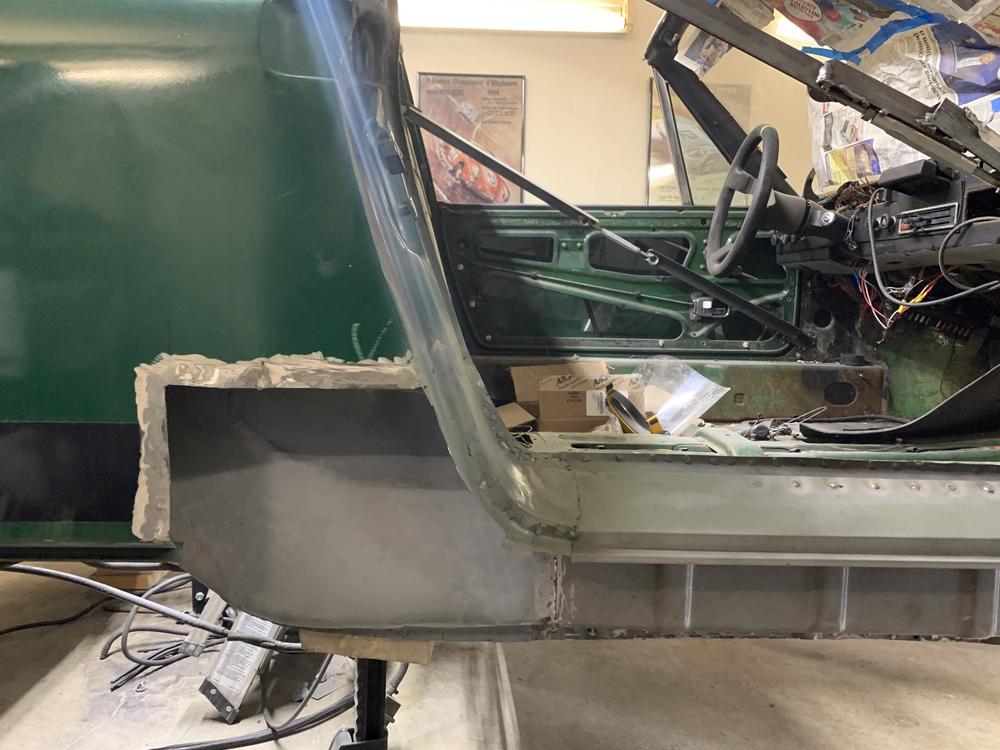
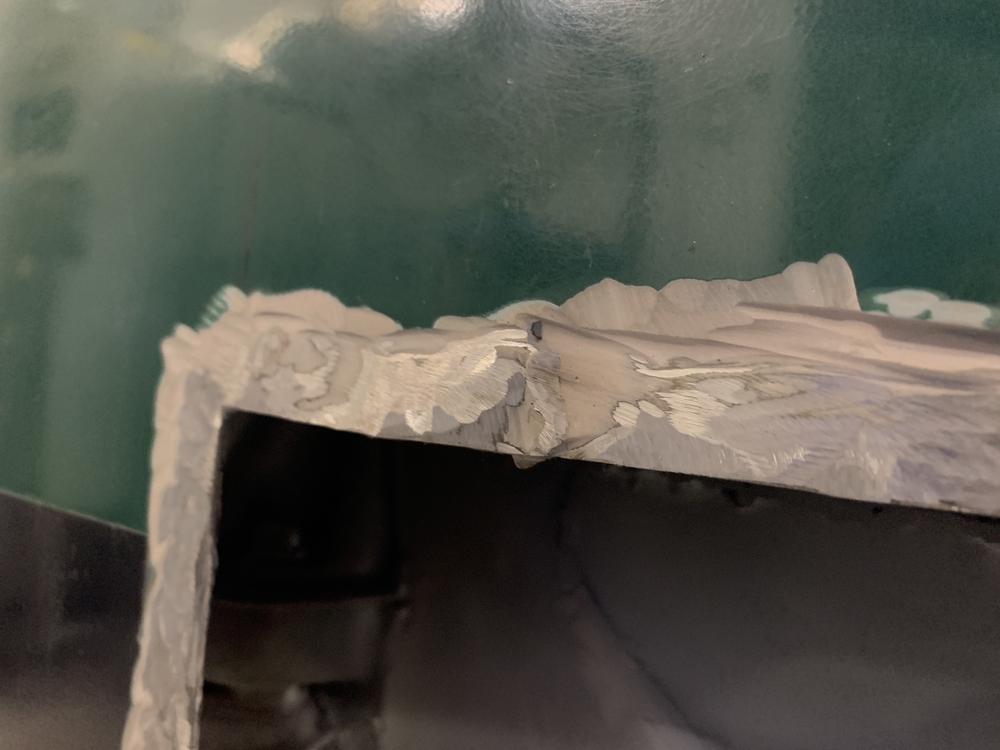
Hey guys, decided to try and tackle this lower jamb.
WORK IN PROGRESS. Man this is a tough piece. Check out the pics for where I am at so far.
I achieved the rolled shape by clamping my new piece to the original lower jamb, pressing with my thumbs, clamp again closer, press, then hammer form.

Outer flange is one piece, and the rolled flat is another.
Fit is close... getting there.
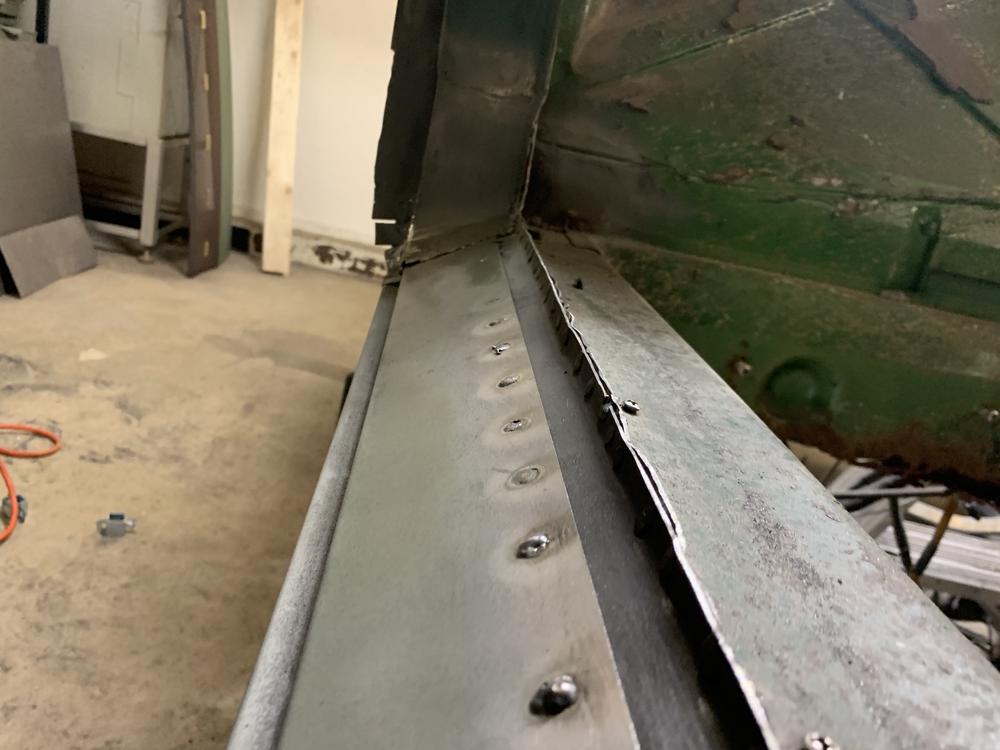
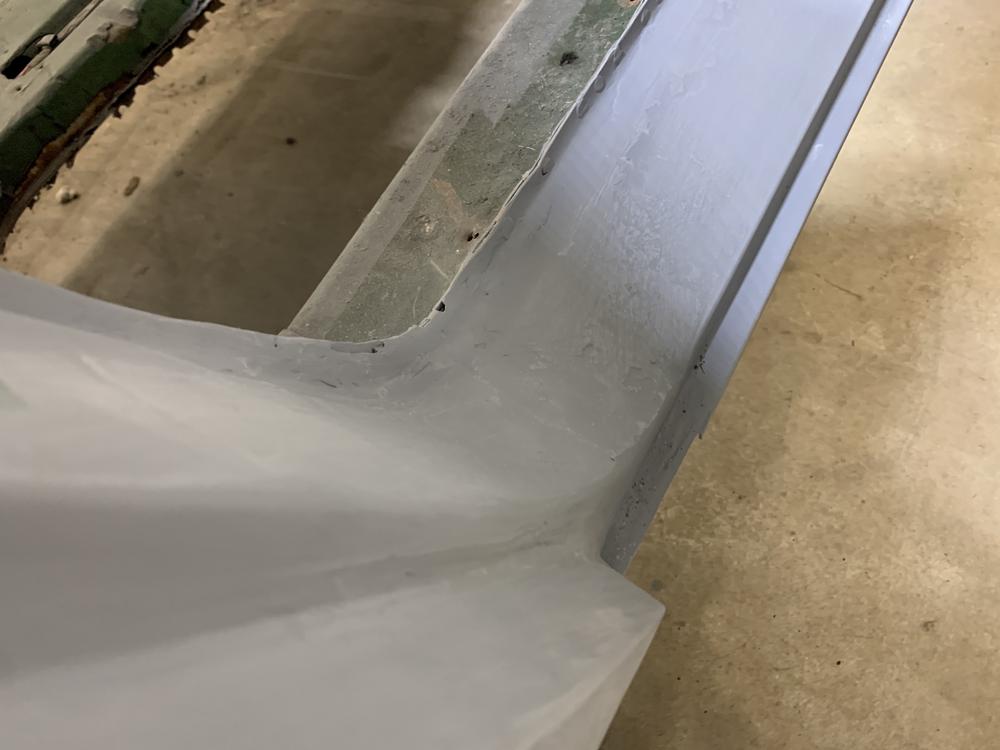
Cleaned up and sandblasted a little more. Now I can see where else I need to spot weld to finish filling this piece in.

Shape is there, its a clean fit and the door closes nicely over it.
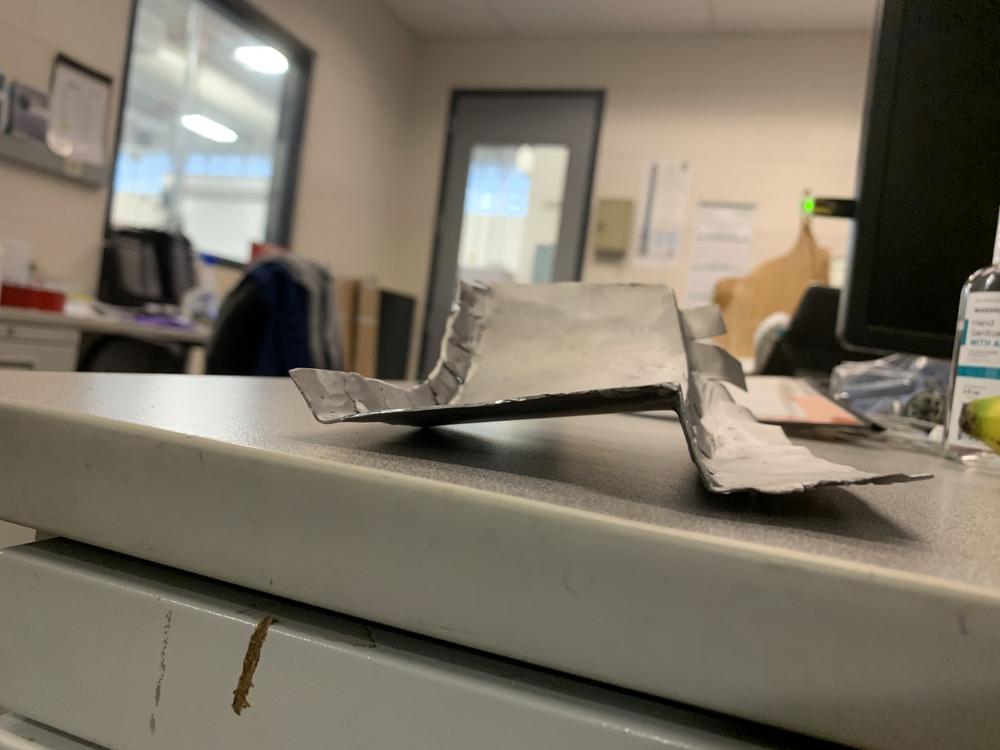
3 hours into this pieces so far. Still cheaper than buying the whole jamb for $129. Depending on what I value my hourly work at... minimum wage?
I have not figured out how to blend those tabs at the end into the sill, I will check out a few more photos of others cars.
Little more welding, shaping, drill the spot weld holes... I might be in business. At least its a more honest shot at a repair than what was on there.
Hey guys, decided to try and tackle this lower jamb.
WORK IN PROGRESS. Man this is a tough piece. Check out the pics for where I am at so far.
I achieved the rolled shape by clamping my new piece to the original lower jamb, pressing with my thumbs, clamp again closer, press, then hammer form.
Outer flange is one piece, and the rolled flat is another.
Fit is close... getting there.
Cleaned up and sandblasted a little more. Now I can see where else I need to spot weld to finish filling this piece in.
Shape is there, its a clean fit and the door closes nicely over it.
3 hours into this pieces so far. Still cheaper than buying the whole jamb for $129. Depending on what I value my hourly work at... minimum wage?
I have not figured out how to blend those tabs at the end into the sill, I will check out a few more photos of others cars.
Little more welding, shaping, drill the spot weld holes... I might be in business. At least its a more honest shot at a repair than what was on there.
A lot of patience and talent. I wish I had nerve to try this when i was your age. This has turned out to be and inspirational thread. Keep up the good work!! I'm sure many of us are following your progress. ![popcorn[1].gif](http://www.914world.com/bbs2/style_emoticons/default/popcorn[1].gif)

thanks for keeping us updated on your project, its great to follow along and see you tackle this extensive of a repair. A car like that would have been scrapped up until a few years ago, by most anyway, I know there are some hear that have rescued some this bad or worse that probably were not "worth it" at the time. AND there are fewer it seems your age willing to develop the skill set to do it. I know my son would not, but my daughter and son-in-law to be want to start one too, so I know there is hope!! anyway just wanted to give you props for saving it. you will enjoy the fruit of your labor soon! I think you could have a future in this if you wanted to, these cars and the other Porsche's are now worth what you put into it so I am sure you can gain back more that just that "minimum wage" you were joking about!!
Phil
Phil
QUOTE(bkrantz @ Mar 24 2020, 10:02 PM) 
Nice progress. And that jamb section could have a place in the 914 PO botched repair hall of fame.

Really enjoying seeing your progress on this project.
Great thread! Keep up the great work!!
QUOTE(JOEPROPER @ Mar 27 2020, 08:45 AM)
A lot of patience and talent. I wish I had nerve to try this when i was your age. This has turned out to be and inspirational thread. Keep up the good work!! I'm sure many of us are following your progress.
There's been a few curse words and tools thrown, but we've made it this far. The way I see it, this is the only thing holding me back from Aircooled Porsche cruising to Cars and Coffee, so lets knock it out.
QUOTE(DRPHIL914 @ Mar 27 2020, 09:15 AM)
thanks for keeping us updated on your project, its great to follow along and see you tackle this extensive of a repair. A car like that would have been scrapped up until a few years ago, by most anyway, I know there are some hear that have rescued some this bad or worse that probably were not "worth it" at the time. AND there are fewer it seems your age willing to develop the skill set to do it. I know my son would not, but my daughter and son-in-law to be want to start one too, so I know there is hope!! anyway just wanted to give you props for saving it. you will enjoy the fruit of your labor soon! I think you could have a future in this if you wanted to, these cars and the other Porsche's are now worth what you put into it so I am sure you can gain back more that just that "minimum wage" you were joking about!!
Phil
Thank you Phil, what a kind response. Like your daughter, there are those of us that are out there. I have my iron in a lot of fires.
I would love to do a 912 after this. Not sick of it yet..
QUOTE(AZBanks @ Mar 27 2020, 01:30 PM)
Really enjoying seeing your progress on this project.
QUOTE(pete-stevers @ Mar 27 2020, 02:20 PM)
Great thread! Keep up the great work!!
Thanks! More to come shortly.
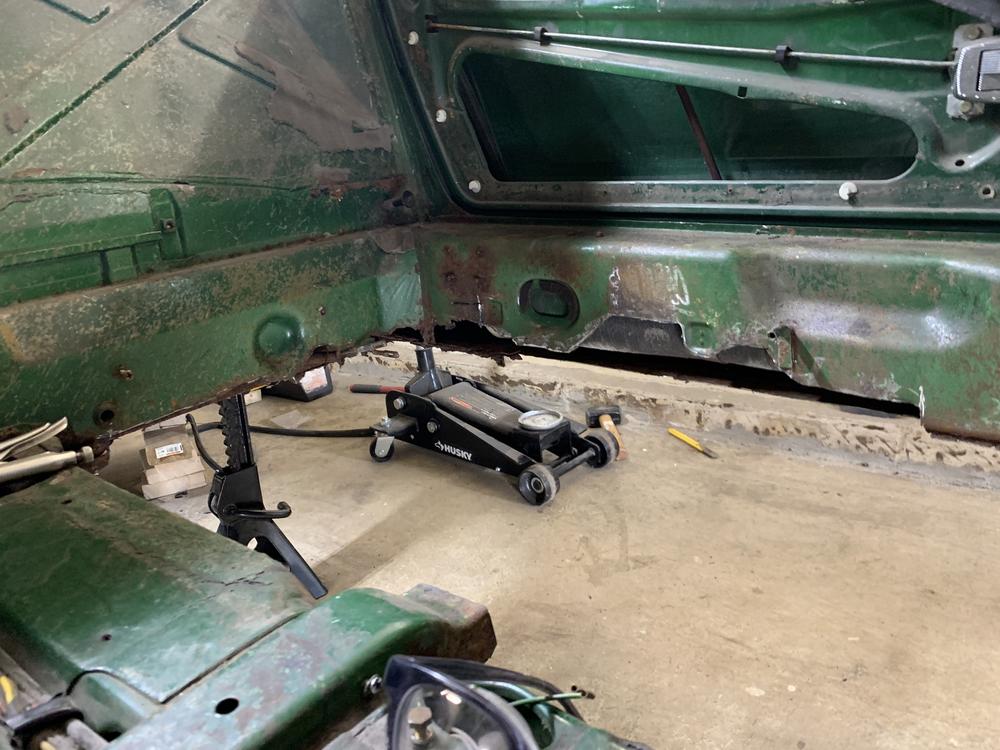
Happy Saturday,
Lets finish up this passenger side!
Weld on sill and finish lower jamb. What will that take 30 mins?
.... 6 hours later....
I ran into a fork in the road here.
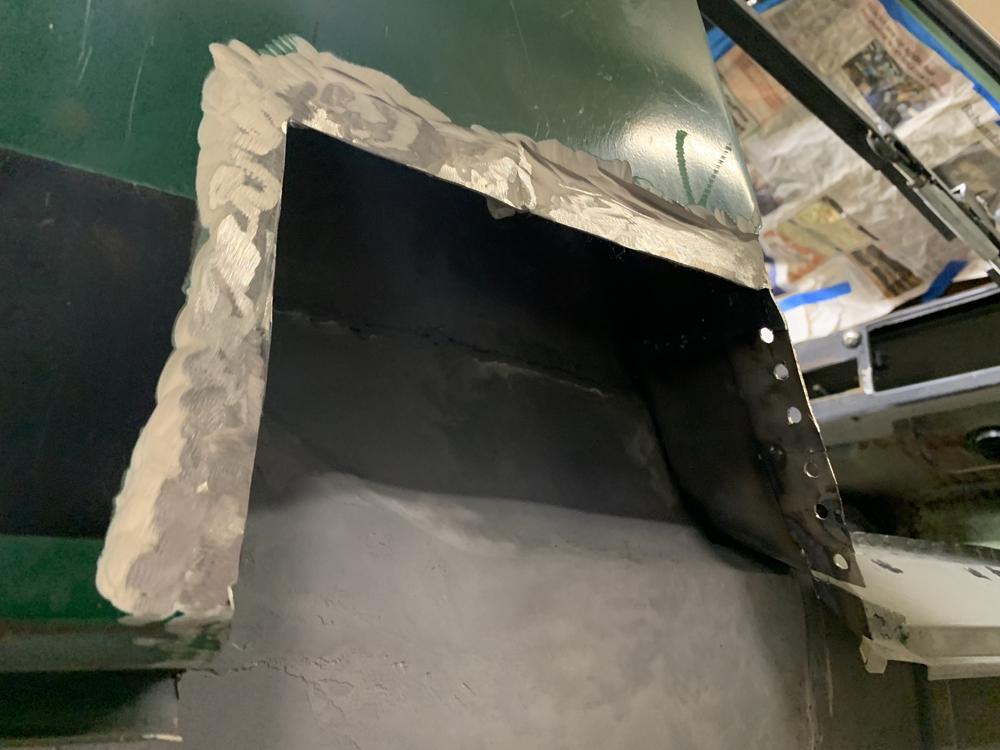
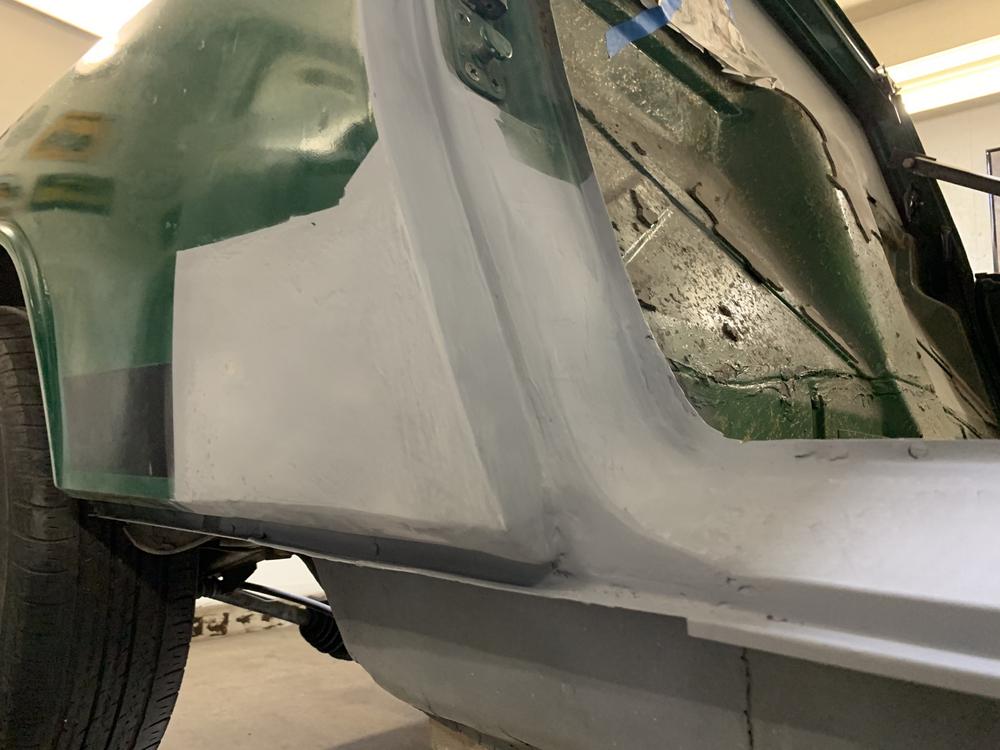
As I ground away the paint to weld in the new body section,
I found about 3/16" of body filler. This goes all the way up to the door handle, following the shoddy jamb repair from earlier. What to do?
Since I do not plan on painting the car right now, (or dig this much deeper!)
I decided to place the remade body panel in, smooth what I can, and use filler for the rest. Not what I was expecting to see or do... Down the road, I would like to replace the entire passenger rear, sail, fender, etc. So I will clean it up and move on until that day.
Sorry to let down any folks, I know this is not doing it "right" and just hiding the inevitable.
Here's the filler.... Lets carry on.
Life goes on, lets weld it up.
Grind.
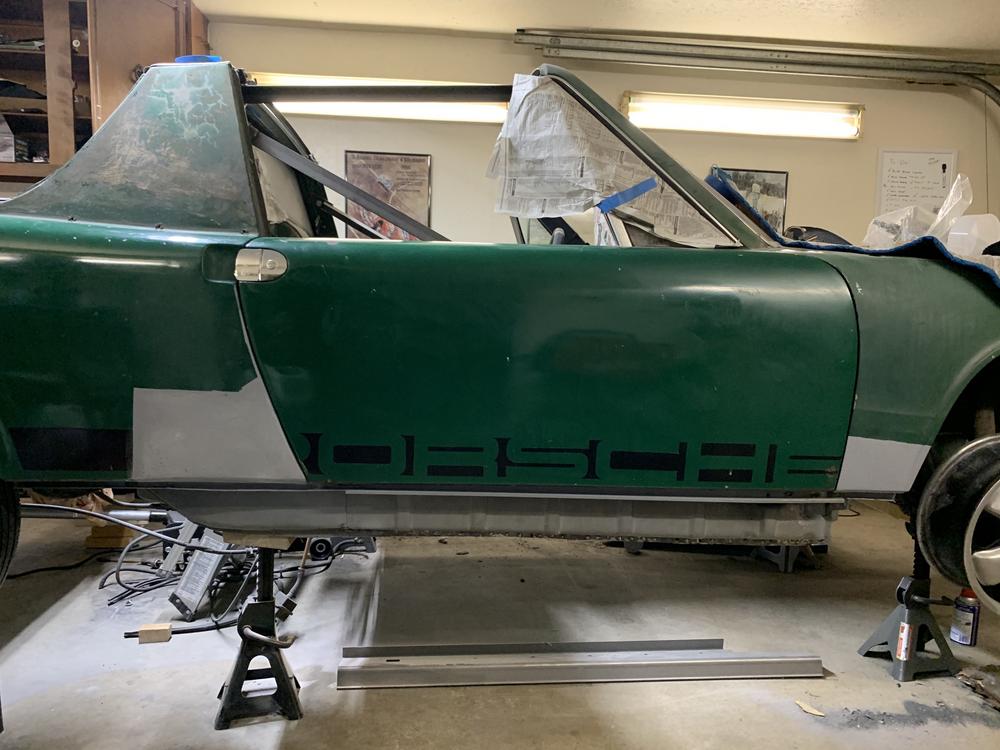
Sand a ton, smooth, sand, prime. Still need to sand.
2 hours later:
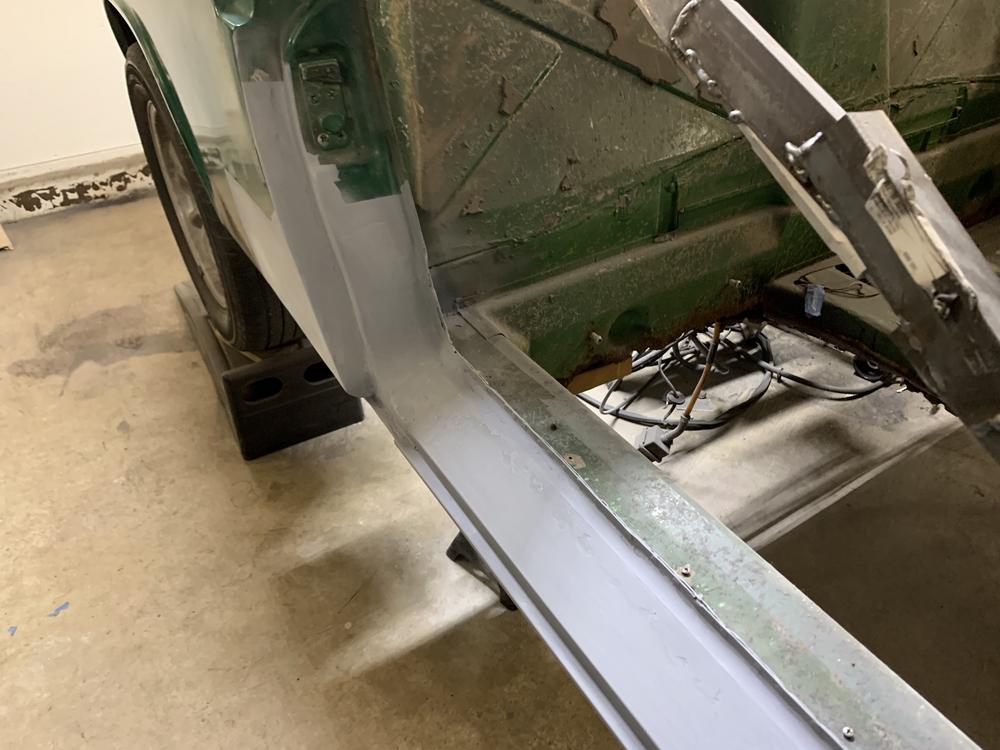
Full shot:
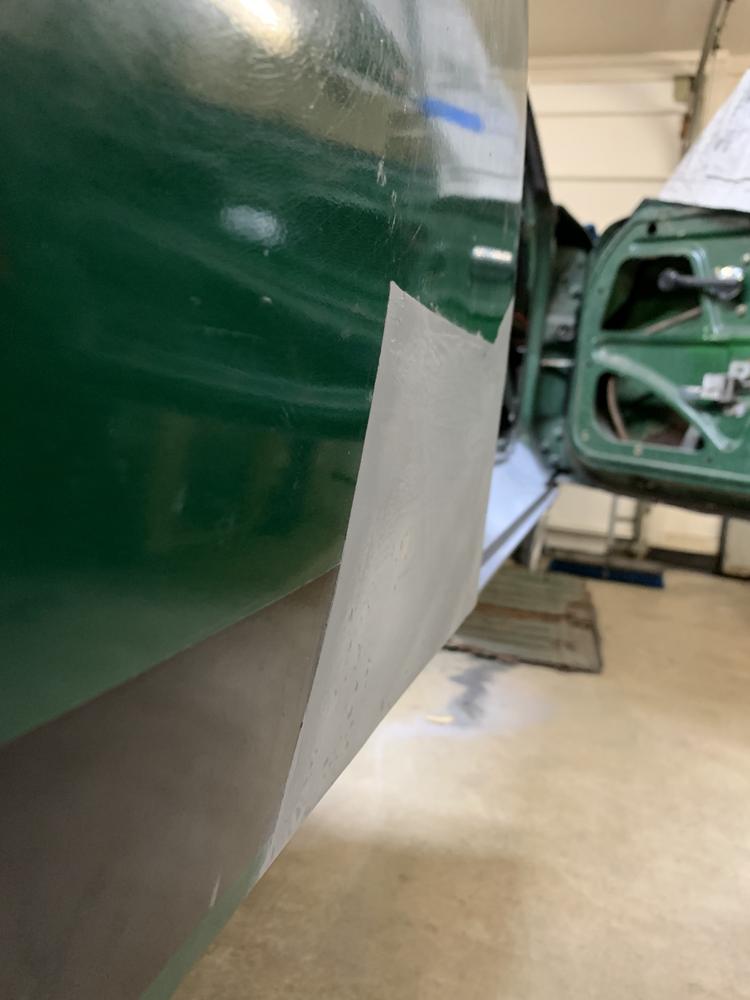
Little bit to sand left, just eager to make another post. I feel really great about these steps. Passenger side is effectively... DONE!
Serious progress for 5 weeks! I am excited to open the garage door tomorrow and see it with fresh light.
Whats next:
-Weld in battery tray/support and engine shelf.
-remove drivers floor.
-914LTD reinforcements.
-rebuild flanges around drivers firewall and long.
-replace floor.
Until tomorrow!
Jared
Lets finish up this passenger side!
Weld on sill and finish lower jamb. What will that take 30 mins?
.... 6 hours later....
I ran into a fork in the road here.
As I ground away the paint to weld in the new body section,
I found about 3/16" of body filler. This goes all the way up to the door handle, following the shoddy jamb repair from earlier. What to do?
Since I do not plan on painting the car right now, (or dig this much deeper!)
I decided to place the remade body panel in, smooth what I can, and use filler for the rest. Not what I was expecting to see or do... Down the road, I would like to replace the entire passenger rear, sail, fender, etc. So I will clean it up and move on until that day.
Sorry to let down any folks, I know this is not doing it "right" and just hiding the inevitable.
Here's the filler.... Lets carry on.
Life goes on, lets weld it up.
Grind.
Sand a ton, smooth, sand, prime. Still need to sand.
2 hours later:
Full shot:
Little bit to sand left, just eager to make another post. I feel really great about these steps. Passenger side is effectively... DONE!
Serious progress for 5 weeks! I am excited to open the garage door tomorrow and see it with fresh light.
Whats next:
-Weld in battery tray/support and engine shelf.
-remove drivers floor.
-914LTD reinforcements.
-rebuild flanges around drivers firewall and long.
-replace floor.
Until tomorrow!
Jared
QUOTE(jaredmcginness @ Mar 28 2020, 08:08 PM)
Sorry to let down any folks, I know this is not doing it "right" and just hiding the inevitable.
To the contrary! You are doing what is needed to save your car the RIGHT way but still get it back on the road quickly. Hold your head high and know that you've proven you'll be ready with your skills when you decide to tackle the rest. I love watching this thread.

A champion! Loving this thread - better than a Motor Trend TV episode, with no commercials, too! 
QUOTE(bbrock @ Mar 29 2020, 10:52 AM)
QUOTE(jaredmcginness @ Mar 28 2020, 08:08 PM)
Sorry to let down any folks, I know this is not doing it "right" and just hiding the inevitable.
To the contrary! You are doing what is needed to save your car the RIGHT way but still get it back on the road quickly. Hold your head high and know that you've proven you'll be ready with your skills when you decide to tackle the rest. I love watching this thread.
love it!
QUOTE(bbrock @ Mar 29 2020, 10:52 AM)
To the contrary! You are doing what is needed to save your car the RIGHT way but still get it back on the road quickly. Hold your head high and know that you've proven you'll be ready with your skills when you decide to tackle the rest. I love watching this thread.
True words Brent! Maybe when I add a tough guy motor and GT flares, that would be a good time to tackle that spot.
QUOTE(StarBear @ Mar 29 2020, 11:47 AM)
A champion! Loving this thread - better than a Motor Trend TV episode, with no commercials, too!
Haha! I love that! I do have a few product placements, but I'll keep that ads to a minimum.
You guys are great!
----------
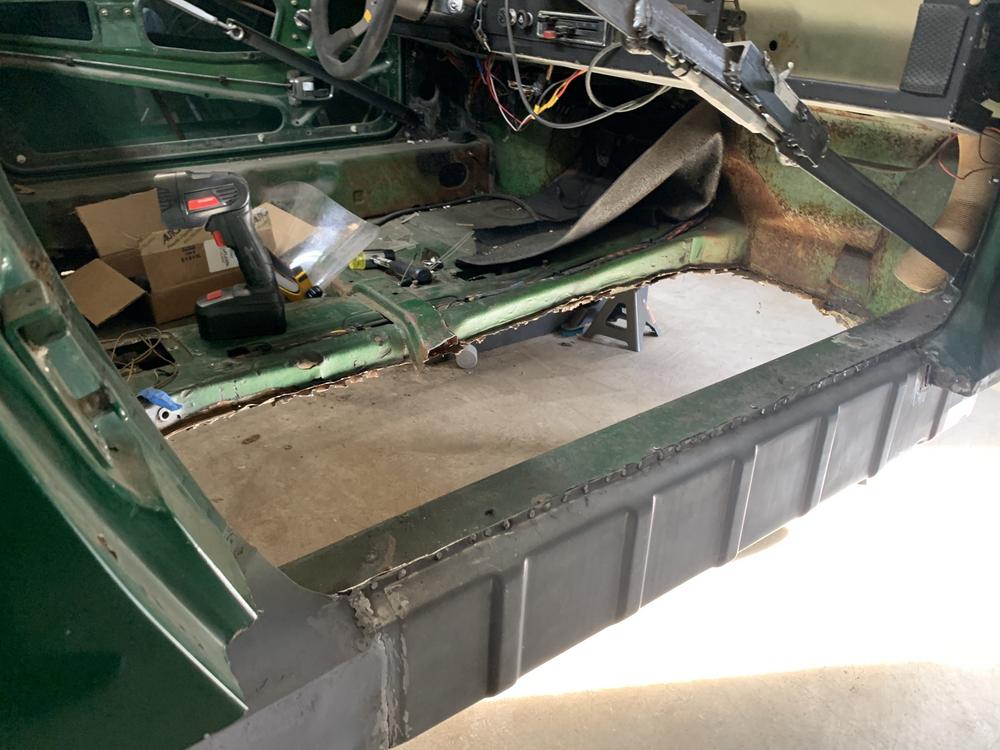
Not a ton of fun things accomplished today, but I got some hours in and knocked the floors out! Had to do the labor work, one day or the next... lets get it over with.
There are still some tabs left, where the rotabit didn't get through all the way. But I am tired of laying on my back.... next time, no excuse not to build a rotisserie.
So the floors were so crunchy, I said F it, cut the main square sections out, this way I can sit up (as much as I can) while I work on the spot weld tabs.
You could say I had my work........ cut out.... for me.... Get it...? Nevermind
Chop.
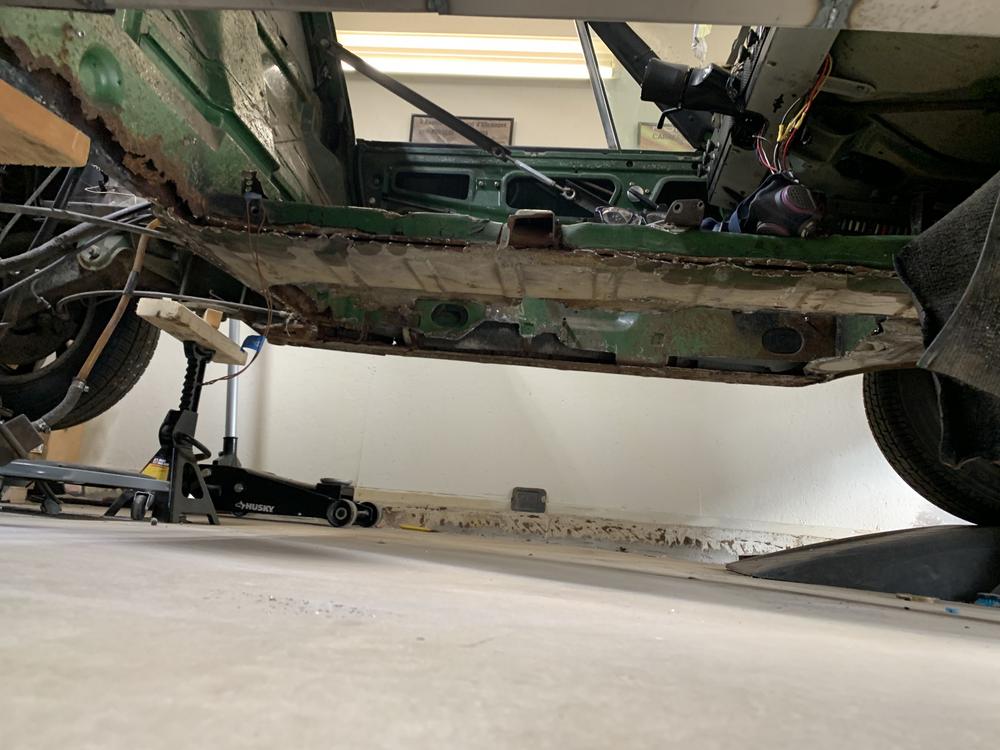
Still need to get the middle section out.
The area near the pedal cluster is in nice shape. So I left that in. I'll stitch in around there, to the new pan.
So the plan otherwise:
-Get that middle section fully out (Some spot welds still hanging on)
-Rebuild the drivers inner long (bottom radius)
-Replace fuel lines - should be here this week.
-Weld in floors.
-Also.. I'm going to need to rebuild that E-brake area, as well as the cable guide sheet metal... Another day, another post.
Cheeeeers,
Jared
You are a better (tougher) man than me, getting all that done without a rotisserie. I have certainly gotten worn out at times on my project, but the option to turn the car sideways and upside-down has eliminated most of the grief.
And I feel your pain from the bondo surprise. I had a couple of those, and a few choice words.
And I feel your pain from the bondo surprise. I had a couple of those, and a few choice words.
You're rocking and rolling! I think it took me like 2 weeks to get the floor pan off with all those spot welds...and I had it on a rotisserie!
Don't beat yourself up about doing it "right" as Brent says. When perfect becomes the enemy of good these projects can get stalled (ask me how I know), or worse, and it sounds like you actually want to be driving this year
Glad your pedal cluster area was in good shape. Below is a pic of mine. It was one of the ugliest "repairs" on my project car, and it took a long time to fab up something to go there. Not sure where you learned to fab and weld, but you've got a talent for it.
Sketchy!
Click to view attachment
and underneath
Click to view attachment
Keep going, Jared!
QUOTE(bkrantz @ Mar 29 2020, 10:18 PM)
You are a better (tougher) man than me, getting all that done without a rotisserie. I have certainly gotten worn out at times on my project, but the option to turn the car sideways and upside-down has eliminated most of the grief.
And I feel your pain from the bondo surprise. I had a couple of those, and a few choice words.
I'm sure most of these cars have them, after 50 years of shade tree repairs. I'll be willing to bet - even after having most of the car stripped down, there are still a few surprises.
QUOTE(BeatNavy @ Mar 30 2020, 06:07 AM)
You're rocking and rolling! I think it took me like 2 weeks to get the floor pan off with all those spot welds...and I had it on a rotisserie!
Don't beat yourself up about doing it "right" as Brent says. When perfect becomes the enemy of good these projects can get stalled (ask me how I know), or worse, and it sounds like you actually want to be driving this year
Glad your pedal cluster area was in good shape. Below is a pic of mine. It was one of the ugliest "repairs" on my project car, and it took a long time to fab up something to go there. Not sure where you learned to fab and weld, but you've got a talent for it.
Keep going, Jared!
I definitely just want to get the floors out and over with, so I am trying to bang it out as quick as I can.
I shouldn't be so hard on myself I suppose. I love that quote. One of my personal faves now is, "If the minimum isn't good enough, it wouldn't be called the minimum."
Yikes, I am a bit scared of doing that pedal cluster section, but I might bend up something at work to fill in the end of the support that I cut off.
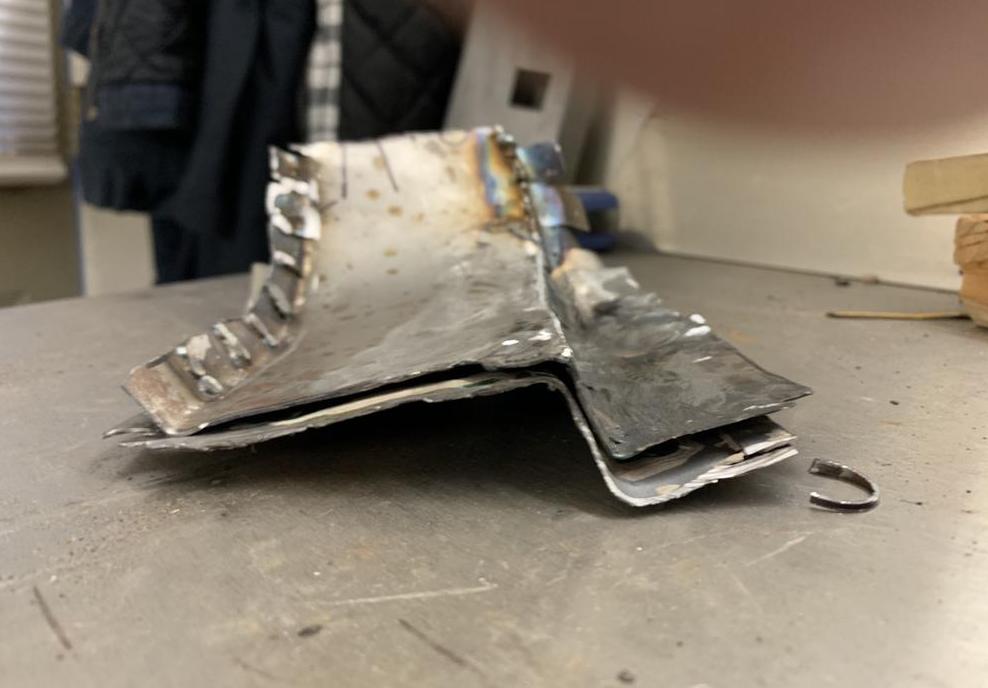
On that ticket, I learned how to mig weld in college, and I tig welded for my job (about 5 years ago) at a well known VW/Audi performance parts company. I haven't really welded since then so I am a little rusty. (and to be frank, not that concerned with pretty welds, because they are getting ground anyways.)
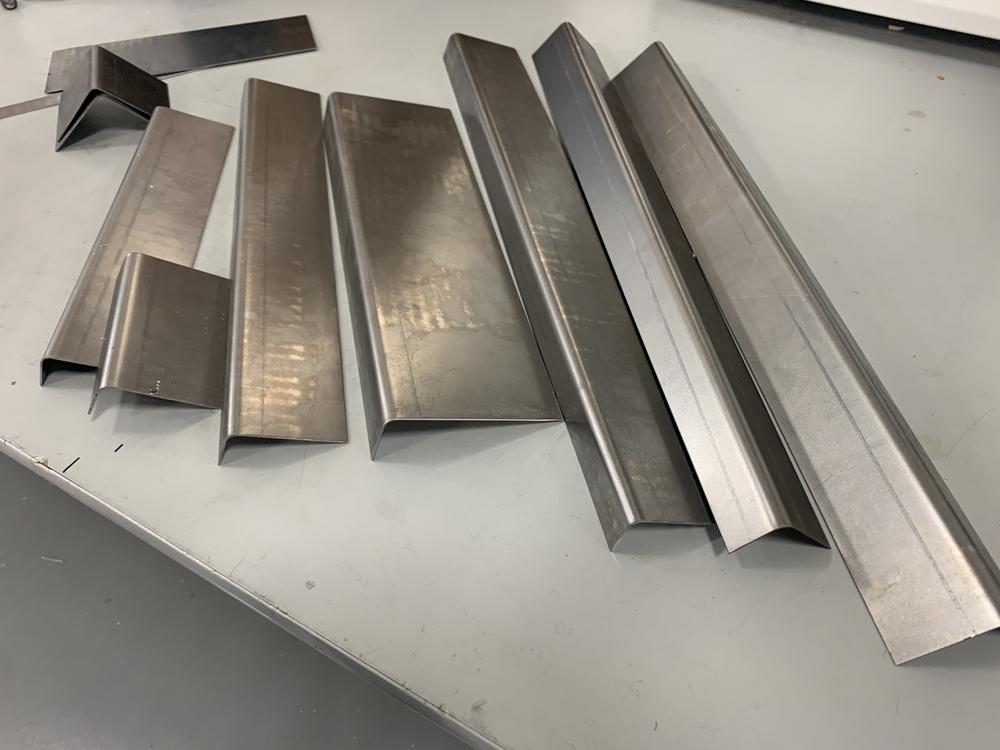
Now, I work at a precision prototype sheet metal shop, I use lasers, 4-7 ton brakes, etc. Here's an example of some test or scrap pieces I made at work.
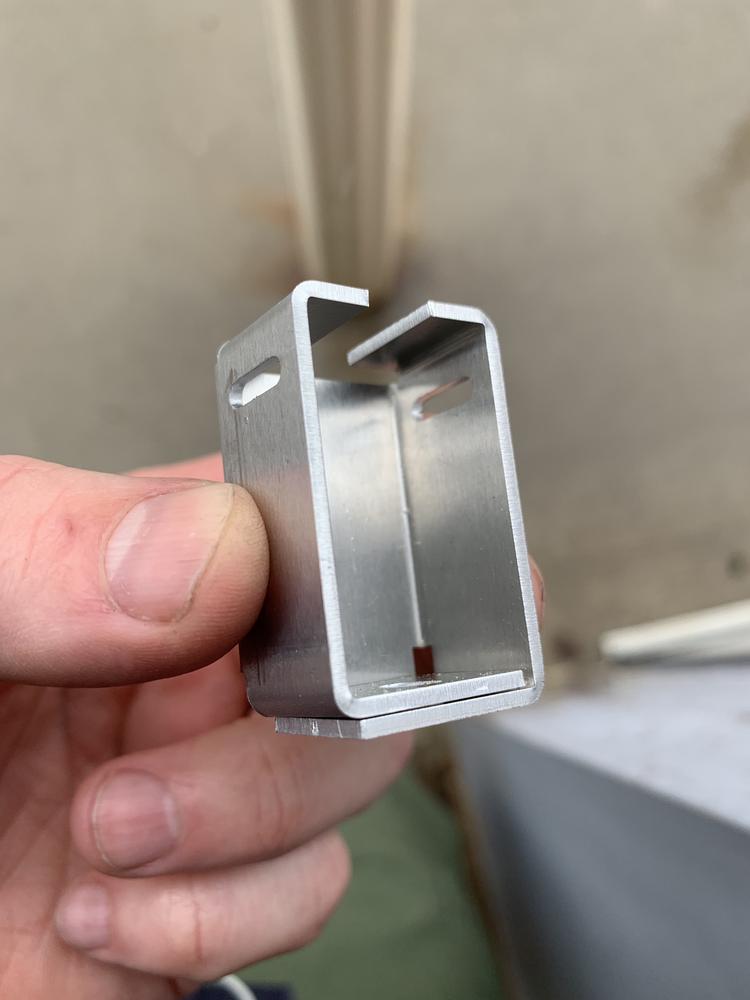

Its funny comparing the accuracy I need at work... to me just smashing sharpie lines with a mallet over a 2x4 at home. I call that the minimum.
Add me to those amazed at your ability to tackle the floor without a rotisserie. When you get that center section out, take a little time to check and reinforce the attachments for the clutch cable tube. It's just a minor little task when the tunnel is open, but a major PITA if it breaks after the tunnel is closed back up.
QUOTE(jaredmcginness @ Mar 30 2020, 08:39 AM)
One of my personal faves is, "If the minimum isn't good enough, it wouldn't be called the minimum."
One of my favorites too. My Army buddy used to say it all the time, and that's why it's in my signature below

QUOTE(jaredmcginness @ Mar 30 2020, 08:39 AM)
On that ticket, I learned how to mig weld in college, and I tig welded for my job (about 5 years ago) at a well known VW/Audi performance parts company. I haven't really welded since then so I am a little rusty. (and to be frank, not that concerned with pretty welds, because they are getting ground anyways.)
Now, I work at a precision prototype sheet metal shop, I use lasers, 4-7 ton brakes, etc. Here's an example of some test or scrap pieces I made at work.
Ok, that makes sense. You've got some learnin' in ya!

Took Monday night off to hang out and not do any work.
Small update last night:
Got the center floor out - oh how i hate laying on my back under this!
Got her out in one piece, rust, acorns and leaf collection in tact.
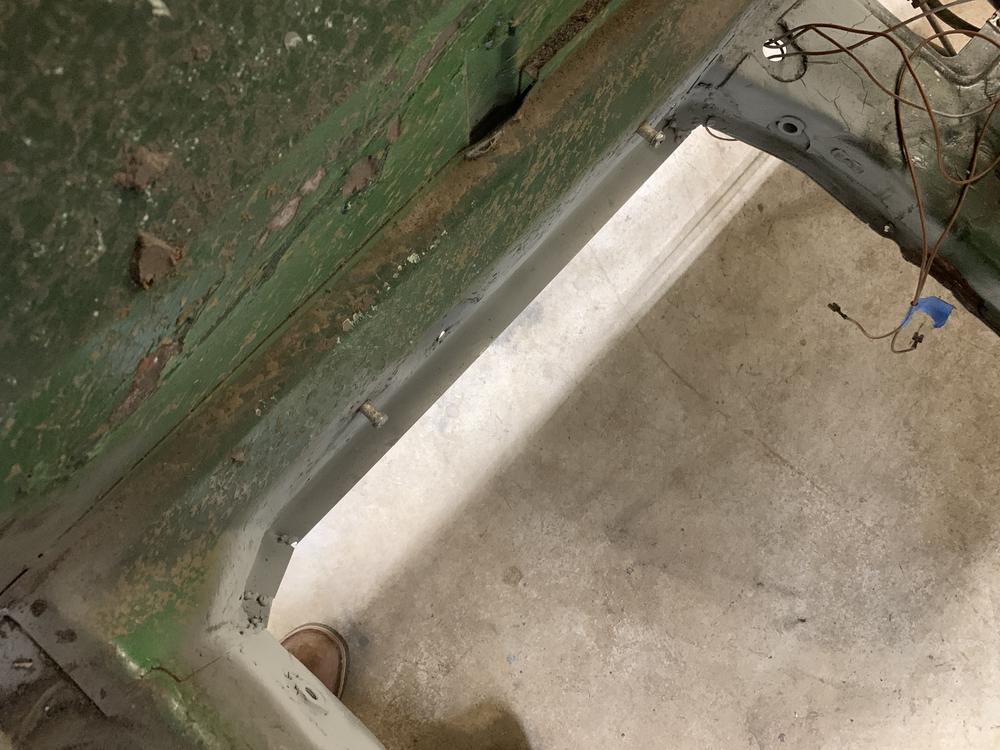
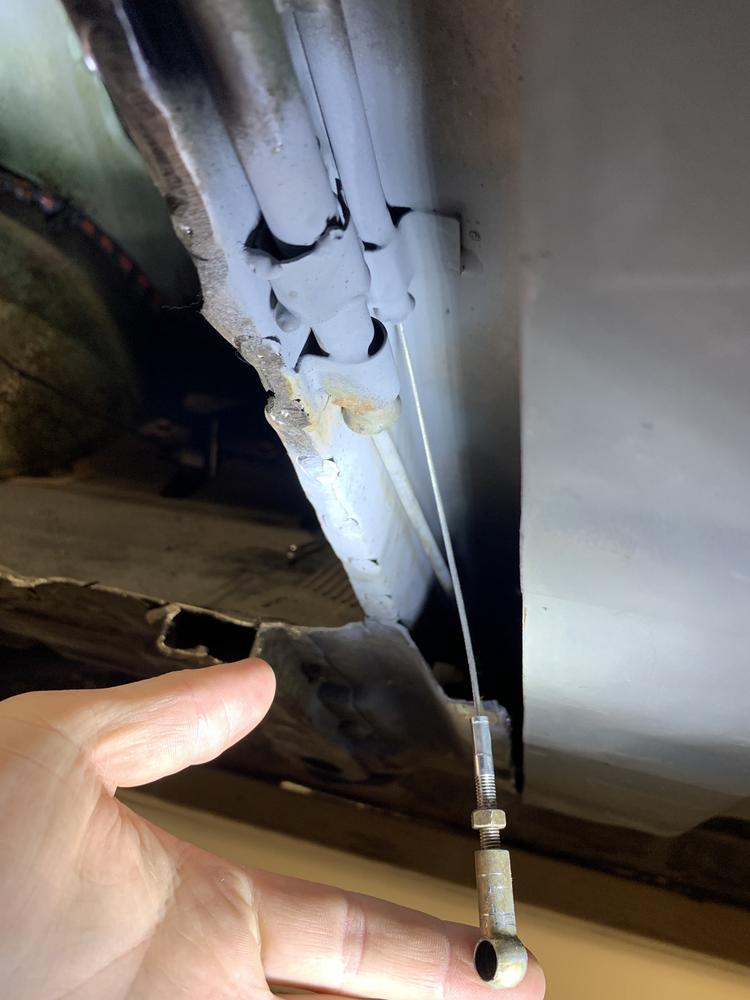
I believe this is the commonly broken, brazed area, looks to be in good shape, any confirmaiton?
Fuel lines are totally nasty... Must have been sitting for a long time with gas.
I am very glad I bought these from Pelican parts! Should be an easy install now.
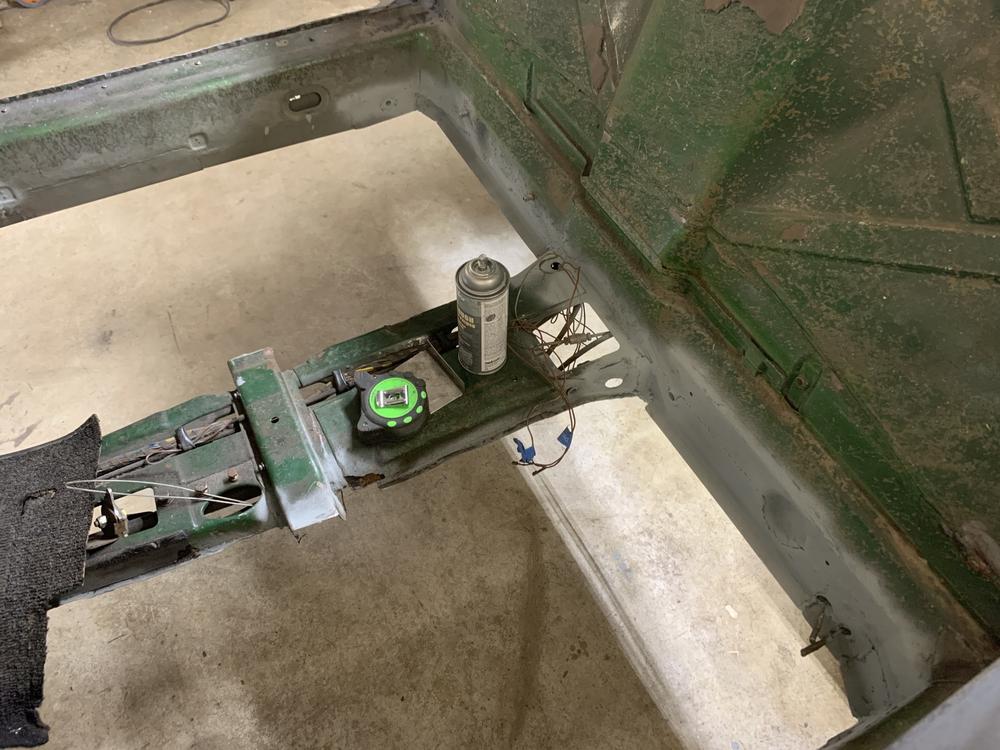
Lastly, I took a few measurements of the pieces I will need to rebuild the inner long radius and lower firewall.
I took a sheet of 18g to work, sheared and bent up some pieces to make my life juuuust a little bit easier at home.
So I'll rebuild this section, I might lap weld the firewall, maybe put a coating of POR15 between the two firewall sections, install the fuel lines,
line the floor up and start getting it attached.
Exciting stuff. Glad to have a creeper.
Small update last night:
Got the center floor out - oh how i hate laying on my back under this!
Got her out in one piece, rust, acorns and leaf collection in tact.
I believe this is the commonly broken, brazed area, looks to be in good shape, any confirmaiton?
Fuel lines are totally nasty... Must have been sitting for a long time with gas.
I am very glad I bought these from Pelican parts! Should be an easy install now.
Lastly, I took a few measurements of the pieces I will need to rebuild the inner long radius and lower firewall.
I took a sheet of 18g to work, sheared and bent up some pieces to make my life juuuust a little bit easier at home.
So I'll rebuild this section, I might lap weld the firewall, maybe put a coating of POR15 between the two firewall sections, install the fuel lines,
line the floor up and start getting it attached.
Exciting stuff. Glad to have a creeper.
Man, you're a handy guy to have around.
QUOTE(jaredmcginness @ Apr 1 2020, 10:29 AM)
I believe this is the commonly broken, brazed area, looks to be in good shape, any confirmaiton?
Yes, and it looks in surprisingly good shape.
I wish I had the machining tools and expertise to use them available!
QUOTE(jaredmcginness @ Apr 1 2020, 08:29 AM)
Got the center floor out - oh how i hate laying on my back under this!
Got her out in one piece, rust, acorns and leaf collection in tact.
Where's the required mouse nest?
QUOTE(bkrantz @ Apr 1 2020, 10:16 PM)
Where's the required mouse nest?
There were two under the gas tank! I had a nice afternoon with the vacuum and a bottle of bleach.

QUOTE(jaredmcginness @ Apr 1 2020, 07:29 AM)
I believe this is the commonly broken, brazed area, looks to be in good shape, any confirmaiton?
That's one of them. The other place they break is where they go through the firewall. I would reinforce them while you have it open regardless of their condition. Mine were perfectly attached too but after doing some cutting and patchwork on the front end of the tunnel, my front one had broken loose from the vibration. Made me realize how fragile those brazed joints are. I welded the front in and welded a little reinforcement loop at the rear firewall. Just a little extra security to hopefully not have to cut open my tunnel later for repair.
Hey guys,
Here is today's diary entry.
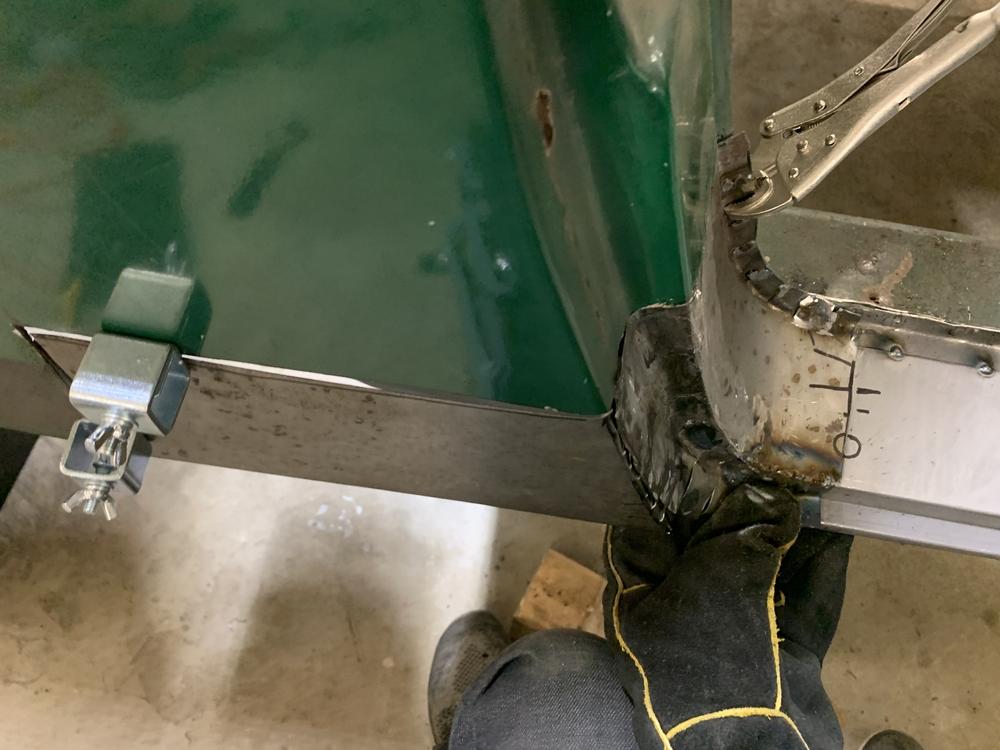
Spent the last two afternoons in the garage rebuilding the firewall flanges.
I lap welded the fire walls and butt welded the driver's long.
Here are some photos. Ran out of 1/2" sanding belts, so all of the corners of the inner firewall still need sanded. Ignore these for now.
Ugly, but honest.
Ahh. This long is a pain in my ass. This metal is so easy to burn through. I'm mostly done, still have a few spots to fill in. I should have extended these, top and bottom to make it a lap weld.
It will be covered with carpet anyways right? I hate to make excuses, but that's the fact of the matter. Cant beat myself up over stuff I am still learning/perfecting.
As recommended from my internet friends above, I made a little bracket and tacked the clutch tube in place. Hopefully this will help disperse the load, and neither of these will break. I brought the heat down a lot on this, does not seem like a good tube to blow a hole into!
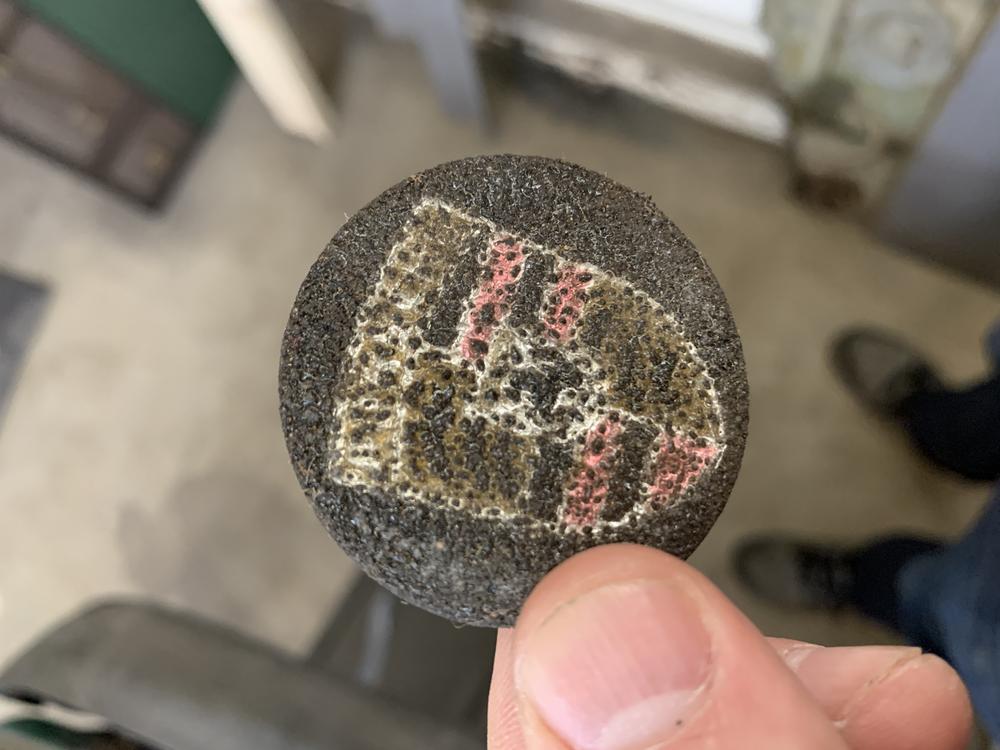
I found this stuck under the dash carpet. I assume this is the shift knob badge.
Also a metaphor for the condition of this vehicle.
A photo I grabbed. Cluttered, tired but a bit hopeful.
Certainly leaving the garage today frustrated. Welding on your back SUCKS. It is so easy to blow through your new metal, but you cant really tell you are.... because you neck is getting covered in sparks and glowing slugs.
If anyone reading this is on the fence... build the rotisserie!
All that being said - another good few hours out there and the floors should be ready to go in.
Thanks for reading!
Here is today's diary entry.
Spent the last two afternoons in the garage rebuilding the firewall flanges.
I lap welded the fire walls and butt welded the driver's long.
Here are some photos. Ran out of 1/2" sanding belts, so all of the corners of the inner firewall still need sanded. Ignore these for now.
Ugly, but honest.
Ahh. This long is a pain in my ass. This metal is so easy to burn through. I'm mostly done, still have a few spots to fill in. I should have extended these, top and bottom to make it a lap weld.
It will be covered with carpet anyways right? I hate to make excuses, but that's the fact of the matter. Cant beat myself up over stuff I am still learning/perfecting.
As recommended from my internet friends above, I made a little bracket and tacked the clutch tube in place. Hopefully this will help disperse the load, and neither of these will break. I brought the heat down a lot on this, does not seem like a good tube to blow a hole into!
I found this stuck under the dash carpet. I assume this is the shift knob badge.
Also a metaphor for the condition of this vehicle.
A photo I grabbed. Cluttered, tired but a bit hopeful.
Certainly leaving the garage today frustrated. Welding on your back SUCKS. It is so easy to blow through your new metal, but you cant really tell you are.... because you neck is getting covered in sparks and glowing slugs.
If anyone reading this is on the fence... build the rotisserie!
All that being said - another good few hours out there and the floors should be ready to go in.
Thanks for reading!
QUOTE(jaredmcginness @ Apr 4 2020, 06:35 PM)
Ugly, but honest.
Honest is better than pretty. Good thing you reinforced that clutch cable. And yes, welding on your back sucks. I once basically set my crotch on fire (I was wearing overalls) welding underneath the car to anchor the clutch tube at the firewall.QUOTE(jaredmcginness @ Apr 4 2020, 06:35 PM)
Thanks for reading!
Weekend Update:
Spent about 12 hours outside Friday to Sunday, finished up the passenger long. Frustrating few days. But good progress none the less.
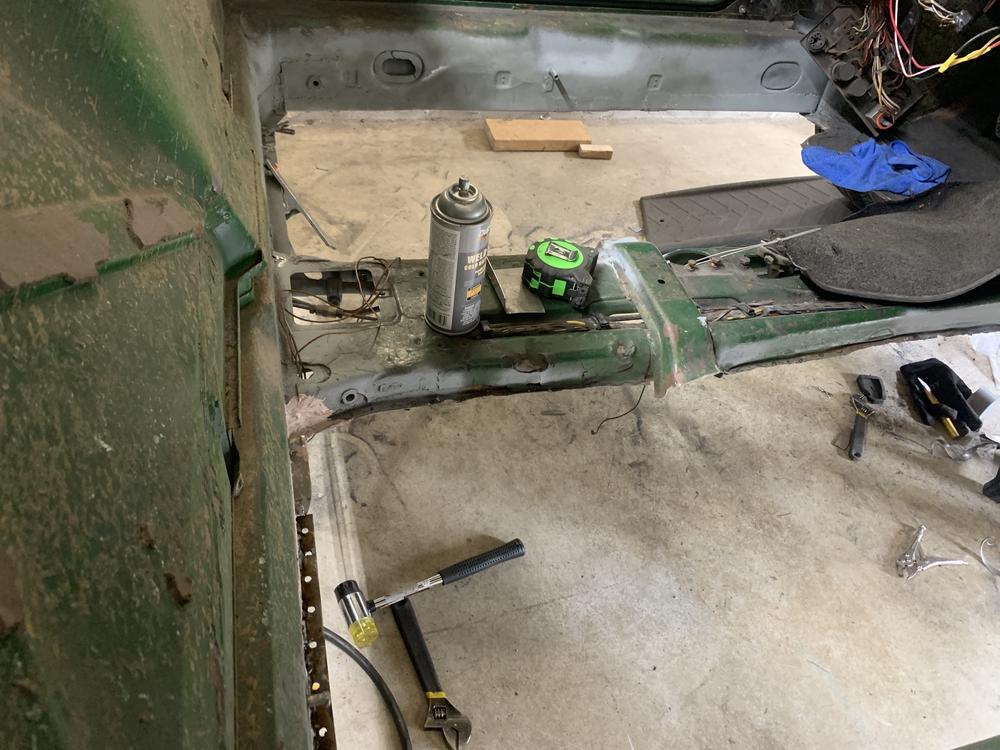
Test fitting my passenger floor... Couple issues. I realized the rear, inner firewall is not flat across the flange, it has a 7/8" step down to the floor spot welds. Had to cut and adjust that.
The woes of making your own parts, with nothing to compare it to (rusted away!) Should have fit the floor first!
Another issue I am working out is the connection of the floor with the horizontal spot welds near the front fender. There's not a lot of meat left, so I will need to make a new strip (on the inner fender)
Here's the fit. Definitely a nice sight, we've come a long way.
Patched the lower front, inner fender. This is only really welded along the top, in case I need to make adjustments to accommodate the floor flange.
Which you can kind of see in this photo:
Gotta keep going! Might take a night off so I don't get burned out.
As another member said, gotta keep fighting the good fight.
Spent about 12 hours outside Friday to Sunday, finished up the passenger long. Frustrating few days. But good progress none the less.
Test fitting my passenger floor... Couple issues. I realized the rear, inner firewall is not flat across the flange, it has a 7/8" step down to the floor spot welds. Had to cut and adjust that.
The woes of making your own parts, with nothing to compare it to (rusted away!) Should have fit the floor first!
Another issue I am working out is the connection of the floor with the horizontal spot welds near the front fender. There's not a lot of meat left, so I will need to make a new strip (on the inner fender)
Here's the fit. Definitely a nice sight, we've come a long way.
Patched the lower front, inner fender. This is only really welded along the top, in case I need to make adjustments to accommodate the floor flange.
Which you can kind of see in this photo:
Gotta keep going! Might take a night off so I don't get burned out.
As another member said, gotta keep fighting the good fight.
Congrats on that milestone. I had my door on for a few days last week and it felt like progress.
More prep and a few questions!
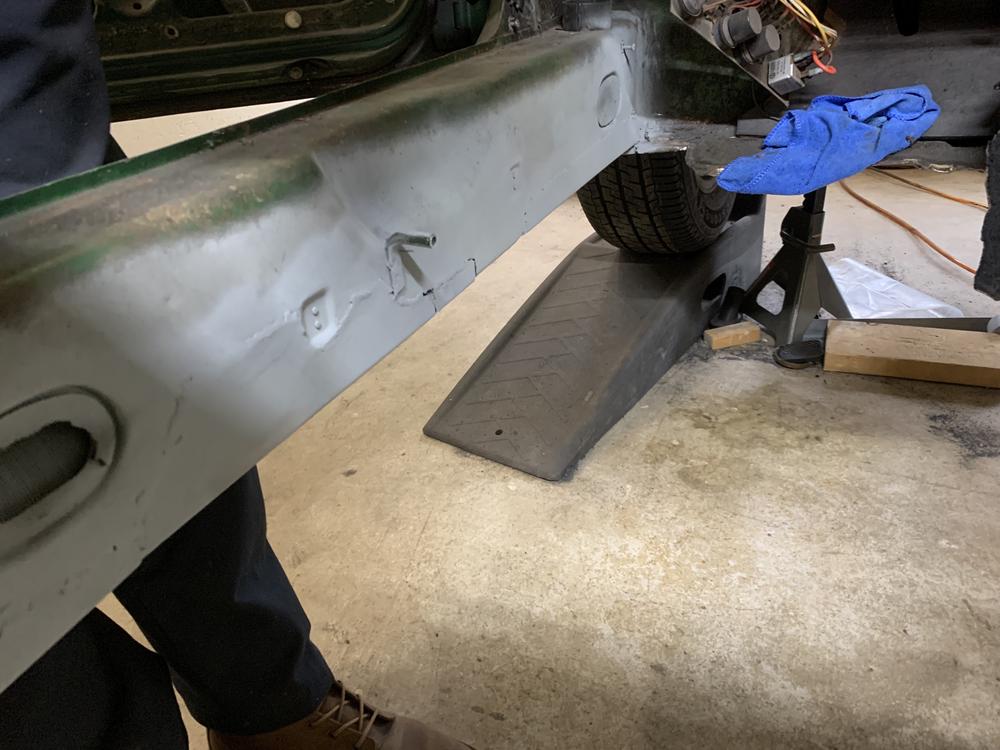
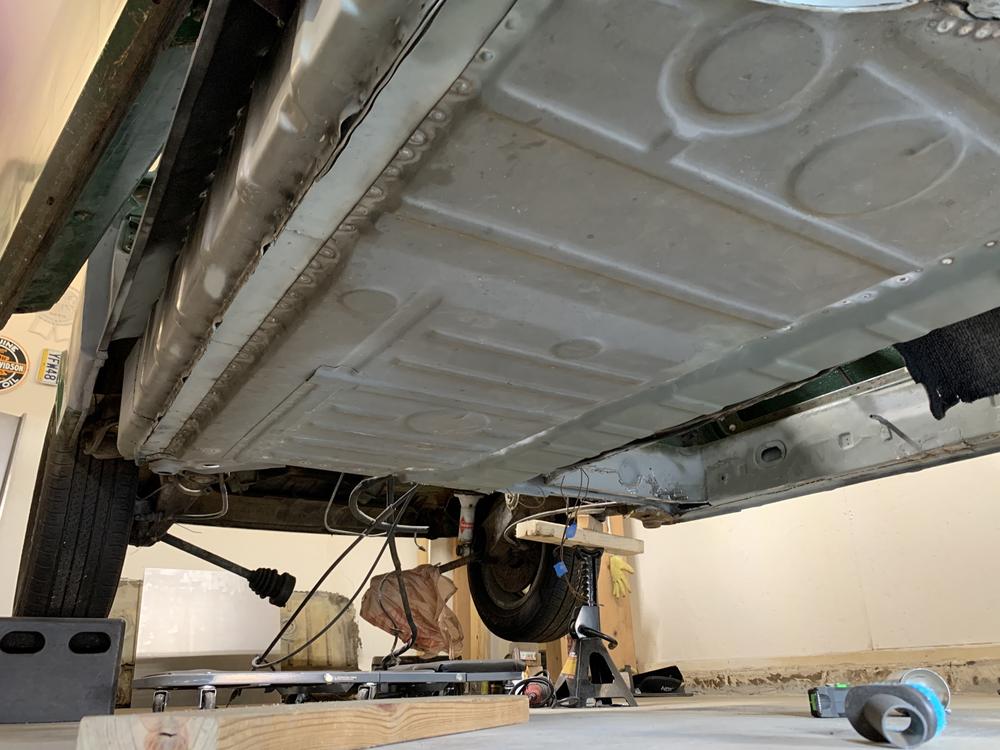
Installing my stainless fuel lines. A breeze with the floor off! I feel bad for anyone that's done it otherwise.
Questions:
-Is this an acceptable lay out? Would you raise them over the wiring harness?
-2 cables ties to keep them tight together, I dont want them flopping around, other wise fine to just chill there?
-the larger 9mm one stays on the passenger side, and comes out the lower passenger side slot in the engine bay?
Looks right for my gas tank outlets.

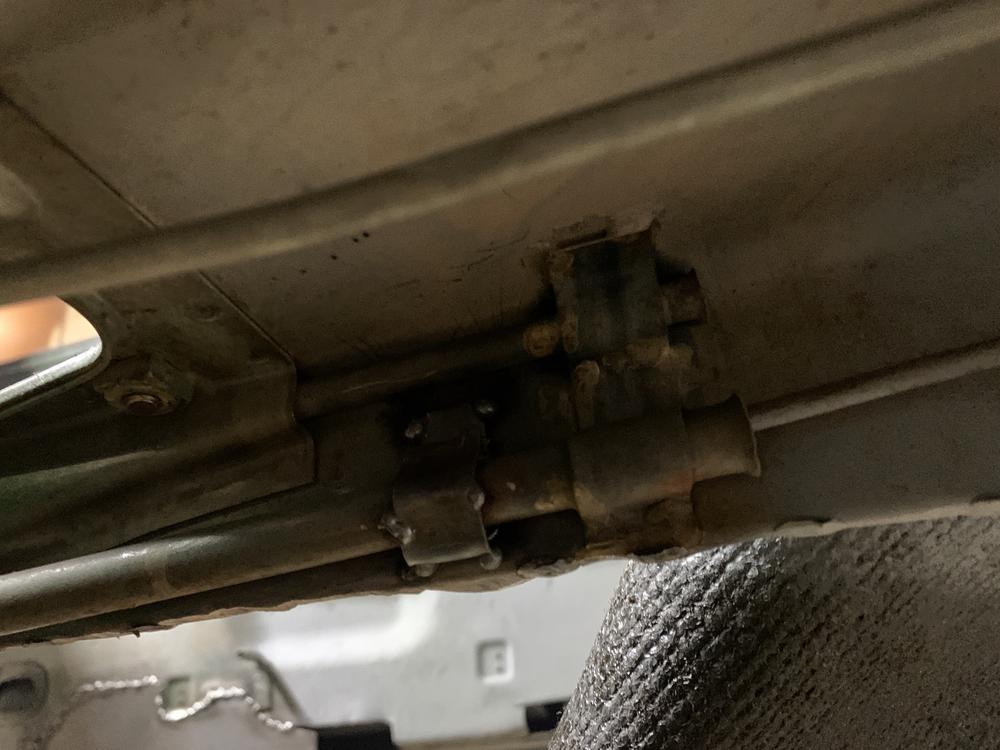
Another question:
-What is this empty mount on top of my control arm?
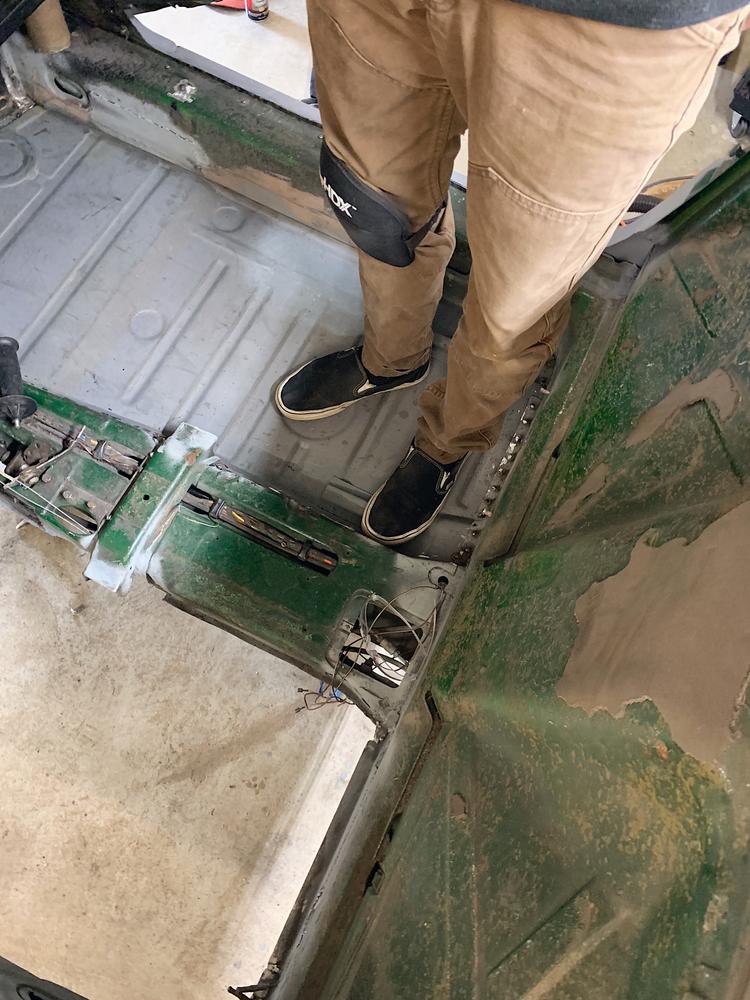
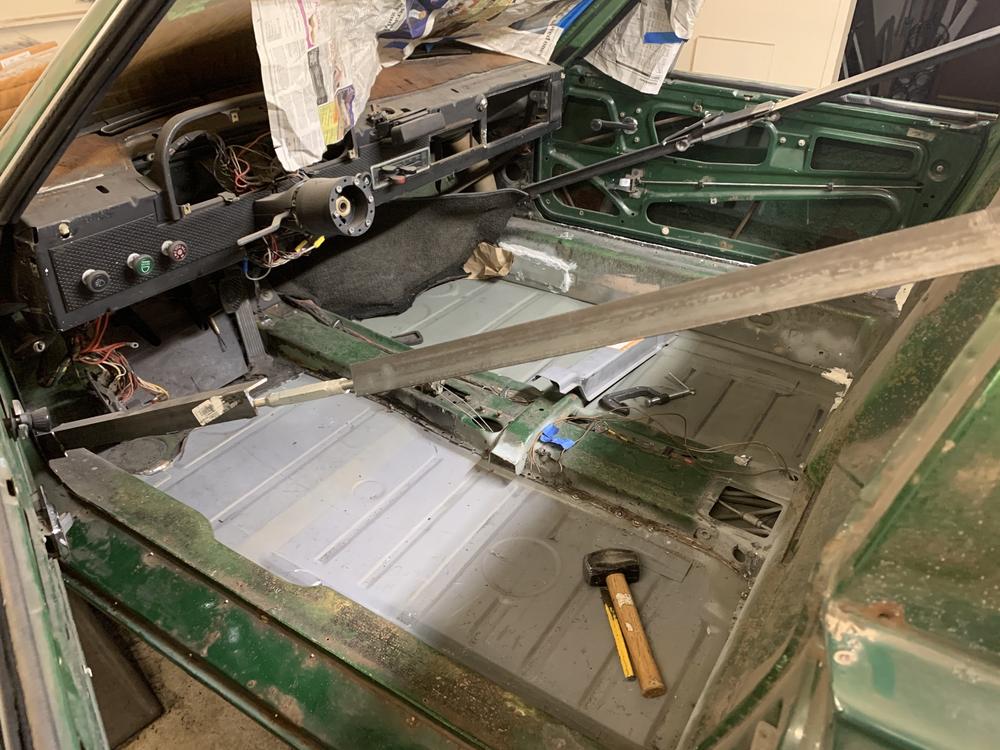
Where I've spent most of my time the last 6 days, on my back!
Long looks nice, hit it with some weld thru right after this.
Drilling the spot weld holes. 70 something holes in the pan and 40
in the fire wall/ tunnel. I hit some zinc primer on the inside of the floor tunnel.
Didn't want to leave it raw.
Basically the final fit, I'll start spot welding tonight.
My checklist has not gotten much bigger these days.
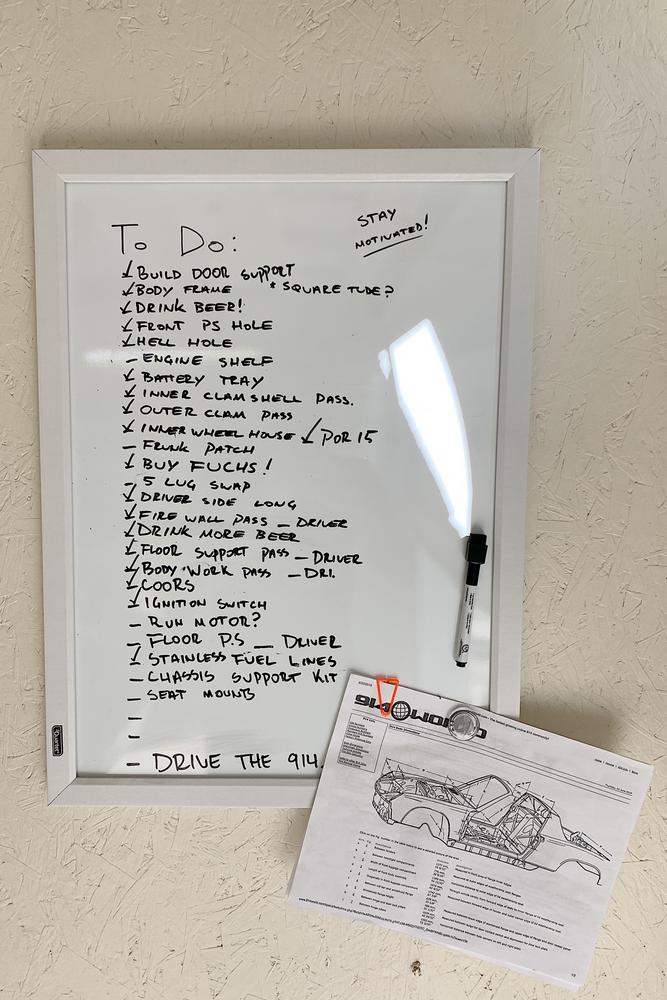
I have a pretty good idea of what needs accomplished - though,
I have left a few blank spots for any surprises....might, need more than 2.

As always, many thanks for reading and the support!
Installing my stainless fuel lines. A breeze with the floor off! I feel bad for anyone that's done it otherwise.
Questions:
-Is this an acceptable lay out? Would you raise them over the wiring harness?
-2 cables ties to keep them tight together, I dont want them flopping around, other wise fine to just chill there?
-the larger 9mm one stays on the passenger side, and comes out the lower passenger side slot in the engine bay?
Looks right for my gas tank outlets.
Another question:
-What is this empty mount on top of my control arm?
Where I've spent most of my time the last 6 days, on my back!
Long looks nice, hit it with some weld thru right after this.
Drilling the spot weld holes. 70 something holes in the pan and 40
in the fire wall/ tunnel. I hit some zinc primer on the inside of the floor tunnel.
Didn't want to leave it raw.
Basically the final fit, I'll start spot welding tonight.
My checklist has not gotten much bigger these days.
I have a pretty good idea of what needs accomplished - though,
I have left a few blank spots for any surprises....might, need more than 2.
As always, many thanks for reading and the support!
Nice Jared. I like how you have the body dimension sheet taped up to your whiteboard. Good reference and reminder!
SS fuel lines: I think your layout is fine. Probably better under the wiring harness, as it's more likely you'll need access to the wiring harness than the fuel lines after you seal everything back up. Someone with better memory can comment on orientation of the lines in terms of which side.
The cable tie is nice touch, but mine have never flopped around without it. Actually installing them, even with floor and engine in, wasn't nearly as hard as it might seem, although having a helper/spotter (my son, in my case) is definitely helpful. Not in my "Top 25 PITA" tasks on my teener.
That empty bracket on your control arm is a mount for the optional sway bar. I can't recall exactly, but I don't think early cars came with the front sway bar. It's a great addition for handling, though.
QUOTE(BeatNavy @ Apr 9 2020, 09:07 AM)
Not in my "Top 25 PITA" tasks on my teener.
That empty bracket on your control arm is a mount for the optional sway bar.
I hate to know what makes the top 25 then! But.. ehh, I think I have a few ideas.
Great thanks, I didn't think 1.7's came with mounts for a sway bar.
Hey guys,
Finished up the passenger floor today.
Added the Jack triangle, fits with a couple swings of my Universal Adjustment Tool.

She's sturdy. (I wont be jumping though. No cross bar yet)
Working on this front section patch. Maybe a bit more smoothing... and I need to finagle the triangle that goes up at the end.

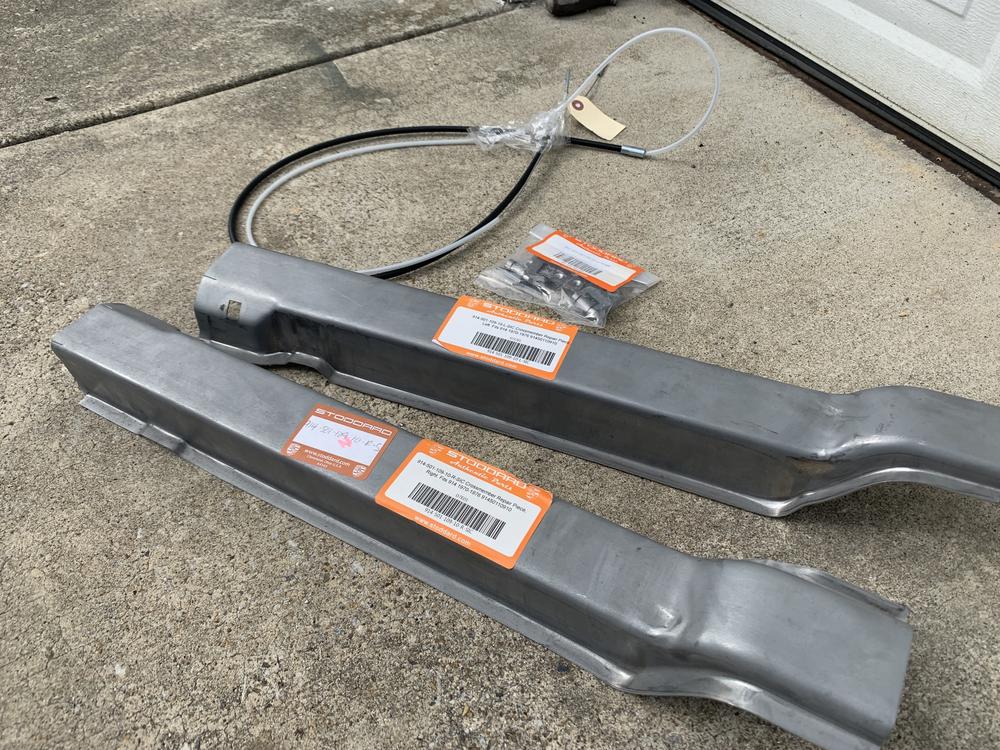
I ordered the crossmember and seat mounts from Stoddard.
So next up on the list for this area.
-Finish up driver side floor flanges and clean everything up.
-Install D.S. floor.
-Install handbrake and accessories.
-Crossmember and Seat mounts.
-Seam seal everything.
-Paint the floor with something.
-Undercoat the bottom.
-Dyna Mat or similar.
-Install interior!
Finished up the passenger floor today.
Added the Jack triangle, fits with a couple swings of my Universal Adjustment Tool.
She's sturdy. (I wont be jumping though. No cross bar yet)
Working on this front section patch. Maybe a bit more smoothing... and I need to finagle the triangle that goes up at the end.
I ordered the crossmember and seat mounts from Stoddard.
So next up on the list for this area.
-Finish up driver side floor flanges and clean everything up.
-Install D.S. floor.
-Install handbrake and accessories.
-Crossmember and Seat mounts.
-Seam seal everything.
-Paint the floor with something.
-Undercoat the bottom.
-Dyna Mat or similar.
-Install interior!
Us old guys call what you're doing "kicking ass and taking names".
Great progress. At this rate, you'll have it back on the road in no time.

Great progress. At this rate, you'll have it back on the road in no time.
Chris- Are you sure you were never a LEO? That was a very common expression back in the day.
Hey Ladies,
Something to look at on your lunch breaks (or just blatantly at work - if you are like me)
Got some goodies in from Stoddard! Last of what I need for the floor.
Cross member halves
4x seat weld brackets
Throttle Cable
And compared to what I had in there... Yikes.
So the throttle cable was left connected when I pulled the motor. Amateur move Jared... So, I needed a new one.
This is 10,000 times easier with the floor still not completely sealed. Easy access.
Arrived at the right time too, finished up the prep for the floor mounting points.
Drilled some spot welds for the drivers side.
Started tacking this bad mother in.
Ran out of argon after about 15 of 120 or so spots. Light at the end of the tunnel.
Until next time,
Jared
QUOTE(jaredmcginness @ Apr 14 2020, 06:17 PM)
And compared to what I had in there... Yikes.
Okay, now I see why you cut those cross member out. That was puzzling me but I figured all would be revealed.
QUOTE
Ran out of argon after about 15 of 120 or so spots. Light at the end of the tunnel.
Until next time,
Jared
Until next time,
Jared

QUOTE(bbrock @ Apr 14 2020, 10:51 PM)
Okay, now I see why you cut those cross member out. That was puzzling me but I figured all would be revealed.
I didn't even have to cut it! Bent it straight up, and it pulled out clean!
Go get the argon tank filled so we can continue to watch the progress. 
This is coming along very nicely. Great work!
This is coming along very nicely. Great work!
Got a 1973 1.7 L by the side of the house just waiting to be worked on. I find your build inspiring and I wish I will be half as good as you are when I get to it. My 914 is typical: shot rear floors and bottom firewall, rust coming out from under the paint on doors, hood and rockers and to add an additionnal degree of difficulty, it was lightly rear ended on the drivers side. And this is what I see... And to think that this is just the tip of the iceberg as I've learned from reading many build threads that there is way more under than what you can see. Oh, and I forgot to mention that the engine has a MAJOR exhaust leak and that I found out that there were many exhaust manifold studs either missing or just plain holding by some miracle ( I m sure they are pulled from the head, but let me dream a little, please!!!) I know, you must be asking yourself why I even bothered; well, this is what I call a bucket list affair and no one but myself will stop me from getting it back on the road. I love bringing stuff back from the depths, it is so rewarding. I just hope I will have the "stamina" to get it finished.
Anyways, very good work on your 914.
Anyways, very good work on your 914.
QUOTE(Baker17 @ Apr 15 2020, 02:15 PM)
I know, you must be asking yourself why I even bothered; well, this is what I call a bucket list affair and no one but myself will stop me from getting it back on the road. I love bringing stuff back from the depths, it is so rewarding. I just hope I will have the "stamina" to get it finished.
Anyways, very good work on your 914.
DO IT! Don't let the naysayers talk you out of it. If you have the desire, I've found restoring the old rust bucket the most rewarding of MANY large projects I've tackled. Oh, and it is oh so sweet to see the jaws drop on those people who mocked and ridiculed the old basket case when they first see the swan that emerges.
QUOTE(Baker17 @ Apr 15 2020, 05:15 PM)
Got a 1973 1.7 L by the side of the house just waiting to be worked on. I find your build inspiring and I wish I will be half as good as you are when I get to it. My 914 is typical: shot rear floors and bottom firewall, rust coming out from under
And to think that this is just the tip of the iceberg as I've learned from reading many build threads that there is way more under than what you can see.
I know, you must be asking yourself why I even bothered; well, this is what I call a bucket list affair and no one but myself will stop me from getting it back on the road.
I just hope I will have the "stamina" to get it finished.
Anyways, very good work on your 914.
I think a lot of us have been in this boat! These cars all seem the same. My car sat around for 7 months, while I stared at it every day. My main motivation early on was not wanting to be the guy that says "i'll get to it".
Honestly, @baker17 the last 6 or 7 weeks have flown by. Its been a pretty straight forward project, cut the brown out, replace it with shiny.

Metal is easy. If you make a mistake you can always cut it out, drink a beer and start over. We'd love to see photos of your car. We can give you plenty of motivation
I appreciate the comment, truth is: I look up to so many other guy's threads, here on the World (and reference them when I come across a new task) I just try to emulate them.
Nothing to it, but to do it! Right?!
95% finished the floor up.
All the spot welds are done, just need to butt weld the front seam, prime, seam seal and under coat. This weekend.
Never thought I'd have a 914 with floors.

ALMOST done laying on my damn back!
Reused the drivers Jack triangle. Its rugged, but sturdy, did not get a pic yet, but you can see I have it welded up in this photo.
Holds up my 160lb butt - before the support is welded up... So I would say we are good.
A far cry from this:
Next on the list:
-Reattach hand brake, and build an E-brake cable guide.
-Butt weld floor near pedal
-Weld in seat mounts
-Seal floor
Feeling pretty good.
Edit: Dang 50 posts! Lost my "914 Newbie" status
All the spot welds are done, just need to butt weld the front seam, prime, seam seal and under coat. This weekend.
Never thought I'd have a 914 with floors.
ALMOST done laying on my damn back!
Reused the drivers Jack triangle. Its rugged, but sturdy, did not get a pic yet, but you can see I have it welded up in this photo.
Holds up my 160lb butt - before the support is welded up... So I would say we are good.
A far cry from this:
Next on the list:
-Reattach hand brake, and build an E-brake cable guide.
-Butt weld floor near pedal
-Weld in seat mounts
-Seal floor
Feeling pretty good.
Edit: Dang 50 posts! Lost my "914 Newbie" status
Man, all that new steel looks GOOD!
Keep rocking,newbie, Jared!
Keep rocking,
QUOTE(jaredmcginness @ Apr 17 2020, 08:01 AM)
95% finished the floor up.
All the spot welds are done, just need to butt weld the front seam, prime, seam seal and under coat. This weekend.
Never thought I'd have a 914 with floors.
ALMOST done laying on my damn back!
Reused the drivers Jack triangle. Its rugged, but sturdy, did not get a pic yet, but you can see I have it welded up in this photo.
Holds up my 160lb butt - before the support is welded up... So I would say we are good.
A far cry from this:
Next on the list:
-Reattach hand brake, and build an E-brake cable guide.
-Butt weld floor near pedal
-Weld in seat mounts
-Seal floor
Feeling pretty good.
Edit: Dang 50 posts! Lost my "914 Newbie" status
looks good on the floor way to go!! BUT— looking at those cross braces i think you need to flip them around, and switch them side to side , the drivers side one will have the E-Brake switch hole and it looks like you have them swapped, if you are standing on driver side , then i see the drivers side support is currently mocked up on wrong side.... hope you have not tacked those down like that yet!
QUOTE(DRPHIL914 @ Apr 17 2020, 06:32 AM)
looks good on the floor way to go!! BUT— looking at those cross braces i think you need to flip them around, and switch them side to side , the drivers side one will have the E-Brake switch hole and it looks like you have them swapped, if you are standing on driver side , then i see the drivers side support is currently mocked up on wrong side.... hope you have not tacked those down like that yet!
Good catch!!!
And great work there "member"
QUOTE(DRPHIL914 @ Apr 17 2020, 09:32 AM)
looks good on the floor way to go!! BUT— looking at those cross braces i think you need to flip them around, and switch them side to side , the drivers side one will have the E-Brake switch hole and it looks like you have them swapped, if you are standing on driver side , then i see the drivers side support is currently mocked up on wrong side.... hope you have not tacked those down like that yet!
Awesome catch, thanks for the PM and response. I will adjust. Just tossed in for the photo! Not tacked in yet.... I might have missed it, due to no reference. (it was all rusted away!)
Thanks all! More updates to come this weekend.
This is a "lo-fi" version of our main content. To view the full version with more information, formatting and images, please click here.