So - thought this would be easy - as a relative newbie would - but
1. Watched all the good videos, ordered the kit from 914rubber
2.thought I could remove the wedge bolt easier than the ball joint collar below - no amount of praying, swearing, pb blaster, and “tapping” worked so tried heat.- ended up cooking the ball joint.
3. Ordered a new ball joint and bolt, but had to remove the strut completely to bring to a machine shop to remove the old wedge bolt- no charge!!! Who does that anymore?
4. Managed to snap a brake line while removing the caliper so ordered new. And since I could not separate the tie rod end bought the appropriate tool which worked well.
5.Needed a 24inch (yes 24inch) pipe wrench after 3 days of pb blaster to remove the collar and free the old ball joint.
6.Used Ian karrs excellent video procedure to remove and install new bushings in the carrier - as luck would have it for the front install my threaded rod stripped halfway thru the install leaving my rapidly cooling bushing stuck only half on…
7.Fortunately by holding the a arm and stuck bushing/carrier upright and holding it in boiling water for ten minutes to reheat itI was able to re-do it successfully. Opposite side of car went much smoother.
8. Result? Much improved suspension, somewhat of a PITA but learned a lot, had fun.
Full Version: Rubber bushing install
Sounds perfectly normal for "penalties in the learning curve". On a brighter note: Now that you've done this you can call yourself an expert like the rest of us! 
Right on. Mission accomplished.

On any car, I always plan to replace ball joints when doing any suspension work that requires removal of the A-arm. They never survive removal. Heat is always required.
Congrats! I call that "tuition"  . Each time you tackle something, your knowledge base and confidence grows. Yes, it's sometimes a PITA, but the satisfaction of getting it done is worth it. Plus, these days it's so hard to find anyone to work on a car, even with all the hiccups you'll probably be on the road sooner.
Quick tip - for heat, you definitely want MAPP or hotter. These old cars laugh at the sight of a plain ol propane torch.
. Each time you tackle something, your knowledge base and confidence grows. Yes, it's sometimes a PITA, but the satisfaction of getting it done is worth it. Plus, these days it's so hard to find anyone to work on a car, even with all the hiccups you'll probably be on the road sooner.Quick tip - for heat, you definitely want MAPP or hotter. These old cars laugh at the sight of a plain ol propane torch.
Yes, this is not an easy journey. I just did the tie rod ends and ball joints. I'll go back and visit the bushings on this car later as they seemed ok for now. Figured I'd space my battles out a bit. I'll tell you the ball joints were a real pain too. I'm going to start stocking the tool for these as there is no way you will ever get the nut off without it.
Congratulations, you can now enjoy a much improved ride. I know that mine has improved. SIGNIFICANTLY. There was a little wobble at about 55. I can see why now.
Also learned another lesson. Somehow we got a brand U part for the ball joints. Didn't know this at 1st, but went to install, got it all the way in and was putting the washer on and this literally fell off in my hand.
So to all of those that are doing this. Use the LEMFÖRDER ones. Now the only ones we sell. And if any of you have had this issue please return them to me. Sometimes it's not clear who makes what when they are parts we don't make.
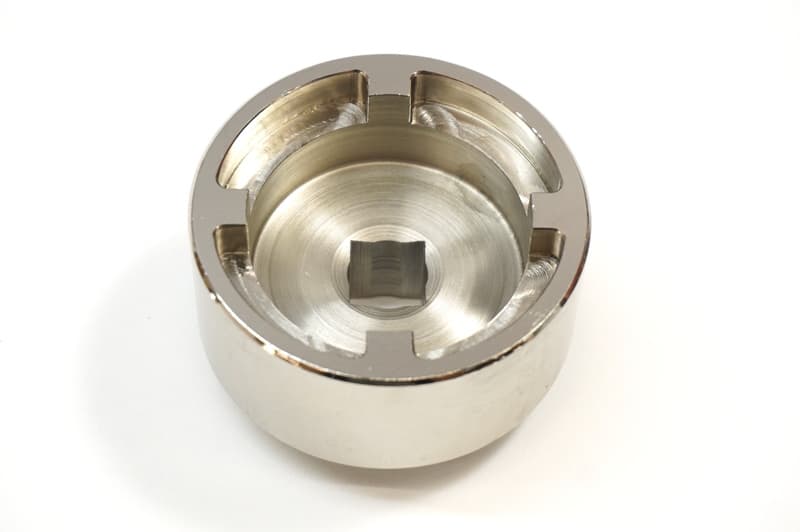
Item #5. Right tools makes it a 30 second job.
Click to view attachment
The problem with the pipe wrench approach is that a pipe wrench compresses & binds inward on the threads the harder you pull the wrench. This effectively makes it harder to turn the castle ring.
The right tool applies rotational torque to the non-threaded portion of the ring - loosening it witout applying compressive forces to the threads.
Click to view attachment
Click to view attachment
The problem with the pipe wrench approach is that a pipe wrench compresses & binds inward on the threads the harder you pull the wrench. This effectively makes it harder to turn the castle ring.
The right tool applies rotational torque to the non-threaded portion of the ring - loosening it witout applying compressive forces to the threads.
Click to view attachment
A major tip I learned from old timer (me now, lol) was to install the ball joint on to the strut FIRST then install pin or bolt. By doing that you can rotate the joint to ANY position you need to put tang into control arm. Line the joint up and compress arm. Makes work easy for me. I recommend the factory tool for the job and a 1/2 in impact.
QUOTE(914Sixer @ Sep 30 2021, 11:43 AM) 
A major tip I learned from old timer (me now, lol) was to install the ball joint on to the strut FIRST then install pin or bolt. By doing that you can rotate the joint to ANY position you need to put tang into control arm. Line the joint up and compress arm. Makes work easy for me. I recommend the factory tool for the job and a 1/2 in impact.
Would that be called work smarter, not harder?
QUOTE(Superhawk996 @ Sep 30 2021, 09:09 AM)
Item #5. Right tools makes it a 30 second job.
Superhawk996,
What kind of socket is that and where can it be purchased?
I will admit that when I rebuilt the front end on my car I used a pipe wrench for the ball joint castle ring. It came off pretty easily.
QUOTE(maf914 @ Sep 30 2021, 05:42 PM)
What kind of socket is that and where can it be purchased?
Baum P280b
There are cheaper alternatives from some guy on Samba. Maybe someone can dig that one up.
This guy
http://www.914world.com/bbs2/index.php?sho...13968&st=20
We are bringing these in and will be stocking will be less than $30.
There are a few different variations we tried a cheap on that failed the one that worked wasn't much more so I actually bought both with the idea of testing. Good thing we did.
Will have this next week.
Mark
There are a few different variations we tried a cheap on that failed the one that worked wasn't much more so I actually bought both with the idea of testing. Good thing we did.
Will have this next week.
Mark
It looks like Baum Tools updated their P280B tool to impact steel. I ordered one from my local Matco tool supplier Baum brand. I have the machined chrome version. I am gathering parts to do my tie rods thanks to 914Rubber for supplying the Lemforder tie rods etc. I bet my control arm bushings are due but one step at a time haha.
Don't forget these bad boys. we have the rebuild kit if you want to do them too.
https://914rubber.com/rebuilt-eye-bolt-set-1
Mine fell apart when I changed out the tie rod ends
https://914rubber.com/rebuilt-eye-bolt-set-1
Mine fell apart when I changed out the tie rod ends
This is a "lo-fi" version of our main content. To view the full version with more information, formatting and images, please click here.