Hi All - Mounting my hood today, and something seems off with the Camp914 hood-shocks. Feels like it takes ALOT of force to push down, which would crease the hood. When I tried to adjust and place the shocks on the bolts closest to the driver, geometry was totally off, and wouldn’t let the hood come all the way up.
I feel like I’m making a stupid-mistake, and I can’t figure out what it is. Any and all input appreciated!
Click to view attachment
Full Version: Camp914 Hood Shocks
I think the shock goes on the rear bolt of the hood.
QUOTE(Spoke @ Oct 3 2021, 05:47 PM) 
I think the shock goes on the rear bolt of the hood.
Yep, tried that as well, but then it doesn’t let the hood come all the way ‘up’.
I have their rear trunk shocks and they're a bugger to close. Once up they hold high and mighty. Didn't make any difference which side is up. all the same. I'm really careful closing the lid slow and with both hands. Since I don't open the lid often, I've lived with it. Always thinking I'd take one to the FLAPs and see if there's a weaker shock but it's always a get around to it and never do.
I have them on the rear and besides the issue that is created with drill in the drain sill (rubber washers provided) I think they are good. They lift the trunk lid nice and close just as nice.
QUOTE(bandjoey @ Oct 4 2021, 05:53 PM)
I have their rear trunk shocks and they're a bugger to close. Once up they hold high and mighty. Didn't make any difference which side is up. all the same. I'm really careful closing the lid slow and with both hands. Since I don't open the lid often, I've lived with it. Always thinking I'd take one to the FLAPs and see if there's a weaker shock but it's always a get around to it and never do.
QUOTE(nditiz1 @ Oct 4 2021, 06:17 PM)
I have them on the rear and besides the issue that is created with drill in the drain sill (rubber washers provided) I think they are good. They lift the trunk lid nice and close just as nice.
@bandjoey @nditiz1 - thanks for the input, guys. I’m determined to make this work, and don’t foresee a problem with the rear, hoping to confirm tomorrow. You certainly need ALOT of force to close them. I’ve purchased the replacement-springs from 914Rubber just in-case. Worst-case, I’ll just run the rear.
I had the same issue when I first put mine on. Felt like the hood would bend before it went down.
Turns out that we had them on the wrong bolt. Once it was adjusted, I could close it very easily.
We also took some 1/8' strap steel and reinforced the front mount on the inner fender well structure on both sides. If you take a look at the pictures, you can see them.
Turns out that we had them on the wrong bolt. Once it was adjusted, I could close it very easily.
We also took some 1/8' strap steel and reinforced the front mount on the inner fender well structure on both sides. If you take a look at the pictures, you can see them.
This is my home made solution that was the basis for the Camp kit.
As you can see, my geometry is somewhat different since i wasn't afraid to drill a hole into the hinge.
The hood opens all the way and stays up there, is easy to close and has practically zero spring when all the way down, which also means i had to add a spring to the latch so the hood would come up just a bit when you open the latch.
QUOTE(SirAndy @ Oct 4 2021, 07:32 PM)
This is my home made solution that was the basis for the Camp kit.
Also note that i'm actually using a different shock. I believe mine are rear hood shocks from a 911. Can't remember exactly, it's been almost 20 years.

QUOTE(SirAndy @ Oct 4 2021, 07:34 PM)
Also note that i'm actually using a different shock. I believe mine are rear hood shocks from a 911.
I am using 944 hood shocks on Elvira.
Click to view attachment
QUOTE(VegasRacer @ Oct 4 2021, 08:50 PM)
QUOTE(SirAndy @ Oct 4 2021, 07:34 PM)
Also note that i'm actually using a different shock. I believe mine are rear hood shocks from a 911.
I am using 944 hood shocks on Elvira.
Click to view attachment
Not sure if I got the correct info about installing this hood shocks. I remember the proper way is how John @VegasRacer installed his. The black part is on top and the shocks insert should be lower. The reason is that the lubricant inside can go downward that will help the insert move properly.
Just FYI, this is the CF hood support made by Seine Systems. Comes with all hardware and magnetize end. MarkClick to view attachment
I need to replace the shocks on mine.
After 10+ years its fair that they are worn out, and the set I have on the back are still going strong. the ones in the front do absolutely nothing though, and I've been using a hood prop for the past 3 years. I need to just replace the shocks.
Zach
After 10+ years its fair that they are worn out, and the set I have on the back are still going strong. the ones in the front do absolutely nothing though, and I've been using a hood prop for the past 3 years. I need to just replace the shocks.
Zach
QUOTE(ndfrigi @ Oct 4 2021, 09:47 PM)
Not sure if I got the correct info about installing this hood shocks. I remember the proper way is how John @VegasRacer installed his. The black part is on top and the shocks insert should be lower. The reason is that the lubricant inside can go downward that will help the insert move properly.
That is the way they did it at the factory on my Cayman.

I just replaced my front shocks as well. Seems like they also died after sitting for ten years.
I have a fiberglass hood and just guessed 35 pounds of force (x2 - both sides) would be about right and it works well. *maybe* a 40 pound strut would work a little better but I like this as is.
I got them from Lift Support Depot, which surprisingly is in Carlsbad. Maybe you can just stop by!
I got these:
11.90'' Lift Supports Depot SE119P35S10 With 10MM Claw Ball Sockets
Specs:
Extended Length A [in]: 11.90
Stroke C [in]: 4.65
Compressed Length B [in]: 7.75
Force (Lbs): 35
Force Newtons: 156
Shaft Connection: Ball Socket Claw (Steel) Type=10mm=3/8"=.39"
Body Connection: Ball Socket Claw (Steel) Type=10mm=3/8"=.39"
Rod Diameter (MM): 8
Cylinder Diameter (MM): 18
SKU: SE119P35S10-W
A Interchanges: SE119P35S10
-Steve
QUOTE(SirAndy @ Oct 4 2021, 07:32 PM)
has practically zero spring when all the way down, which also means i had to add a spring to the latch so the hood would come up just a bit when you open the latch.
@SirAndy - I'd love to see what you did for that. I have the same problem - basically zero lift when closed.
-Steve
First off, thank you all for the input, very much appreciated. I'm wondering why this is such an issue, and hope I don't have the same problem on the rear. I'll try to resolve and, worst-case, install the 914Rubber springs in-front. 
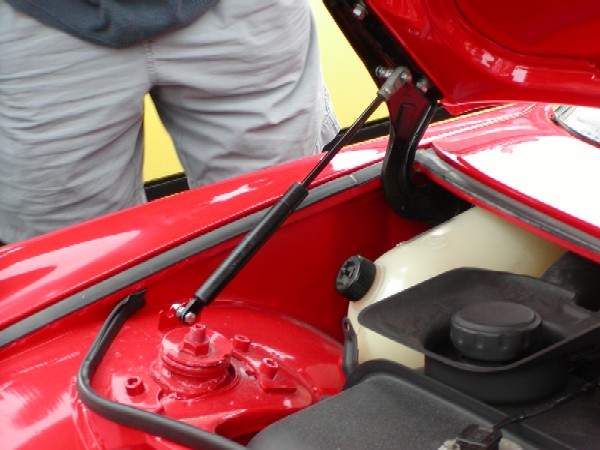
@mmichalik - Interesting, after the initial photo I tried moving the bracket back to the rear-most bolt, but thats when I had the problem that the hood wouldn't close all the way, and that the 'fully open' position wasn't high-enough to be able to refuel.
@siverson - Thanks for the recommendation, I'll check those out. I can't verify that the geometry in the position was wrong, but I actually used your photo as a reference. The hood was very hard to close and I was afraid I'de bend/crease it.
Click to view attachment
Click to view attachment
Your mounting point is the highest force position. What does the other end feel like?
If you need less lift, take one side shock off (and always push closed on the shock side), or replace gas shocks with lighter duties from a pick a part place. Once you find the right resistance, you'll know the best replacement and have learned how to do it yourself instead of buying a kit.
If you need less lift, take one side shock off (and always push closed on the shock side), or replace gas shocks with lighter duties from a pick a part place. Once you find the right resistance, you'll know the best replacement and have learned how to do it yourself instead of buying a kit.
QUOTE(Rand @ Oct 6 2021, 09:04 PM)
or replace gas shocks with lighter duties

Your geometry seems off, the attachment point should be somewhere in the middle of the bracket.
Try just one shock and see if is a lot easier to close. If so, your shocks are too strong.
Like i said above, i think i'm using the shocks from a 911 *rear* lid, which are pretty soft.
The correct orientation for gas shocks is to install with the shock body on the upper end. That way, the lube in the shock body will gravity feed the piston rod and seal thus extend the life of the shock.
It's a simple end-for-end swap to correct.
Sherwood
It's a simple end-for-end swap to correct.
Sherwood
This is a "lo-fi" version of our main content. To view the full version with more information, formatting and images, please click here.