Help - Search - Members - Calendar
Full Version: 70 Standard Equipment Car
914World.com > The 914 Forums > 914World Garage
Pages: 1, 2
nathanxnathan
I've been looking for a needs-some-love car to do like a rolling restore on. — A car with not a crazy amount of rust but needing a lot of the parts that I've got 2 or 3 of from my other way-too-deep project. To put the 2nd best, not quite perfect parts from my stash on.

This past Friday I think I found the car finally, saw it on Craigslist. I sent the link to my girlfriend with the caption "so tempting" smile.gif I kept going back to the page to look, and at about 3:30 called the seller, left work early and drove from Anaheim to Redondo B each to look at it.

Well it was a bit rough but so much good on it, that I bought it. Waited 5 hours for a tow truck, and got it back to my studio where it's parked now.

I hope to do like a focused restore, keep the project creep to a minimum, go in like a surgeon and take care of the issues. I'm going to try to keep the thread like here's the issue, here's the work, and how I took care of it... instead of like here's how I took my entire car apart to a bare metal cut up body and got stuck lol.

Anyway, here are some pics

From the Craigslist ad
Click to view attachment

Click to view attachment

Click to view attachment

Click to view attachment
nathanxnathan
I talked with the owner for a few hours looking over the car. He had it in his driveway for the past 15 years under a cover. He had a "914 sandrail" — had 914 suspension and mid engined that he was actually offering to give to me lol. ...if only had had more room....

Click to view attachment

He'd gotten it originally on a trade for some Fuchs. He'd originally planned to put the parts from the 6 that he had. He still had all the parts in his garage.

Click to view attachment

Pushed it out on the street

Click to view attachment

and when the tow guy finally showed up

Click to view attachment

nathanxnathan
Having got it back to my studio, I tried to make it look a bit less like a deralict, for my landlord's sake. I put some tail lights in, cleaned it up a bit, some hubcaps, replaced the cracked turn signal lenses.

Click to view attachment

Click to view attachment

Click to view attachment

Swapped out the steering wheel, I think it was a Grant wheel for the non appearance group wheel that I had. I put in a shifter as someone had cut the one in there for some reason. I felt like I was maybe opening too many cans of worms, but couldn't help pulling off the door panels..

Click to view attachment

First day was that and pulling out all the wiring bastardizations from the previous radio and alarm installs of years past.
nathanxnathan
The car was originally Tangerine. The Karmann plate

Click to view attachment

and now some issues...

Bolts broke off the bracket that hold the passenger seat bottom to the floor. I'm thinking of maybe using rivnuts and bolts rather than trying to get the brackets off to weld new bolts from underneath.

Also, a hole in the floor under the passenger seat. Hard to see in the pic, but it's between the inner seat bracket and the center console. There's a pretty big dent there from improper jack placement.

This was the "just remove the seat" shot. Maybe a coke mirror? Trident gum wrapper. 1.20 in change including a 1969 quarter, some 70's coins, latest was '83.

Click to view attachment

This is the worst right here, the driver's seat was just sitting in there. Someone tried to weld the back ot it to the floor and buggered up the brackets, no hinges in sight.

Click to view attachment

After removal of the tar to get a better look.. I wonder if I can use the access hole to spot weld new brackets on? With the reinforcements below, it's not ideal to use a tig welder to put new ones one, and I don't have a mig/wire feed... kind of an issue.

Click to view attachment

Click to view attachment


The driver door, someone went crazy with a plasma cutter putting speakers in presumably. They cut the housing of the window..track/driver thingy in half and the inner door feels flimsy with what remains of it. I'm thinking of swapping the door for 1 from my stash but I'll need to paint... The rear lid is pretty rusty on the inside by the latch, and the passenger headlight cover is dented up pretty good. I have better parts as seconds.

I'm torn on trying to color match this unknown red or doing the whole thing the original orange. Sucks they were so thorough with the red, like they did the door jambs and front and rear trunk, even the inside of the passenger door (not the driver door though). The interior and the underside and the engine compartment are still orange.

Click to view attachment
914sgofast2
It's amazing how much better it looks with all the lights in place and a set of hubcaps.
If it were mine, I would do a rolling restoration if I already had a running engine, trans and axles, etc.
On the other hand, your motivation to finish it might be stronger if you gave it a coat or two of the original orange color so you weren't tempted to just let it sit in the driveway for another 15 years! That would force a decision about replacing the driver's door with one that hasn't been butchered up on the inside.
KELTY360
That car is screaming for body color bumpers, regardless if you keep the red or go back to orange! Nice find...have fun with it.
flyer86d
Back in the mid 70’s, one of our PCA members had a non appearance group 71 in Bahia Red that was stunning. It looks like you found a good one. All the best!

Charlie
mb911
What is he doing with the 911 engine?. Just an FYI that looks yo not be a 914-6 engine but rather a 911 engine. Yes I know they are kind of 1 in the same but this example has 911 heat exchangers and a red shroud which likely is middle 70s and then carbs with steel air cleaner so maybe early 70s Induction but the a 914-6 came with plastic air cleaners.
930cabman
Welcome aboard and it looks as though you dove in head first. How are the longs? do you have an engine?

beer.gif
Shivers
Cool, another one saved.
rgalla9146
Forget the car for now. No insult intended.
Chase that engine. It's early. It could be an S
Find the type number to the right of the fan support on the horizontal
surface....do your homework.
nathanxnathan
QUOTE(KELTY360 @ Jun 1 2022, 12:23 PM) *

That car is screaming for body color bumpers, regardless if you keep the red or go back to orange! Nice find...have fun with it.


Yeah, definitely gonna have body colored bumpers. The targa trim was also originally orange — 1 side I think is original. I am going to pull off the top/center piece and see if that is original. At some point someone painted a lot of the trim black.

I'm not sure if the back bumper is original to the car I will check soon.
nathanxnathan
QUOTE(flyer86d @ Jun 1 2022, 02:50 PM) *

Back in the mid 70’s, one of our PCA members had a non appearance group 71 in Bahia Red that was stunning. It looks like you found a good one. All the best!

Charlie


I love the non appearance group cars. I even like the skinny tires. It has 165's on the 4 1/2 inch steelies — they are all mismatched, 1 might be the original spare.

It came with a set of horn grills, I think aftermarket though, they seem kind of rubbery. I have a few, maybe a set. 1 I recall is like white plastic and I think I have a chrome plastic one. I think these early cars the original would be metal. Probably pot metal though so it's probably hard to find decent original ones.

I was looking at the wiring harness in the front trunk and it looks like it may have had fog lights though. It's weird because the wires seem to be there but comparing it to the appearance group that I have, it doesn't seem to have nearly as many mounting holes in the front panel — my APG car is a 72 though so idk.

A few weird things the car does have a headliner. With the late door panel and the partially replaced targa trim, it makes me think a lot of things are not as original though.
nathanxnathan
QUOTE(mb911 @ Jun 1 2022, 04:40 PM) *

What is he doing with the 911 engine?. Just an FYI that looks yo not be a 914-6 engine but rather a 911 engine. Yes I know they are kind of 1 in the same but this example has 911 heat exchangers and a red shroud which likely is middle 70s and then carbs with steel air cleaner so maybe early 70s Induction but the a 914-6 came with plastic air cleaners.


mmm, I didn't ask too many questions about the 914-6 stuff. I figured I couldn't afford it lol. The car was up for $2k and that's what I gave him.

The guy was actually a car dealer, still is sort of. He had some blue dealer plates that I thought were cool. When he filled out the paperwork for the sale he stamped it "Sundial Enterprises". He told me about the targa tops he used to make for 964's bitd.

He realized he didn't have the transmission at his house and we arranged to go pick it up from his truck which was at this other space 2 days later, on Sunday. I helped him hook up a trailer to his "racecar" which he didn't pull the cover off, but it was a 70's targa 911 with a Ginther windscreen from the shape of it. He had a lot of toys and parts all stashed away at his place. Pretty cool guy. He told me about how he was a weapons consultant for the movie Apocalypse Now and how he had a speaking part in it, and showed me his art which was pretty cool.

He did say that he had a real six that he drove, but it was rusted pretty badly. Anyway... it will remain a lowly 4 lol
nathanxnathan
QUOTE(930cabman @ Jun 1 2022, 04:41 PM) *

Welcome aboard and it looks as though you dove in head first. How are the longs? do you have an engine?

beer.gif


I'm almost afraid to look at the longs.. It kinda needs to be done though, if only to clean under the rockers and have a look at the jack plates. ...I'm hoping for the best...

I have a few motor options. I think I've got a good bottom end/short block. I need to get some heads looked at. The engine is on the short list. I've got tins for it I believe. A few pieces have some rust issues that I may be able to repair. I'm going to have to go through my stuff some more.

I've got some parts on the way. I guess I've resolved to focus on the seat which involves the floor. It will need a battery tray and support, there's a bit of the inner fender well that needs some attention, like it has no battery tray, just the support, and I think when they removed the tray part of the fender went with it. I think it may be not as bad as that sounds, but I'm gonna get into that this weekend I think.
nathanxnathan
I made some progress on the driver's side floor. TOmorrow's agenda is to get those brackets off.

Click to view attachment

Some pinholes toward the back unsure.gif

Progress on the seat frame, I had one from a 71. I blasted, etched and painted it. I didn't realize that 70's were different with the straight rod for the adjust and a round knob. Also the part that engages in the teeth is brass where the 71 is steel it looks like. I swapped that out.

Click to view attachment

I couldn't get the spring tensioned and the roll pin back in, like how the heck are you supposed to achieve that? I was able to pry the spring back to position with a punch and get that to hold it. I then cut off the punch end lol. I know that's pretty ghetto, but Idk, is there some tool I don't have to do it properly? I couldn't figure it out.

Click to view attachment
nathanxnathan
1 question, is a 70 supposed to have the parking brake cover and the tab to screw it to?

You can see above there's no tab... I need to look closer under the back pad dampener thing to see if it was taken out/broke or what. Here is a pic of someone else's car. I can see on my 72 it is welded in.

IPB Image
nathanxnathan
It's odd there is no parking brake tab for a spring. The orange I think is original paint and there's not a trace of it. Also there's no hole in the guide to mount the cover. This car is pretty early, 11/69 so I'm thinking they didn't have return springs or covers maybe. How much of an issue is it to not have a return spring there?

comparing it to my 72..

Click to view attachment

Click to view attachment
nathanxnathan
Other developments, I took off the rockers. I was kind of stoked about the passenger side.

Click to view attachment

Click to view attachment
nathanxnathan
I thought the driver was gonna be better,I was expecting it to be like clean.

sad sad.gif

Click to view attachment

some poking, it's through both layers and the jack plate
Click to view attachment

Click to view attachment


I don't know if there's much I can do about it. It seems to address it would entail going sooo deep. It's a bit heartbreakibng, like why do I do this to myselfbuying 914's thinking it's going to be different huh.gif
Arno914
Your 914 looks like a really solid basis! Congratulations.
The rockers seem to be quite good. No major rust here. Keep us posted. beerchug.gif

I have a late ´71.
Has the plate for the handbrake cable cover + cover, but no spring. Additional spring came somewhere during the ´72 MJ.
bbrock
It doesn't look too bad to me. Should be able to address it with a patch rather than full long replacement. You'll be able to get inside and really clean things out. Do some poking on your passenger side with a screw driver. Looks like you have some rot started there too that you'll want to patch before it gets worse. It doesn't look like either side will require you to go too deep. How does under the battery look?

Don't fret. It could be much worse. Here's what I started with:

IPB Image
rgalla9146

The passenger side jack receiver is so good.......it makes the drivers side a
surprise.
Dion
Agree with Brent. Not too horrible. Hope the battery area is decent for you.
Keep at it!
nathanxnathan
thanks for the reassurance, it is definitely not like "bringing out the dead" levels of rust. smile.gif ..more than I would have liked but I'm not gonna give up.

It's interesting how these cars get it in varying areas per car. This car I've been very impressed with, the cowl area is really good, the air inlets by the doors are nice, suspension console ears look good, trunks are not too bad, the hellhole itself looks not too bad. My 72, though I'm always impressed by just how nice a lot of that car was had some real doozy areas that required going really into it. 914's are like a box of chocolates, you never know what you're going to get smile.gif

So I bought a mig welder this morning, a Hobart handler 140. I haven't mig welded in 20 years. My dad got me a I think that same welder back in the 90's. I've just had my tig for the past 10 years or so and as much as I like it and as comfortable as I am with it, it's not good for the way these cars are sandwiched together. It wants everything to be clean, spotlessly clean. Areas like the brackets for the seats, the way the reinforcement plates are under the car, the only way to get that clean enough would be to remove those which would mess them all up. It seems to me that mig is better in this way.

I'll need some gas and solid wire and it's shipping in the next week or so. Plenty to do in the meantime, I'm going to see if I can save these rockers...
nathanxnathan
Click to view attachment

Coming along with the floor repair. Weird the dapo drilled those holes, through the brackets, through the floor, but not through the reinforcements beneath. I can't really see the point. A bit more blasting to do.
nathanxnathan
I've been busy getting into the car, getting in further than I thought I might have to huh.gif

Things snowballed a bit, what I was trying to avoid, but I'm trying to focus on the front half at least for now.

I started stripping off the black in the front trunk, just cleaning it up.

Click to view attachment

Both headlight motors seems to have something going on

Click to view attachment

The steering wheel being loose and working on getting a key to fit the locks and ignition switch got me into taking out the steering column I think the housing being cracked is a lot of the issue

Click to view attachment

I wanted to fix the dash frame there is a big cut out of it above the heater controls, so that's come out.

Click to view attachment

Seems the wiring has some issues.

Click to view attachment

The brake fluid reservoir has things pretty gross in its vicinity

Click to view attachment

More cleaning

Click to view attachment

I'm not sure how I got to and decided I needed to cross the line and take out the fuel tank. I think access to the wire issue forward of the dash.

Click to view attachment

pretty nasty under there, and the steering cover panel thing also, the mice just having at it

Click to view attachment

So more cleaning

Click to view attachment

sucks the mice chewed holes in the steering rack cover and in the rubber bellows. I may have extra... the iphone "pano" feature is pretty crazy.. it does tend to make some distortions but it can feel pretty immersive the shots it gets

Click to view attachment

more cleaning. I'm kind of liking the Tangerine more and more

Click to view attachment

The rust beneath the fuel tank and in the front trunk area I resolved to do some blasting, but I wanted everything out of the way so I pulled the wiring harness out of the whole front of the car and dropped the whole front suspension/steering rack assembly

Click to view attachment

The balljoint boots are torn, tie rod end boots are torn A arm bushings look pretty rough. Worse than that though I come to find that the passenger side upright is late and the driver is early. I have an early and a late brake shield, an early and a late caliper, rotor, etc, like wtf lol

Click to view attachment

I have a spare set of early uprights with inserts that I can use, spare calipers from a 71 that I had, I think I have a spare early brake shield. I'm working on refinishing the front suspension, blasting, painting. I need to get some parts...

Working on blasting the front trunk and under the fuel tank earlier.. I'll post about that in its own post here. I'm debating on what to do about some issues there...
nathanxnathan
So blasting under the fuel tank earlier, found some pinholes.

Click to view attachment

They're all on the piece to the rear which is to the inside above the pedal assembly (also taken out at this point, I just can't help myself)

Click to view attachment

kind of a lot when you look at it this way ^

with flash it looks not so bad

Click to view attachment

Glass bead inevitably everywhere...

It seems not a hard piece to make, like cut it out, a bend, some welding... I'm pretty slow though. I could use seam sealer? I don't know, thinking about options here.

I'm trying to blast the rust (I'll have to get pics tomorrow of progress on that) and sand in the front trunk and under the fuel tank, primer, seam sealer, and paint, meanwhile get the whole front suspension and steering and brakes sorted, refinished and installed. I want to have it sitting on the ground again before I get into the stuff at the back.

Click to view attachment

I'll post more pics of the front trunk soon. Some findings, the front panel/clip is a replacement I think. Maybe factory replacement as the holes for the rubber plugs at the lower front are all there. It has no orange paint and it is brazed in at the bottom which I don't think is standard. Also it explains why there are wires for fog lights but no holes to mount them.
autopro
The more you take off the more you find and that will lead you to a full restoration. Mind you it will be a good thing if you have the time. In the end you will know you have a sound car that you will enjoy for a long time.
nathanxnathan
Progressing slowly, but keeping at it.

Let's see, some progress on the dash.

Click to view attachment

Click to view attachment


I sanded the black off with 220 grit. The whole thing needs some love like some surface rust at the bottom of the inside, and this patch. I'm thinking about using a 2k paint, go for a satin on the dash, rocker panels and valances when the time comes.

Click to view attachment

For now I put some high temp paint on it to keep rust at bay, it's easy to sand off being totally flat. I like black high temp paint for this and use it often as a guide coat also, but I only had white on hand.

Click to view attachment

The back I sprayed some Oshpo on, testing how well it works for preventing rust bare.

Click to view attachment


I uncovered this interesting bit of writing. I'm not sure what it says. I was thinking on top it might be "IO" like the in order stamps they do. The backside of the dash doesn't have anything, no chassis number — maybe early cars they didn't do that.

Click to view attachment

Still some finish sanding to do on it, but I'm happy with how the hole patching came out.

nathanxnathan
I'm focusing on the front trunk and Fuel tank areas currently. I stripped out the black spray paint easily with Citrus Strip. It works ok on the resprayed reddish paint if left for awhile. There are 2 coats of red — a brighter red over the factory paint and then a darker red which is what is on the exterior, both with a layer of dark primer beneath.

Here's the current situation in the front trunk. Working of feathering in the bare metal to what remains of the factory coat.

Click to view attachment

I'm not sure exactly why the inner fender wells had a lot of bondo and had been taken down to bare metal. There are a few dings, and the passenger side was pushed in from the inside. I removed all bondo, pushed the fender back in from the outside in and set it, and I think it's in good shape. no need for a half inch of bondo, maybe a few spots.

I think I mentioned the front panel is I think a factory replacement. sort of poorly installed with brazing. The driver suspension reinforcement was barely hanging on just brazed in a few placed. I ground it out as rust underneath seemed wanting attention. Will have to weld it back in... I think the outer of the front panel they didn't even paint, the factory reddish finish they left bare.

Click to view attachment

There are 3 parts where it juts out that help it drain under the seal at the front. I'm not sure if that's an early thing or late? My 72 doesn't have it.

Click to view attachment

I've been working out a lot of the dents and such in the front panel — not sure if they were driving it with no bumper or what. Also using a jack to back the bottom of the trunk with a dolly to put that back in shape, dents on the underside.

Click to view attachment
nathanxnathan
This weekend I decided to dive in to the dirty stuff, the rust at the bottom of the fuel tank area. I had thought about maybe a coat of seam sealer, or maybe fiberglass. After blasting it you wonder if replacing the metal is necessary. Mulled it over a few weeks and decided I have access, let's do this. ar15.gif

Seems easy enough..
Click to view attachment

No turning back now
Click to view attachment

sure is a big hole
Click to view attachment

Really does feel nice to have that out though.
Click to view attachment

I wish spot weld drill bit were smaller, it's like too much destruction. I think using a regular bit and just not going deep, you can weaken the weld enough to pop it with some persuasion and get a better finish.

Made a paper template before cutting began.
Click to view attachment

Years ago I bought a roof clip of a VW bus to patch this Riviera Small poptop dealer converted camper bus that was my first VW. I ended up selling that bus and getting a deluxe bus, same year, same month actually, and I've been using the metal from that top for patches and such ever since. I have about half left. It's 1 mm thick German steel — a little thicker than what's on a 914 I think, but it allows some room for working welds in/burnishing and such.

I've still got a bit of finagling to do to get it to sit just right.

Click to view attachment

Click to view attachment


I've been practicing my plug welds with the mig for the bottom and side, the rest I think I can tig it. welder.gif

There are some spots in the floor and the bottom of the inner fender well that will need patching, also I need to assess the channel for the front lid seal which may need some love.

The plan presently is to get the front trunk, fuel tank, headlight buckets, seal channel, and front panel exterior solid and sprayed in the factory orange. The front suspension and most of what I've taken off the car are getting powdercoated this past week. I'm working on getting my copy cad Caswell setup functioning, to do a the parts that were finished as such.

Figured out the wheels are a mix of probably beetle rims. the black ones are dated 9/68 4 1/2 J x 15.. I'm not sure what the offset is, but can't be actual 914 wheels with that date. The fronts are 4J x 15 dated 10/71 so not 914 either. I'd like a set of 4 1/2 J x 15 as the car had originally. I don't know what the offset is supposed to be, ET36? I think 914 wheels have it stamped but idk.

Anyway, it's a lot currently, trying to keep focused on the task at hand. smash.gif


Al Meredith
Automobile Atlanta has the seat hinge and bracket you need to repair your drivers seat.
Literati914
This is coming along well Nathan! it reminds me so much of the project I currently have up on the rotisserie ... a ratty red paint job over factory tangerine (why would anyone do that?) and with a replaced front clip too!! keep chipping away and you'll be driving.gif soon!!
Superhawk996
QUOTE(nathanxnathan @ Jun 3 2022, 03:16 AM) *

I thought the driver was gonna be better,I was expecting it to be like clean.

sad sad.gif

Click to view attachment

some poking, it's through both layers and the jack plate
Click to view attachment

Click to view attachment


I don't know if there's much I can do about it. It seems to address it would entail going sooo deep. It's a bit heartbreakibng, like why do I do this to myselfbuying 914's thinking it's going to be different huh.gif


Don't panic.

On my project I replaced the driver side jack point without needing to cut the rear quarter panel. Not much much drama.

Jacking point can be pretty gone but the rest of the long still in great shape. The jack triangle drain holes get blocked and then it takes out the pyramid and the 1st layer of metal behind the pyramid.

Based on the other work you've already done, the replacement of the driver side jack point is easy. See my build thread post #510 on page 26
nathanxnathan
QUOTE(Al Meredith @ Jun 27 2022, 08:48 AM) *

Automobile Atlanta has the seat hinge and bracket you need to repair your drivers seat.


I got Restoration Design brackets from Pelican, and hinges from 914Rubber, also Restoration Design. They are pretty nice.

Click to view attachment

The brackets the bends are a little bigger radius so the sides of the hinges hung over a little, and I felt like I should weld the sides to bridge the gap.

I'm mulling over how I want to go about the driver floor. The hole drilled through the seat reinforcement and the floor, and the dent there etc, it's kind of a problem area. I'm fighting the urge to remove the seat reinforcement and get full on into that area.

Click to view attachment

Not the greatest shot.. I was concentrating on the trouble at the back when I took it...

Click to view attachment

nathanxnathan
QUOTE(Literati914 @ Jun 27 2022, 08:51 AM) *

This is coming along well Nathan! it reminds me so much of the project I currently have up on the rotisserie ... a ratty red paint job over factory tangerine (why would anyone do that?) and with a replaced front clip too!! keep chipping away and you'll be driving.gif soon!!

The further I get, the further it seems to bring it back unsure.gif I'm trying to remain vigilant, though.

That's so funny with these cars. I was looking at Montreal914's build thread and his red driver door with the whole front support cut out for a speaker, was like, "I've seen this before" huh.gif Like echos of the same recurring issues.

My girlfriend has a fixation with cherries I guess because her name is Cher, and wants it red. I keep calling it "the orange car" and she makes this classic disapproving expression biggrin.gif
Superhawk996
QUOTE(nathanxnathan @ Jun 27 2022, 12:53 PM) *

I'm fighting the urge to remove the seat reinforcement and get full on into that area.


Don't fight it . . . come to the rustoration side. happy11.gif You have the skills to fix it right. I don't think I've ever heard anyone lament "I shouldn't have done that the right way!"
nathanxnathan
QUOTE(Superhawk996 @ Jun 27 2022, 09:38 AM) *

QUOTE(nathanxnathan @ Jun 3 2022, 03:16 AM) *

I thought the driver was gonna be better,I was expecting it to be like clean.

sad sad.gif

Click to view attachment

some poking, it's through both layers and the jack plate
Click to view attachment

Click to view attachment


I don't know if there's much I can do about it. It seems to address it would entail going sooo deep. It's a bit heartbreakibng, like why do I do this to myselfbuying 914's thinking it's going to be different huh.gif


Don't panic.

On my project I replaced the driver side jack point without needing to cut the rear quarter panel. Not much much drama.

Jacking point can be pretty gone but the rest of the long still in great shape. The jack triangle drain holes get blocked and then it takes out the pyramid and the 1st layer of metal behind the pyramid.

Based on the other work you've already done, the replacement of the driver side jack point is easy. See my build thread post #510 on page 26


I'm fighting the urge to cut it open, trying to focus on the car in zones. Currently on the front 2 of the 5 zones, the frunk and fuel tank compartment. I strayed a bit to zone 3 already with the floors, removed all the tar and got the seat brackets off except 1.. will showcase that in a bit.. Jack points after that.

The layers kind of haunt me. I know the 4 sided pyramid of the outer layer of the long is spot welded to the inner layer which iirc has the circle cutout for the recessed square that the jack tube is welded to. It's good to think about the contingencies beforehand though. like if it's just the outer, cut out the pyramid, probably new jack post, plug weld it to the inner layer. I need to work on using the mig to do butt welds without backing. If it's really a mess I might go full DWD, I don't want to think about it if it comes to that. wacko.gif

Interesting job with the sectioning of the cover plate.

I'm gonna have to do some soul searching about how to deal with it.. probably that is the worst repair of the car, I think the hellhole area maybe will to be easier even.
nathanxnathan
I've been focusing on prepping the front trunk and fuel tank area. I want to get them in at least 2k primer. The original plan was to reinstall the front suspension and tank and such before moving further back, to go start to finish on each section of the car so it doesn't end up like my other car. I'm wavering on that plan, thinking about rotisseries.

For now just trying to focus on an area at a time and thought addressing the channels in the front trunk would be a next step.

It turned into a pretty epic project, stretching the limits of how big 1 post can be on 914world biggrin.gif

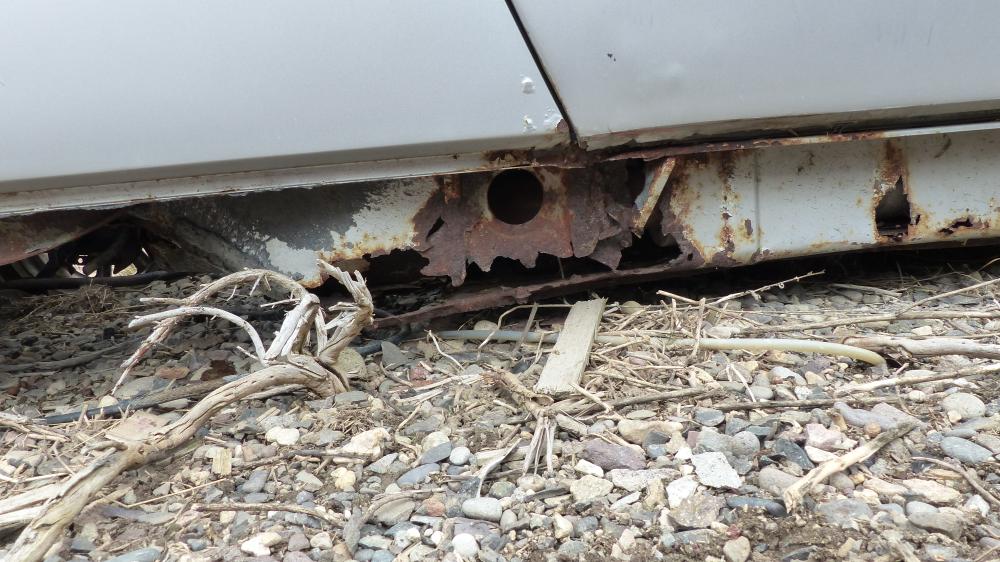
Passenger side above the headlight bucket didn't look too terrible.
Click to view attachment

Driver side seemed worse
Click to view attachment

But a bit of glass bead revealed that seam sealer had been used as a coverup. The passenger side was indeed more terrible than the driver.
Click to view attachment

Click to view attachment

I'd removed the front lid adjustment brackets and the forward lips at this point. A few layers to be addressed and those are the first that needed to come off.

I decided to do both sides at the same time in steps. Before I cut I made paper templates in order to make patch pieces from. Removed the top layer.

Click to view attachment

Click to view attachment

The second layer, didn't take a pic of the passenger side at these steps.

Click to view attachment

And the final step of the deconstruction

Click to view attachment

I'd made the pieces to fit as I was taking them off. I don't have a break, and I just used clamped plate steel and a body hammer to do the bends. I ground a few radiuses on the plates to get the radiuses to match. I had a hard time getting 2 and even more so 3 bends aligned. The templates were made of the top, to fit inside, and it was tricky to fudge the modulus of elasticity and take into account the panel thickness to get the bend in the right spot. For the 3-bend topmost piece on the passenger side which has a radius to follow the hood line, I formed it with the first bend by itself and then welded it to the 2 bend channel part. The joggles in the 3rd layer I welded 1 of the seams

Click to view attachment

2-part piece assembled. The radius I did by notching it into 3 individually bent sections, welded the notches and smoothed the curve on a dolly.

Click to view attachment

Prepped the back of both sides from beneath
Click to view attachment

And putting it all back together

Gap was a bit wide here, but manageable.
Click to view attachment

I tried using SEM Copperweld at first but I found 3M Rust Thru primer to not start on fire for the spot welds and did most with that.
Click to view attachment

2nd Piece felt good filling the gaping hole. Did both sides, only got pics of the 1.
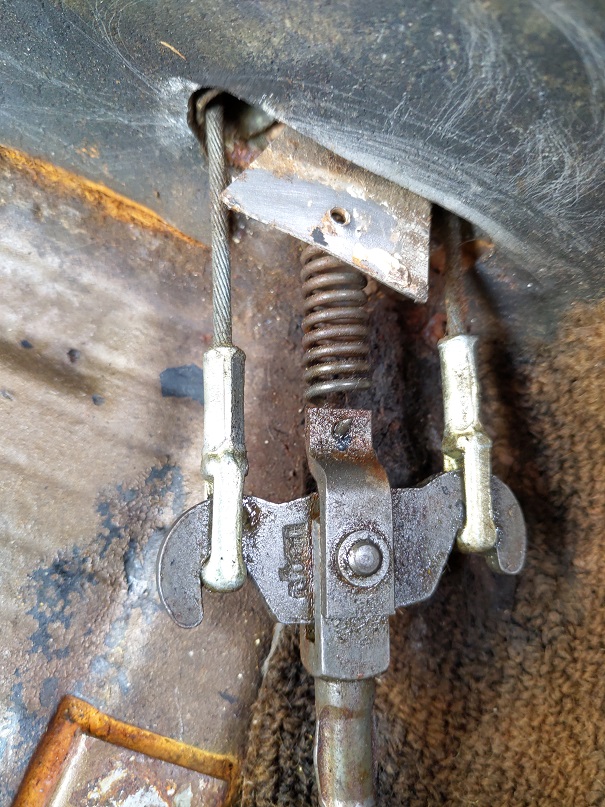
Click to view attachment

I spot welded where I could, the inner seal channel, the special tongs installed.
Click to view attachment

And the final piece
Click to view attachment

Working on the driver side revealed some damage that had been done previously. The welds started melting the nearby bondo and uncovered some tortured metal looks like it was ground with 24 grit. I sprayed rattle can black and sanded to reveal low spots and worked out what I could with a dolly. It will need some filler still.
Click to view attachment

The gray blotchy metal is the Ospho. As I'm doing this outside I spray it to keep the rust from forming on the bare pieces.

Not perfect, but it's solid. I've been watching Wray Schelin Proshaper videos and I'm sure he'd have done it differently, flanging the joggles and such. I haven't seen him work any parts so small and finicky to see how he would do it. I wish there was a class like his workshop out here. Anyway, building the skill set. I don't think I botched anything that was salvageable, I cut out only the bad and one could always cut out what I did and do over if the work isn't satisfactory.

I've still got the hood adjustment brackets to get back in. The lower lips as well but I may want to address the front cross panel before I do that.
914werke
aktion035.gif
Puebloswatcop
Pretty nice find. Your work is looking good. Have fun with the new toy.
Montreal914
Nice work! smilie_pokal.gif

wonkipop
QUOTE(nathanxnathan @ Jun 2 2022, 01:08 AM) *

QUOTE(flyer86d @ Jun 1 2022, 02:50 PM) *

Back in the mid 70’s, one of our PCA members had a non appearance group 71 in Bahia Red that was stunning. It looks like you found a good one. All the best!

Charlie


I love the non appearance group cars. I even like the skinny tires. It has 165's on the 4 1/2 inch steelies — they are all mismatched, 1 might be the original spare.


keep up the good work.

love your spot welder on the previous page.
wouldn't mind having one of those.
thought of it a few times fixing up the falcon ute.
but hard to think of how to position one in, unless it had 8 foot tongs! smile.gif

go the original minimalist look. they were really cool the early base cars.

yes to skinny tyres.
i put a set of michelin XAS 165s on mine.
expensive but fantastic.
gives you the beautiful light steering with heaps of feel.
not so good in the rain, but i don't do rain driving if i can help it. beerchug.gif
rgalla9146
Early 'no appearance group' cars are so cool.......and not appreciated enough.
They're pure and simple.
Mine includes performance upgrades. smile.gif
Your work is outstanding.
Great to see.
nathanxnathan
I've got quite a few projects going with the car. I need to start focusing on 1 particular aspect and not spread myself too thin, but there were obstacles to the main plan of getting the front end together so I took on some other stuff while working them out.

I started working on the doors, but I'll leave that for another post.

I did a lot of stripping — the door jambs and fenders, headlight buckets, besides the front trunk where I started.

I started cleaning up the wires in the rear trunk, getting the overspray off and cleaning up.

I've been patching the front cross panel, but I'll go into that in another post once I've got some more progress in that area.

For now the big victory is completion of the octisserie.

Click to view attachment

Stripping uncovered some accident damage repair. I got the bondo off the driver side which seems worse overall and was able to slap out most of the problems. Hopefully the passenger side will be similar, and all that bondo will not be necessary.

Click to view attachment

I started with the Restoration Design plan and modified it to use larger casters that I had laying around. I cut all the joints for a mitered fit using my horizontal bandsaw, and I used 1/4" plate to reinforce the joints.

Click to view attachment

Here's a pdf that has angles and measurements I used in case it helps anyone. It is Adobe Illustrator editable and has a vector of a 914 which is pretty cool. I'm not super sure of the accuracy of the scale — The drawing is 1:1 for everything else and dimensions and angles are marked. Most of what RD had was pretty accurate.

Click to view attachment

I did the front mounts differently, to not use the factory suspension cross member as part of the rotisserie. I can see now why they used it as this was the trickiest part to locate the mounting holes and determine heights of the standoffs. I made a sort of tool to find the center using my lathe.

Click to view attachment

Click to view attachment

The final.. made the plates to the angle that the suspension mounts wanted to be. I should have used a plumb bob to check vertical as when I welded the front hoop to the plates, it's actually leaning forward. The top is about 1 inch further forward than the back. I made the back angle match the front so all the interties are the same length though.

Click to view attachment

A glimpse of the rear mount.

Click to view attachment

I braced the doors. I wanted to do it so the doors could be fit, but I'm reluctant to weld to the lower A pillars where I can't get behind to treat burnt off paint inside.

This heat has been rough. The canopy has offered some help/shade and kept the rain that followed off me these past few days. It's 8' x 8'. Got a cover from carcovers.com which is supposed to be waterproof, though that is questionable.

Click to view attachment

One learning that I was a bit disappointed is that I think I'm too weak in my old age to get it on its side by myself. I can get it to the first angle, but it doesn't stay up, and then the 2nd angle to go vertical, maybe if my child (if I had a child) was under it I could do it, but it's pretty heavy. The rear suspension is still on the car.

Next task is focusing on the front cross panel.
nathanxnathan
I took a break from working on the car. I think reluctance to get into the areas where the front fenders meet up with the cowl, I needed a good long time to prepare for.

So after getting the front cross panel just about ready to go in, which was really a beast of a job for me... I did a bunch of home improvement and worked on some bicycles for like a year. biggrin.gif

But to get the thread up to where I'm at presently.. First I remedied a shortcoming with the octisserie. The car sat too low and it was just about unmanageable to put it on its side on my own.

So I modified the plan, added some support to raise the car up in the hoops about as far as I could get it.

Click to view attachment

Click to view attachment

It's still a bit heavy but I can get it on its side now.

Click to view attachment

Here's a shot to show how close the windshield frame now comes.

Click to view attachment

I will put up pics of the work on the front cross panel soon, and then on to the projects at hand.
nathanxnathan
So let's see, the front cross panel. You can see in one of the previous rotisserie shots that I took it off. A little of that story as it looks like I haven't really talked about it here... It gets pretty ugly here.

The car had been in an accident at some point and presumably a repair shop had replaced the front cross panel with a late version. This presents some issues that they didn't handle very well.

The late panel does something a bit different on account of the bumper shocks. The headlight buckets are different on late cars I think — so to fill the gap they sort of cut the bottom and bent the inner bits forward.

Click to view attachment

The bottom supports were pretty rough on both sides, maybe brutalized when the shop removed the original, but also some body filler disguising some accident damage. Worse though, the top portion of an early support doesn't go far enough forward to contact the front cross panel and they left a big old gap there. The front of the headlight bucket is in bad shape.

Click to view attachment

The passenger side was pretty bad, all the brazing was a mess.

Click to view attachment

Basically every junction of this front cross panel was butchered.

Click to view attachment
nathanxnathan
A forum member here, pezz really helped me out with an early front cross panel. They're a beast to deal with, and he really came through cutting it off and getting it shipped to me.

Here's the thread leading up to that.

http://www.914world.com/bbs2/index.php?showtopic=360483

Really epic thing to show up on your doorstep
Click to view attachment

It was tricky, as I wanted to use the ends of the pieces that attach to it to fix what was all messed up on the car, but of coarse keep the panel itself nice. To save both I had to mess up both a little bit, getting them apart.

It was relatively easy getting the late panel out of the car. It wasn't held in by that much. Separating the early panel was a lot harder.

Click to view attachment

I used a hole punch to make fillers.. hundreds of fillers.
Click to view attachment

Click to view attachment

Click to view attachment

Part of the early panel had been cut off to repair another car, so I had to splice some of the late one into it..

Click to view attachment

Repairing this panel took a long time...

Click to view attachment

I will post more...


nathanxnathan
The replacement panel had a number of its own problems.

I had to remove the trunk latch support plate take care of a hole rusted through right above it.

Click to view attachment

Ugh
Click to view attachment

Click to view attachment

A few spots were rusted thin, and patched in bits to repair.
Click to view attachment

Click to view attachment

This pic just doesn't do justice to how much went into making this piece whole again.
Click to view attachment

With the panel whole again, I moved on to prepping the car for it. Will post that progress soon.
This is a "lo-fi" version of our main content. To view the full version with more information, formatting and images, please click here.
Invision Power Board © 2001-2024 Invision Power Services, Inc.