Help - Search - Members - Calendar
Full Version: Project 914n6 -> the infamous Nissan V6 swap
914World.com > The 914 Forums > 914World Garage
Chris914n6
Logic, according to my brain...

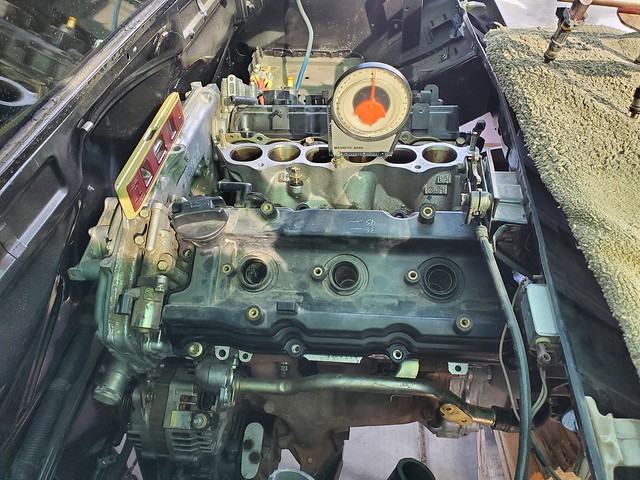
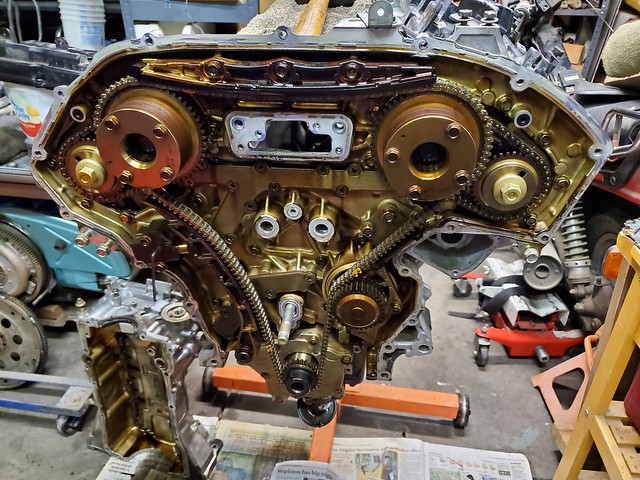
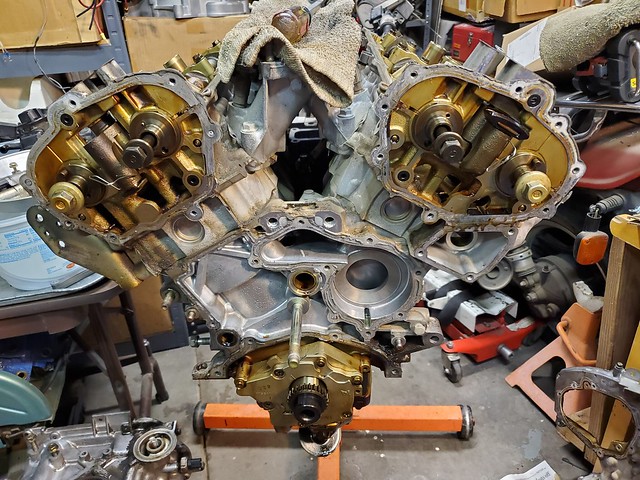
In 2000 I installed a Nissan VQ30, 3.0L from a 97 Maxima. 190hp 205tq and it was great. Then things happened (rusted battery tray). Then it sat for a decade (recession). The engine now overheats the cooling system like a bad head gasket. Likely from aluminum erosion from sitting too long (other signs). Fixing that requires complete disassembly down to a short block.

Soooo....

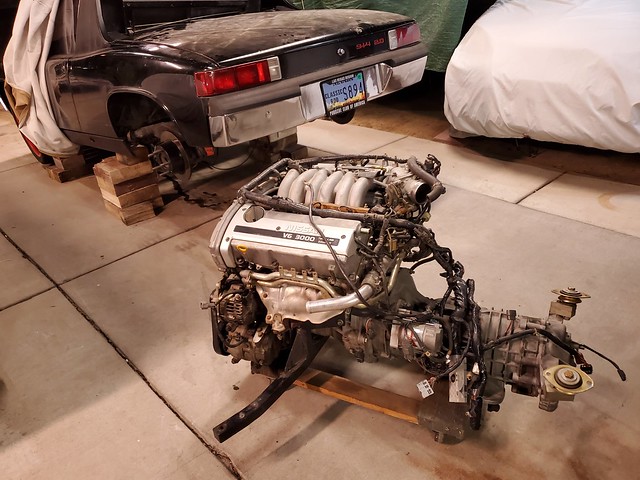
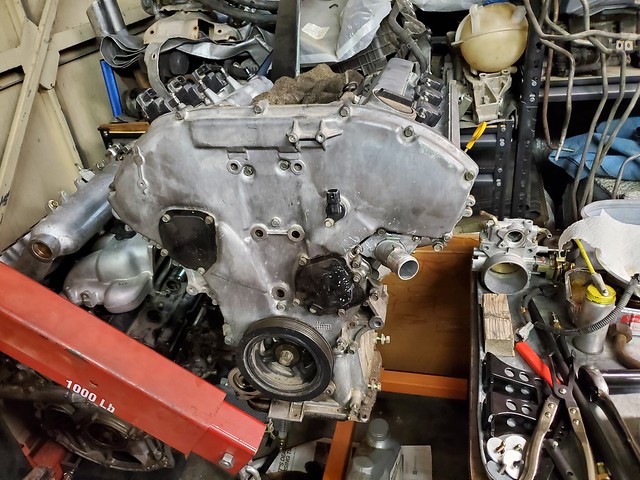
I decided to move up to a VQ35, 03 Maxima 3.5L +80hp!!! (that's 42% more)

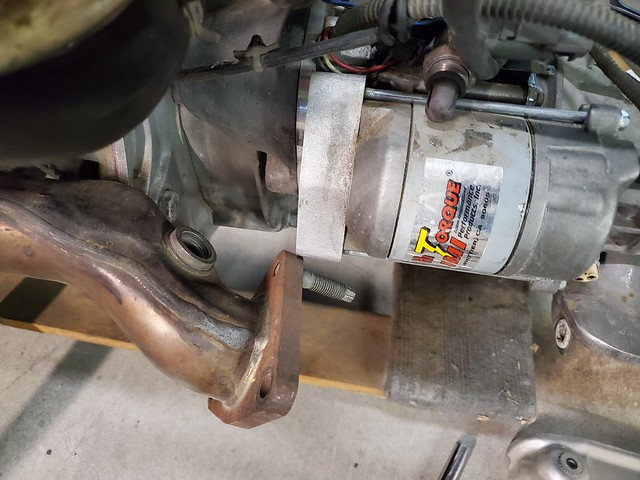
Here's the rub. To get the VQ30 to fit I moved everything forward 1.5". Renegade sbc trans blocks, shortened shift rod, small hole in the truck. To fit the VQ35 as-is I would need to move it back, likely to stock location, to clear the variable cam timing stuff. That means a new cross mount, new shift rod, redo exhaust, plus new harness and ms3pro ecu ($$$$).

Turns out the gearheads at Maxima.org like to upgrade too. They created a VQ30/35 hybrid. It's a VQ35 engine with VQ30 ecu, harness, timing components and accessories. I lose the variable cam timing but I get to reuse all my custom swap bits, which saves a bunch of time I don't have before RRC22. But it requires some new custom parts.

If one or more of our great fabricators has time and tools I'd love to toss email money your way. @mueller @tygaboy @mb911

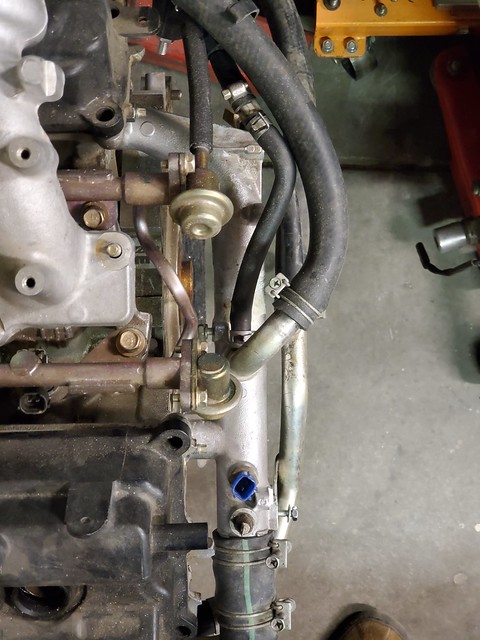
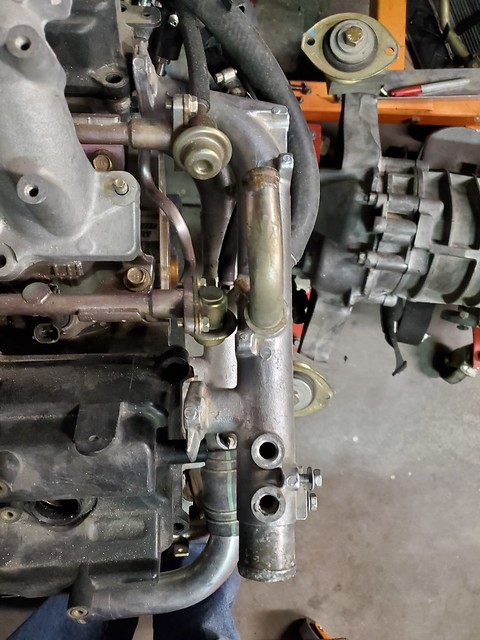
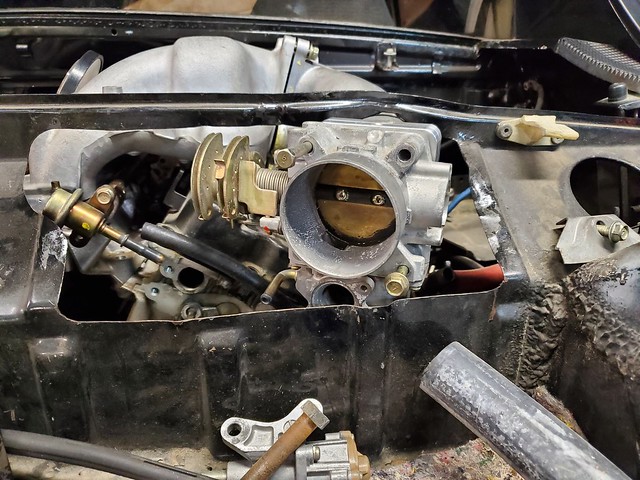
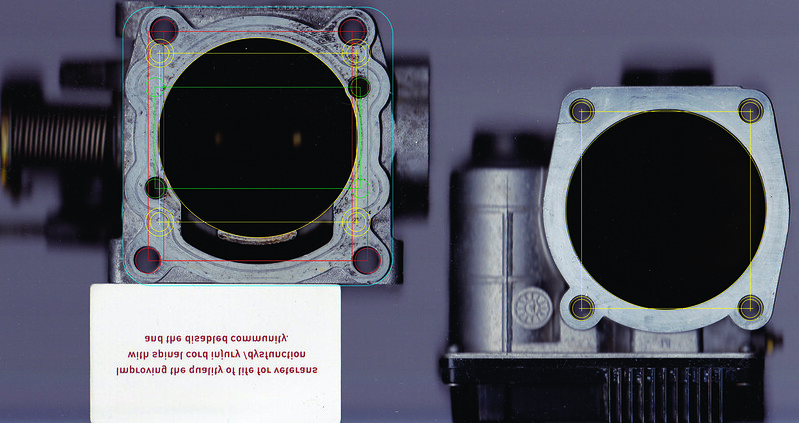
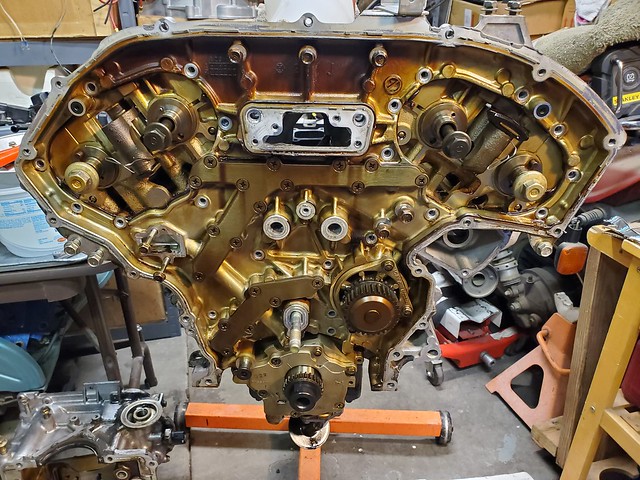
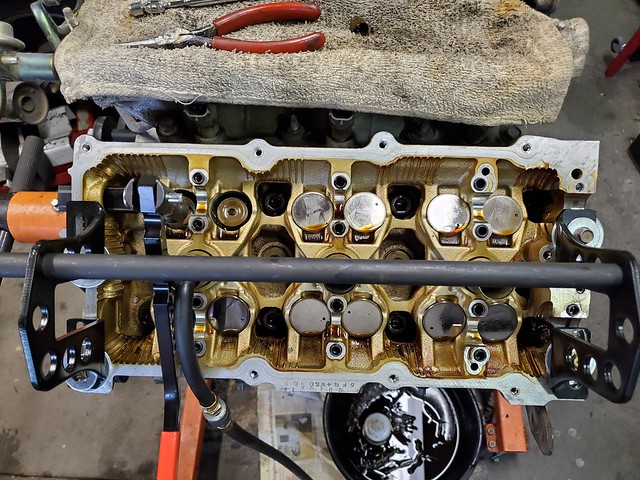
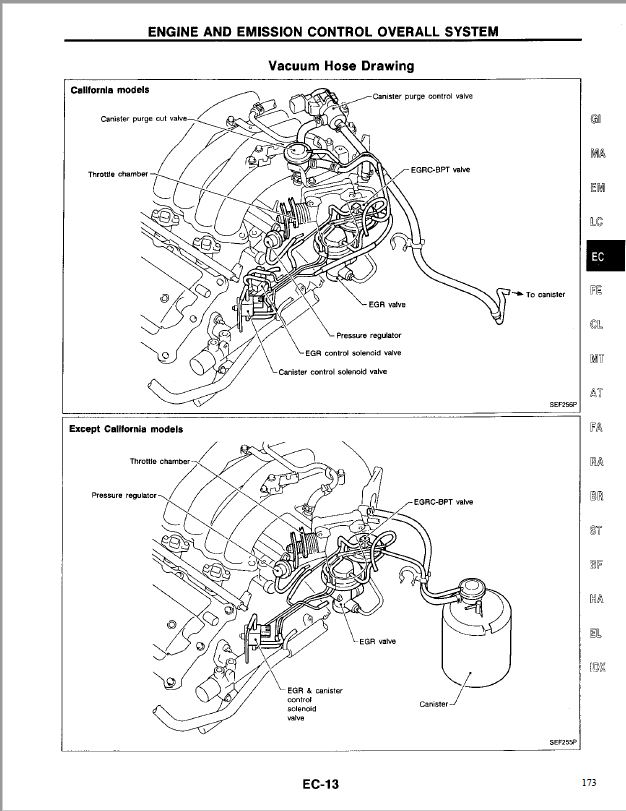
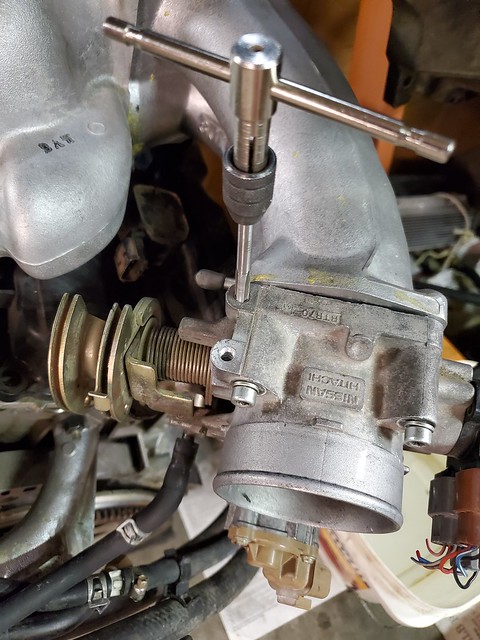
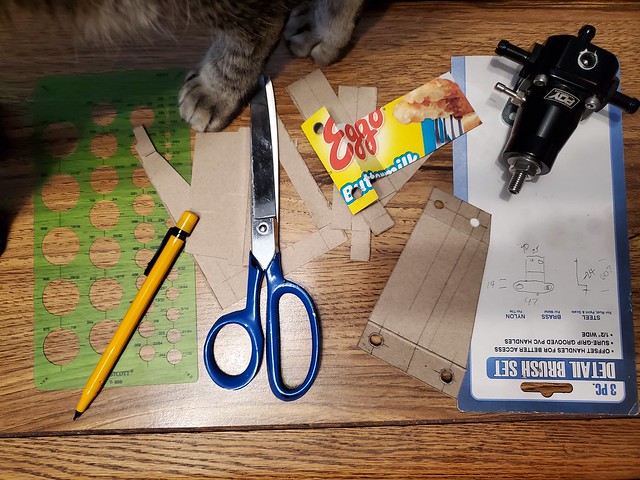
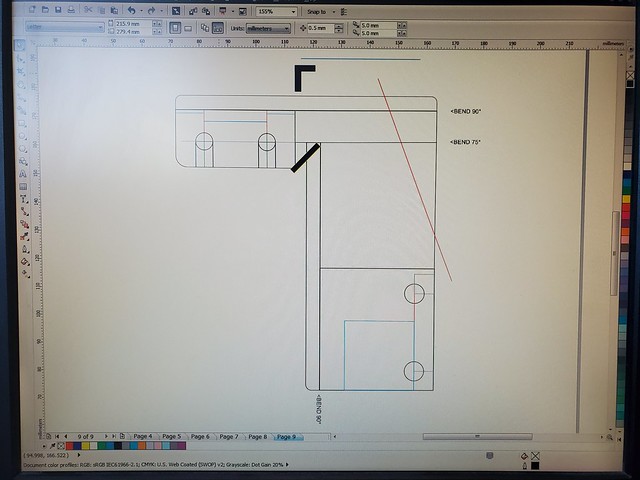
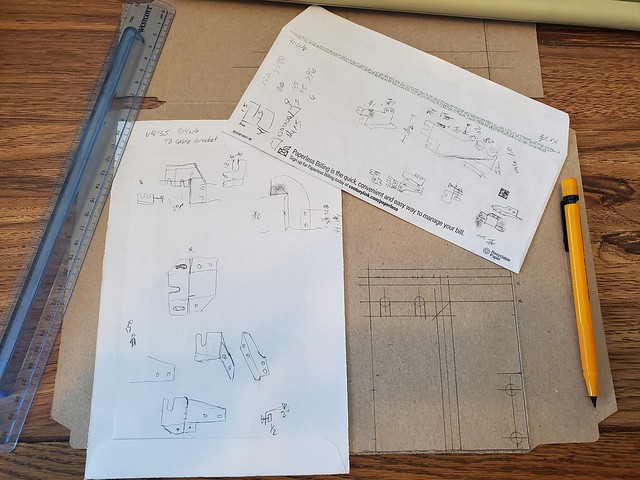
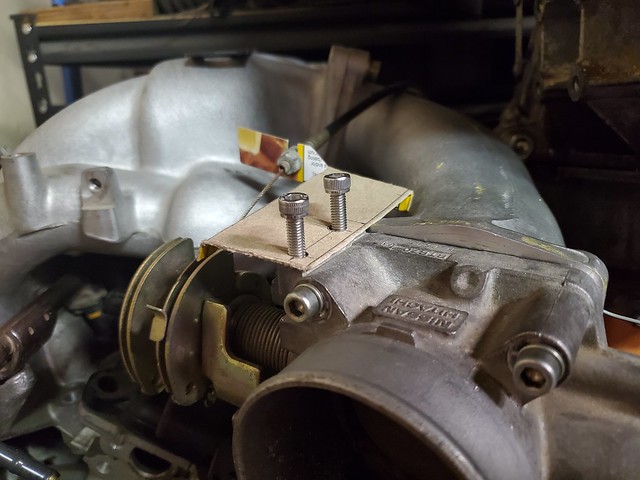
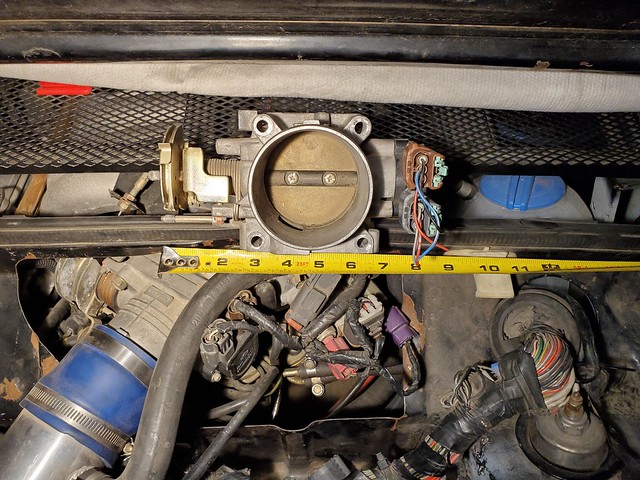
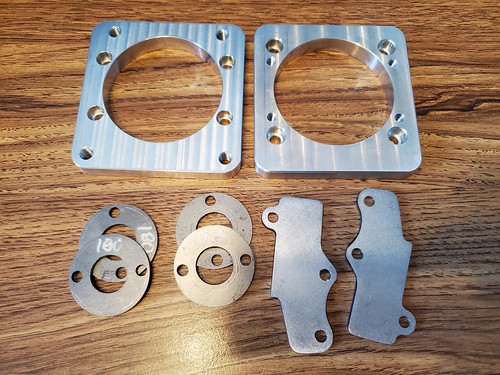
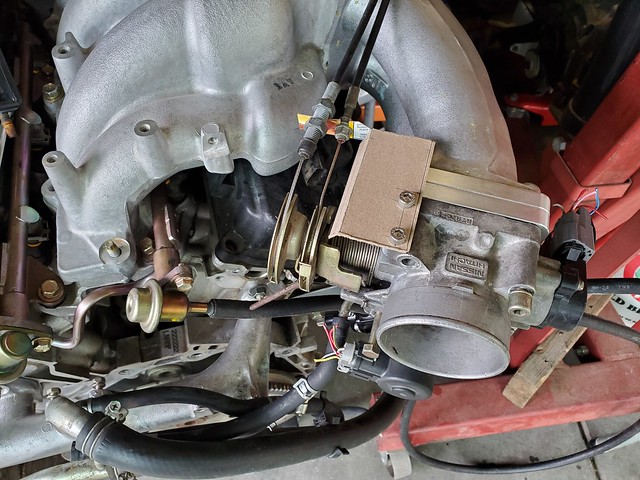
First is the Throttle Body adapter. Replacing the factory e-gas with cable. I currenly have this partially drawn in CorelDraw and design is not absolute (still searching hardware). 96mm x 99mm. TB (red) bolts to piece_1 (blue) which bolts to piece_2 (green) which bolts to IM (yellow).

IPB Image

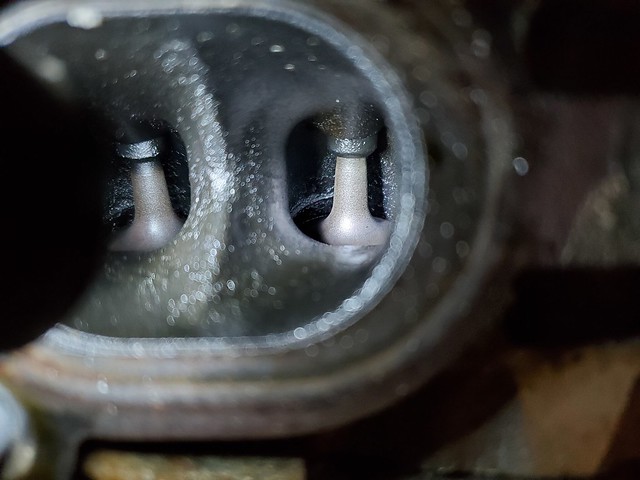
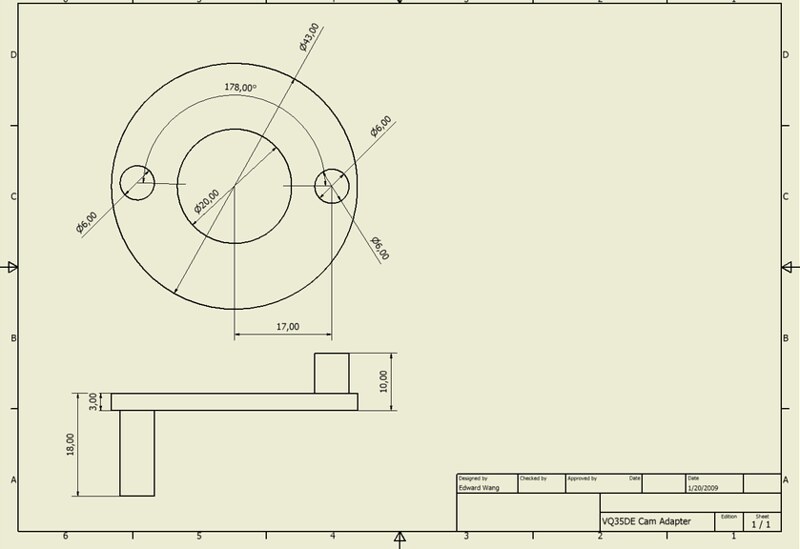
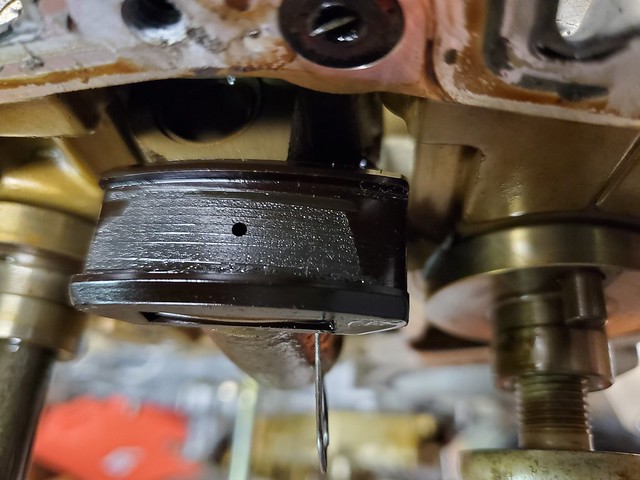
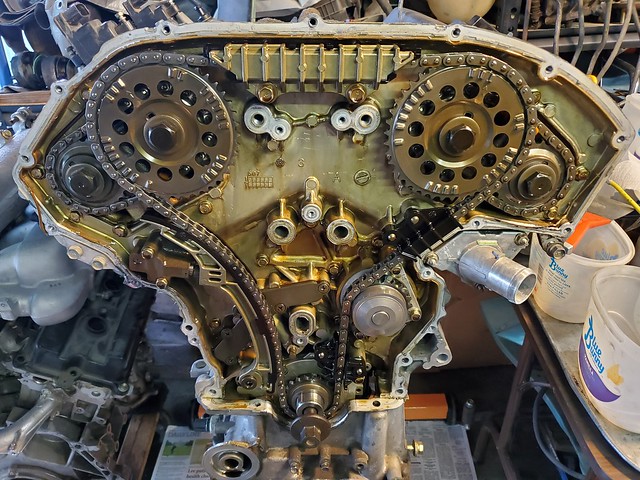
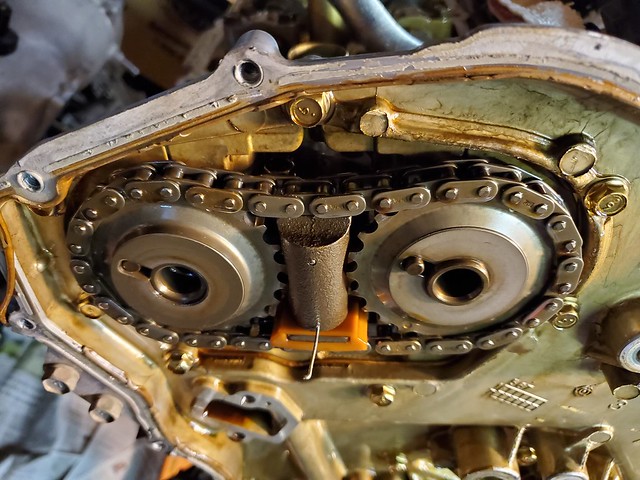
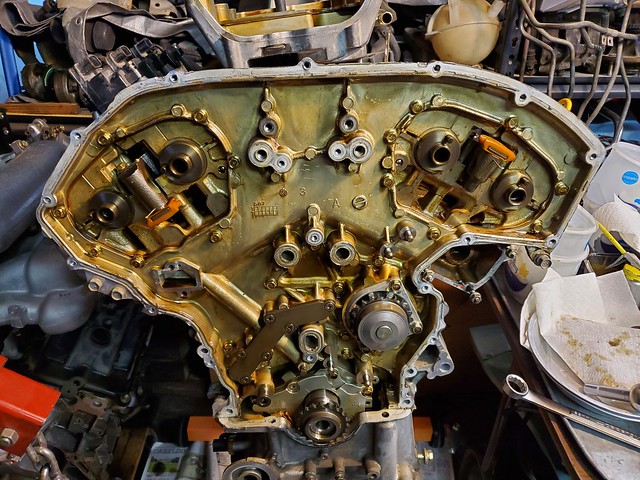
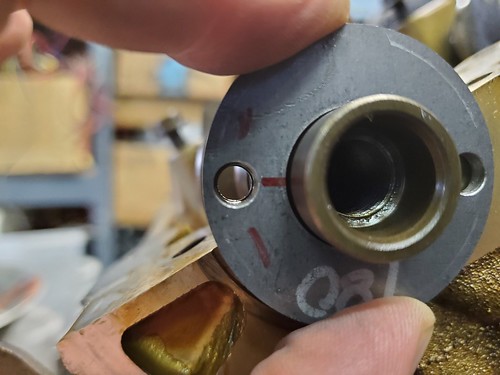
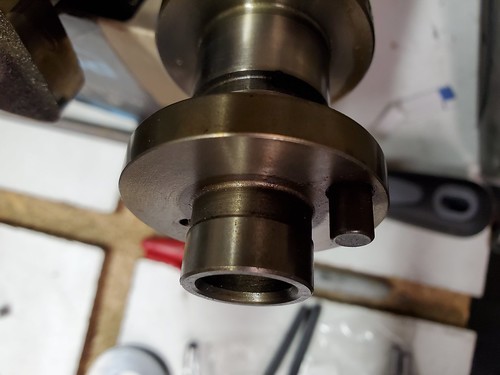
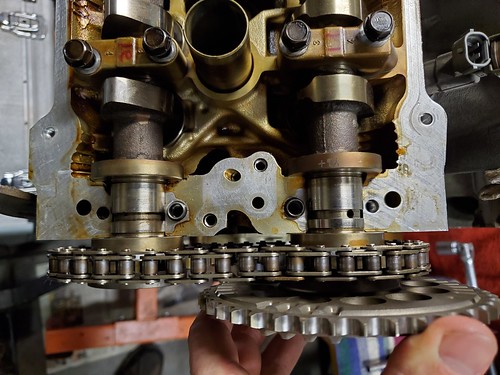
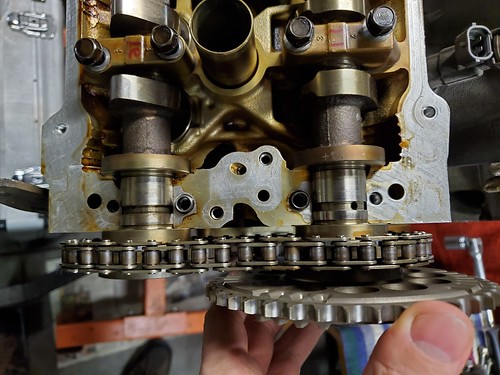
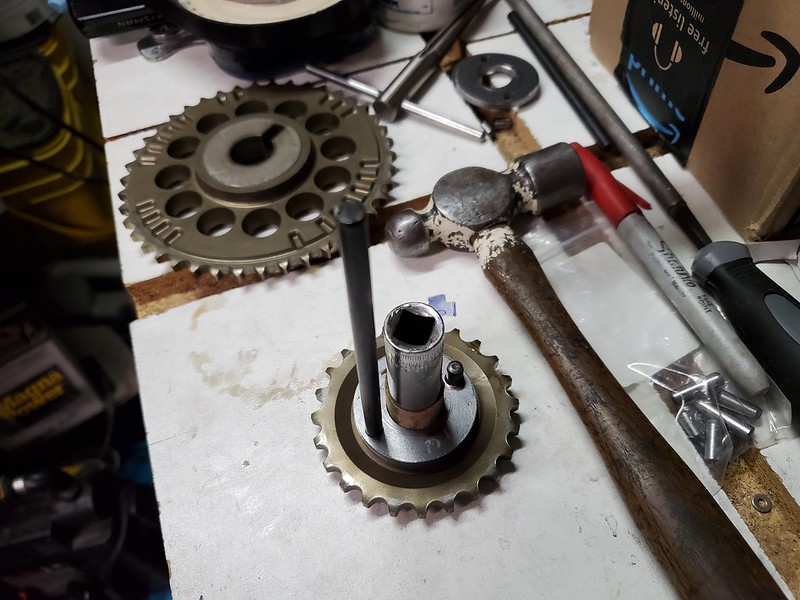
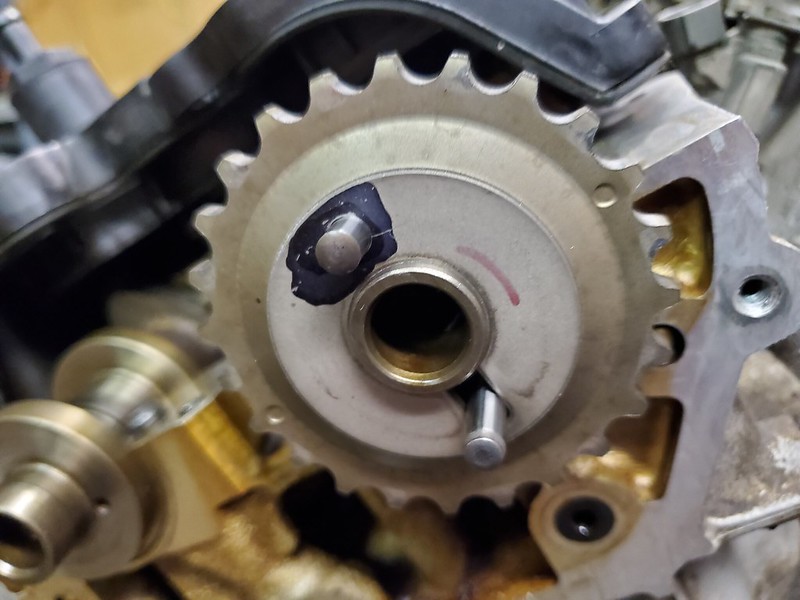
Second is cam gear adapters/spacers in steel. I need 2 @ 178* and 2 @ 180*. 4 total cuz 4 cams of fury. 6mm dowel pins look to be readily available.

IPB Image

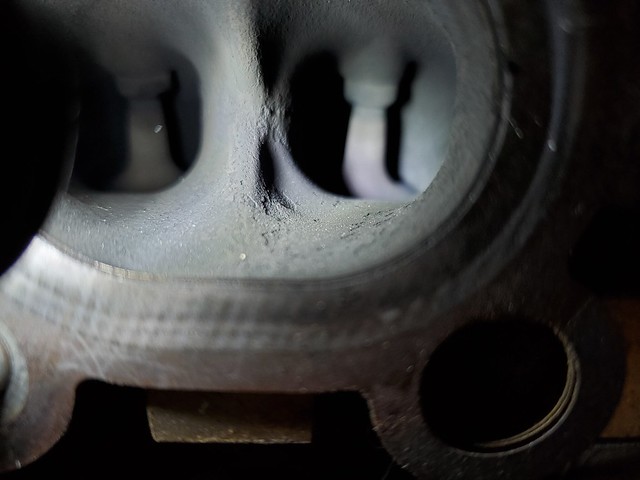
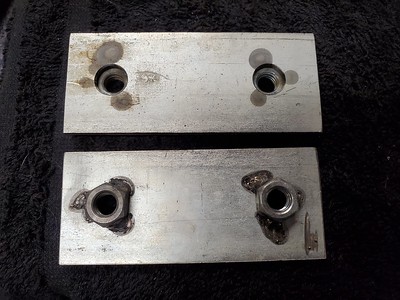
Third is a pair of aluminum block-off plates for the VVT cam adjusters. 1.5" x 3.5" Also drawn in CorelDraw, which can be exported as .ai or .dxf. Actually I might make these by hand.

IPB Image

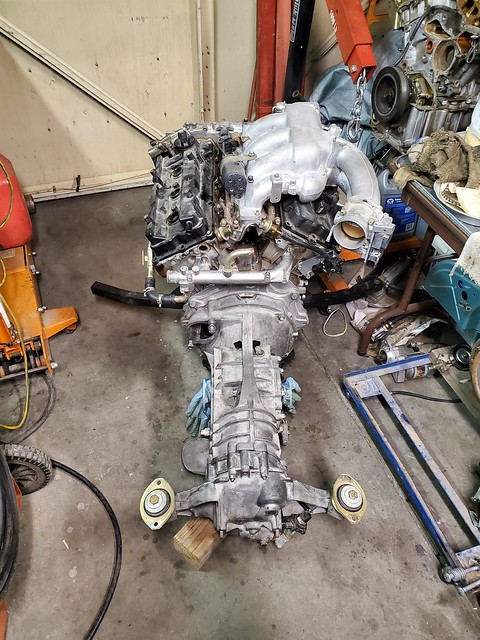
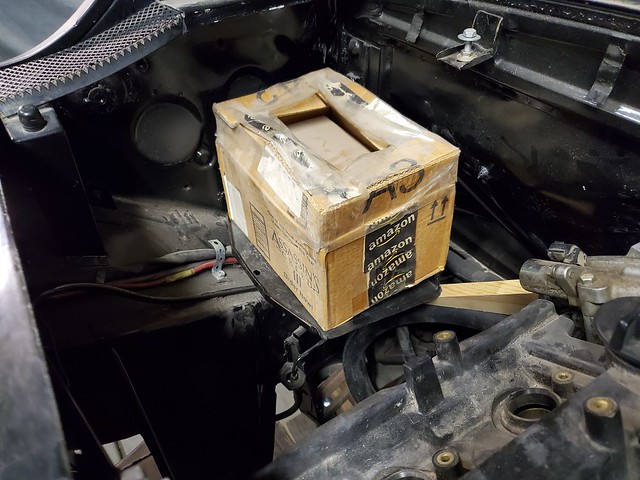
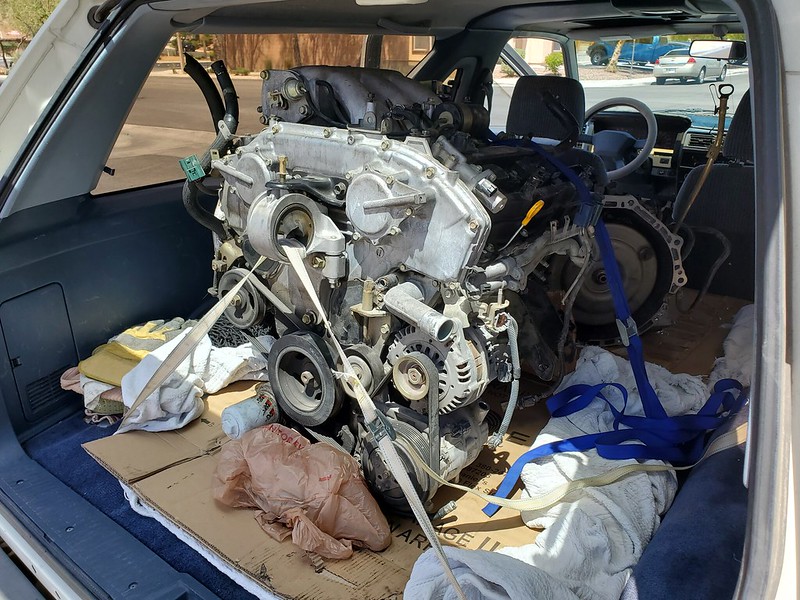
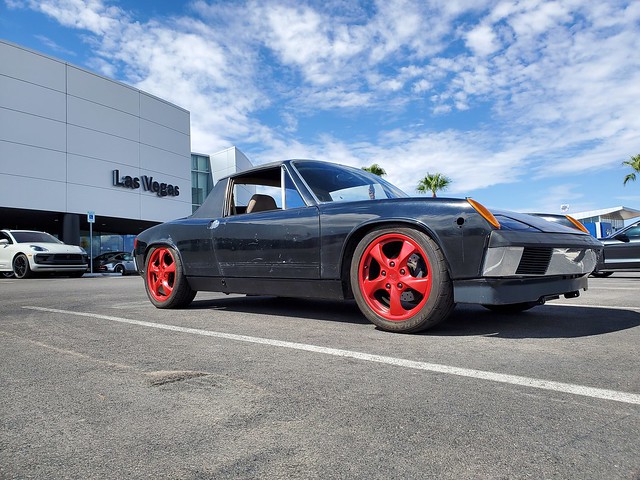
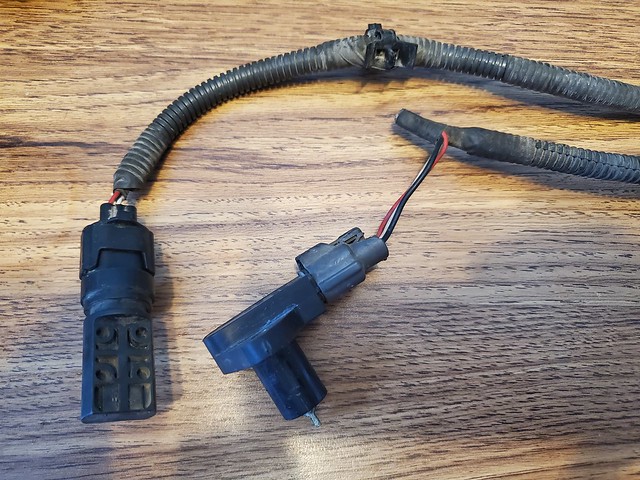
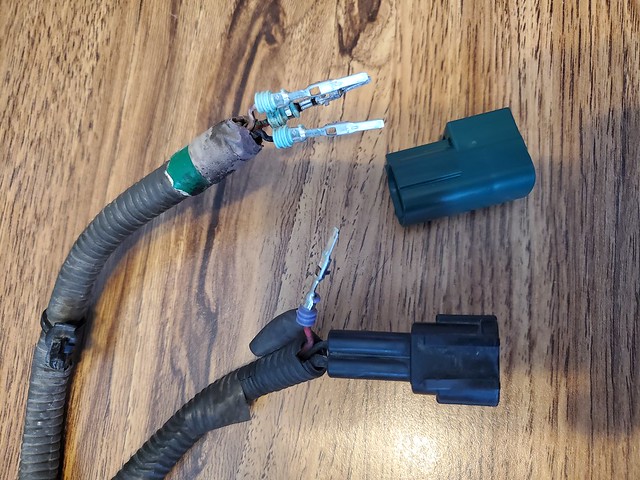
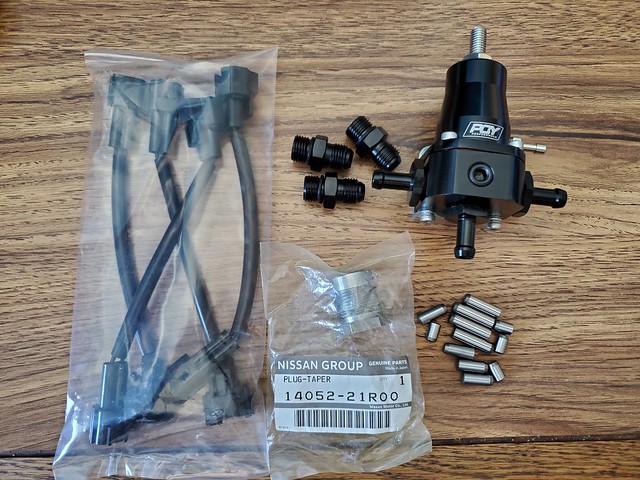
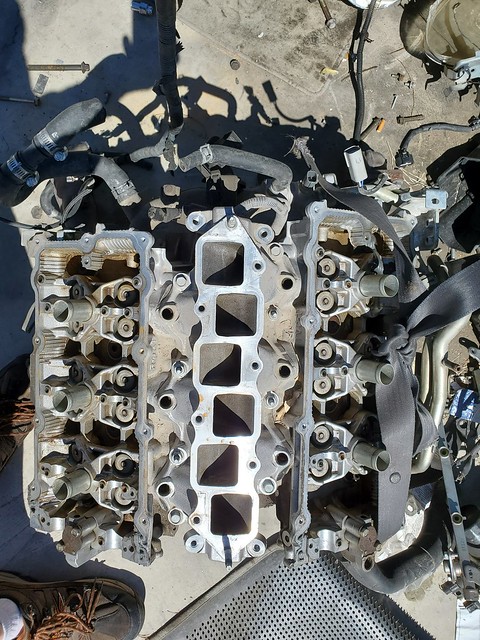
Gratuitous PartsFinder pic

IPB Image
tygaboy
I may be able to assist with the block off plates. What thickness of aluminum? The plasma table can’t compete with a mill for edge finish, particularly on thicker material but let’s at least explore it. Feel free to PM me, too.
Mueller
Hi Chris,

Remind me late next week if not in a huge hurry, I'm driving up to Cornelius Oregon for a wedding this weekend.

That car is going to be even more wicked with that power upgrade!

Think you'll do a VR30DDTT from a new Z or Infinity once they start to get wrecked on a more regular basis?

Chris914n6
QUOTE(Mueller @ Jul 26 2022, 06:59 AM) *

Think you'll do a VR30DDTT from a new Z or Infinity once they start to get wrecked on a more regular basis?

Not likely. Too many things going on with that one. Same with the HR and 3.7. This vq35de will hopefully be the last one. Will do ~300hp with headers and a good tune, 400hp with turbo but only if a WRX trans can take it.
Chris914n6
Made it to the Gaudin Porsche Bumblebee reveal. The first official outing of my resurrected car sunglasses.gif 
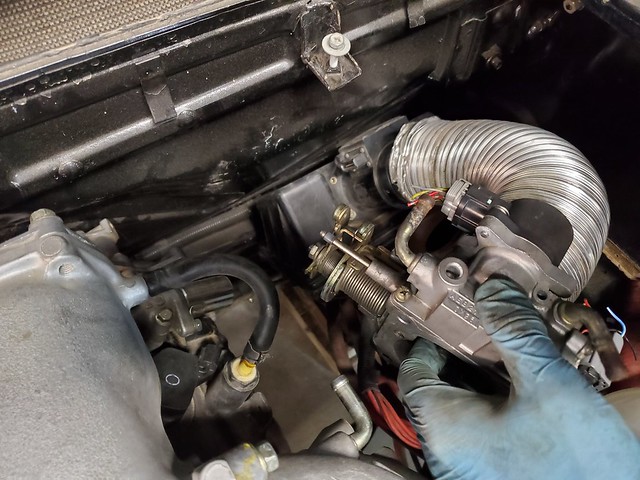
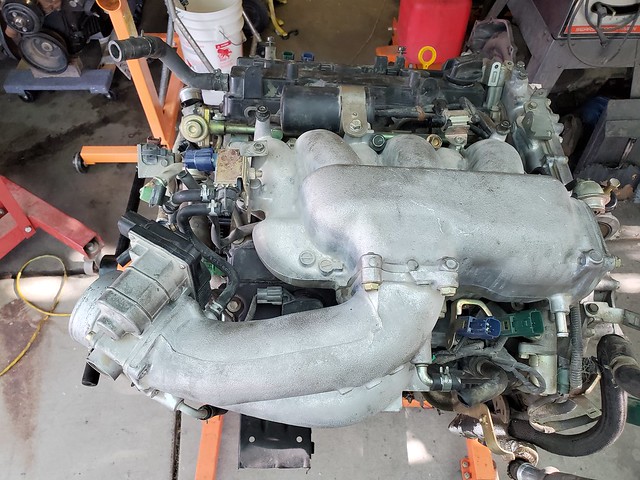
Also the last with this poor engine. It was tough to be so gentle with the throttle but made it no problem. I'm tempted to paint the lowers red and call it a Bumblesicle av-943.gif

IPB Image
Chris914n6
Let's file this under things I don't want to do twice.

First the outer timing cover.

IPB Image

Then the timing components.

IPB Image

Then the inner timing cover. 72 bolts total blink.gif

IPB Image

But before I put the vq30 parts on I am going one step further. This year motor came with a bad batch of valve stem seals. So I'm pulling the cams to replace them while I'm already here. For that normal person that asks "why not just do the head gasket on your 3.0L?". Well, after the cams are out the head bolts can come out -- this is why I chose upgrade over just fix...

IPB Image

They also had issues with the cam gear chain guides prematurely wearing. The fact that it hasn't worn thru yet is a good sign of low miles and easy living.

IPB Image

Mueller
Looks easier than an Audi. Are upgraded guides available or is that not worth the effort?
Chris914n6
The factory fix is updated guides and chain. The chain is the problem.

I'll be using all the parts from the 3.0 so it's not an issue.

Mid work day update. Got one side done and my back wanted a break. This valve spring popper tool works really well if you have the right hardware handy.

IPB Image

In case you're wondering.... solid lifters.
Chris914n6
Got behind on updates.

Boring part
<rant> The cam adapter diagram is wrong. Because the person (engineer) that designed it took logical measurements but didn't update his mistakes after trying to assemble it on the engine. The pins are too long, specially the 10mm that goes (doesn't) only 3mm into the tapered cam flange. Then the 18mm is way longer than it needs to be, the factory only did 3mm in 7mm out headbang.gif
Threads also left out the factory part#s. This is why I double check and usually figure it out myself. ar15.gif
</rant>

This would be alot easier if vq30 hot cams weren't $1400. But going from vq35 238/240 to vq30 232/232 just gives up too much fun.

Spent the rest of the evening removing ancillary parts then another 5/8" in 1/2 hour t-storm blew in.

Also 100f and humid sucks.

Chris914n6
I've gotten to the point where I have an engine in/out system that is fairly quick. Unfortunately I have gotten to the point where I have an established system...

IPB Image

Previously I used threaded rods to lower the front while using a jack for the trans. Now I use 2 jacks and the rods as guides. Still have to drop the front wheels to the ground to clear 32" under the bumper.

IPB Image

Then in the spirit of upgrades I test fit 350z/g35 exhaust manifolds. Would have been cheap and easy HP if they weren't such a poor fit. Tried z32 headers too but didn't fit the heads. I'll have to make some when/if the time comes.

IPB Image

IPB Image
Chris914n6
Not much for today. Got the vq30 stripped except for the flywheel, as it's stuck.

Did a little pre-fitting of coolant pipes and seeing how much of the vacuum hoses stays with the EGR. The 02-03 vq35 didn't have EGR so those bits won't be transferred over.

After way too many brain taxing hours looking thru FSMs it looks like I'm free to remove the whole vacuum hose jungle gym that was used on my 97 CAL spec swap. I previously grabbed a 95 FED manual ecu as it's compatible with NIStune and it's before all the evap system check systems.
Also going back to the early 90s for the basic evap system. The ecu controlled system is just too much.

IPB Image

IPB Image
Mueller
Hi Chris,

Just need to machine off the excess material on this one and tap it.


Click to view attachment
Chris914n6
biggrin.gif piratenanner.gif aktion035.gif beerchug.gif


QUOTE(Mueller @ Aug 21 2022, 09:12 PM) *

Hi Chris,

Just need to machine off the excess material on this one and tap it.


Chris914n6
Weekend update.

A little WD40 overnight soak and I was able to work the flywheel off.

Then the part I didn't want to do twice happened again...

Nice simple flat outer cover that was a b* to pry loose.

IPB Image

Outer cover off. You can see the necessary timing marks on the intake cam gear. Everything looks good like it should given the 20-25k on the motor.

IPB Image

The much simpler timing setup off and without power tools this time.

IPB Image

Rear cover doesn't want to come off either, so called it a night.

IPB Image

But before I went in I did a quick test fit of the VVT cover. This Chris isn't making a new firewall for 5-10 hp...

IPB Image
Chris914n6
A rare moment of easier than expected.

The 3.5 FlywheelPS is 4mm longer and the oil pan is 4mm thicker at the mounting location to accommodate. The guide lists options as grind down the 3.5 mount or swap the 3.0 oil pan. The only other differences with the oil pan is an extra hole for the compressor to mount directly instead of with a bracket -- and extra internal bracing.

I feel the bracing is important... so some quick FSM reading and, no surprise, the sensors function the same.

Luckily this part of the harness is a separate segment and it just happens to use the same pins (unlike the injectors) and it wasn't removed from the motor before I got it. Presto change-o connector replace-o santa_smiley.gif

IPB ImageIPB Image

Spent the rest of the time cleaning and de-gasketing and making my neck hurt.

I also need to up my pace poke.gif
Chris914n6
Noting much to take pics of. Did some more cleaning. Started working on the throttle cable bracket. Had some down time waiting for parts... found some interesting info on the HR & compatibility. The RWD HR intake looks like it will fit without the trunk cuts I had to make earlier, but the parts list gets involved and fuzzy.

Monday was delivery day. Adjustable FPR (Aeromotive clone), added 8mm barbs, injector connectors from wirespecialties.com (yes 2 are missing, they are inbound), factory EGR tube plug. Grabbed double the dowels (10mm 16mm 20mm) I need just in case I mess up the 'fitting' from McFaddendale Hardware (local). Also got a quart of paint to cover the primer in the engine bay (finally, put that off for a while).

IPB Image

Took a trip to the Pick-a-part for a G35 fuel rail inlet/damper. Rubber hose over a plastic hose -- kinda funky thing to do.

IPB Image

They happened to have an HR apart to inspect.

IPB Image

IPB Image

Looks like it's going to be 110F all week, because it's crunch time dry.gif
Chris914n6
Another series of small accomplishments.

Used the drill press to file down the TB adapter cap screws from 10mm to 9mm to make @Mueller happy.

IPB Image

Took a lesson from the 'resurrection' and bench tested the injectors before the engine is installed. Passed with flying mist rolleyes.gif

IPB Image

Also set the aFPR to 51 psi (3.5 bar). No surprise the cheap gauge is off. Followed advice from a Youtube vid and took the FPR apart first. Found aluminum chips (debris) that would have been bad for the injectors and greased the adjustment screw. Also put thread seal on the gauge plug. Still trying to find a good place to mount it.

IPB ImageIPB Image

Lastly, prepped the engine bay for paint in the morning afternoon right before dark again.

IPB Image

tygaboy
Chris - I'll get your parts shipped tomorrow. Enjoy!
Chris
Chris914n6
Those look goooood! drooley.gif

Fun fact - your project and mine spec the same torque ~275 lbft burnout914.jpg

QUOTE(tygaboy @ Sep 1 2022, 05:02 PM) *

Chris - I'll get your parts shipped tomorrow. Enjoy!
Chris

tygaboy
QUOTE(Chris914n6 @ Sep 2 2022, 01:30 PM) *

Those look goooood! drooley.gif

Fun fact - your project and mine spec the same torque ~275 lbft burnout914.jpg

QUOTE(tygaboy @ Sep 1 2022, 05:02 PM) *

Chris - I'll get your parts shipped tomorrow. Enjoy!
Chris


Ha! But why do I think yours will be running first? laugh.gif
Chris914n6
Another sleepy day of small projects.

The Pathy TB has a nice pair of unused bosses in the perfect place to mount a cable bracket, so I threaded them m6x1.0. In the process I realized they both didn't go all the way through. headbang.gif Don't know if I want to risk drilling after threading...

IPB Image

Seemed like a good time to mount the rear sway bar so I made these. Then in test fitting I found rust, so I decided that should probably wait... headbang.gif

IPB Image

But to end on a positive note... sleeping on a problem resulted in an easy solution to the FPR location issue. Bracket fabrication in progress....
Chris914n6
Well lookie here, I made #2 on Google piratenanner.gif

IPB Image

Since I'm on the subject of #2...
....the bay got painted this evening. We will say it looks better than 21 year old primer and leave it at that. Someday I will make the whole car all nice like, but I want to driving.gif at least 9,146 miles first hissyfit.gif black914.jpg

IPB Image

Now something I'm good at... Waffle Aided Design & cardboard brackets laugh.gif Nailed it on v2.1

IPB Image
Retroracer
Using Eggo waffle packets to make bracket patterns? Well, I've seen Stranger Things.


Thx, I'll be here all week.

- Tony

PS. Interesting build, keep the posts coming!
Chris914n6
The acc cable bracket was a bit more involved design. Penciled a few ideas before deciding this design would be strong enough and easy to make. KISS

Upped my game with CAD this time. I was a CorelDraw wiz in my past life in signs.

IPB Image

Prototyped with WAD of course biggrin.gif

IPB Image

Will be a perfect fit after the adapter is installed. first.gif

IPB Image

Since I felt like avoiding sweating buckets today, and I thought the trunk light would be good if it didn't shine on the ground and everywhere like a ricer, I did a little hobby painting before putting it back on.

IPB Image
Mueller
These will ship out in the morning. Hope they work!
Click to view attachment
Chris914n6
QUOTE(Mueller @ Sep 5 2022, 11:41 PM) *

These will ship out in the morning. Hope they work!

They look perfect. Thanks so much for making these.

Since everyone is dying to know... the TB adapters required a 3 step process of SAD, CAD & RAP.

First both TBs were digitized using Scanner Aided Design. Then measurements were taken and overlaid using Computer Aided Design. Then that was converted to physical form using Ritz Aided Prototyping. lol-2.gif 
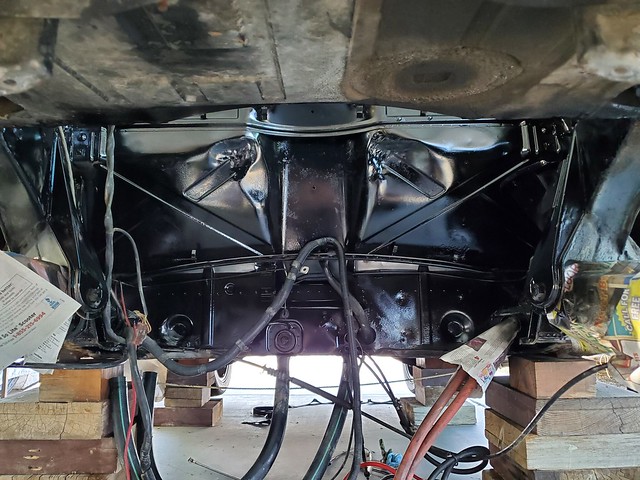
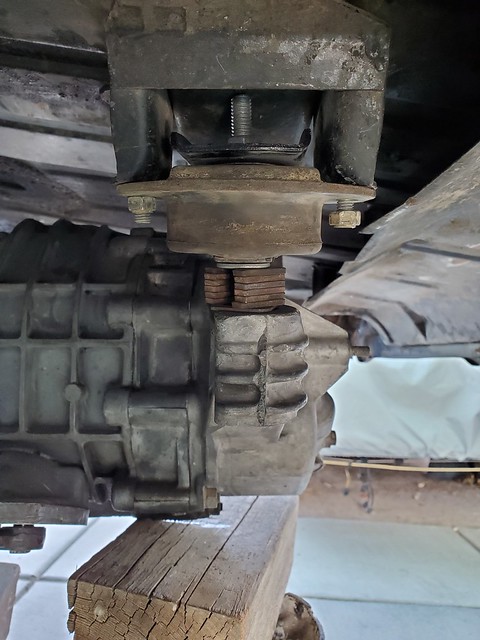
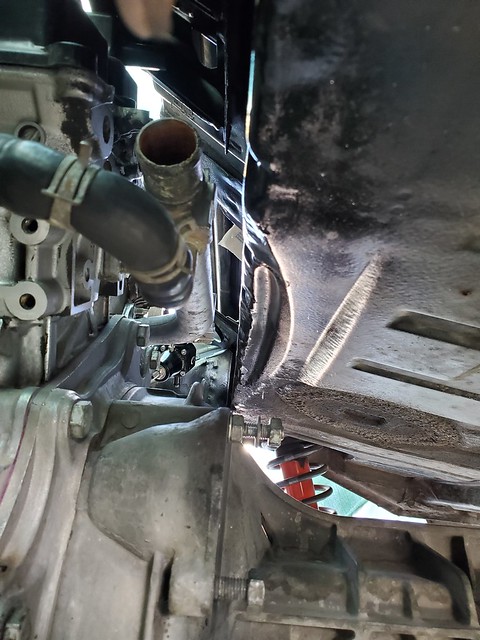
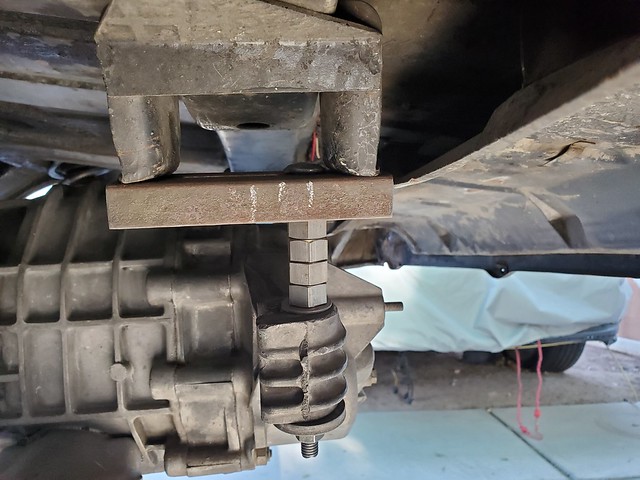
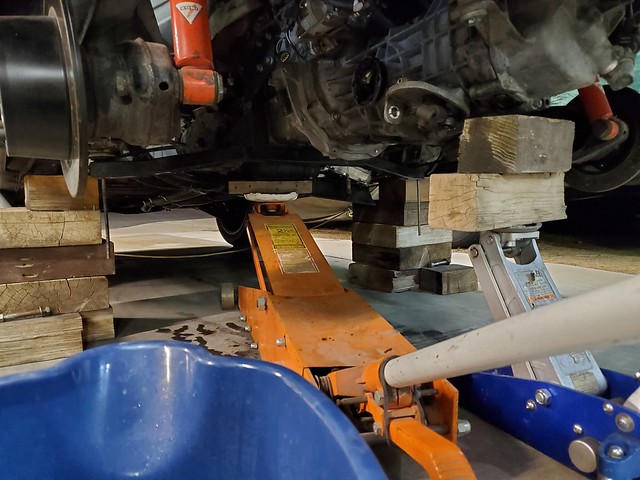
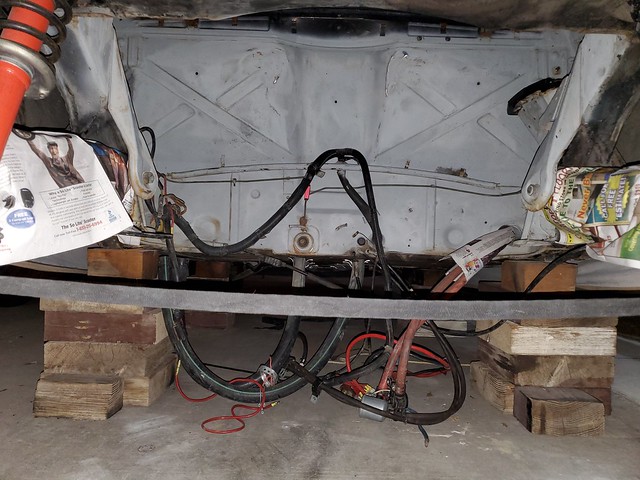
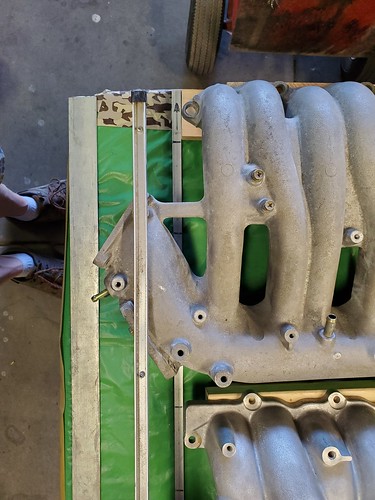
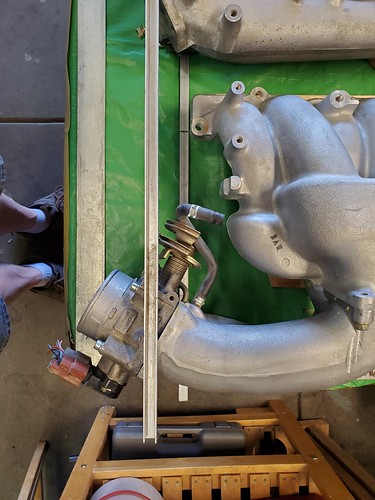
This allowed me to get an idea of how it would fit at the trunk wall.
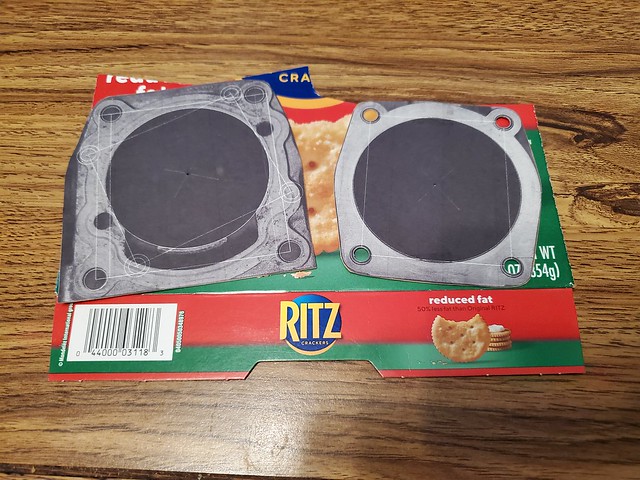
IPB Image

IPB Image

IPB Image
IPB Image

Bonus that the FWD vq35de intake is 2 piece, which allows me to fabricate (ideas?) a non-trunk interfering option in the future biggrin.gif

IPB Image
Chris914n6
Today was Metal ---- in the mailbox aktion035.gif wub.gif

IPB Image

I like to start the day off with easy stuff. I figured the bottom wasn't too thick, so with a center punch I was able to pop the bottom out without damaging the threads. Then I tapped it all the way thru. Basically it just gives me flexibility with bolt length/type.

IPB Image

Then a moment of truth... @mueller SUCCESS!!! beerchug.gif

IPB Image

Officially earned my Binky Badge* smash.gif smilie_pokal.gif

IPB Image
*(not a real thing)

IPB Image
Chris914n6
hitfan[1].gif ar15.gif Andrew Wang

So the dudes cam adapter diagram is wrong again, this time in a super important way.

The actual cam pin bolt circle is 33mm NOT 34mm.

IPB Image

So I had to make them fit, which took hours I didn't have to spare.

IPB Image

But I got it to fit with careful filing.

IPB Image

But there is an even bigger problem. There is a groove where the piece mounts....

IPB Image

...that lets the gear rotate many degrees.

IPB Image
IPB Image

Even if I could get it lined up and torqued there is no guarantee it wouldn't slip in use. Way to janky for me. Wasted day.

IPB Image
Chris914n6
The cam adapters seemed to be the easy method, but it's not the only one. Others choose to drill the cams, too involved and risky for me. Or drill the cam gears, which is a solid way to do this (plus new gears are cheap and easy).

So with much, very very much thought, totaling half a day, I moved forward with what I had available...

2 cnc machined adapters as templates (off by 0.5mm)
1 undersized socket
1 paper towel roll cut to work as a shim
1 loose fitting center punch
1 wobbly Harbor Freight drill press
5 American size drill bits near 2mm 3mm 4mm 5mm 6.1mm
2 cojones from a desperate man with too close of a deadline

IPB Image

Must include that impossible to acquire skill of Divine Intervention...

IPB Image

I can't describe the feeling when this worked out at this level. At this point I called it a night and drank the elixir of stress relief beer3.gif

The next morning I decided it has been too stressful to try to get the 914n6 running for RRC22. I'll finish it up when I get back.
Mueller
Awesome amount of work and very ingenious Chris.
Chris914n6
After RRC I wasn't in a hurry anymore... and I discovered Link now makes a plug-in 350z ecu... so I started rethinking the plan. idea.gif 
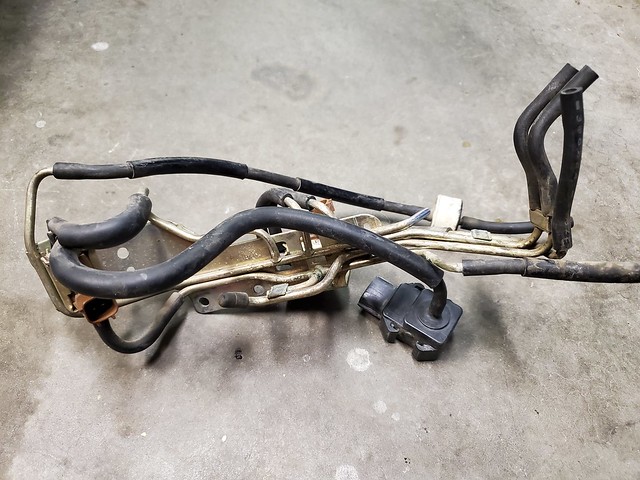
I have a vq35de harness hidden somewhere. Nissan makes a floor mounted e-gas pedal. The 3.0L ecu will run the 3.5L but things will be a bit off so a new ecu was on the list anyways.

Plan the work. Work the plan. Change the plan. Spend more money. dry.gif

But luckily for my wallet I was motivated to work on something else. Plus it gets cold in my north facing garage.

The infamous 1988 Nissan Partsfinder is pretty much worn out @233k. It's fine for local needs but sucks for touring and can barely get it's own butt up the Baker grade - forget towing a 914. I was looking into a newer Pathfinder (one with the vq35de biggrin.gif ) when circumstances offered a likely better option.

The next door neighbor's 2004 Chevy Blazer broke again and he was ready to move on. He took good care of it and I did most of the previous fixes, so I couldn't say no.
BUT, what I thought was a bad spark plug wire and broken motor mount was actually a leaking injector and hydrolock damage sad.gif So it sat for a while, because, frankly, Partsfinders don't break.
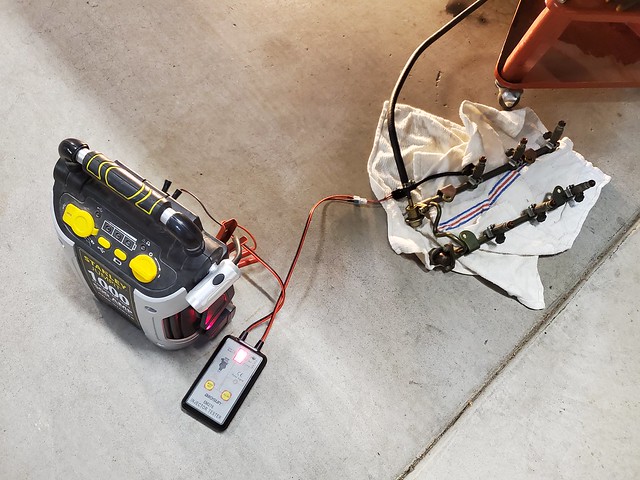
 aktion035.gif Eventually I scored a 61k engine & trans from a wrecked 2001 S10. Last winter I finally committed to fixing it. I got it put together and running again by this summer but there were some other issues.

After the 16 hours of driving for RRC I was motivated to finish the Blazer. Still a few little things but at this point it's practically restored reconditioned. Will I unintentionally also drive this Partzfinder for 15 years? confused24.gif

IPB Image
Chris914n6
So it started as a simple MIA (Mosquito Involved Absence) from the N6 engine rebuild, which lasted into winter, so I moved to backyard projects cuz that’s where the sun shines making it reasonably warm. Also includes some much overdue house projects but unfortunately this year had uncooperative weather so even those are behind schedule.

But in March I had some random downtime, and a need to make room in the garage, so I decided to install the mockup VQ35 with the 914 trans.

IPB Image

Begin plot twist...
Chris914n6
Three decisions were then made. One, I’d like to swap in a WRX trans as I’d like 300+hp with no worries. Subaru Diff is 1.5” closer to the engine compared to the 914, and with the VQ30 I used RH spacers to move it FORWARD 1.25”, so repositioning the drivetrain is necessary, which leads to 2. The VQ35 VCT gears add 1.5” to the front of the motor, which would not be a problem if I moved it back to stock location. Plus I'd prefer to keep it for it’s benefits.

Step one: Can I clock this heater coolant tube at the rear of the engine?

IPB Image

Yes! biggrin.gif

IPB Image

Step two: Install drivetrain

IPB Image

IPB Image

IPB Image

Decision three, the VQ35 intake as is hits the trunk lid if I use the VQ30 conv bits and that is no bueno.

IPB Image

Chris914n6
An hour here, an hour there, I narrowed down the sweet spot.

914 trans moves rearward 1”.

IPB Image

IPB Image

Oil pan sits 3/4” below the floorpan – similar to the VQ30.

IPB Image

The engine lid will get a minor beauty hump.

IPB Image

The custom intake extension/MAF/filter box will go where the battery sits.

IPB Image

The battery will move to the drivers side.

IPB Image

Trunk will get a removable cover panel to clear the fuel rail.

IPB Image

Add VQ40 headers for a better flowing dual exhaust. Lastly, cable shift. I may or may not do the Subaru trans at this juncture.

Chris914n6
Continuing…

That’s a lot of work to be done, and I’m still paying insurance, so I looked more into the VQ30 cooling issue.

One of the exhaust ports looks different... idea.gif

IPB Image

IPB Image

So the plan when I get caught up is to pop the heads off and if it’s an easy head gasket fix, I’m putting the 3.0 back in.
w00t.gif
End plot twist.
FL000
Sounds like you are coming full circle and that’s ok if it gets you back on the road sooner.
ClayPerrine
I want to ask a curiosity question here.

Why use a WRX transmission? With it you have to remove all the stuff that hooks to the rear driveshaft, and install an aftermarket block off plate. Then you have to make custom axles to use it in a 914 chassis. And you still have to make an adapter plate/clutch assembly to hook it to the Nissan engine. Plus you have to fabricate a cable shift setup.

Why not use a Boxster/Cayman G86-21 transmission? It is 2 wheel drive, so you don't have to do any mods to it, and you can use stock, unmodified Porsche 996 axles in a 914. And it already comes setup for a mid engine cable shifter.

It also appears that the VQ35 starter mounts from the engine side (I could be wrong though), so with the Boxster/Cayman trans, you don't have a big unused open hole in the bell housing.


The prices on the Porsche G86-21 trans are about $2500.00. The Subaru trans is cheaper, but with all the mods you have to do it may be cheaper to use the Porsche trans.

Just my $.02 worth on it.
76-914
blink.gif
tygaboy
To @clayperrine Clay's question: Chris is handy and clearly likes to fab stuff so more of a DIY may appeal to him. Plus the aforementioned cost savings.
Plus, I suspect Chris is a charter member of the "mine is different/special" club! aktion035.gif

That said, I've been noodling on re-powering my LS car with a Nissan V6 and, if I understand it correctly, Kennedy Engineering could supply a complete adaptor kit to the Boxster trans, if he wanted to go that way.
ClayPerrine
QUOTE(tygaboy @ Apr 10 2023, 10:09 AM) *

Plus, I suspect Chris is a charter member of the "mine is different/special" club!


Oh.. and like I am not?? biggrin.gif

I was just offering alternatives, not criticizing.

Chris914n6
QUOTE(ClayPerrine @ Apr 10 2023, 05:36 AM) *

I want to ask a curiosity question here.

Why use a WRX transmission?

Why not use a Boxster/Cayman G86-21 transmission?

My engine is the FWD version as it's more plentiful and much cheaper. The RWD 350z/G35/etc tend to get thrashed. FWD has the starter on the trans, no provision on the engine side.

Box6 disadvantages:
making a starter fit
175 lbs
short gearing
have to buy or make flywheel
small dia bellhousing
Not going to cost $100

Suby advantages:
bolt on starter
100 lbs
plenty of conversions to work from
decent gearing
coupler & axles & plate $300-500
Here is the kicker... Suby flywheel bolts on with a spacer which allows me to use all stock parts.
I can make the adapter.
Only cost $100 piratenanner.gif

It's really a no brainer on my end.
Chris914n6
QUOTE(tygaboy @ Apr 10 2023, 08:09 AM) *

To @clayperrine Clay's question: Chris is handy and clearly likes to fab stuff so more of a DIY may appeal to him. Plus the aforementioned cost savings.
Plus, I suspect Chris is a charter member of the "mine is different/special" club! aktion035.gif

That said, I've been noodling on re-powering my LS car with a Nissan V6 and, if I understand it correctly, Kennedy Engineering could supply a complete adaptor kit to the Boxster trans, if he wanted to go that way.

I think this is more your forte biggrin.gif @tygaboy

Nissan VQ37VHR to PDK Adapter Kit
ClayPerrine
QUOTE(Chris914n6 @ Apr 10 2023, 01:09 PM) *

QUOTE(ClayPerrine @ Apr 10 2023, 05:36 AM) *

I want to ask a curiosity question here.

Why use a WRX transmission?

Why not use a Boxster/Cayman G86-21 transmission?

My engine is the FWD version as it's more plentiful and much cheaper. The RWD 350z/G35/etc tend to get thrashed. FWD has the starter on the trans, no provision on the engine side.

Box6 disadvantages:
making a starter fit
175 lbs
short gearing
have to buy or make flywheel
small dia bellhousing
Not going to cost $100

Suby advantages:
bolt on starter
100 lbs
plenty of conversions to work from
decent gearing
coupler & axles & plate $300-500
Here is the kicker... Suby flywheel bolts on with a spacer which allows me to use all stock parts.
I can make the adapter.
Only cost $100 piratenanner.gif

It's really a no brainer on my end.


The starter is not a big deal to remedy, but I can't beat a 6 speed trans for $100.00.

Post picts. I want to see this setup.

This is a "lo-fi" version of our main content. To view the full version with more information, formatting and images, please click here.
Invision Power Board © 2001-2024 Invision Power Services, Inc.