Help - Search - Members - Calendar
Full Version: Rebuilding the FI relay board.
914World.com > The 914 Forums > 914World Garage
Air_Cooled_Nut
My soldering skills leave something to be desired and the space in which to perform the soldering is rather tight but I was able to do it...I think...at least it looked okay and felt solid. Here's a picture of before my soldering and after it was all coated:
IPB Image

Mine showed only a couple cracks in the tar bottom and I'm sure I could've easily patched them but I wanted to see if recoating was easy. It is, just messy and I recommend wearing nitrile or latex gloves. The LET shrinks considerably. One container will be more than enough for two coats and left overs for later wiring projects. The 3M undercoating sprayed on easily and did not shrink. Several coats of that would probably be fine. I hesitated using RTV because I thought I read somewhere that it may be slightly acidic on some metals and I didn't want to risk having my copper strips and soldered joints disappearing on me one day while driving.

If anyone else has done this differently I would like to hear about it, be is successful or not. Mine was successful (short term at least wink.gif ) as the car started right up and ran after installation. Will it last for the years to come? We'll certainly find out beerchug.gif
Air_Cooled_Nut
It's working for me...here's the URL I used:
http://www.icbm.org/erkson/temp/914-fi-relay-board.jpg
brant
Wow... looks great.

does anybody know if common glues (adhesive-all, dries clear) would have any electrical conduction properties.

I used some and am having problems, but have not yet identified it as a board problem or short elsewhere.... (I'm gonna have to break out the ohm meter)

so how do I tell if a glue has an electrical carrying capability (even though it does not claim any such thing on the label)

tia
nice work
brant
TonyAKAVW
Has anyone ever thought of building a modern version of this relay board? It seems that one could get a printed circuit board made and use cheaper relays to get the job done.

-Tony
Aaron Cox
i potted mine with rtv silicone. good stuff.
mightyohm
I used Silicone Conformal Coating. It's very thin and clear so you can still see what's going on underneath, but it should keep moisture and most chemicals out. It should also be a lot easier to remove than that black stuff.

Tony, even if you make a custom PCB you still have those funky connectors to the wiring harnesses. Probably easier just to use the real deal. If you really wanted to you could probably open up all your old relays and rebuild them by putting new (smaller) relays inside. Those things are way too expensive new.
dan10101
We need to do one of these boards. At least that's what the diags say. Do you solder all the terminals? Will a 15watt gun do the trick? Do you just stick in on the rivet and get it hot then stick some solder to it? Inquiring minds... yada yada...

The one I stripped looks like this one, just a few solders here and there maybe 4 total.

Andrew drove his car to school today.... cool.gif Oh, he was cool... cool_shades.gif
Air_Cooled_Nut
I have an old soldering pencil. Couldn't tell ya the wattage.

I put the point on the rivet but the copper and rivet just sucked the heat away and I couldn't get any solder to flow. Here's what I ended up doing...
- Put solder tip on rivet center.
- Form a puddle of solder on the rivet. Thanks to surface tension you can get a decent sized bead on it.
- Keep the solder tip in the solder bead so it will get nice and toasty.
- Stroke the solder bead away from the center of the rivet and to the edge of it where it meets the copper ribbon.
- Keep the solder tip in solder bead, again heating it, then remove the solder tip.
- The solder will flow into/around the rivet and on the copper ribbon.

The reason I used the center of the rivet is because there isn't much room for the soldering tip. On spaces where there is room you can puddle the solder on the edge of the rivet. Again, my solder joints didn't look pretty but this method seemed to hold. If there's an expert on this subject, please, speak up!!! I would hope there is a better/easier way.

If you keep typing "solder", after a while it really looks like a funny word and you have to check the dictionary just to make sure you're spelling it right blink.gif
Korijo
I would like to have mine done like this... Where could I send it ?

Its in great shape, but I would like a good "FRESHENING" up.
mightyohm
A higher wattage iron with a decent tip helps a lot.

I used a high power Weller 60W soldering iron. A gun might work too but don't get too carried away. The fat tip might not let you get to all the rivets.

But first to really make good connections you want to use a wire wheel or grinder (don't get carried away) on all the rivets where they contact the copper traces. This exposes nice shiny copper which will solder a lot better than the dull oxidized stuff. Adding some extra rosin flux helps too (don't use acid flux or acid flux solder). Get the trace and the rivet nice and hot and apply solder right at and next to the tip. Ideally it will flow outward and coat the joint, but sometimes it takes some scraping with the soldering iron and more solder. If you wait too long you'll start to melt the plastic but a little bit of melting is inevitable.
ThinAir
Where can one get Silicone Conformal Coating or LET or 3M Rubberized Undercoating? My board seems to have failed this weekend (had to hard wire the fuel pump to the battery to get home from 60 miles away).

Can you just soak the whole board in paint thinner or do you apply some to the underside and gently work at getting it off before applying more thinner and repeating?

Is there a reason to choose one of these materials over others? I'm thinking of how you remove it in the future should another repair become necessary.
Air_Cooled_Nut
The chemicals are readily available at any decent auto parts store. I used NAPA.

Yes, you can soak the whole board in thinner. I soaked mine for 1/2 a day, scraped off a thin layer of tar, soaked it some more and chipped away at it with a flat blade screwdriver (#2 size I think it was IPB Image
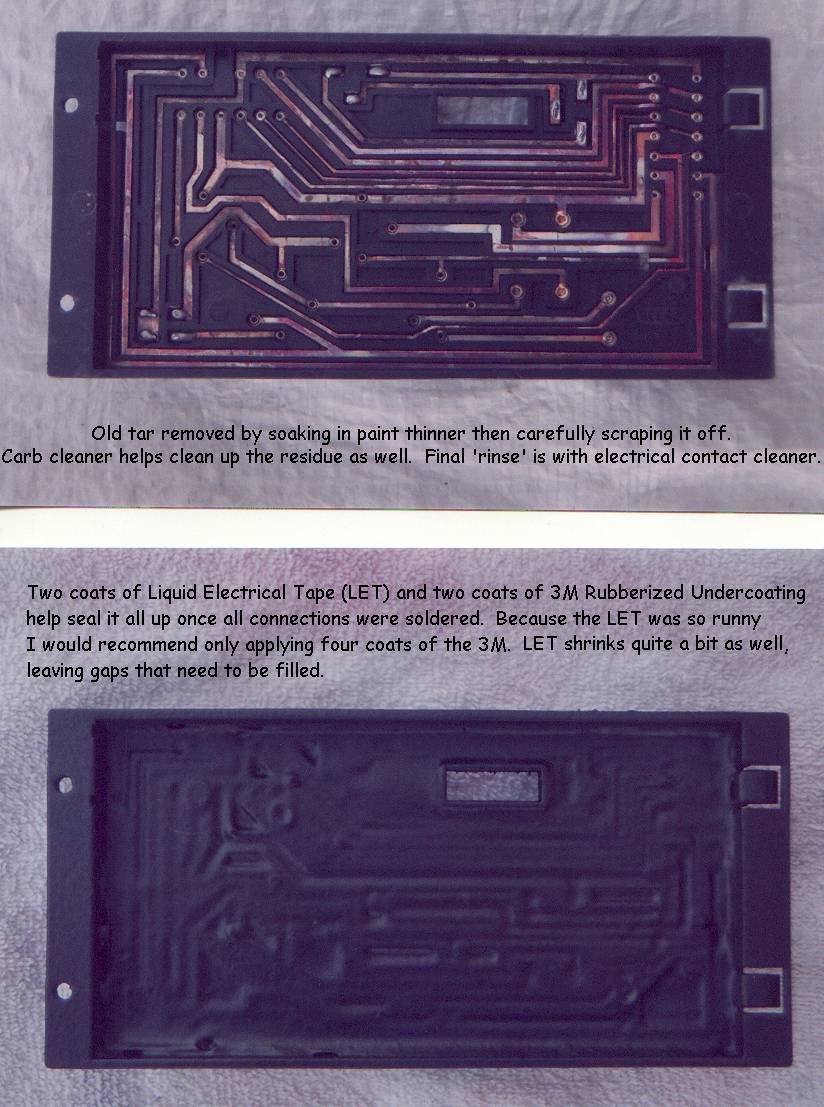
). Added more thinner and let it soak over night and into the next day (I was in no rush). Scraped it some more and washed with carb cleaner. The board won't be hurt, don't worry.

You want to coat the underside so NO MOISTURE will ever creep its way in and create corrosion. You solder the connections so there is no chance of vibration wearing away the connections (wallowing out). Thus you are insuring a 'more fit' board that should last a lifetime!

Of the two 914's I've owned, neither one has a bad board. They seem pretty darn durable to me. But I wanted to fix the couple of cracks in mine and since I plan on fixing more of my 914 (terrible battery rust) and treating her right (plus I wanted to stain my hands with black spots IPB Image) I figured what the hay IPB Image
dan10101
Thanks for the suggestions. I'll try again to find the hotter iron I used to have somewhere. If not I'll try the milktoast 15 watt'er. If that doesn't work it's off to the tool toy store boldblue.gif

QUOTE
plus I wanted to stain my hands with black spots )


Ahh, Yup...
Korijo
So where would I go to have this done ??
Air_Cooled_Nut
Do it yourself! wink.gif
Brad Roberts
Thank for the thread Toby.. it will go into the classics page.


B
Air_Cooled_Nut
Here's the image as an attachment:
seanery
Dude,

Dave has ALS, I don't think he can do it by himself.
Is there anyone who is familiar with the process that can help him out?
Air_Cooled_Nut
Sorry, didn't know and what is "ALS"?

If nobody local can do it I will since I know how ;-)
seanery
it's commonly known as Lou Gherig's disease.

See the thread nailed about the van/wheelchair. There is good info there.
Air_Cooled_Nut
Ah...gotcha!

Hey, my sister's name is Kori and we live in Oregon...hmmm....but she's married to a firefighter in Sherwood.
This is a "lo-fi" version of our main content. To view the full version with more information, formatting and images, please click here.
Invision Power Board © 2001-2024 Invision Power Services, Inc.