Help - Search - Members - Calendar
Full Version: PorSTi Project Thread…
914World.com > The 914 Forums > 914World Garage
Pages: 1, 2, 3, 4, 5, 6, 7, 8, 9, 10, 11, 12, 13, 14
Amenson
As the title states my project has turned a critical corner. After may months of planning and measuring and prognosticating how great it will be, I put down the sand blaster and stripping pad and got down to real work.

I purchased my 914 with the plan of dong this swap. The motor is from my ex-daily driver that I managed to shorten a bit. The 914 that I am starting with has been restored once before and had a decent autocross suspension. The first thing I did to it was to upgrade the front calipers to 3-series BMW. It is not perfect but is pretty clean and straight. The only part that had not been repainted was found behind the heat/sound pad in the engine compartment. The plan is to repair some shoddy patch work in the battery tray area and repaint the engine compartment once all of the fab work is complete for the swap.

Project details:

Engine:
’05 Subaru STi

Trans:
Stock…for now

Adapter Plate/Clutch:
Kennedy Engineering adapter plate and Stage 3 clutch.

Engine Mount:
Modified Small Car Performance mounts bolted to the stock engine bar. The solid body mounts at the ends of the bar have been replaced with stiff 911 mounts. The engine bar has been modified to accommodate the mounts without changing the position of the bar.

Oil Pan:
I will probably take the easy way out and have Small Car Performance shorten and box out the stock pan.

Exhaust:
Custom exhaust will be made starting with Outback stub headers. 2” tubing will be run to the turbo from each header. Exhaust from the turbo will be 3” SS to a straight through MagnaFlow muffler. The exhaust will exit in the stock location (maybe people will not notice anything unusual about the car when they pull up next to it).

Electrical:
The entire electrical system will be taken from the STi harness with unnecessary parts removed. This may seem like a lot of effort but it will provide a much needed update to the old stock harness and allow me to still develop my digital display product. It will also make it straight forward to use the throttle by wire.

Cooling:
Ron Davis 28” x 16” x 3” double pass radiator mounted in the front vented through the hood like wbergtho’s. The current plan is to run the cooling lines through the center tunnel.

Steering:
The stock steering column will be replaced by a shortened STi column. This will allow use easy use of the of the stalk switches and more importantly, the RF ID security key system. Initial measurements show that this will be fairly straight forward to do and will also give the benefit of adjustable steering wheel height.

Seating:
Momo Start. These seats were chosen because of the FIA certified seats they have the thinnest seat cushion and are bottom mounted to allow for the lowest possible seating position (they are also quite economical). I tried a set of Corbeau seats that I had from another project and I hardly fit in the car at all much less with a helmet on.

Belts:
For the road I am going to run Schroth Rallye Cross 4-points. They are DOT approved and have a quick latch mechanism. I will install 6 points for track use.

Intercooler:
A 25” x 12” x 3” Ebay bar and plate front mount intercooler will be mounted to the top of the engine. While this is not ideal, the intercooler will get quite a bit of fresh air from in front of the engine. The engine lid will be modified to a GT style so that as much air can flow through the area as possible. 3” Al tubing will be run from the turbo to the intercooler and on to the throttle body.

Oiling:
A remote filter/cooler is necessary because the stock oil/water cooler does not quite fit with the engine mount in place.


Unresolved Items:

Turbo placement.
It is awfully tight under there even with some of the sheet metal removed. We will find out on Saturday, that is when the exhaust will come together.

Cooling lines:
The plan is to run them through the tunnel in thin walled Al or SS tubing. With the heater control and throttle cable tubes removed, two 1” od test tubes fit to the front of the tunnel. I would like to use slightly larger tubes and still need to fit the fuel and brake lines. The tightest spot is right at the shifter. I am considering widening the tunnel at this point.

Throttle Pedal:
I am not sure how to mount the STi electronic throttle. In the Suby it is top pivoting. This may be uncomfortable with the floor pivot brake and clutch pedals. I have also considered linking the throttle sensor to the stock 914 pedal. This will have to wait until I have seats in the car again.

Starter:
Not really a problem…just have not picked one out yet.

Wipers:
I have not yet checked if the STi wiper control system will run the 914 wiper motor.


As much as possible items will be mounted to the engine in a way that will allow for minimal disassembly when removing the engine/trans. The current exhaust/turbo plumbing plan should all come out with the engine with the exception of the supply to the turbo.

Timing….the goal is to have it ready for the track day at Mid Ohio on Oct. 6th. This is a bit aggressive, especially considering that I will be vacationing in London for 8 days at the end of the month. I have been making great progress the past month and I have most of the critical parts already. Just need to keep plugging along and hope that my friends keep helping. Without them this project would not be possible.

Now for the important stuff…the pictures.

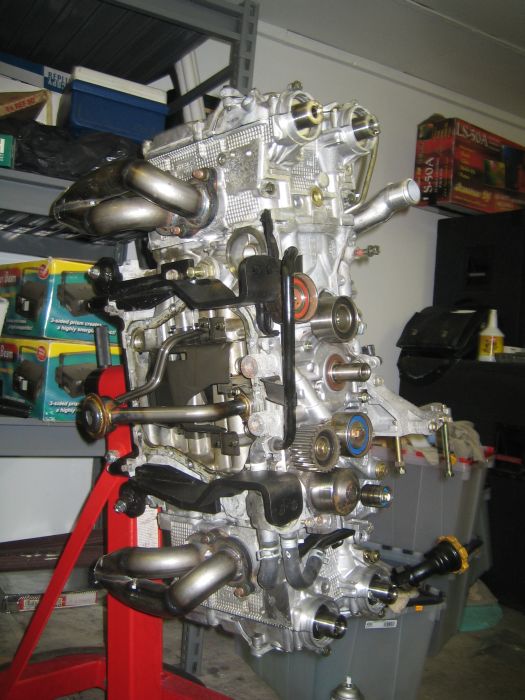
This is the engine that I started with, it came out of my daily driver STi that came to an untimely death:


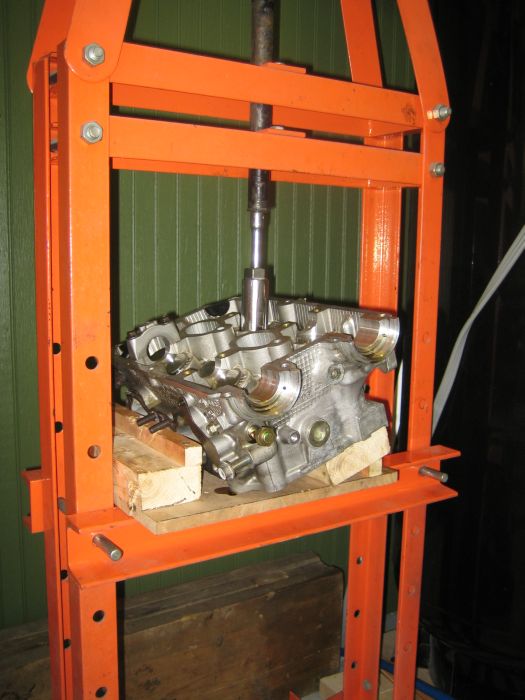
When the timing belt broke 2 valves were bent so a teardown was necessary:

IPB Image

Due to the obscene cost of the Subaru tools to remove the valves I, made my own:

IPB Image

Put the engine back together and attached it to the trans:

IPB Image

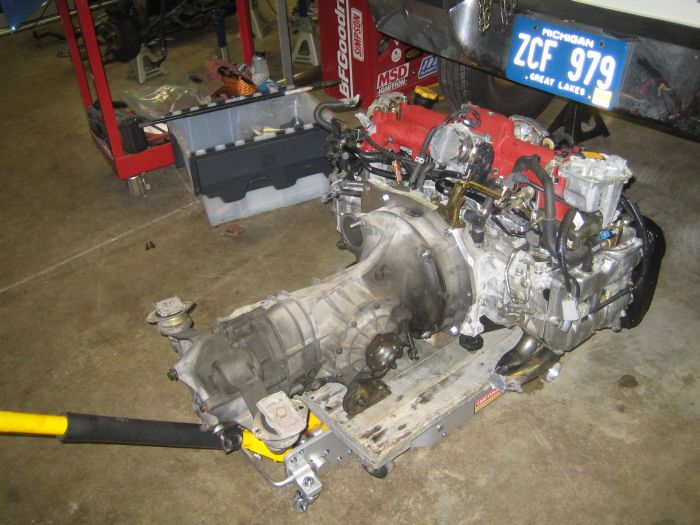
Slipped it into place and attached the trans mounts:

IPB Image

Here is a picture of the unmodified Small Car Performance engine brackets mounted to the bottom of the engine. They wrapped nicely around the oil pan. There was a slight interference between the water line from the oil/water cooler that required a notch.

IPB Image
Amenson
Then spent hours and hours getting it to the right level and notching the brackets fit the stock engine bar. It is a little tight to the water pump housing. Otherwise there is plenty of room.

IPB Image

Lots of room in the front for air to get to the intercooler:

IPB Image

Welding a cross piece between the brackets that will bolt to the stock engine bar.

IPB Image

It was a bit tight welding under the car so we only partially welded it on the car.
IPB Image

Finish welding was done on a bench, fixtured to make sure that it did not move.

IPB Image

Done!

IPB Image

On the car…look ma, no jacks!

IPB Image


You may have noticed that a notch was taken out of the top of the mount. This is a mistake and is not necessary. While the mount is very solid and should do its job very well, it is not as tidy as I would prefer. I may make another one paying a bit more attention to the finish portion of “Fit & Finish.” Now that I have this one made it would be easy to make a jig to make another mount.

You also probably noticed that everything looks pretty bad in the engine compartment. I am partially through stripping/restoring the engine compartment. I took a break from that work to do the more interesting fabrication work. The engine/trans need to come out again so that I can run the cooling, fuel and brake lines. The beautification will be completed at this time.

I am sure that I missed some details so feel free to ask questions. Also feel free to use my mount design. If you order the parts from Small Car Performance, mention this post...maybe if a few people order the parts I can get a discount on my oil pan work.

More pictures to come as more work gets done.

Scott
TonyAKAVW
COOL!!! It will be really interesting to see how this engine works with a 901 transmission. Sounds like you have quite a project on your hands but you've identified a lot of the tricky aspects. I'll definitely be watching whatever progress is posted.

-Tony
JerryP
shocked[1].gif Wow...good luck.
TravisNeff
Very cool project, and ambitious one at that!

popcorn[1].gif I'll be watching!
fiid
NICE WORK!!! aktion035.gif aktion035.gif aktion035.gif

That's a new approach to the engine mount problem - very interested to see how that works - looks like you have all the bases covered.

Where are you planning to put the turbo? Do you think you have enough space for the shift linkage?
Amenson
QUOTE(fiid @ Aug 11 2006, 12:53 PM) *


Where are you planning to put the turbo? Do you think you have enough space for the shift linkage?


I have had the shift linkage installed (not sure why I don't have a picture) and it works as well as stock. The exhaust tube that will connect the left header to the turbo needs to make a slight jog around the shifter shaft but that is not a problem. The turbo will go behind the right head, as far up and to the right as possible. I hope to have the pressure side of the exhaust done tomorrow so we will find out soon if my plan will work.

Scott
Loser_Cruiser
Im sorry for asking, I may not have read enoguh yet, but did you make those mounts your self or buy them and adapt them for your purpose? BTW awesome project. hopefully I will be doing this in the future.
Rotary'14
I like your engine mount too. agree.gif

-Rob
mongrel-gs
Very Nice! That's going to be a fun ride!
BKLA
Keep the pic's and stories coming!!!

Nice job!

pray.gif
boogerboy72
your engine mount looks awesome. Looks like i found a simplier one to replicate for my project smile.gif did yuo buy the brackets somewhere? link please? smile.gif
Amenson
Thank you for all of the positive feedback.

I guess that I did not mention Small Car Performance enough times as the supplier of the brackets that I used, so here it is again...in link form.

Small Car Performance

It is the "Subaru 4 Cylinder to Vanagon Engine Mount Adaptor"

Off to make the exhaust...

Scott

Porcharu
Interesting engine mount. That is almost exactly how I am doing mine (just an N/A 2005 RS engine) except I am not using the stock engine bar. I'm using the 911 sport mounts at all 4 corners.
DNHunt
I've dealt with Small Car Performance many times. They also supply type IV stuff. I usually get my Mahle oil filters, and consummables from them. Good people. They do conversions in their shop and keep trying to get me do this same conversion. The last time I was in there they had a WRX engine sitting on the floor and thet keept saying it had my name on it.

Dave
Loser_Cruiser
Do you think the shift rod will have to be changed at all?
Aaron Cox
"cooling lines thru center tunnel"

bad idea....

ask 'series9' how much of a PITA it was to do smaller 6cylfront cooler lines....

go thru the heater tubes/outside of longs/under car/ etc....
914-8
Wow, youse gots some serious tools and workspace! And it looks like you know how to use them.

Cool project, keep the updates and pics flowing!
Amenson
QUOTE(Porcharu @ Aug 12 2006, 06:46 AM) *

Interesting engine mount. That is almost exactly how I am doing mine (just an N/A 2005 RS engine) except I am not using the stock engine bar. I'm using the 911 sport mounts at all 4 corners.


When I ordered my parts from Small Car Performance they told me that one other person had ordered them for a 914 Suby conversion...I guess that would be you. Do you have any pictures of your setup? I checked your blog but did not see any.

Scott
Amenson
We made most of the pressure side exhaust yesterday. We did not finish because I messed up the tube order and ended up one bend short. headbang.gif Still need to finish the collector into the turbo and final weld the seams, it is now only tacked.

The turbo fits! It was tight but clears everything. The final position will be slightly different than what is shown in the picture, it is only sitting on the tube right now so it rotated a bit.

IPB Image

It took a little more than anticipated to get around the shifter shaft.... The clutch pulley will need to be rotated slightly.

IPB Image

The major problem with the turbo location is caused by the waste gate actuator. It would be a much better fit if an external waste gate turbo were used. When I upgrade the trans I will also upgrade the turbo. This is why I did not make this part of the exhaust out of SS, the rest will be.

Scott


Rotary'14
exhaust looks sweet! keep the enthusiasm up! If I go subie,, I'll use your car for inspiration and as a guide.

-Rob
Amenson
Not much progress this week...partially because I was waiting on some parts and partially because I had some stitches on my chin to keep clean. I made it 30 years doing careless and generally stupid things without having to be stitched up and I ruin the streak by running into somebody during an indoor soccer game. bs.gif

Today my intercooler arrived and it looks like it will fit very well...there is actually room for a much longer one but this one is sized properly and allows access to the dipstick, oil filler and water tank.

IPB Image

IPB Image

I am probably going to relocate the in/outlets to the end of the tanks pointing toward the rear of the engine. This will make the plumbing much shorter.

The seat also came in this week.

IPB Image

Hopefully I can get the pressure side of the exhaust done this weekend...although with the Dream Cruise going on this weekend I may not get much done.

Scott
zaphod750
Awsome project...I say this because im doing something similar. Was wondering what parts of the harness you plan to keep? I have a 2004 sti engine that I am putting in my 914, and I have gotten rid of everything that doesnt connect to the engine as far as wiring is concerned, and i was interested in what parts you are keeping...cruise, gauges, etc? Cant wait to see how yours turns out...looks like you will be done a lot sooner than me, I got caught up in some rust repair..wink.gif
banksyinoz
cheers great work on the sti transplant we have an 04 with the six speed over here and it looks nuts,

q: are you bolting the engine bar directly to the block or using the suby mounts, just curious?????

hey your exhaust looks awesome but will it cause boost to be later? not that its a problem.

the wiring is definetly the best way to go, just quietly been lookin at the suby 3.0 six quad cam

great work keep it up beerchug.gif
GS Guy
Great looking conversion Scott.
I might be the person Small Car was talking about using their mounts? I bought a set of the side pieces for my Suby conversion, going onto a 914 trans (though not in a 914 vehicle) back earlier this year.
Comment - on the oil pan. As you know, the Small Car mounts severely restrict what kind of oil pan you can use. I went with Outback and they were very specific that I use their "mid-engine" version pan, which wasn't listed in their literature at the time. According to Outback, when you shorten the pan 1.5" and the pickup a corresponding amount, it moves the pickup head forward in the pan. This, in conjunction with the angled shape at the rear of the pan can cause starvation problems during hard acceleration - oil runs back away from the pickup and up the back of the pan. Their mid-engine pan locates the pickup more towards the rear and a small kick-out is boxed at the rear of the pan. Something to think about for your conversion - pic attached.

Question - can you tell me how far below the head exhaust surface the Outback primary tubes hang? I've got limited room below the heads for exhaust routing, couple of lower chassis tubes below the heads.
Great looking intercooler BTW!
Cheers, Jeff
Amenson
Not much to report so I will first answer the questions.

-Harness: I am keeping everything that has a corresponding system in the 914. The list of things that will not go in is shorter and includes things like ABS, DCCD, power locks/doors and HVAC. Other than that, the car will think that it is an STi.

-The exhaust should not cause any lag. With smoother bends and merges, and slightly shorter routing (virtually no up-pipe) on the pre-turbo side and a 3", very short, only marginally muffled and cat-less post exhaust, spool up should be a bit sooner. Not that it really matters with the tiny stock turbo.

-Oil Pan: I have not yet decided. I am thinking about doing my own but am considering going with the small car pan+baffling to save a bit of fabrication. The Outback pan sticks down a bit to far for my liking.

-The headers are the Outback Mid-engine "shorty" headers. They stick down about an inch less than the Small Car motor mounts.

GS Guy...what are you building?

It has been over a month since my last update, here is what I have been up to...

-Trip to London, 10 days plus packing/recovery time really ate up garage time. Great fun though.
-Wiring my buddies soon to be 30 psi Audi 200 20v with a stand alone ECU. This ate up much of the last week but turned out great and was quite fun.
-Pulled apart and figured out how to modify and mount the Suby steering column.
-Cut up the shiny new intercooler to move the inlet and outlet to the ends of the end tanks.
-Replaced the alternator and troubleshot a rich condition in my daily driver (Galant VR4). Every time I turn up the boost something seems to go wrong. confused24.gif
-...and more weekend social events than I care to think about. Fun stuff but bad for progress.

So, not much progress. I hope to get back at it tomorrow.

Thanks for the kind words.

Scott
eric914
I have been in contace with Brian Steel at small car and they will sell the side pieces and hardware from the Van motor mount for $185. No point in paying for a piece you do not need.
jsteele22


Just stumbled across this thread. Very nice work. I like the engine mount idea a lot : small, simple, and easy for others to copy.

One thing I didn't quite follow. Where the stock 914 engine bar bolts to the chassis, is there some kind of motor mount (vibration damper) that you inserted ? If not, where are the front engine mounts ? If so, does this lower the bar ?

Sounds like you're on an ambitious schedule ! Keep up the good work !
Amenson
jsteele22: The motor mounts are at the ends of the slightly modified stock engine bar. I gave an explanation in my (long winded) first post. You can see the mounts in most of the pictures.

iric914: Small Car worked out the same deal for me. They are a great supplier.

I made a bit of progress this weekend. The Suby steering column is installed.

Here is the modified shaft:

IPB Image

Here is the old and the new, notice that the stock u-joint fit the suby spline. The section I removed from the shaft is laying against the wall...it is about half as long as it started:

IPB Image

Installed, it is positioned very high in this picture...the comfortable position is much lower:

IPB Image

It adjusts up and down but also rotates around the adjuster so I need to make a pivot at the end of the column. Not a big deal just a little more work. As hoped the suby wheel is closer to the driver than the stock so the driving position should be much more comfortable for me.

I also spent some time on the exhaust but did not finish it so no pictures.

Scott
Amenson
Finally finished the pre-turbo exhaust. I think that it turned out pretty well. Still need to finish weld all of the seams.

IPB Image

IPB Image

I started to mount the muffler side of the exhaust only to find that the muffler does not fit behind the skirt very well. I will need to find a smaller one or modify the the one that I have. Now it will be even louder. happy11.gif

Probably will not make much more progress this month. I leave for a 2 week business trip to Japan on Friday.

Enjoy,
Scott
zaphod750
any news on the conversion??

inquiring minds want to know..smile.gif
Amenson
Unfortunately there has not been much progress. Due to considerable business and pleasure travel this winter/spring plus a move to a new house, I have not even seen the project much. The good news is that the new house has a big enough garage so that I can set up shop at home instead of using my buddies shop. This should allow me to make progress much more quickly.

I did accomplish a few things since the last post:

Finished welding the header

Click to view attachment


Modified the intercooler

Click to view attachment

Hopefully progress will start up again within 2 weeks. My friends have started planning for Power Tour 2007 at the beginning of June and I would really like to take the PorSTi.

Scott

Amenson
Well, it's been a while since the last update. Have not stopped working on the project, just too busy to document it.

Moved the car to it's new home at the end of April. Yup, it is sitting next to a potential donor car, my girlfriends '05 Legacy.

Click to view attachment

Had the header ceramic coated. I went with the silver because it was supposed to be the most durable color. Not a huge fan of the chrome look though. Based on my buddies header with the same coating, after it heats up a few times it should dull a bit.

Click to view attachment

Decided to take the easy, although expensive route and order a shortened oilpan from Outback Motorsports. Shown next to the stock Suby oilpan.

Click to view attachment

Ordered an aluminum fuel cell from Summit Racing. Fits really well!

Click to view attachment

Click to view attachment


....
Amenson
...

Modified the stock turbo flange for the 3" ss exhaust.

Click to view attachment

New oilpan, exhaust and turbo flange installed.

Click to view attachment

Mock-up of the exhaust. The outlet of the muffler will be in the stock location of the rear valance...maybe nobody will notice that it is a bit bigger than stock happy11.gif

Click to view attachment

Click to view attachment

...


Amenson
...

Got engaged...in the nose of a B-17 "Flying Fortresses" flying up the Detroit River!!!

Click to view attachment

Click to view attachment

Finished a few more things but can not find the pictures right now. Will post again soon.

Scott
scotty b
That's going to be one wicked ride ! What if anything will you be doing to the body? While I am generally in favor of body mods....keeping the stock appearance would be a killer sleeper aktion035.gif
neo914-6
Great work! clap56.gif Makes me want to get back to my project...

That must've been fun to fly in a B-17, did you get in the turret?
bigkensteele
Congratulations on your engagement! However, you will now need to finish the car asap. Free-time as you know it will cease to exist. There will be wedding planning, which is Hell on Earth if you have to be even remotely involved. After the ceremony, I found that my attendance was required to events that were once optional. We needed to spend more time together. I would rather work on my car than be with her. Yada, yada. Then we had kids, who are currently 5 and 1. While I love them with no bounds, they are not conducive to leisure time in the garage, unless you are married to a true saint.

Was that out loud? Sorry. I think that I might be a little jealous of your free-time and more importantly, your skills. Your project, and work is incredible.
PeeGreen 914
Wow that is reat work. I wish I had the talent to do all the fab work you are doing. Keep it up.

PS. tat's cool that you got to fly in a B-17. My grandfather was a belly gunner.
Amenson
Thanks to everybody for the kind words and congratulations.

-I am going to leave the body stock for now. Eventually it will need flares of some sort so that I can put some decent rubber on it.

-The only place on the plane that we could not go was the belly turret. I asked several different members of the ground and flight crews hoping that somebody would let me in.

-My free time should be safe until kids come into the picture, which will be a few years yet. My fiancee fully supports work on the 914...she came over and introduced herself for the first time while I was working on it!

-The plane was pretty darn loud. Not so loud though that I could not ask the question biggrin.gif

Scott
PeeGreen 914
That's awsome you found a good lady. My wife likes me making my 914 better. She wants me to win. Rather competitive woman;) Even when the kids come along I am sure you will have 914 time. You have to get away from the for sanity sake sometimes. I also have my 10 monthy old with me all day, and he likes making car noises.

On the belly, you have to be very folded up to sit in there. They had one at an air show near my house when I was 10, and when they found out my grandfather was killed in there they let my dad and I sit in it. I could fit as I was a little kid, but my dad was too tall at 5'6". I guess my grandfather was 5'6" as well but very thin. Sounds like a very creative way to propose. Nice work and congratulation.
GS Guy
QUOTE(Amenson @ Jun 22 2007, 11:42 PM) *

...

Modified the stock turbo flange for the 3" ss exhaust.

Click to view attachment

...


Man - you've got to get one of these to to finish off that awesome turbo exhaust!

Click to view attachment

PM me for details.
Conversion is looking good - can't wait to see how you plumb the intercooler.

Jeff
Amenson
Very cool turbo outlet, I sent you a PM to find out where you got it.

I made a bit of progress this weekend. Finally got the turbo apart so that I could port the waste gate hole. It took a torch and a big soft hammer and then some very careful prying. The porting is necessary to avoid boost creep with a low back pressure exhaust.

Click to view attachment

Made a frame to mount the fuel cell. Still need to weld it in and make some straps to hold the cell down to it.

Click to view attachment

I have the engine out so that I can cut the engine shelf out of the engine bay and fix some rust. Could not resist to pose the PorSti engine with my daily driver...'05 STi II. Hopefully I do not make this one into a donor car also.

Click to view attachment

This pic shows the engine compartment w/o the engine shelf. I ordered some POR-15 and plan to seal everything up this week.

Click to view attachment

Scott
mrdezyne
Excellent work! Love the mount, much easier than what I had planned and it looks like it provides plenty of room for exhaust. One quick question.... I think the Renegade mount raises the motor and moves it forward so you can use the stock Suby oil pan, if you had not notched the Small Car mount do you think it would have raised the motor enough to keep from cutting the oil pan? Difference might be using the 2.5 NA as opposed to the 2.0 STI turbo model. Any insight would be appreciated. At this point I'm looking for ways to cut my build time down and get mine rolling again. Your mount looks straight forward enough it should save a ton of time.
Amenson
I mounted the engine so that the crank is parallel to the floor of the car, which turns out to be about as low as you can go and still use an oilpan. My STi engine is also an EJ25 although you may have a different oilpan as the late model engines have a different oil pan. Maybe your pan is shorter. It seams like you would have to raise the motor a whole lot to use the stock oil pan and not have it be the lowest part of the car. The Outback pan is only 4.25" deep and it is just barley above the bottom of the car.

This is the best picture that I could find that shows the position of the oilpan with respect to the cross bar and the bottom of the car. The cross bar is in the stock location.

Click to view attachment

Scott
Amenson
Made some more progress cleaning up the engine compartment. Man, does it take a long time to cleanly remove all of the extra brackets, etc. I would probably be done with the conversion by now had I not decided to do some extra cleanup and restoration work at the same time. Tis' the right thing to do though.

I finally built up the guts to cut out the hell hole rust.

Click to view attachment

I also figured out how to hold down the fuel cell...use the stock fuel tank strap!!

Click to view attachment

I will need another one for the other side. Anybody have an extra one lying around?

Should make some serous progress this week because I took the entire week off of work mueba.gif Won't get to spend all 9 days off on the car, I will be going up to Mackinac Island next weekend for a quick vacation.

Scott
Amenson
Made a couple patch panels today. I am really pleased with how they turned out. The large one fits better than it looks, I could not hold it in place and take the picture at the same time.

Click to view attachment

Will weld them in tomorrow.

I am going to Por15 the entire engine compartment tomorrow as well. Does anybody have any experience with por15 over paint. The instructions say that it is OK but warns that it adheres better to rough metal. I would prefer not to have to remove all of the paint but if the por15 is not going to stick I will have to.

Scott
PeeGreen 914
Hey Scott

I would just rough up the paint. Paint adhears to a rough surface the best. Doesn't need to be barfe metal as long as it is rough.
Chris Pincetich
Nice photo of the side by side STIs beerchug.gif
I also have a potential donor Suby as a daily driver. I really hope it never gets totaled, leaving me a free/salvaged EJ25 for my 80 HP 914 happy11.gif
RoninEclipse2G
Awesome work!

this thread really makes me want another teener to do a suby swap in, I love the handeling of the creamsicle but I also love the power the WRX gives me.
This is a "lo-fi" version of our main content. To view the full version with more information, formatting and images, please click here.
Invision Power Board © 2001-2024 Invision Power Services, Inc.