While I was sitting in the driver's seat admiring my new dash and making engine noises I happened to decide to row through the gears. Much to my dismay, I was really disappointed by the sloppiness of the shift linkage. I have a RennShift and when I first installed it I was blown away by how much it improved the feeling over the short shift kit I already had. I soon found myself disappointed with that so I upgraded the new rear shift bushing with a Patrick brass bushing. That made an improvement in the feel also but I guess the incremental improvements have warn off and now I need something better.
So I ordered the JWest Shift linkage based mostly on the review SirAndy did a while back...if this is as good as it get's then I need one.
I did a search and read through his installation threads and the JWest instructions but have yet to find a picture of what it looks like installed on a stock 4 cyl side shifter. If you have a picture, will you please post one here. I would really like to see the position of the front joint on the crooked rear shaft.
Cheers
Scott
Full Version: PorSTi Project Thread…
QUOTE(Amenson @ Jan 17 2011, 09:24 AM) 
I did a search and read through his installation threads and the JWest instructions but have yet to find a picture of what it looks like installed on a stock 4 cyl side shifter. If you have a picture, will you please post one here. I would really like to see the position of the front joint on the crooked rear shaft.
I could probably crawl under the car and take a picture, but i'm using a straight shift rod on the /6 so that might not help you much ...
One thing to note, when you cut and weld the shift rod, make sure both ends are exactly in the same plane!
Meaning, the part that slides into the front coupler needs to be in the same 3D plane as the part that slides into the transmission console.
If you don't get that right, you will get some binding in certain positions ...
I am very happy with my JWest setup. I think as far as shift rods go, this is probably the best shifting you will ever get for a 914.

The only thing better would probably be to ditch the rod setup completely and go with a good cable shifter solution ...

QUOTE(SirAndy @ Jan 17 2011, 09:56 AM)
I could probably crawl under the car and take a picture, but i'm using a straight shift rod on the /6 so that might not help you much ...
There are already some really nice pictures in your instillation thread. Very good writeup, thanks for taking the time to make it.
QUOTE(SirAndy @ Jan 17 2011, 09:56 AM)
One thing to note, when you cut and weld the shift rod, make sure both ends are exactly in the same plane!
Meaning, the part that slides into the front coupler needs to be in the same 3D plane as the part that slides into the transmission console.
If you don't get that right, you will get some binding in certain positions ...
This is exactly why I want to see a picture. Taking some very quick measurements of my spare rear bar based on the JWest instructions, the front u-joint would end up almost in the same place as the first bend in the bar. This makes the front splined stub significantly un-parallel to the rear splined stub. I must have messed up the measurements but want to see a picture to prove it.
Cheers
Scott
Scott,
I'm glad you're happy with the dash and thank you for the kind words.
It is nice to help and see your project come together.
I like your STI instrument cluster, it's going to look great all lit up.
I don't know how many time I have pulled my dash and wires out. I still have little unsolved problems like the dimmer circuit not dimming, thinking about putting a map light in the dash just above the radio. Maybe satellite tweeters at the end of the dash and my last and final clean up of all wires will have me pulling it all out at least one more time.
I was looking back at your great VSS set up. I like that better then the one I mounted to my CV. Do you recall the brand?
As for shifting, I used a cable shift but still think the Porsche transaxle is the biggest problem. I already had my KEP adapter and wanted to get on the road. So, I let the guys work out the bugs on the Subie trans. Maybe a little late but in the end the path has been cleared and I expect that is the way to go.
It was just pointed out to me that it was basically a year since the last update. Sadly I have not make enough progress to actually drive the car.
I have been slogging through the harness and am just about to the point that I can pull it back out and start reconnecting all of the wires after the latest re-org of the component locations.
I also worked on the radiator ducting a bit and will have to suck it up and cut the hole in the hood.
I finally got around to purchasing a new shift linkage. I missed the opportunity to pick up a J-west setup before they discontinued it so I ended up getting the kit from CFR. After fussing a bit to make sure that I got the holes in the shift console in the correct place the kit bolted right in and is nice and precise. The the supplied metal hole location template made the process very straight forward.
Click to view attachment
Click to view attachment
Having now eliminated all of the slop between the top of the shifter to the input shaft on the transmission I am still not overly impressed with the shift feeling. I know it is a 30 year old transmission design but with my BMW 2002 transmission, when all of the bushings are replaces with brass, it feels like you have your hand inside the transmission directly moving the shift forks.
I was hoping for a similar feel with my 901, but when when in gear there is quite a bit of movement in the shift lever shaft both in rotation and in/out.
Is something wrong with my transaxle or is that how they all are?
How much movement should I expect to get with "healthy" 901 in gear?
Regards
Scott
how come this thread is inactive? so much to learn.
QUOTE(dian @ Sep 16 2012, 09:26 AM)
how come this thread is inactive? so much to learn.

Scott, Its that time again.
Your yearly

Hi All,
Sorry for the lack of updates. I have been a little busy lately. I know, you are probably expecting the same old story, bla, bla bla, work, family, money, bla, bla, bla. Not this time!
I am finally building my dream garage. Spent the last year designing it and broke ground at the end of October. We (myself, wife, father-in-law and other misc friends/family) are building it ourselves. The only thing that we contracted was the foundation and concrete work.
Click to view attachment
The new garage shop is 1300 sq.Ft. Daily drivers will live in the two car garage. We are also finishing/expanding the breezeway so that we have an office, laundry room, half bath and mud room.
Click to view attachment
Fish-eye shot of the new space. Ceiling over the parking are is 11.5ft for lift room.
Click to view attachment
I built in a half lift that I found on Craigslist a few months ago, still need to refinish it.
Click to view attachment
Part of the project was to buy a "work" truck. Picked up a '70 C10 with a modded 350. Total burnout monster...also good for hauling 800 lbs of steel siding to the scrap yard. Already installed power steering/brakes and harvested an 80's C10 front suspension to convert to disk brakes and front anti roll bar. Will be lowering it soon to make it easier to load.
Click to view attachment
It will definitely be a few months until I get back to the Porsti project. I can't even move it into the new shop because the concrete is still curing so I can not apply the stain/sealer.
Click to view attachment
Need to get it done before I get my '72 2002 back home.
Stay tuned!
Cheers
Scott
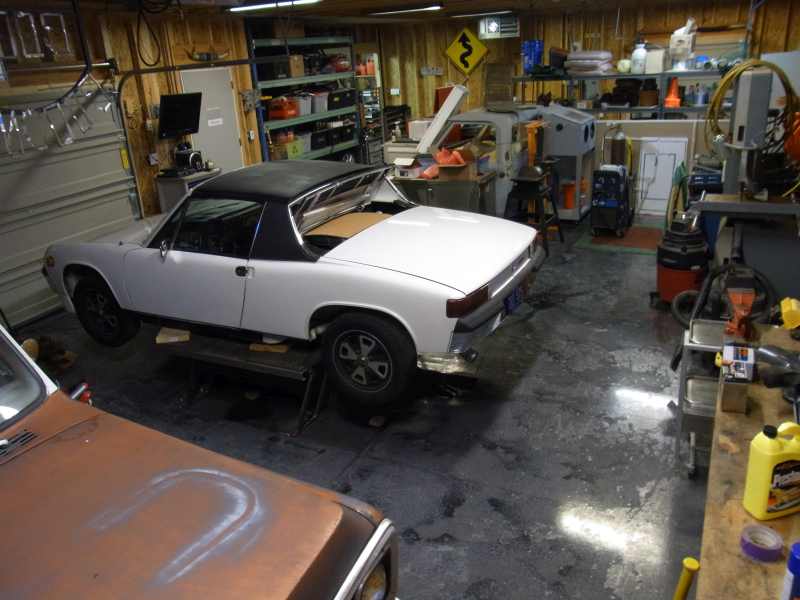
Well, still no progress on getting the PorSti closer to driving but the weather has kept us from working on the exterior of the construction project so we were able to move some stuff to the new garage. The 914 included 
Click to view attachment
It is really motivating to see it off of the jack stands.
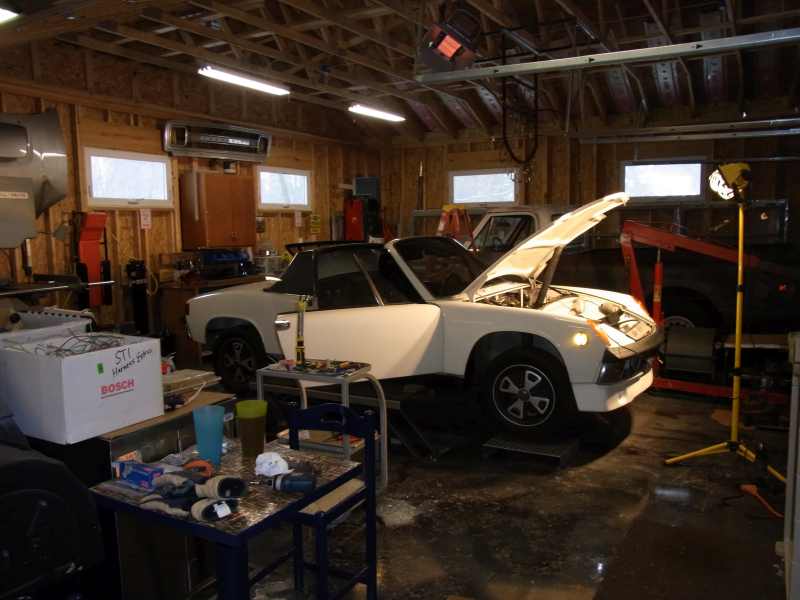
Click to view attachment
I am not able to install the coating on the garage floor until spring so I can only setup a temporary workspace. Should be just enough to make some progress this winter.
Cheers,
Scott
Click to view attachment
It is really motivating to see it off of the jack stands.
Click to view attachment
I am not able to install the coating on the garage floor until spring so I can only setup a temporary workspace. Should be just enough to make some progress this winter.
Cheers,
Scott
QUOTE(ConeDodger @ Jan 6 2013, 02:00 AM)

Man, that looks like a real nice place to wrench! Turns out your only an hour and a half from me...

Thomas
I have no idea why it quoted rob above? 
Wow, nice. Heat and all.
Wish my house has that big.
Wish my house has that big.
QUOTE(tscrihfield @ Jan 6 2013, 09:16 AM)
Man, that looks like a real nice place to wrench! Turns out your only an hour and a half from me...
Thomas
Let me know if you get over my way and want to stop in sometime.

QUOTE(ruby914 @ Jan 6 2013, 09:27 AM)
Wow, nice. Heat and all.
Without a ceiling the main forced air heater mostly just warms the attic area. The induction heater directly over the car helps a bit more but only in a very small area. Better than nothing but far from efficient.
Cheers,
Scott
QUOTE(Amenson @ Jan 6 2013, 03:45 PM)
QUOTE(tscrihfield @ Jan 6 2013, 09:16 AM)
Man, that looks like a real nice place to wrench! Turns out your only an hour and a half from me...
Thomas
Let me know if you get over my way and want to stop in sometime.
Cheers,
Scott
Will do! I'm in Columbus area quite frequent.
I know Ross wanted to plan a get together in the cinci area, maybe we could have you join?
Thomas
QUOTE(Amenson @ Sep 29 2010, 04:31 PM)
QUOTE(Root_Werks @ Sep 23 2010, 08:09 AM)

Oh man, I stared too long at all those wires.

Seriously, amazing work! I couldn't even begin to think I could keep track of all that. What a cool project!

They are all color coded

lol I was thinking the same thing about what I might be into if and when I do a Suby swap.
I was wondering if you could steal HID adjuster motor switch from a STi and use that, you might even be able to have it open just a 1/4, 1/2, 3/4 and all the way?
But I might be just talking out my ass, just know some of the Nasioc guys have done retro fits on non HID cars.
QUOTE(Amenson @ Jan 6 2013, 12:45 PM)
QUOTE(tscrihfield @ Jan 6 2013, 09:16 AM)
Man, that looks like a real nice place to wrench! Turns out your only an hour and a half from me...
Thomas
Let me know if you get over my way and want to stop in sometime.
QUOTE(ruby914 @ Jan 6 2013, 09:27 AM)
Wow, nice. Heat and all.
Without a ceiling the main forced air heater mostly just warms the attic area. The induction heater directly over the car helps a bit more but only in a very small area. Better than nothing but far from efficient.
Cheers,
Scott
Sounds like all you need now is a good ceiling fan. or 4
QUOTE(tscrihfield @ Jan 6 2013, 01:50 PM)
I know Ross wanted to plan a get together in the cinci area, maybe we could have you join?
Thomas
Let me know when you start making plans.
QUOTE(Dasnowman @ Jan 6 2013, 03:37 PM)
I was wondering if you could steal HID adjuster motor switch from a STi and use that, you might even be able to have it open just a 1/4, 1/2, 3/4 and all the way?
But I might be just talking out my ass, just know some of the Nasioc guys have done retro fits on non HID cars.
It might be possible. The motor on the adjustable low beams is pretty small though.
I should have a spare headlight to tinker with thanks to an inattentive driver that smashed the front of my daily driver STi.

QUOTE(ruby914 @ Jan 6 2013, 11:19 PM)
Sounds like all you need now is a good ceiling fan. or 4
I can't install ceiling fans until I get power installed...which is on hold until the budget has a few months to recover.
QUOTE(tscrihfield @ Jan 6 2013, 04:50 PM)
QUOTE(Amenson @ Jan 6 2013, 03:45 PM)
QUOTE(tscrihfield @ Jan 6 2013, 09:16 AM)
Man, that looks like a real nice place to wrench! Turns out your only an hour and a half from me...
Thomas
Let me know if you get over my way and want to stop in sometime.
Cheers,
Scott
Will do! I'm in Columbus area quite frequent.
I know Ross wanted to plan a get together in the cinci area, maybe we could have you join?
Thomas
im up for a get together in the columbus area.
[quote name='tornik550' date='Jan 7 2013, 07:09 PM' post='1798360']
[quote name='tscrihfield' post='1797711' date='Jan 6 2013, 04:50 PM']
[/quote]
Will do! I'm in Columbus area quite frequent.
I know Ross wanted to plan a get together in the cinci area, maybe we could have you join?
Thomas
[/quote]
im up for a get together in the columbus area.
[/quote]
That's a possibility for a garage opening/finishing celebration?
I know there are a few teeners around columbus....
What are you doing for a floor coating?
2pac I assume?
Dad insisted on it in our shed and we are both a little upset with how it turned out.
I was hesitant after seeing a few workshops with lots of marks and ours is no different.
Welding means putting a mat down now.
Much prefer the idea of pvc tiles or something similar if a coating is needed
Just a thought
Edwin
QUOTE(tscrihfield @ Jan 7 2013, 07:36 PM)
QUOTE(tornik550 @ Jan 7 2013, 07:09 PM)
im up for a get together in the columbus area.
That's a possibility for a garage opening/finishing celebration?
I know there are a few teeners around columbus....
I would be open to having a 914 gathering in the new garage, might motivate me to get the thing running. My work travel schedule for the rest of Jan and Feb is all jacked up so I wont be able to commit to a date for a week or so. Feel free to make recommendations.
QUOTE(edwin @ Jan 8 2013, 06:11 AM)
What are you doing for a floor coating?
2pac I assume?
Dad insisted on it in our shed and we are both a little upset with how it turned out.
I was hesitant after seeing a few workshops with lots of marks and ours is no different.
Welding means putting a mat down now.
Much prefer the idea of pvc tiles or something similar if a coating is needed
Just a thought
Edwin
Ahh the floor coating dilemma. After months and months of research, quotes, soul searching I have decided to install it myself using contractor grade products. I will be using a non acid stain and two coats of either polyaspartic or polyurthane. Surface will be diamond ground to to the proper roughness for the products.
Is it the best way? No, but given my budget and intended use of the area, it should be more than adequate.
Cheers
Scott
Scott good to see you are getting a nice place to work. I am 68 and have been working on cars since I was 15. My tools and workplace has changed a lot over the years. I'm sorry but I have never placed an importance on a concrete floor finish that I will be welding, beating on metal, dropping heavy objects on, painting on, spilling or dripping many different solutions on and so forth. I do try to not damage the floor but stuff happens. I always wipe up spills but the floor does have stains on it. I have a friend who's shop looks like a display room but he mostly tinkers with stuff. I would be more concerned with insulation and trying to keep the utilities down as electricity will only go up in cost.
Good luck any way you go though. I see the little person has his hotrod in the shop.
Good luck any way you go though. I see the little person has his hotrod in the shop.
QUOTE(Amenson @ Jan 8 2013, 01:31 PM)
QUOTE(tscrihfield @ Jan 7 2013, 07:36 PM)
QUOTE(tornik550 @ Jan 7 2013, 07:09 PM)
im up for a get together in the columbus area.
That's a possibility for a garage opening/finishing celebration?
I know there are a few teeners around columbus....
I would be open to having a 914 gathering in the new garage, might motivate me to get the thing running. My work travel schedule for the rest of Jan and Feb is all jacked up so I wont be able to commit to a date for a week or so. Feel free to make recommendations.
Cheers
Scott
I know how you feel! I'll have enough frequent flyer miles by June to fly to Munich and back 2 or 3 times.. (not sure if itll really be that much)... But Ill be free the later part of January and February. Where you headed? I'll be in Minneapolis next week....
Thomas
QUOTE(charliew @ Jan 8 2013, 02:12 PM)
I see the little person has his hotrod in the shop.
Ahhh....I don't have any little people in my family

All of the hotrods in that garage are mine!
QUOTE(tscrihfield @ Jan 8 2013, 05:59 PM)
Where you headed? I'll be in Minneapolis next week....
Thomas
I have to spend a couple of weeks in Baudette, MN (I can't exactly say why I am going there but if you look at the Google satellite view of the airport you might be able to figure it out). Then I have a week in Japan for some meetings.
Cheers,
Scott
Any updates on this?? This thing is a beast! Hope to maybe see this in person one day as I live in the Dayton area...
Is this thing on the road yet?
Here we go again….recovering from a long period of project dormancy.
You might notice that Porsti is proudly perched on top of a fully restored lift, in a nice new shop. The shop while not finished inside, is completely functional. I still need to put up more lights, more outlets, run the compressed air system and insulate and cover the walls/ceiling. That can wait…it is time to get the Porsti running.
But first I must digress…
While building the garage I also found myself working on the ’70 C10 that we purchased so that we could haul lumber. Even in the middle of building an extensive shop and adding several new rooms to the house, which was essentially a second 50hour/week job, I was able make time to install power brakes, power steering, and a few other updates to a crappy old truck and have a great time doing it.
What does this have to do with anything?
The Porsti project has been stalled for quite some time, even before construction started on the new shop. Sure there were other priorities and distractions along the way but why could I enjoy making mundane upgrades to a $2000 truck during a huge construction project while the Porsti, with almost 10x the money and 100’s of hours of effort already invested, sat ignored so close to completion?
The remaining work in the Porsti project is adapting the complete wiring harness from the Subaru to the 914. This includes not only getting the Suby engine running (which I did Aug. ’09 with the entire wiring harness in the trunk) but also get the lights (including popup functionality), instrument cluster, windshield wipers (intermittent with the Subaru motor on the 914 linkage), radiator fans, new fuel level sender, new vehicle speed sender ….etc, etc, etc all complete and installed to my somewhat neurotic level of refinement. The approach I was taking was that the wiring was a single task like building the exhaust or cooling system or installing power steering on the C10. The goal for the wiring is that once complete, a turn of the key would result in a running engine with no faults and all other systems working and installed to a near OEM level. I spent hours, day after day, working on the wiring and at the end of each day all I had a mess of slightly less jumbled wires with no way to experience the satisfaction of completion. The task of installing the wiring is simply too large to be viewed as a single goal. The reward of completion was gone and with it the incentive to dedicate precious spare hours to the project. What is needed is a change of mindset.
Even though the car is a mess of jumbled wires, I am going to get it running. There are a few connections that that I need to make in order to achieve this and if I have to splice in a random colored wire because I don’t have the correct pins or colored wire, so be it. Just make a note of what needs to be cleaned up in the future and move on. Once it is running I should be able to drive it out of the garage and smoke the rear tires off of the rims. Then I can pull it back into the garage with a smile on my face get back to the task of getting all of the other systems working, one by one with a feeling of achievement at the end of each project. Once everything is working and the car is fully functional I can worry about cleaning up any esthetic compromises that I made getting it running.
Time to make some progress...incrementally!
Sorry for the non technical, somewhat philosophical and rambling post but I thought that it could help others with stalled projects figure out how break through the progress block.
It also helped me organize my thoughts and clarify my way forward.
Cheers,
Scott
Happens to the best projects sometimes. I can appreciate the level of effort you have put in already, and needing to take time off from it!
Alright, another Suby player.
What did you use to design the garage?
QUOTE(wobbletop @ Feb 13 2014, 07:20 AM)
What did you use to design the garage?
Google Sketchup...great (free) program, very easy to use.
Sketchup is one of my favorite programs!
Tip: Try to find an older version. Google sold Sketchup about a year ago, and the newer versions push you (often) to purchase the $600 version of the software.
Tip: Try to find an older version. Google sold Sketchup about a year ago, and the newer versions push you (often) to purchase the $600 version of the software.
Scott,
Good to see you back.
I can fully understand your stall. I remember thinking you were operating over my pay grade on the wiring. It may have been your planed ECU location? I would have go back and read up.
Anyway, I followed your lead but tried to stay out of the big bumps that you were tackling.
I used all the colored wires I could find from AT harness, etc... to extend the instrument cluster 3' but came up very short. So, like Porsche do it on the 914 ECU I used all the same color where I couldn't find the correct size and color. That's all in a single loom and you can still keep the correct pins.
My ECU wire loom is still a foot or more too long for my ECU location but I was afraid to cut it down. It just loops under the seat. That's not so bad. Fuse box's behind my seat and between the seats is livable as well.
I still have all my extra wires if you want them. It's still about a kitchen trash can worth and I did pick out many but some may useful.
QUOTE(ruby914 @ Feb 13 2014, 11:54 AM)
Scott,
Good to see you back.
...
I still have all my extra wires if you want them. It's still about a kitchen trash can worth and I did pick out many but some may useful.
Thanks Mike,
Great to be back on it. Appreciate the offer for the wires if we were closer I would take you up on it.
Throughout the week I studied the wiring schematic and got reacquainted with the component locations in the car. Spend a good part of Saturday under the front hood sorting out the power distribution from the main fuse box/battery. I also rework twin two speed fan control do work with the twin singe speed fans in the car now.
Could only spend a few hours on Sunday but I was able to get a good start reconnecting all of the cut wires. Luckily I took the time to label both sides of the cut as I made them. Now it is just a matter of finding both ends and reconnecting them. I got sick of playing "Concentration" against myself (and losing) so I made a map to record the wire number and color.
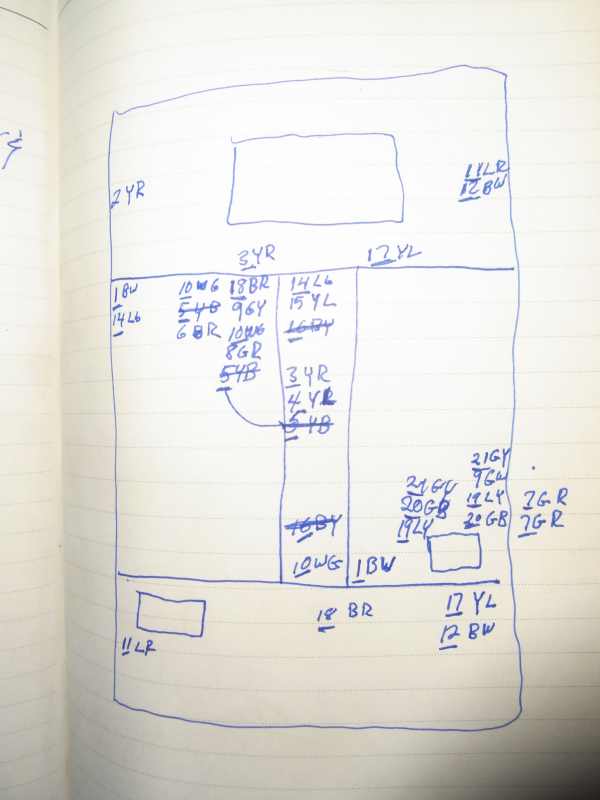
Underline means that both ends are on the map and crossed out ones have been connected.
I was kind of disappointed that I did not get far enough to try to turn the key but decided to be happy that I had a very productive weekend and had a great time doing it.
Cheers,
Scott
PorSTI started again today. For the first time ever I was able to rev the Suby engine from the driver's seat. I had 15 minutes of terror when it would turn over but not start. I was confident that I had reconnected all of the cut wires properly and the faults I was getting did not make sense with that assumption. I eventually found the main connector going to the driver side of the engine disconnected. Plugged it in and it started right up.
Tomorrow I have a buddy coming over to help me do a thorough check to make sure that everything is tight (to avoid loose connector type issues with something safety critical ) and hopefully it will pull out of the garage under it's own power for the first time in, well, forever.
Will post video if successful.
Cheers,
Scott
Tomorrow I have a buddy coming over to help me do a thorough check to make sure that everything is tight (to avoid loose connector type issues with something safety critical
) and hopefully it will pull out of the garage under it's own power for the first time in, well, forever.Will post video if successful.
Cheers,
Scott
That sounds awesome.
I'm nervous about that happening to me too. Spending all this time/money/energy and having something real simple stump me.
Can't wait to hear the success story!
I'm nervous about that happening to me too. Spending all this time/money/energy and having something real simple stump me.
Can't wait to hear the success story!
Wow, that was a fast rebirth. 
So, not quite the video I was planning to post but it will have to do.
https://www.youtube.com/watch?v=gooqcFg4dmA
We went through all of the fasteners on the back half of the car, adjusted the shift linkage and tidied up a few things in hope of making the maiden voyage out of the garage but the clutch will not disengage. I am not sure if my custom hydraulic clutch setup is not stroking far enough or if there is some other issue. I remember reading that the Kennedy flywheel/clutch setup sometimes having this issue if everything is not perfect but I can't recall the details.
If anybody has any suggestions, I am looking for answers. If someone can measure how much the clutch fork moves on a functioning setup that would be extremely helpful.
Cheers.
Scott
The Kennedy parts are the Subaru 2.5 adapter to 228mm Clutch disk with stage III pressure plate. Invoice says Porsche trow out bearing.
Any ideas?
Any ideas?
The kit I got from KEP had a problem with the pressure plate. For 2 weeks, I thought it was my linkage or that ball pivot. But no, a spring was broken on the pressure plate. They sent me a new one.
QUOTE(ruby914 @ Feb 23 2014, 07:02 PM)
The kit I got from KEP had a problem with the pressure plate. For 2 weeks, I thought it was my linkage or that ball pivot. But no, a spring was broken on the pressure plate. They sent me a new one.
I called KEP to ask about the travel required at the TOB to to disengage the clutch and they said about 3/16". He recommended 1/8" of slop at rest before the TOB touches the pressure plate. I am pretty sure that I am over that, maybe too far.
I measured some pictures of a clutch fork and it appears to be about a 2.6 motion ratio. If this is the case and I am stroking the fork ~1" on the outboard side, the TOB should be moving .38", almost perfect if I have the proper slop. If I am fully stroking the slave to the max 1.375" the TOB moves .53"...maybe far enough to crack a spring?
I need to measure the actual slave stroke and confirm the motion ration to know for sure. Does anybody have a clutch fork laying around to measure the dimensions from both ends to the center of the pivot cup.
I have been considering that the clutch disk could be rusted to the flywheel due to the obscenely long time that the project has been sitting. I mentioned this idea to KEP but they said that the disk I likely have is mostly organic and probably not the problem. I will still try to pop it free as a last resort before pulling the trans.
Cheers,
Scott
Scott,
Had my trans with installed clutch TO-arm and Kennedy TOB installed sitting in the basement and took some quick measurements. This is maximum throw of the arm, only limited by the physical opening in the bellhousing. Slave is not installed. My set-up also uses the 9" clutch/flywheel but just a stage II PP.
At the TOB face and outer slave pivot point I got:
TOB movement: 11/16" (0.6875)
Outer pivot movement: 1-5/8" (1.625)
1.625/0.6875 = 2.364 motion ratio
To get 3/16" movement at the TOB, should require 0.443" at the outer fork (slave) attachment pivot, less than 1/2"! My Wilwood slave has 1-5/16" total travel, waaay more than enough, at least on paper.
Hummm... I've got a 3/4" MC and the slave is also 3/4, easy 1:1. My Wilwood pedal ratio is 6:1 so that should be 2.66" of pedal movement for 3/16" at the TOB. That's good because I only have about 3" of total pedal travel available in my set-up!
Cheers,
Jeff
QUOTE(GS Guy @ Feb 24 2014, 02:13 PM)
At the TOB face and outer slave pivot point I got:
TOB movement: 11/16" (0.6875)
Outer pivot movement: 1-5/8" (1.625)
1.625/0.6875 = 2.364 motion ratio
To get 3/16" movement at the TOB, should require 0.443" at the outer fork (slave) attachment pivot, less than 1/2"! My Wilwood slave has 1-5/16" total travel, waaay more than enough, at least on paper.
Hummm... I've got a 3/4" MC and the slave is also 3/4, easy 1:1. My Wilwood pedal ratio is 6:1 so that should be 2.66" of pedal movement for 3/16" at the TOB. That's good because I only have about 3" of total pedal travel available in my set-up!
Jeff,
Thanks for the details, this is exactly what I needed.
I did a really quick measurement and my slave is moving 1", maybe a hair under. This makes my TOB displacement ~.42". Plenty of movement to release the clutch and should not be too much to have broken a spring. Sounds like your setup will work also.
So why isn't my damn clutch releasing? At this point I have convinced myself that the disk is stuck to the flywheel. Besides the rusty rotors the there has been no resistance on the drive wheels as it has only started in the air. I only started it in gear once or twice and it was in first and revere to see if the wheels would actually turn. From what I have found online, starting it in 5th and braking should free it.
I am leaving for a business trip this afternoon, so I will not get to try to "brake" it free this until Friday or Saturday. Maybe I can hop into it quickly at lunch and give it a try.

Cheers
Scott
The clutch works!!!
Started it up in 3rd with the clutch depressed, pressed the brake and the engine did not stall. No major shaking or thunking noises. Let the clutch out and the wheels started turning, pushed it back in and the wheels stopped. It even goes into gear with the engine running Wish that I would have tried this on Sunday.
Should be driving it out of the garage this weekend
Cheers
Scott
Started it up in 3rd with the clutch depressed, pressed the brake and the engine did not stall. No major shaking or thunking noises. Let the clutch out and the wheels started turning, pushed it back in and the wheels stopped. It even goes into gear with the engine running
Wish that I would have tried this on Sunday.Should be driving it out of the garage this weekend
Cheers
Scott
Cool, I was just digging up the old posting about my clutch troubles for you.
Looks like you will not need them.
You're going to love your new toy.
BTW, the car sounds great.
Looks like you will not need them.
You're going to love your new toy.
BTW, the car sounds great.
QUOTE(ruby914 @ Feb 25 2014, 09:07 AM)
Cool, I was just digging up the old posting about my clutch troubles for you.
Looks like you will not need them.
You're going to love your new toy.
BTW, the car sounds great.
Hey Mike...mind finding that info about your clutch dilemma.
I put the car on the ground and it will not go in to gear with the engine running. I shortened the slave cylinder to make sure that I could adjust it properly and still could not get the clutch to fully release.
It will release enough that I can sit on the ground in gear w/o stalling the car but it will not go into gear. With the tires off of the ground they will slowly turn when in gear and the clutch pushed in. If I start the car in gear I can get it to move in that gear by releasing the clutch but if I want to select another gear I have to shut off the engine. I did get it out of the garage under power using this method but it was not glorious, it was rather infuriating.
Something is dragging in the clutch. I guess that I will have to pull the trans to figure out what.
I was out of ideas so I pulled the trans. Actually came out relatively easily.
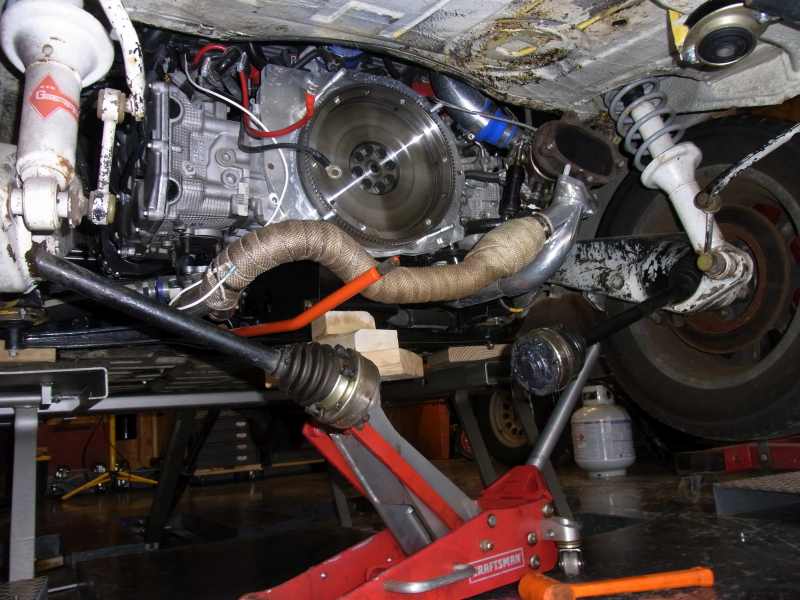
The pressure plate appeared to be properly in place and all of the bolts tight.
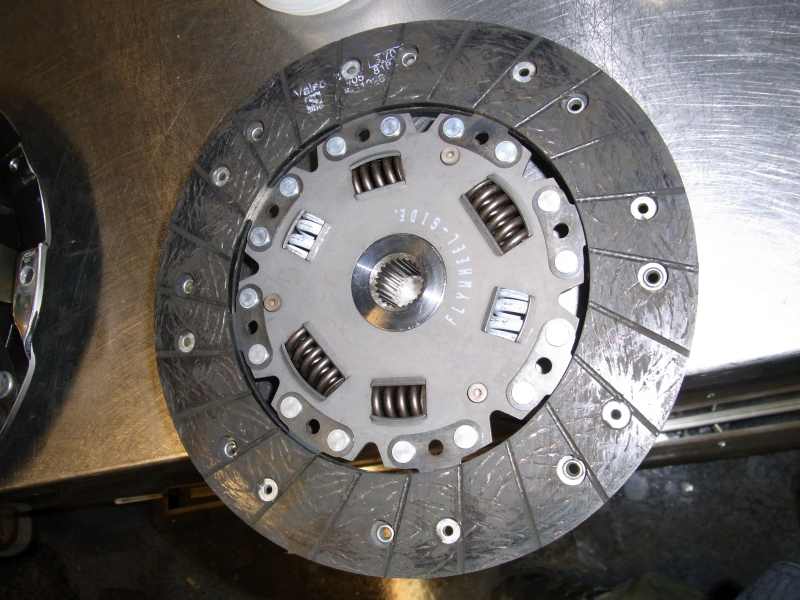
The disk looks basically new:
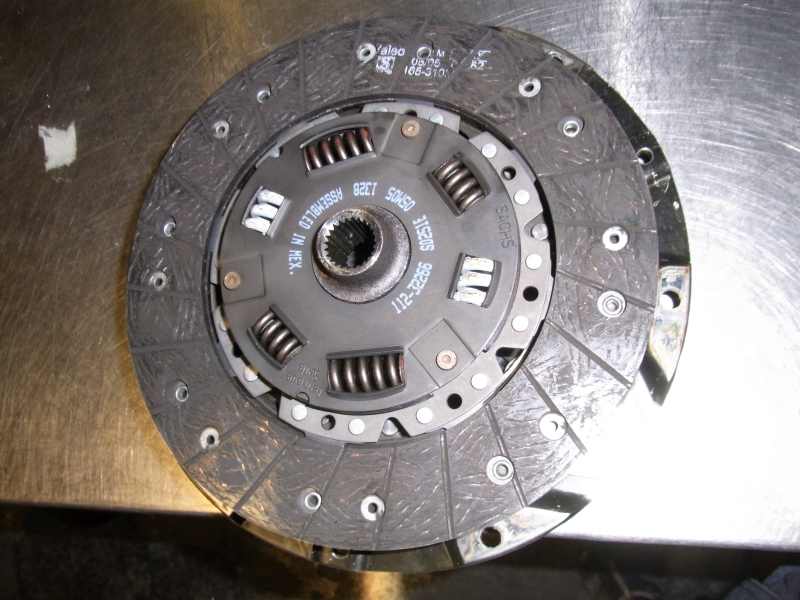
The flywheel looks unused except one area is starting to show some heat spots.
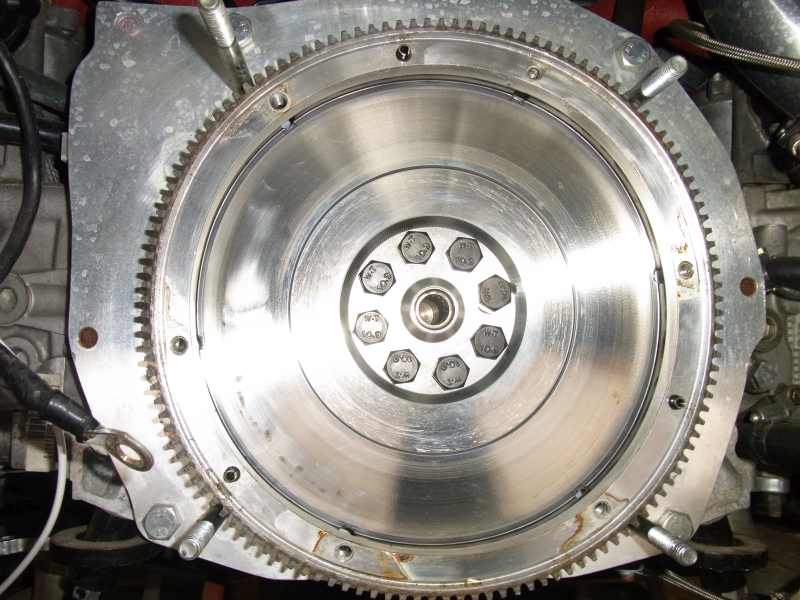
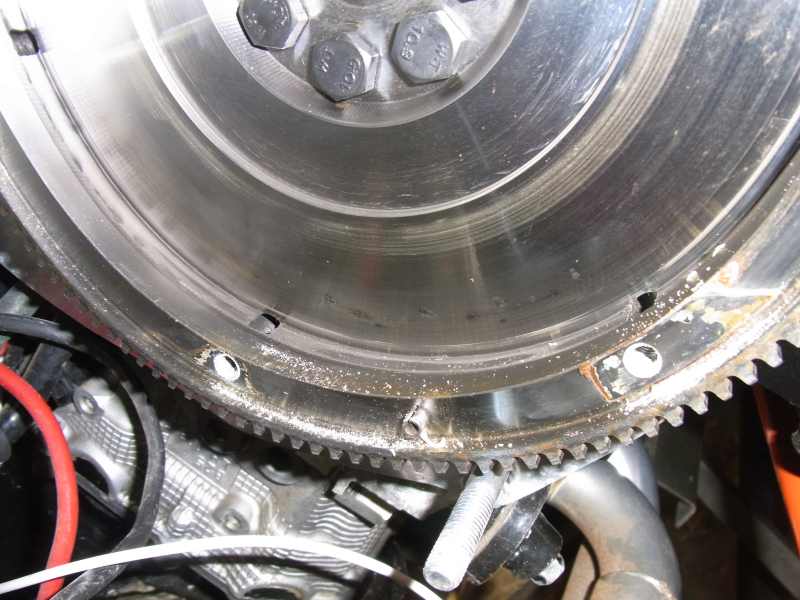
The pressure plate is the same with a matching area showing some heat spots.
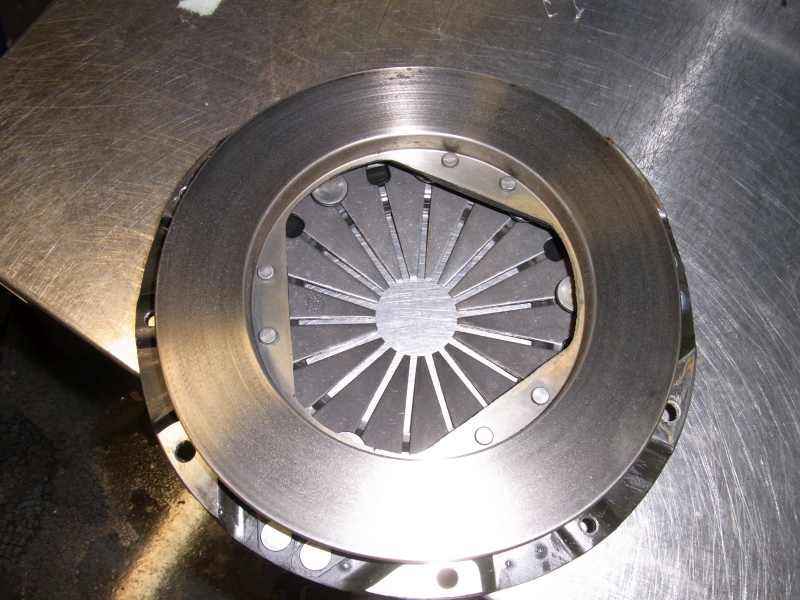
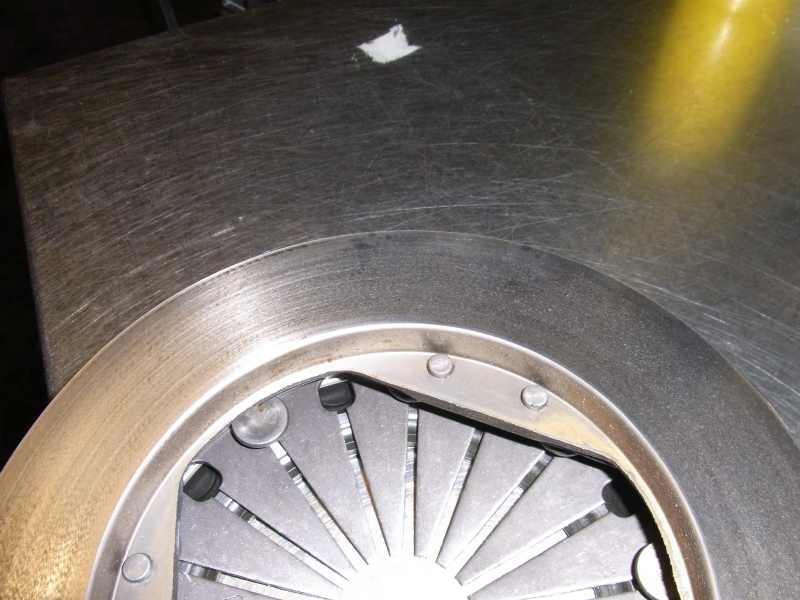
I have no idea what these parts should look like at this point in their life but it is odd that there are asymmetric marks in the same region of both the flywheel and pressure plate. Seems like those areas could be rubbing even with the clutch in. Nowhere else does it show any signs of slipping.
Any thoughts?
Cheers,
Scott
The pressure plate appeared to be properly in place and all of the bolts tight.
The disk looks basically new:
The flywheel looks unused except one area is starting to show some heat spots.
The pressure plate is the same with a matching area showing some heat spots.
I have no idea what these parts should look like at this point in their life but it is odd that there are asymmetric marks in the same region of both the flywheel and pressure plate. Seems like those areas could be rubbing even with the clutch in. Nowhere else does it show any signs of slipping.
Any thoughts?
Cheers,
Scott
I know on the subie flywheels you can over tighten and cause dragging. Do you have a torque spec for the pressure plate bolts? I think it is around 14 ft - lb for the subie pp.
Do you need the spacer washers behind the cluch release bearing fork piviot ball if the flywheel has been turned ???
Jack
Jack
Here you go Scott.
From my Narp thread:
Posted: Sep 21 2009, 09:39 AM
I got the stage II, 9" Porsche heavy duty pressure plate and clutch from KEP but the clutch is not fully engaging.
It's adjusted so tight that it bottoms out on the transaxle case. KEP tells me, I may need to place a washer under the little Teflon pivot on the clutch arm, or bend the arm. Wish I knew before I installed the motor.
Is this normal?
Sep 25 2009, 11:23 AM
I found the thread: Suby conversion and hydraulic clutch?, Two mods at once??
GS guy said:
"While studying the Kennedy installation instructions, it states specifically to:
1) Remove the sealing washer behind the ball stud where the clutch arm pivots -
apparently to reposition the clutch arm slightly and allow more lever travel?"
I don't know if I ever got installation instructions, not to say they didn't send them but I don't find any in my file.
I don't remember a sealing washer behind the ball stud, in my case I think I need to go the other way and add the washer behind the cup.
Looks like it will come apart soon, maybe I will just bend the arm?
Nov. 5
I pulled the transaxle back from the motor to remove the clutch pivot arm, shim the pivot cup and bend the arm.
The clutch still did not fully disengage. Pulled the motor and checked everything in relation to the stock motor and transaxle. Everything looked good.
Called the good people at KEP more than one time.. Finally found the problem. The diaphragm was cracked from between two fingers to the outer edge.
KEP mailed out a new one that day. I was told, with the newer kits you don't have to remove the washer from under the pivot ball.
And that was it.
Problem is, from your photo yours looks ok.
The diaphragm was cracked behind the rivet in the photo.
This is a "lo-fi" version of our main content. To view the full version with more information, formatting and images, please click here.