Full Version: Rust removal : any experience out there ?
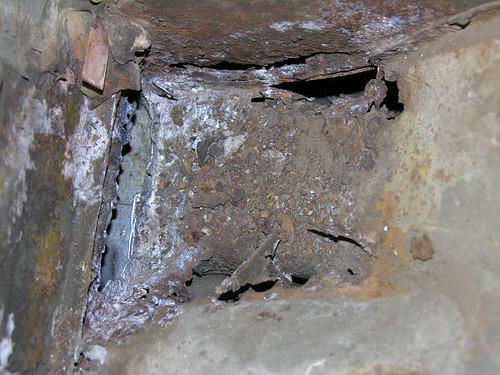
So the engine/tranny are out of my car and I cleaned the engine bay out reasonably well. Very little rust in general, but of course the RH hell hole was pretty funky. And the battery tray was half gone, so I removed the tray and the support.
Today I attacked it with a wire brush wheel in a power drill. I found that the flaked paint (if any) came off pretty fast, then a layer of light brown dry powdery rust also came off reasonably fast. After that, I seemed to get to a layer of "lumpy" kooking metal that would take on a burnished look, but the color was more of a dark grey than the shiny silver I expected. If I brushed where there had been no rust, I did find shiny silver.
So what I want to know is : how far should I go ? It feels like I'm gonna have to remove a lot of material (and spend forever doing it) if I try to procede w/ the wire brush. I don't have air tools, so blasting would take a lot of effort to set up, and I'm sure it's a big mess. Is media blasting the only way to procede ?
OTOH, if I get all the metal down to that lumpy, dark grey, burnished state, will one of those rust converter products be good enough ? There realy isn't that large an area affected, and so far it doesn't look like there are any "rust throughs" or structural issues.
Sorry, no pics yet. Car at home, camera & computer at office, not organized enough, etc. I'll see if I can get a well-lit pic in the next day or so.
When I got to the point of lumpy metal i used a phosphoric acid rust converter. I figured as long as the metal feels strong (screwdriver can't be poked through it, etc.) that there's enough there not to warrant removal. Unless its a huge area I would jsut convert it and be done. You can remove it with a grinder if it really bothers you, but a grinder is tough to fit in an engine bay. Dremel and lots of patience maybe?
-Tony
-Tony
When you hit the "lumpy metal" you really should go at it with a flatblade screwdriver and a hammer. Tap the screwdriuver at an angle to try at get under the lump, usually it will pop off and you will have a hole underneath. As for the treatment use ONLY Ospho or another similar product (phosphoric acid based) the "rust converters) sold at fLAPS are not true converters and will only make you feel better. When using a phosphoric based product
USE RESPIRATORY PROTECTION AND SKIN PROTECTION!! Got that? Phosphoric acid is N-A-S-T-Y stuff and will f-you up if inhaled! Don't let that scare you off just be cautious. I regularly spray it into rocker panels and other areas I can't access just as a safety measure and have gagged to the point I had to walk far away from the fumes.
USE RESPIRATORY PROTECTION AND SKIN PROTECTION!! Got that? Phosphoric acid is N-A-S-T-Y stuff and will f-you up if inhaled! Don't let that scare you off just be cautious. I regularly spray it into rocker panels and other areas I can't access just as a safety measure and have gagged to the point I had to walk far away from the fumes.
QUOTE(jsteele22 @ Nov 5 2006, 02:37 PM) 
So the engine/tranny are out of my car and I cleaned the engine bay out reasonably well. Very little rust in general, but of course the RH hell hole was pretty funky. And the battery tray was half gone, so I removed the tray and the support.
Today I attacked it with a wire brush wheel in a power drill. I found that the flaked paint (if any) came off pretty fast, then a layer of light brown dry powdery rust also came off reasonably fast. After that, I seemed to get to a layer of "lumpy" kooking metal that would take on a burnished look, but the color was more of a dark grey than the shiny silver I expected. If I brushed where there had been no rust, I did find shiny silver.
So what I want to know is : how far should I go ? It feels like I'm gonna have to remove a lot of material (and spend forever doing it) if I try to procede w/ the wire brush. I don't have air tools, so blasting would take a lot of effort to set up, and I'm sure it's a big mess. Is media blasting the only way to procede ?
OTOH, if I get all the metal down to that lumpy, dark grey, burnished state, will one of those rust converter products be good enough ? There realy isn't that large an area affected, and so far it doesn't look like there are any "rust throughs" or structural issues.
My car is in the shop right now to have the hell-hole area repaired. The guy said it would take about 27 hours to do the work and I provided him with the replacement engine tray, upper wheelhouse panel and battery tray and support from Restoration Design. Here are some pics of my car just before I brought it in.


Many of us here have done this work.
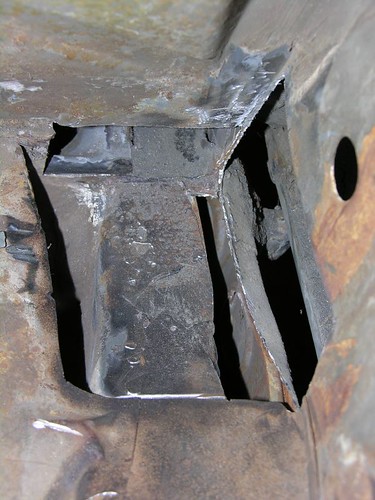
I did it, teaching myself to weld along the way. Just takes a little bit of balls and determination to turn this:
into this:
Into this:
....
Um. INTO THIS:
....
Okay. What did I do with my pics of the finished hell hole job....
Well, anyway. I did it, knowing nothing about it going in, and learning a ton by the time I was done.
Zach
hammer and chisel jeff
Ok, so I didn't get around to taking alot of pics of the finished product, but here's a thread I made about my rust repairs (I also did alot more, like trunks, floor pans, firewall, ect.) and they all turned out great.
rustoration
My process was;
1.wirebrush to see what you're dealing with (via grinder... used ALOT of wirebrush wheels)- sometimes I would 'explore' far beyond where I thought the problem was and would find rust begining under perfectly good paint- go searching!
2. chop it if it's cheese (with a grinder wheel)
hint: buy a craftsman grinder- I used three. Paid for one. Gotta love craftsman's return policy
3. shape a piece of sheetmetal for a patch if I had to chop and weld in new material, if not go step four. Shaping sheetmetal is really fun and not as hard as you would expect. Use screws to hold patches inplace for welding.
4.wirebursh again, shiny as you can get it.
5. burnished slightly lumpy was ok, black spots were not- they didn't pass the screw driver test. I would either continue cleaning black spots with Naval jelly/scraping/brushing/repeat (days at a time on some occasions)- or chop them out if I had to.
6. once all rust was dug out with a bit of force I would apply metal etching/metal prep PPG DX 579 (to clean surfaces) from auto paint supply shop
7. rinse PPG DX 579 off with water and sponge to get rid of acid.
8. Get water out with acetone rags to help immediately dry metal before surface rust could begin again. Hairdryer to bone dry metal helps alot.
9. Paint immediately with ZeroRust spray paint. It's shown to last longer then POR-15 when tested side by side on dock pilings in saltwater.
Sorry I don't have pictures of my trunks and floorboards. They came out awsome and I'm very confident they will last a long time!
rustoration
My process was;
1.wirebrush to see what you're dealing with (via grinder... used ALOT of wirebrush wheels)- sometimes I would 'explore' far beyond where I thought the problem was and would find rust begining under perfectly good paint- go searching!
2. chop it if it's cheese (with a grinder wheel)
hint: buy a craftsman grinder- I used three. Paid for one. Gotta love craftsman's return policy
3. shape a piece of sheetmetal for a patch if I had to chop and weld in new material, if not go step four. Shaping sheetmetal is really fun and not as hard as you would expect.
Use screws to hold patches inplace for welding.4.wirebursh again, shiny as you can get it.
5. burnished slightly lumpy was ok, black spots were not- they didn't pass the screw driver test. I would either continue cleaning black spots with Naval jelly/scraping/brushing/repeat (days at a time on some occasions)- or chop them out if I had to.
6. once all rust was dug out with a bit of force I would apply metal etching/metal prep PPG DX 579 (to clean surfaces) from auto paint supply shop
7. rinse PPG DX 579 off with water and sponge to get rid of acid.
8. Get water out with acetone rags to help immediately dry metal before surface rust could begin again. Hairdryer to bone dry metal helps alot.
9. Paint immediately with ZeroRust spray paint. It's shown to last longer then POR-15 when tested side by side on dock pilings in saltwater.
Sorry I don't have pictures of my trunks and floorboards. They came out awsome and I'm very confident they will last a long time!
QUOTE(Mid_Engine_914 @ Nov 5 2006, 06:26 PM)
QUOTE(jsteele22 @ Nov 5 2006, 02:37 PM)
So the engine/tranny are out of my car and I cleaned the engine bay out reasonably well. Very little rust in general, but of course the RH hell hole was pretty funky. And the battery tray was half gone, so I removed the tray and the support.
Today I attacked it with a wire brush wheel in a power drill. I found that the flaked paint (if any) came off pretty fast, then a layer of light brown dry powdery rust also came off reasonably fast. After that, I seemed to get to a layer of "lumpy" kooking metal that would take on a burnished look, but the color was more of a dark grey than the shiny silver I expected. If I brushed where there had been no rust, I did find shiny silver.
So what I want to know is : how far should I go ? It feels like I'm gonna have to remove a lot of material (and spend forever doing it) if I try to procede w/ the wire brush. I don't have air tools, so blasting would take a lot of effort to set up, and I'm sure it's a big mess. Is media blasting the only way to procede ?
OTOH, if I get all the metal down to that lumpy, dark grey, burnished state, will one of those rust converter products be good enough ? There realy isn't that large an area affected, and so far it doesn't look like there are any "rust throughs" or structural issues.
My car is in the shop right now to have the hell-hole area repaired. The guy said it would take about 27 hours to do the work and I provided him with the replacement engine tray, upper wheelhouse panel and battery tray and support from Restoration Design. Here are some pics of my car just before I brought it in.
IMO 27 Hours is total BS. It took me a max of 10 hours to do and I had to hand form all of the metal, cut it out, weld it, and then prep to paint it.

Here's my hell-hole-be-gone pics (before final paint)  :
:
Click to view attachment
Click to view attachment
Oh yeah,and for those who are afraid of welding- my welding experience consisted of about 10 minutes practice on scrap metal basically to set the wire speed and voltage and practice making little circles.
:Click to view attachment
Click to view attachment
Oh yeah,and for those who are afraid of welding- my welding experience consisted of about 10 minutes practice on scrap metal basically to set the wire speed and voltage and practice making little circles.
QUOTE(jd74914 @ Nov 5 2006, 06:58 PM)
QUOTE(Mid_Engine_914 @ Nov 5 2006, 06:26 PM)
QUOTE(jsteele22 @ Nov 5 2006, 02:37 PM)
So the engine/tranny are out of my car and I cleaned the engine bay out reasonably well. Very little rust in general, but of course the RH hell hole was pretty funky. And the battery tray was half gone, so I removed the tray and the support.
Today I attacked it with a wire brush wheel in a power drill. I found that the flaked paint (if any) came off pretty fast, then a layer of light brown dry powdery rust also came off reasonably fast. After that, I seemed to get to a layer of "lumpy" kooking metal that would take on a burnished look, but the color was more of a dark grey than the shiny silver I expected. If I brushed where there had been no rust, I did find shiny silver.
So what I want to know is : how far should I go ? It feels like I'm gonna have to remove a lot of material (and spend forever doing it) if I try to procede w/ the wire brush. I don't have air tools, so blasting would take a lot of effort to set up, and I'm sure it's a big mess. Is media blasting the only way to procede ?
OTOH, if I get all the metal down to that lumpy, dark grey, burnished state, will one of those rust converter products be good enough ? There realy isn't that large an area affected, and so far it doesn't look like there are any "rust throughs" or structural issues.
My car is in the shop right now to have the hell-hole area repaired. The guy said it would take about 27 hours to do the work and I provided him with the replacement engine tray, upper wheelhouse panel and battery tray and support from Restoration Design. Here are some pics of my car just before I brought it in.
IMO 27 Hours is total BS. It took me a max of 10 hours to do and I had to hand form all of the metal, cut it out, weld it, and then prep to paint it.
-----
27 hours is longer than I thought it would take too but I was not in a position to question him because I've never done rust repair work. He did say that would be the uppper limit for the number of hours and that he would keep track of the actual hours it takes. It's only money and hopefully he'll do a good job.
Ok, that makes sense (I guess) as long as thats just an upper estimate. I can empathize with your situation. Good luck.
QUOTE(jd74914 @ Nov 6 2006, 01:58 PM)
IMO 27 Hours is total BS. It took me a max of 10 hours to do and I had to hand form all of the metal, cut it out, weld it, and then prep to paint it.

best bet is to remove all the rust. If you still have bumpy rust, you should be able to remove it. a blaster is good for that , but a wheel/sanding will work. Often the case is a high speed wire wheel will heat the metal, and cause it to discolor, so that you won't see shinny metal, this is usually the case with very high speed wheels, and lots of pressure, this causes more heat. if you know the the alloy, you can make a good estimate of the temperature obtained by the color of the metal! a thin oxide forms, and the thickness of the oxide is a indication of the temp achieved. a straw color indicates a lower temp (thinner oxide formed) than a blue color. this color change is becuase the thickness of the oxide is on the order of the wavelength of light, and destructive /constructive reflections occur in the oxide, making some colors of light (wavelengths) increase, and others decrease.
try hand sanding with sand paper to see if the discoloration is removed. sand paper cuts better than a steel wire wheel, and might work better to remove the rust. you want to get down enough to truely see how bad it is. if sulfuric acid from the battery got down into the rockers, you likely have rust in there.
Also, since you are doing the engine bay, at the same time give a look by removing the passenger side outer rocker panel (screws, rivets) and look near the jack point, if battery rust got into the rocker, you often will find holes under the rocker panel. also remove any engine bay sound pad on the firewall, and look behind it (early cars lack this rust trap) and remove the passenger seat and inspect the floor near the fire wall. again, battery acid rust can work its way into the there, rusting the cockpit floor / firewall.
good luck!
I thought I might get a reply or two to this topic !
Still no pics, but I must say that my case is way, way less severe than any of the pics here. Apart from the battery tray itself (which I've removed) there isn't any perforation of the metal. I didn't make it back home yesterday in time to try the "screwdriver" test, but (now that I've heard it) that's the obvious thing to try next.
Toolwise, I've got to try a better grindstone. I bought a white colored one from Ace, and it nearly vanished before my eyes.
I think the comment about the wire wheel heating the metal and causing the discoloration is worth looking into. It seems I recall using a wire brush years ago on something and had the same issue. I'll try some sandpaper to see if the tops of the lumps get shiny.
The insulating pad is out. No visible rust, but I'll snoop aroun some more once I get a method down.
I read about ZeroRust, and I like the product. It does say, though, that it should be applied to bare metal for best results. Anybody have experience with using ZR over paint ?
This is a "lo-fi" version of our main content. To view the full version with more information, formatting and images, please click here.