So, when I started this restoration in October of 2005, I started a progress thread on the Subaru Board (NASIOC) that I active on. I have been meaning to create a thread here, but I never got around to it. I figured the kids over in ricer land would find it more amusing to see a classic resto in action then the folks here that have lived it.
But, I now post more here then I post in NASIOC OT, and feel more involved in the community then I did when I started. So, for the sake of ease, I am going to port over my posts from NASIOC, and posts from today on will be unique here.
As I get ready to paint (JUNE 9th - 13th are PAINT DAYS!) this thread will get more active. :-)
Zach
PS, it kinda fun for me to do this. Looking over the old posts brings back memories of the ride...
Full Version: What the World needs now is... a progress thread
First posted on 10-2-2005

Woot, I have a 30 year old sports car.
In other news, I'm poor for the rest of the month.... er... couple of years....
Porsche parts will be featured on my christmas list. :-)
And so ends the 914 vs power wagon debate.
At least for me. :-)
Zach
Woot, I have a 30 year old sports car.
In other news, I'm poor for the rest of the month.... er... couple of years....
Porsche parts will be featured on my christmas list. :-)
And so ends the 914 vs power wagon debate.
At least for me. :-)
Zach
First Posted 10-2-2005
Yeah. There is very little rust on it. Hell holes, longs, battery tray are just about pristine. A little bit of rust int the trunk, due to a poorly sealed rear spoiler leaking. I am going to start tearing it apart tomorrow. Start the good old frame up restoration.
Jackstands, HO!
Zach
Yeah. There is very little rust on it. Hell holes, longs, battery tray are just about pristine. A little bit of rust int the trunk, due to a poorly sealed rear spoiler leaking. I am going to start tearing it apart tomorrow. Start the good old frame up restoration.
Jackstands, HO!
Zach
First Posted 10-2-2005
Originally Posted by MattSEG
didn't buy it from someone in albuquerque on ebay did you?
No, I got it from a guy in Rockville MD. Great guy too. We agreed on a price that we were both ahppy with, he helped load the thing. I was ready to go. He said "Hey, Wait!"
Mike took me into the basement, which was full of porsche parts and said "Take what you need." I waled out with 2 new seats and cushions (dusty, but no tears) a straight, uncracked lower dash, and car cover, and some other parts. When I left, Mike said "As you start working, you will find things that you need. Call me, if I have them I'll just send them to you."
The guy had two other 914s in his garage - one a rust bucket parts car, the other a 914-6 race car. He had to get rid of this one, as he was expecting another 914 and a 944 to come in a week. I think that he was less concerned about the money, and more concerned tht he felt that the car would go to someone that would do it justice.
Zach
QUOTE
Originally Posted by MattSEG
didn't buy it from someone in albuquerque on ebay did you?
No, I got it from a guy in Rockville MD. Great guy too. We agreed on a price that we were both ahppy with, he helped load the thing. I was ready to go. He said "Hey, Wait!"
Mike took me into the basement, which was full of porsche parts and said "Take what you need." I waled out with 2 new seats and cushions (dusty, but no tears) a straight, uncracked lower dash, and car cover, and some other parts. When I left, Mike said "As you start working, you will find things that you need. Call me, if I have them I'll just send them to you."
The guy had two other 914s in his garage - one a rust bucket parts car, the other a 914-6 race car. He had to get rid of this one, as he was expecting another 914 and a 944 to come in a week. I think that he was less concerned about the money, and more concerned tht he felt that the car would go to someone that would do it justice.
Zach
First Posted 10-4-2005
Well, last night I went out and started buying the tools that I would need to restore the car.
The shopping list included
* 2 Craftsman metric wrench sets (7mm-17mm)
* 4 new jackstands (I suppse my old ones were good, but, well, I was in a buying mood)
* an angle grinder
* wire brush cup for the angle grinder
* Breaker bar (I had been just using a lenght of pipe for this )
* bunch of drill bits
* and a tool box
I was very lucky to have happened to walk into a sale at Sears, so the grinder, tool box, and wrenches were on sale.
I still need to find some triple square wrenches, and a 17mm allen wrench.
These (along with the various clamps, vice grips, etc that I have allready) will be the basics for the tear down. As I tear the car apart, I'll update with pictures and such.
Zach
First Posted 10-4-2005
Originally Posted by wrigh003
So you bought an ancient Porsche that's notorious for rust, then went to Sears and bought a bunch of tools.
Did something bad happen to you last week?
Not at all. This is somehting that I have been planning to do for about 3 or 4 years. But, until this spring, I was living in an apartment. As you said, notorius for rust. If I had started then, it would have rusted away faster then I could have restored it.
Bought a house with a detached garage that I could put 4 cars in - or my car, Erins car, a project car, and a workshop. Then I started looking for cars that would be a good candidate for a restoration. Meaning, I did not care if the engine worked, but the body and frame had to be is good condition. Air cooled engines are easy, VW air cooled engines are easier. Rust repair is a pain in the butt, and I don't know how to weld yet.
The tools I got as I did not have metric tools.
I used to repair and drive WWII british armored cars, so I know that I can do this. I also like building things and takeing them apart. I know it is not an investment.
Zach
QUOTE
Originally Posted by wrigh003
So you bought an ancient Porsche that's notorious for rust, then went to Sears and bought a bunch of tools.
Did something bad happen to you last week?
Not at all. This is somehting that I have been planning to do for about 3 or 4 years. But, until this spring, I was living in an apartment. As you said, notorius for rust. If I had started then, it would have rusted away faster then I could have restored it.
Bought a house with a detached garage that I could put 4 cars in - or my car, Erins car, a project car, and a workshop. Then I started looking for cars that would be a good candidate for a restoration. Meaning, I did not care if the engine worked, but the body and frame had to be is good condition. Air cooled engines are easy, VW air cooled engines are easier. Rust repair is a pain in the butt, and I don't know how to weld yet.
The tools I got as I did not have metric tools.
I used to repair and drive WWII british armored cars, so I know that I can do this. I also like building things and takeing them apart. I know it is not an investment.
Zach
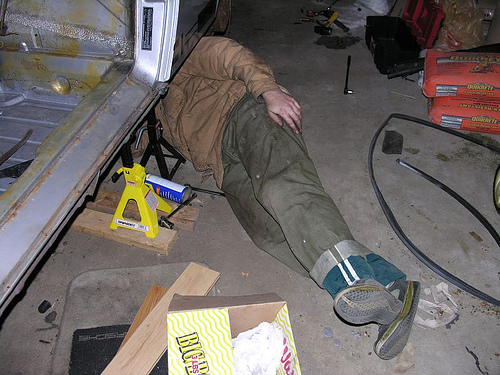
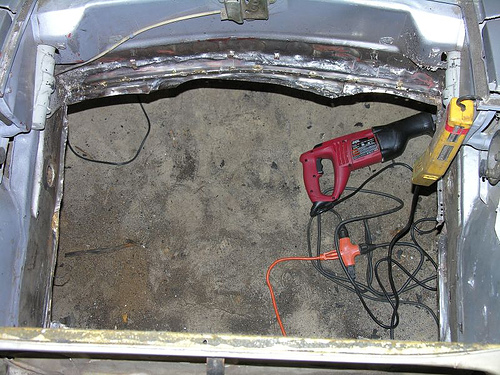
914 Update 10-12-05
Well, so far, the car is still in pieces (haha - of course it is...). The interior is out except for the shifter, pedal cluster, and the dash. I am trying to figure out the dash, and going through the tedious process of marking were all the wires connect. Each wire gets a red tag of electical tape, with a sharpie number written on it, and the associated bit on the back of the dash also gets a red tag with the number. In theory, next year when I am putting everything back together, the numbers will match up and everything will work. Arn't theories grand?
I have also taken out several bit of the car that I never intend to put back in - for the cause of weight savings. Like the "factory" A/C fittings, vents, and dash panel. Using a heat gun and a three-way paint scraper I removed all that nasty "rust preventing" and sound proofing tar from the cabin floor pans (about 10 pounds worth, not to be returned!). It never did much rust proofing, but rather trapped water under it and ruuusted the floor pans. I knew to expect this, and the floor pans look better then expected. Lots of surface rust, but I have not been able to poke through the worst of it with a screw driver and a hammer. I think I dodged a bullet on needing to replace the floor pans!
As soon as I get the dash out, and the shifter and pedal cluster out, the interior tub will be hit with a wire wheel on an angle grinder. This will strip the remaining tar bits, pull out the seam sealer, and clear the rust off the metal. This will be the final test to see exactly how deep it is, but I am hopefull.
I only work on the car a couple hours every other night or so - other wise my household duties won't get done and Erin will get (understandably) pissy. Keeping the natives happy is one of my primary goals with the restoration.
Its kind of perverted, but I kinda hope to find that replacing a floor panel to be needed. Why? Because it gives me the excuse I need to justify buying a MIG welder and learning to weld. I am really trying to be finacially tight on what I buy to do the restoration. So far, so good. But buying a $400 welder "on spec" might open the flood gates in a way I don't want them opened.
I have taken pics, but I did not bring them to work to resize and upload, I'll try and get that done. For the time being just picture a 914, on jackstands without doors, rockers, a hood or an interior.
:-)
Zach
Posted 12-08-2005
Luke asked for them, and that was enough to get me to post them up.
These are from my 914 Flickr page here:http://www.flickr.com/photos/17886282@N00/sets/1537526/
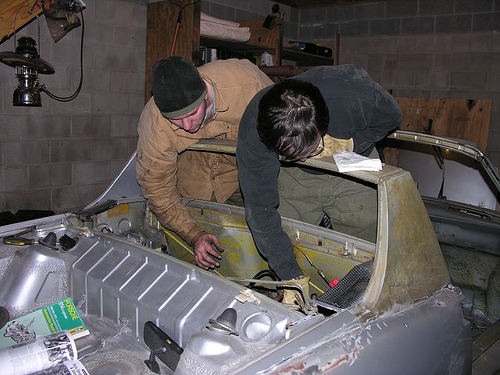
All of these pics were taken the saturday after Thanksgiving. I suckered my buddy Ross to brave the cold and help get the engine out of the 914.
Me unblolting somehting - either heat exchanger or engine crossbar.
What do you mean it caught on somehting?
Ross throws the horns before the engine is out. Could have jinxed the whole thing!
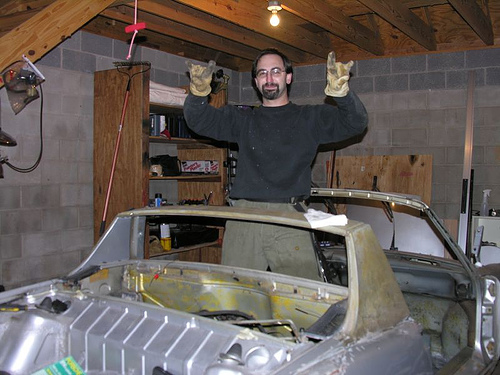
And ITS OUT!
This is the proper time to throw the horns.
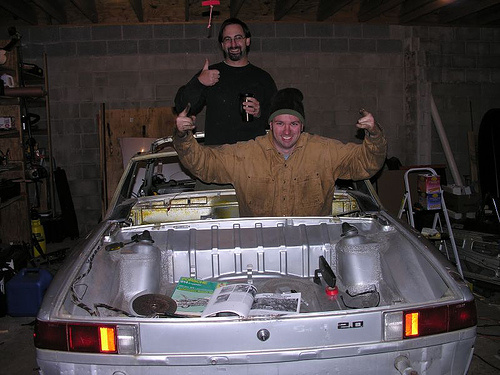
Zach
Luke asked for them, and that was enough to get me to post them up.
These are from my 914 Flickr page here:http://www.flickr.com/photos/17886282@N00/sets/1537526/
All of these pics were taken the saturday after Thanksgiving. I suckered my buddy Ross to brave the cold and help get the engine out of the 914.
Me unblolting somehting - either heat exchanger or engine crossbar.
What do you mean it caught on somehting?
Ross throws the horns before the engine is out. Could have jinxed the whole thing!
And ITS OUT!
This is the proper time to throw the horns.
Zach
Posted 12-8-2005
Other stuff done since the 10-12-05 update:
The floor pans were found to be in really good shape. I wire brushed them, hit them with Metal Ready and then 2 coats of silver Por15. I used the silver as it is supposed to fill pits a little better, and be a little stronger.
The only bits still left on the car right now are the suspension. Everything else is out.
It ended up being a very good thing that the car would not start when I bought it. The fuel ring on the passenger side was very cracked and was leaking fuel. Looked like the driver side had been updated, but not the passenger. I am converting the fuel system to stainless steel through the tunnel, but will probably stay with (new) rubber injector hose out of the tunnel.
I ended up cutting out that section of the rear trunk with the rust. I have not found a replacement for it yet, but am looking.
The front trunk also ended up being pretty rusted. I took out the A/C condenser in the front, and was going to weld the hole closed. However, while cleaning up the area around it (getting rid of the "rust proofing") my angle grinder went right through it a couple of places. Luckily, the trunk panel that I picked up to replace the A/C can be used to replace the front trunk floor. :-) All of the A/C stuff is out of the car (including all the hoses and fittings), and I don't think that it will be going back in.
There was also some battery tray rust, so I am planning on cutting out the battery tray and welding a new one in after that is fixed.
The only other bit of significant rust that I found was on the engine firewall. tree debris, mud, and probably battery acid had collected in the bottom passenger corner of the firewall. It rusted through an area 2inch tall by 3inch wide. The only thing keeping it together was paint. When I touched the angle grinder to it, the whole section exploded. But that has been the only significant spot. Its totally flat, so that will just be a sheet metal weld.
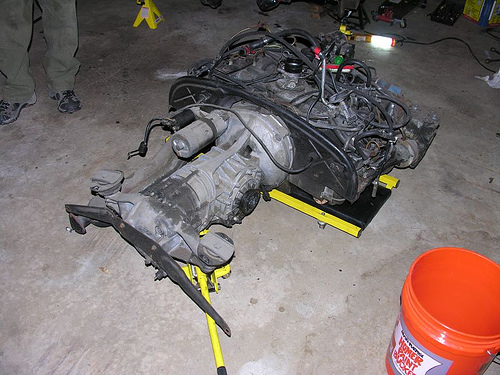
The engine did not start due to the fact that the wire harness was burned at the ignition coil. Given the fuel leak, this was a good thing. Several wires on the engine wire harness were scarred, bald and somewhat burned, so I am going to pony up for a new one.
I have the engine out and mostly stripped. I have not taken the heads off, and probably won't at this time. The entire power robbing exhaust system on that car is going to be binned. Initially I wanted to put headers on it, but Erin convinced me that heat was a good thing. :-) I have not decided what I want for the actual exhaust. I know that the Bursch 2.0 exhausts are supposed to preform the best, but I really like the looks of the 4 tipped Monza (indulge the little ricer in me - the both flow about the same). Either way, it will be a while before the engine is back in the car, so I have time to ponder it.
It looks like all of the 75/76 model year smog stuff had been capped off, but left bolted in. I am going to find out what I can get away with in PA, and try to avoid putting back all that back on when I re mount the engine.
I ground all the paint bubbles down to bare metal. No rust was found, looks like a crappy respray. Not an issue, as I was going to repaint anyhow.
So far the biggest goof up on my part was the windshield. The rear glass was just about ready to fall out on its own. But the front took more time. I spent a lot of time slowly cutting away the butyl tape around the windshield. But it sealed behind me again. Needless, I ended up cracking the windshield. Doh.
The last big disassembly task is to remove the suspension, and then scrape the bottom of the car down to bare steel. This will also be por-15ed. I know I will probably find some surprises, but I doubt it will be through. About the only place that I have not been able to inspect is the center tunnel.
Now it is getting really cold in the garage, so I will probably take a break on the car and work on setting up some heat in there. It will take me a while, but the car is going to be in top notch shape by the time that I am done with it.
Zach
Other stuff done since the 10-12-05 update:
The floor pans were found to be in really good shape. I wire brushed them, hit them with Metal Ready and then 2 coats of silver Por15. I used the silver as it is supposed to fill pits a little better, and be a little stronger.
The only bits still left on the car right now are the suspension. Everything else is out.
It ended up being a very good thing that the car would not start when I bought it. The fuel ring on the passenger side was very cracked and was leaking fuel. Looked like the driver side had been updated, but not the passenger. I am converting the fuel system to stainless steel through the tunnel, but will probably stay with (new) rubber injector hose out of the tunnel.
I ended up cutting out that section of the rear trunk with the rust. I have not found a replacement for it yet, but am looking.
The front trunk also ended up being pretty rusted. I took out the A/C condenser in the front, and was going to weld the hole closed. However, while cleaning up the area around it (getting rid of the "rust proofing") my angle grinder went right through it a couple of places. Luckily, the trunk panel that I picked up to replace the A/C can be used to replace the front trunk floor. :-) All of the A/C stuff is out of the car (including all the hoses and fittings), and I don't think that it will be going back in.
There was also some battery tray rust, so I am planning on cutting out the battery tray and welding a new one in after that is fixed.
The only other bit of significant rust that I found was on the engine firewall. tree debris, mud, and probably battery acid had collected in the bottom passenger corner of the firewall. It rusted through an area 2inch tall by 3inch wide. The only thing keeping it together was paint. When I touched the angle grinder to it, the whole section exploded. But that has been the only significant spot. Its totally flat, so that will just be a sheet metal weld.
The engine did not start due to the fact that the wire harness was burned at the ignition coil. Given the fuel leak, this was a good thing. Several wires on the engine wire harness were scarred, bald and somewhat burned, so I am going to pony up for a new one.
I have the engine out and mostly stripped. I have not taken the heads off, and probably won't at this time. The entire power robbing exhaust system on that car is going to be binned. Initially I wanted to put headers on it, but Erin convinced me that heat was a good thing. :-) I have not decided what I want for the actual exhaust. I know that the Bursch 2.0 exhausts are supposed to preform the best, but I really like the looks of the 4 tipped Monza (indulge the little ricer in me - the both flow about the same). Either way, it will be a while before the engine is back in the car, so I have time to ponder it.
It looks like all of the 75/76 model year smog stuff had been capped off, but left bolted in. I am going to find out what I can get away with in PA, and try to avoid putting back all that back on when I re mount the engine.
I ground all the paint bubbles down to bare metal. No rust was found, looks like a crappy respray. Not an issue, as I was going to repaint anyhow.
So far the biggest goof up on my part was the windshield. The rear glass was just about ready to fall out on its own. But the front took more time. I spent a lot of time slowly cutting away the butyl tape around the windshield. But it sealed behind me again. Needless, I ended up cracking the windshield. Doh.
The last big disassembly task is to remove the suspension, and then scrape the bottom of the car down to bare steel. This will also be por-15ed. I know I will probably find some surprises, but I doubt it will be through. About the only place that I have not been able to inspect is the center tunnel.
Now it is getting really cold in the garage, so I will probably take a break on the car and work on setting up some heat in there. It will take me a while, but the car is going to be in top notch shape by the time that I am done with it.
Zach
Posted 12-08-2005
Originally Posted by Anglophile
I see you've stripped the vinyl off the rear pillar/roll bar. Ever consider leaving it that way (painted the same color as the body I mean)? I've seen a few like that, it can look really good if the metal is prepped right.
Always hated vinyl roofs myself.
That is my current plan. I am going to get rid of the bottom trim piece, fill the mounting holes and sand the glue off the sail panels. I have also been considering blocking and sanding the targa top till it is smooth, and painting that the body color as well.
All of the crome trim is either going to be painted black (if the top stays black) or body color. The crome trim around the windshield will be replaced with modern black rubber trim.
Excepting the seats, there may be no vinyl in or on that car when I am done.
Zach
QUOTE
Originally Posted by Anglophile
I see you've stripped the vinyl off the rear pillar/roll bar. Ever consider leaving it that way (painted the same color as the body I mean)? I've seen a few like that, it can look really good if the metal is prepped right.
Always hated vinyl roofs myself.
That is my current plan. I am going to get rid of the bottom trim piece, fill the mounting holes and sand the glue off the sail panels. I have also been considering blocking and sanding the targa top till it is smooth, and painting that the body color as well.
All of the crome trim is either going to be painted black (if the top stays black) or body color. The crome trim around the windshield will be replaced with modern black rubber trim.
Excepting the seats, there may be no vinyl in or on that car when I am done.
Zach
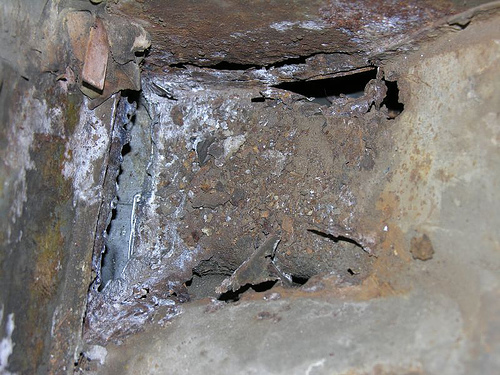
Update for 12-16-05
Well, today I tackled one of the cars "problem areas." And if you know 914s, i'll give you one guess as to what is was.
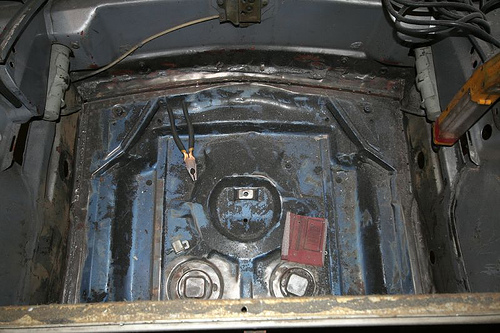
When I bought the car, I could not see any rust in the hell hole area. As I dug into it over the past couple of months, I found some, and then some more. So, today I took care of it.
The day started with the hell hole looking like this (keep in mind, this is _LIGHT_ rust for a 914 hell hole):
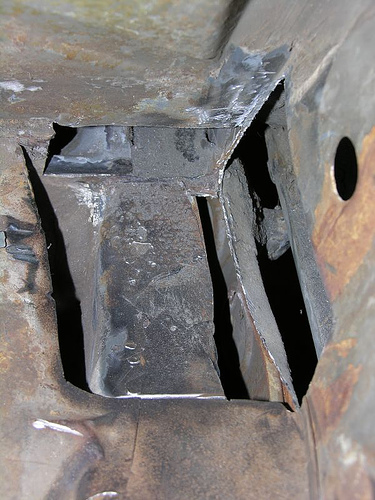
4 hours later, it looked like this:
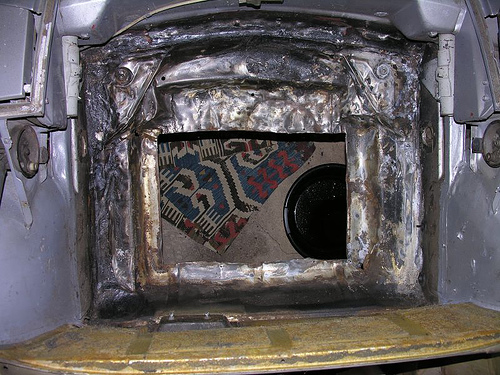
And from the cabin side:

I tried to grind it out with my angle grinder and a 4 1/2 inch cutting disk. But my grinder is too bulky to get int here. So, I swapped over to a dremel, and burned through about 15 heavy duty cutting disks. The I used my grinder to wire brush it, then hit it withthe dremel again.
Last part of this repair will be to cut some patches out of sheet steel, and weld them in. But, alas, I have yet to buy a welder. I looked at them today, but I refuse to buy one till after all my Christmas holiday shopping is over.
Anyhow, patches will be welded in, and the hole mess will be POR-15ed. Hopefully that will be that for rust in the hell hole. At least for the next 30 years.
Zach
Well, today I tackled one of the cars "problem areas." And if you know 914s, i'll give you one guess as to what is was.
When I bought the car, I could not see any rust in the hell hole area. As I dug into it over the past couple of months, I found some, and then some more. So, today I took care of it.
The day started with the hell hole looking like this (keep in mind, this is _LIGHT_ rust for a 914 hell hole):
4 hours later, it looked like this:
And from the cabin side:
I tried to grind it out with my angle grinder and a 4 1/2 inch cutting disk. But my grinder is too bulky to get int here. So, I swapped over to a dremel, and burned through about 15 heavy duty cutting disks. The I used my grinder to wire brush it, then hit it withthe dremel again.
Last part of this repair will be to cut some patches out of sheet steel, and weld them in. But, alas, I have yet to buy a welder. I looked at them today, but I refuse to buy one till after all my Christmas holiday shopping is over.
Anyhow, patches will be welded in, and the hole mess will be POR-15ed. Hopefully that will be that for rust in the hell hole. At least for the next 30 years.
Zach
Posted 03-06-2006
I did more work on the 914 this weekend, and remembered to take some pictures. Hopefully, as spring startes to warm up my garage, I'll be able to spend more time out there on the car.
The mission: get the crappy, rusty front trunk out and replaced with a new clean one.
The task this weekend started when a body panel that I got from a salvage car showed up in the mail. The weather was nice, so off to work I went.
This was what needed to come out. The big hole in the bottom was a cut out for the dealer installed AC (which will notr be going back in). Notice how crumpled this metal is. There are rust holes at the top left and bottom right corners. The top left suspension triangle is really rusty. What is left there is a patch work of steel welded and brazed in. This car has had several front enders... The more I dig into this car, the more I think it was raced pretty hard. There is lots of front end work on it.
Almost all the metal is cut out. The front still needs to be cut away. At the factory this area was attached by spot welding. But the DPO brazed it on. The spot weld are drilled, but i need to grind off the brazing as well.
Here it is looking at it from the front. You can still see a rust hole near the top left. The drilled holes along the left are spot welds that I drilled out. Before I cut that last bit out, I need to take very precise measurements so that I can replicate the cut on the new panel. The goal is not to have to have a gap when I weld in the new piece.
This is the part to be welded up after a lot of cleaning. The guy who was cutting up his car left much of the fenders, nose and fuel wall on. the fenders and nose I took off (drilling out the spot welds) and when I get my measurments for the back rise, I'll make the same cut here. If doen right, it will make a very tight fit and be easy to weld in. All the white junk in it is ground out seam sealer. I wanted to take it all out to make sure that there was no rust hiding under there. Before the piece gets welded into the car, it will be bare metal, and right after welding it will get the POR-15 treatment.
Around 1AM Erin came out and asked if I was planning to come to bed. Time had gotten away from me. I work pretty slow, but I am teaching myself all this stuff as I go along. Sunday I had other tasks to do, but today is supposed to be nice out. Maybe I'll have the new front trunk welded in by this weekend. If so, it will be one of the big steps in my restoration.
Along the way this weekend, I realized that I had gotten a 2 for 1 deal on my sawzall. I bought one, on sale. Put it away without opening it. Saturday night, I take off the cellophane and 2 bozes of saws come out! They were packaged in bundles of 2, and never unpacked at the store. The checkout person just rang the barcode, and neither of us ever new any better!
Also, while wire wheeling the seam sealer out of the new piece, I felt something hit me in the forehead. Not too uncommon (and I was wearing goggles, a hat, and ear muffs). My neighbor stopped by to chat, and while brushing the dirt off my face, I felt something that was not right. Reached up and pulled out a 1/2 inch piece of wire that had embedded itself in my forehead.
Zach
So, I have alsmot had the car for a year now. It pretty different from the way it looked when I bought it.
That was today. I have begun stripping the old paint and bondo off the car. It had several coats of paint on it, and the most recent job was pretty crappy. I've stripped about 1/4 of the car at theis point and the good news is there was ZERO rust under the paint. The bad news is that there was a ton of bondo on the front. This was expected, and I am going to try and work the lumps back into shape with a hammer and a shrinking disk.
The front trunk is welded back into place.
The back rise (not pictured) has a slight gap to it. I'll need to patch it, and I will get to that soonish.
The hell hole is totally fixed, por-15ed and seam sealed. It should never be a rust magnate again. The single biggest weak point for these cars has been tended to.
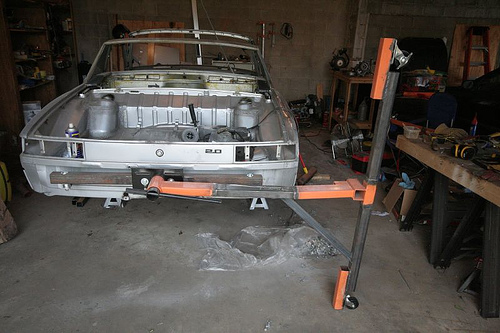
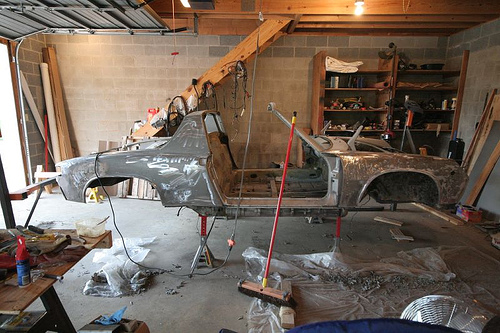
This pic is part of the rotisserie that I built. It should be on it by the end of the month. I just need to bribe enough freinds to come over and muscle the thing up. The tub alone can be lifted by 4 people at this point, so it should be pretty easy.
By the end of the month I will have had this thing for a year. I've not bought a lot for it this summer, as all my money has been being saved for my wedding and honeymoon. I have a bunch of winter projects to keep me busy, and I want to have all the body work done for a spring painting.
I'll probably bump this for the day crew tomorrow, but I thought I'd update tonight.
Zach
That was today. I have begun stripping the old paint and bondo off the car. It had several coats of paint on it, and the most recent job was pretty crappy. I've stripped about 1/4 of the car at theis point and the good news is there was ZERO rust under the paint. The bad news is that there was a ton of bondo on the front. This was expected, and I am going to try and work the lumps back into shape with a hammer and a shrinking disk.
The front trunk is welded back into place.
The back rise (not pictured) has a slight gap to it. I'll need to patch it, and I will get to that soonish.
The hell hole is totally fixed, por-15ed and seam sealed. It should never be a rust magnate again. The single biggest weak point for these cars has been tended to.
This pic is part of the rotisserie that I built. It should be on it by the end of the month. I just need to bribe enough freinds to come over and muscle the thing up. The tub alone can be lifted by 4 people at this point, so it should be pretty easy.
By the end of the month I will have had this thing for a year. I've not bought a lot for it this summer, as all my money has been being saved for my wedding and honeymoon. I have a bunch of winter projects to keep me busy, and I want to have all the body work done for a spring painting.
I'll probably bump this for the day crew tomorrow, but I thought I'd update tonight.
Zach
Posted 12-19-2006
Hey everyone,
I just got 2 big boxes from Eastwoods today. Looks like my week off for the holidays is going to involve a lot of body work on the 914.
for the past 2 weeks I have been stripping it while time permitted. I have been using a combo of chemical stripper (aircraft stripper - DON'T let that stuff touch bare skin) and mechanical stripping with 3M stripper pads chucked on a bit.
The passinge side of the car was in pretty good shape, but the drivers side of the car.... man, dent city. I am going to do what I can to pull the dents. but I have resigned myself to just using body filler and smoothign them over again. The good news is that there is no rust on the body under the paint and bondo. I got a gallon of some much lighter filler then the bondo that was on there, and body rasps and some long blocks. If I can get the final paint jkob to look good at 10 feet, I'll be happy. It will be my first time at this, and I have been reading a lot about paint techniques.
I am going to need to rig up a few heat lamps in my garage to raise the metal temps above the air temps, so that condensation does not get trapped between the putty and the metal as it cures.I amy take off friday to do some last minute shopping as well as run to HD to get heat lamps and stuff to hang them on.
No pics tonight. Nothing new at least. Hopefully i have something to show by new years.
Zach
Posted 1-29-2007
So, I just came in from another chilling session of sanding body filler. I have showered, but I still feel the dust in my eyes, and I think I need to replace my resperator. But the good news is that I have the body mostly smooth. Or, at least as smooth as I will probably get it. There will still be some bumps and waves, but I have fixed most of the major stuff.
I took the duck tail off the rear trunk lid, and put that on some saw horses to start stripping it. Then I will just have the doors.
Does anyone have a ****ing clue how to take apart the door from a 76 914? I can not find a screw that is (i'm told) holding the top bit of trim on. I need to get the doors down to metal, and I really don't want to break any of the trim or glass doing it. I have gone up to look at them several times, and each time come back frusterated.
I also stripped off the undercoating from the bottom of the car. New stuff will be put on in the spring. The good news - no hidden rust.
I imagine that I am going to spend the rest of the cold months with body filler and sand paper, and sometimes a hammer. I keep finding little high spots.
Anyhow. No pics, as it does not look much different from how it looked in December. But it is making progress, and every day is getting closer to paint.
Zach
With this post, the thread is current to today. (5-21-2007)
It has been forever since I updated this thread, so I figured it was time.
Over the past few months, I have gotten a TON done on the car, but none of it actually looks any different.
All the rust on the rear engine shelf has been ground off, treated and painted with rust encapsulator.
I pressure washed and totally degreased the engine bay.
Body filler is done and sanded - the car is as smooth as it is going to get.
The undercoat is painted.
The ears have been welded back onto the under body.
The engine compartment has been painted with the same chassie black paint used to paint the underside. I'm not too pleased with the black engine compartment though. I think that I am going to paint it rattle can silver. Being able to see what you are working on FTW. The black makes it look like a cave, and will hide oil and grease build up that I would rather clean off.
I cleaned out the channels where the front and rear trunk seals go, and found a little rust. Ground out the rust, and hit is with some encapsulator.
Yesterday was spent scrubbing the cabin side of the firewall with lacquer thinner. The factory used this fiberous glue to hold the sound deading in, and the remnants have to come off before I paint. I'll need to do the same in the front trunk, where the carpet was glued onto the fuel wall. i am not sure that i am going to recarpet that wall or not, so I need to scrub it clean.
I still have a lot of work to do. I need to clear out the area where the windshield sets in. Butyl tape leaves a sticky black residue that paint will not stick to. Infact, I need to examine the car, and wash of the butyl where ever I see traces of it.
I need to sand all over the car to knock off the flash rust. The car has been sitting as bare metal since ~October, and got power washed. So, it does have a little surface rust on it. An hour or two of sanding will have it bright steel again.
I have taken a 5 day weekend the 2nd week of June to paint my car.Day 1 will be sanding, cleaning, and spraying epoxy primer.
Day 2 will be spraying high build primer and sanding.
Day 3 will be as day 2.
day 4 will spray color and color sand. I chose Conda Green, which was used on 911s in 1970 and 1971.
Day 5 will be a second coat of color, and more color sanding, and fainally buffing.
Day 5 will also be my 32nd birthday (June 13).
If you are curious what Conda Green will look like, here is pic I took of a Conda Green 914 from the Hershey Swap Meet in April:
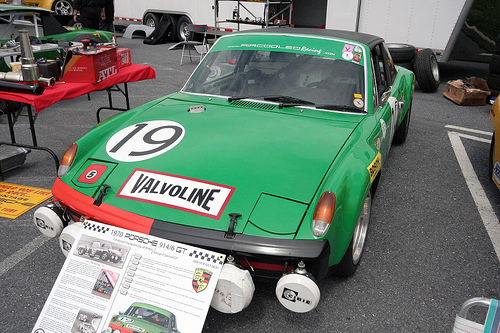
mine won't have all the racer graphics, and the roof will be body color.
Zach
It has been forever since I updated this thread, so I figured it was time.
Over the past few months, I have gotten a TON done on the car, but none of it actually looks any different.
All the rust on the rear engine shelf has been ground off, treated and painted with rust encapsulator.
I pressure washed and totally degreased the engine bay.
Body filler is done and sanded - the car is as smooth as it is going to get.
The undercoat is painted.
The ears have been welded back onto the under body.
The engine compartment has been painted with the same chassie black paint used to paint the underside. I'm not too pleased with the black engine compartment though. I think that I am going to paint it rattle can silver. Being able to see what you are working on FTW. The black makes it look like a cave, and will hide oil and grease build up that I would rather clean off.
I cleaned out the channels where the front and rear trunk seals go, and found a little rust. Ground out the rust, and hit is with some encapsulator.
Yesterday was spent scrubbing the cabin side of the firewall with lacquer thinner. The factory used this fiberous glue to hold the sound deading in, and the remnants have to come off before I paint. I'll need to do the same in the front trunk, where the carpet was glued onto the fuel wall. i am not sure that i am going to recarpet that wall or not, so I need to scrub it clean.
I still have a lot of work to do. I need to clear out the area where the windshield sets in. Butyl tape leaves a sticky black residue that paint will not stick to. Infact, I need to examine the car, and wash of the butyl where ever I see traces of it.
I need to sand all over the car to knock off the flash rust. The car has been sitting as bare metal since ~October, and got power washed. So, it does have a little surface rust on it. An hour or two of sanding will have it bright steel again.
I have taken a 5 day weekend the 2nd week of June to paint my car.Day 1 will be sanding, cleaning, and spraying epoxy primer.
Day 2 will be spraying high build primer and sanding.
Day 3 will be as day 2.
day 4 will spray color and color sand. I chose Conda Green, which was used on 911s in 1970 and 1971.
Day 5 will be a second coat of color, and more color sanding, and fainally buffing.
Day 5 will also be my 32nd birthday (June 13).
If you are curious what Conda Green will look like, here is pic I took of a Conda Green 914 from the Hershey Swap Meet in April:
mine won't have all the racer graphics, and the roof will be body color.
Zach
Okay, so I am pretty frusterated tonight.
I need to bump up my painting schedule. I am going to be in class two of the 5 days I took off to paint my car. I had hoped to get the car prepped enough to paint the Epoxy sealer tomorrow. But it seems every time I start working on paint prep, I find another dozen things to do.
I am running out of time to get this done. I am glad that I have tomorrow off, but I seripously doubt that I will have it sealed by the days end. I just ended up doing some more welding to fill up the holed drilled into the rear end of the car for the 2.0 badge. I am thinking I sould dig the filler out of the front trunk, and weld those holes from the badge too. Worried that the filler is going to eventually come loose.
It just seems like I am never going to get this freak'n car painted.
Zach
Zach - Damn fine work so far. Keep on keepin' on!
-pt
-pt
![popcorn[1].gif](http://www.914world.com/bbs2/style_emoticons/default/popcorn[1].gif)
 I love following the progress of builds. I want to be able to do this one day, I just need a garage.
(Shameless self promotion)
Anyone want to buy a Subaru? I need to sell it so i can aford to save for a down on a real house with a garage!
I'm taking a little break from the work, though I have gotten a lot done today.
The front trunk and gas tank area both got scrubbed with lacquer thinner and vacumed. I got all the glue off the wall of the front trunk.
After lunch, I am going to scrub the cabin and rear trunk. Then I'll give all three areas one final cleaning with wax and grease remover, mask and spray the first coat of sealer on the interior spaces.
Depending on what time it is when that is done, I'll sand off flash rust from the exterior and epoxy seal them as well. However, I thin that will probably be a job left for sunday.
I am hopeful, though, that by the time I head back to work Tuesday, the car will be fully coated in epoxy sealer.
It would be great if I get all this done. But right now, I am going to go have have lunch before I go back out to continue my work. I've still got a lot to do.
You know better than that, Zach

hey Zach, how did you build your rotisserie? it looked like you cannibalized a couple 1/2 ton engine stands.
QUOTE(Dr Evil @ May 25 2007, 03:53 PM) 
You know better than that, Zach
Too busy for a camera. I have pretty much only stopped today to eat poop and pee. Eating an early dinner now, then go out to finish wrapping the garage in plastic.
QUOTE
hey Zach, how did you build your rotisserie? it looked like you cannibalized a couple 1/2 ton engine stands.
It is made from 2 x 700 pound engine stands from Harbor Freight. The rest was stock steel from the local steel yard, and the plans were a combo of the AA plans, and plans from another member here, and me just winging it.
Zach
So. I got the front trunk painted with Epoxy Primer. I need to tune the guns better, but the damn guns did not come with ANY instructions. Even though I usually like to just wing it, this is a little more then I like to just wing.
So I was able to put down paint. I did not do much paint prep to the trunk other then cleaning the hell out of it, so it looks rough. But it is sealed. I am treating the trunks as "proof of concept" so hopefully the rear trunk will look better when I paint it sunday. I am hopefull that I will be able to seal the rest of the car sunday, but I need to find gun directions online somewhere. I'll have a seperate post about that in a moment.
Gotta get ready for my parade tomorrow.
Later
Zach
Parade tomorrow? 


![whip[1].gif](http://www.914world.com/bbs2/style_emoticons/default/whip[1].gif) This kind of parade?
This kind of parade?
This kind of parade?
QUOTE(Dr Evil @ May 26 2007, 03:16 AM)
Parade tomorrow?
This kind of parade?Click to view attachment
More like this, but hopefully with more blue coats. The Chestertown parade usually draws about 20 guys, due to the party afterwards.
Zach
Nice work home skillet and interesting use of the old roticeroid. Glad to see your more of a pig slicer than a pig staber. 
QUOTE(Vacca Rabite @ May 25 2007, 05:51 PM)
I have pretty much only stopped today to eat poop and pee.
Did no one else pick up on this?
Zach - you eat poop and pee?
 Whatever gets a rise in your Levi's...
Zach,
Did you MIG weld the rotisserie yourself and if so, did you do much welding prior to welding it? I am going the same route, but need to pick up some welding skills.
Thanks,
Mark
Did you MIG weld the rotisserie yourself and if so, did you do much welding prior to welding it? I am going the same route, but need to pick up some welding skills.
Thanks,
Mark
QUOTE(ptravnic @ May 26 2007, 10:38 AM)
QUOTE(Vacca Rabite @ May 25 2007, 05:51 PM)
I have pretty much only stopped today to eat poop and pee.
Did no one else pick up on this?
Zach - you eat poop and pee?
Whatever gets a rise in your Levi's...I picked up on it but he made an error, its, eat poop and drink pee or sumthinlikedat. Them skivillwar boys really like to keep it real don't they? Colonel Sanders didn't know a thing about war but he made a hell of a good bucket of fried chicken!!!!:rotfl:
QUOTE(Zimms @ May 27 2007, 08:53 AM)
Zach,
Did you MIG weld the rotisserie yourself and if so, did you do much welding prior to welding it? I am going the same route, but need to pick up some welding skills.
Thanks,
Mark
Due to the thickness for the metal, I used flux cored wire at a high temp setting and a low wire speed.
This was my first major welding project. I practiced a little, and had done a little sheet metal welding on my car. However, the thickess of the metal (1/8 inch wall thickness, 1/4 inch for a 2x2 that I got for free from a neighbor) anf CLEAN metal makes for very easy welding. Welding thick metal is way easier then welding thin metal. If you make good cuts (I used a power miter saw with a metal cutting blade) the welding goes together like a snap. I did not bother to grind down the welds. In fact, I made them a little thicker. Afte the first pass, I wire brush the seam, and then lay a second bead, really melting it in good. Probably not needed, but it made me feel better.
On a lincoln 140 (or HD1400 - same welder, but sold via Home Depot) for 1/8 inch thick steel I was using temp D (the hottest) and wire speed between 2 and 3. For my welder, 1/8" steel is around the max that true MIG could weld, so I felt safer with flux core, which my welder is rated to 5/12 inch thickness.
I have to admit, most of my freinds think it is more cool that I welded something from scratch that can supprt a car and is useful, then the fact that I am restoring a 30 year old car.
Zach
I thought the car was on it to prove that your welds could hold, your restoring the car? 
I had to come in and post this.
I just caught a bird.
I just re-plasticed off the garage, so I can seal the rest of the car (a breeze blew into the garage this morning, and took down much of the plastic). I was sanding some paint ripples out of the front trunk, when I heard flapping. I looked around, and a bird was trying to exit the garage though the clear plastic I have taped to the garage door. I walked over and caught it. I tried to get Erin to take a pic of me with the bird, but she would not (women ). So I let it go.
I am now masking off the rest underside of the car, so I can seal the rest of it. I'll probably mask until dinner time, eat and the go out and seal the rest of the car.
These past few days I have gotten so much done, between the house and the car.
I am making one choice that I know I am going to regret later. I am not putting in an Engman stiff kit while I have the car unpainted. I had intended to do this, but never got around to it. I know once I have the car sorted, I am going to want one, but it will have to be a winter project for some future time. Right now, I need to start taking the antibiotics to kill the DWD, and get this puppy done. I really want to drive it to Hershey next year.
Zach
I just caught a bird.
I just re-plasticed off the garage, so I can seal the rest of the car (a breeze blew into the garage this morning, and took down much of the plastic). I was sanding some paint ripples out of the front trunk, when I heard flapping. I looked around, and a bird was trying to exit the garage though the clear plastic I have taped to the garage door. I walked over and caught it. I tried to get Erin to take a pic of me with the bird, but she would not (women
). So I let it go.I am now masking off the rest underside of the car, so I can seal the rest of it. I'll probably mask until dinner time, eat and the go out and seal the rest of the car.
These past few days I have gotten so much done, between the house and the car.
I am making one choice that I know I am going to regret later. I am not putting in an Engman stiff kit while I have the car unpainted. I had intended to do this, but never got around to it. I know once I have the car sorted, I am going to want one, but it will have to be a winter project for some future time. Right now, I need to start taking the antibiotics to kill the DWD, and get this puppy done. I really want to drive it to Hershey next year.
Zach
Thanks for the info. I welded some thin sheet, and the results were nothing to write home about. I was getting fearful of welding something that would hold a lot of weight over me.
I no longer need to worry about flash rust. :-)
My car is encased in epoxy primer.
I need to shower, and I will take some pics tomorrow when there is sun.
I need to get better at painting. I think I have too much pressure going into the gun. When I put on the second coat of epoxy, I am going to try 20 psi instead of 30.
Zach
My car is encased in epoxy primer.
I need to shower, and I will take some pics tomorrow when there is sun.
I need to get better at painting. I think I have too much pressure going into the gun. When I put on the second coat of epoxy, I am going to try 20 psi instead of 30.
Zach
So, painting.... Its fun, but it looks that I am going to be as slow a painter as I was a welder and a body man.
Pics:
First, the paint booth, to make sure that I don't paint my wife's car. Its not perfect, but it works well enough. You can see the 914 behind the plastic.

2 coats of epoxy sealer/primer yeilded this:
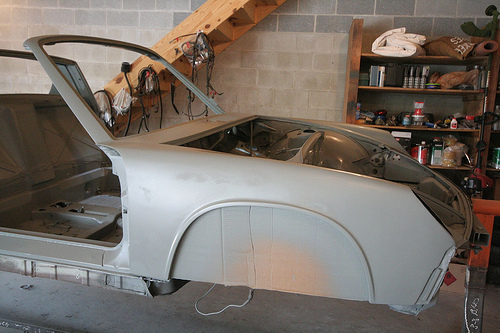
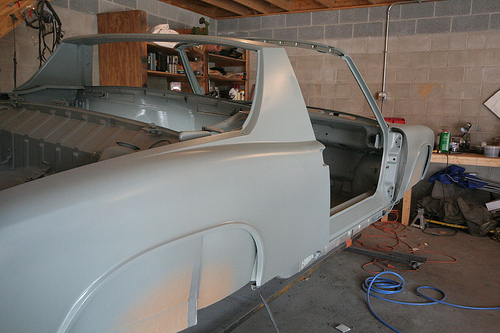
I'll be the first to admit it is not perfect. This morning I went out to look at last night first coat, and found all sorts of body irregularities that I could not see when it was steel and body putty. So, I mixed up more filler, and went to work leveling things out. I also found a few pinholes in the filler that I am going to need to close. I had not seen them before, and was hoping not to need a glaze. After sanding the filler down, I put on another thin coat on one or two spots that warrented it, and sanded it again.
I wiped the car down again with wax and grease remover, and then dusted with a tack cloth.
Last night, I had the pressure set at 30 PSI at the hose, and that was too high, got runs too fast. So I set it this time for 20 PSI. My test spray looked okay, but as soon as I put it on the car I saw it was crap. Not enough pressure to atomize the spray, so I am going to need to sand that out. I raised it to 25 PSI and that seemed to work well. Nice spray, but not laying so fat that it runs.
Somehow, I found dust, again, on the same quarter panel fender that I needed to sand any how. So, that will have to be sanded out too.
The rest of the car went well, except for a run at the rear where I was not paying attention. *sigh*
There are areas where the paint lays differently over the body filler then the metal. I hope that is just how sealer works, and when I spray the sandable primer that will just cover over.
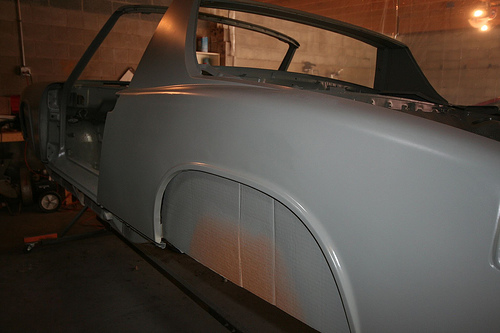
So, its not perfect, and I still have a long way to go, but MAN do I feel happy to see the car one color!
Zach
Pics:
First, the paint booth, to make sure that I don't paint my wife's car. Its not perfect, but it works well enough. You can see the 914 behind the plastic.
2 coats of epoxy sealer/primer yeilded this:
I'll be the first to admit it is not perfect. This morning I went out to look at last night first coat, and found all sorts of body irregularities that I could not see when it was steel and body putty. So, I mixed up more filler, and went to work leveling things out. I also found a few pinholes in the filler that I am going to need to close. I had not seen them before, and was hoping not to need a glaze. After sanding the filler down, I put on another thin coat on one or two spots that warrented it, and sanded it again.
I wiped the car down again with wax and grease remover, and then dusted with a tack cloth.
Last night, I had the pressure set at 30 PSI at the hose, and that was too high, got runs too fast. So I set it this time for 20 PSI. My test spray looked okay, but as soon as I put it on the car I saw it was crap. Not enough pressure to atomize the spray, so I am going to need to sand that out. I raised it to 25 PSI and that seemed to work well. Nice spray, but not laying so fat that it runs.
Somehow, I found dust, again, on the same quarter panel fender that I needed to sand any how. So, that will have to be sanded out too.
The rest of the car went well, except for a run at the rear where I was not paying attention. *sigh*
There are areas where the paint lays differently over the body filler then the metal. I hope that is just how sealer works, and when I spray the sandable primer that will just cover over.
So, its not perfect, and I still have a long way to go, but MAN do I feel happy to see the car one color!
Zach
So, last night after the folks went home from the Memorial Day cookout at my place, I went back into the garage, sanded the orange peel from the car, and put on another thin coat of epoxy sealer to cover where I sanded through. This simply resulted in more orange peel. After I spent several minutes cursing Eastwoods for not packaging instructions with the paint guns I bought (Devilbiss Startlingline), I cleaned the guns, put them away and went inside. While I was not able to find directions for the Startingline guns, I was able to find directions for the FinishLine guns, which are also Devilbiss gravity fed HVLP guns with a similar layout. So, now that I have 3 coats of paint on the car (which I need to sand smooth again) I now know that I totally bollocked up tuning the guns.
This is a bit of a rant.
Eastwoods Automotive has been my goto company whenever I have needed something for this resto that was tool related, and that I did not want to buy locally. I know they are a little more expensive then if I shopped around, but they have EVERYTHING, and they tell you exactly what it is used for, and it is a PA company so I like to support them. That said, I feel that they totally dropped the ball with this paint gun set, by not putting in a simple 8 page instruction booklet.
They heavily advertised the 3 gun Startline set as _THE_ gun set for the beginning hobbiest painter. Hey, thats me. For under $200 you got 2 production sized HVLP guns (one with a primer tip, and one with a finish tip) a touchup HVLP gun, paint cups for all three guns, a regulator, a cleaning brush, and a free gun stand. But then, they go and cripple you by not including any documentation on how to use, clean, store, etc. the equipment you just bought. You just get a slip of paper that says to tighten the packing nut on the gun. Given that the guns are being targeted towards folks that have never done this before, the result is almost catastrophic. There was not even anything in or on the box which said which gun was the primer nozzle, and which had the paint/clear nozzle. I had to figure that out by looking at each nozzle, and just using the biggest for the primer.
I do realize that there is a learning curve to painting, and deal on these guns was smokin', but the time spent printing an 8 page PDF doc on what the parts were, how to clean, and how to tune and pattern the guns would have been invaluable. I know how to do it now, but it cost me a lot of sanding time (and more to come, as I sand off last nights bad paint). I am not the only one to complain about this either. There are many complaints on the Eastwood site about the lack of instructions.
There, rant over.
Classes start tomorrow, so I doubt that I am going to have any time to work on the car this week, but I do hope to be able to sneak in to the garage and sand it smooth before the weekend. We will see.
Zach
So, I did not get any work done on the car this weekend. I had planned to work on more painting today, but the (much needed) rain held me off. I had homework to do anyhow.
BUT, I did do some other rather important work.
As of Friday night, this is how I had my "shop" part of the garage separated from the rest of the garage:
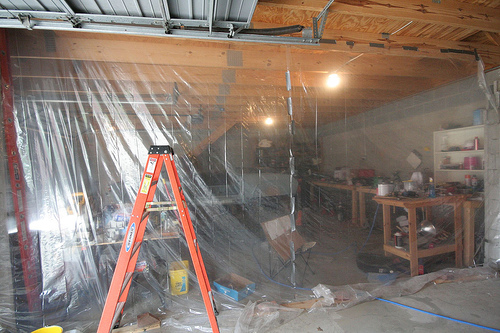
As of Saturday night, it looked like this:
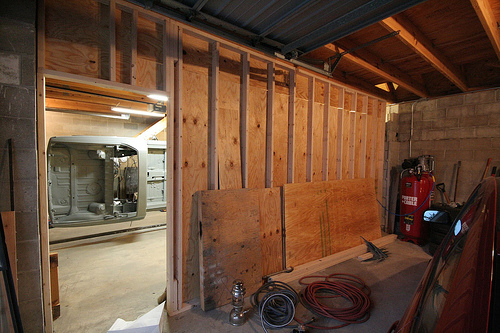
I love it when I get to build things. This has freed up _SO_ much room in my shop - which I can now consider a shop as it is a separate room from the garage.
The inside now looks as such:
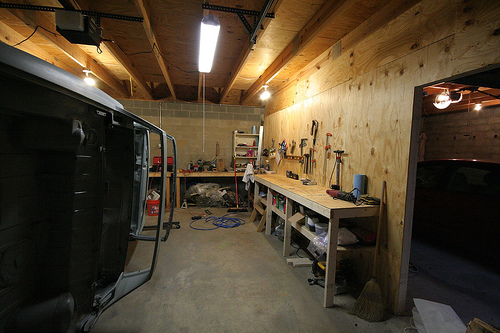
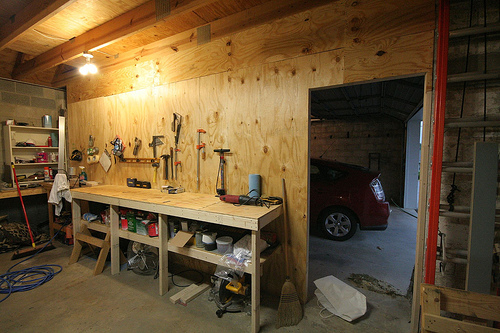
Aside from the obvious wall and workbench, I added doublers to the existing light fixtures (as well as putting in CFLs instead of incandescents) and 2 hanging shop fluorescent light banks as well. I can actually see what is going on in there.
For painting, I am just going to put plastic over the door to the garage.
I still have shelving to hang in the garage part, in order to more efficently use the space, but that will have to wait for a drier, less busy day.
Zach
BUT, I did do some other rather important work.
As of Friday night, this is how I had my "shop" part of the garage separated from the rest of the garage:
As of Saturday night, it looked like this:
I love it when I get to build things. This has freed up _SO_ much room in my shop - which I can now consider a shop as it is a separate room from the garage.
The inside now looks as such:
Aside from the obvious wall and workbench, I added doublers to the existing light fixtures (as well as putting in CFLs instead of incandescents) and 2 hanging shop fluorescent light banks as well. I can actually see what is going on in there.
For painting, I am just going to put plastic over the door to the garage.
I still have shelving to hang in the garage part, in order to more efficently use the space, but that will have to wait for a drier, less busy day.
Zach
Boioioioioioioioioioioing! I am sooo fricken jealous.
progress progress progress..... looking great.
Mike
Mike
NO ZACH HERE, ONLY ZOOL
oh go study something.
QUOTE(RoninEclipse2G @ Jun 4 2007, 07:17 PM)
Indeed I have. Sadly, its grad school. Posting while waiting for class to start now.
I don't have class tomorrow, so I am going to try and squirt some epoxy sealer on the doors and both hoods, and the one or two places that I sanded down to bare metal after the last round of body sealing. The in class Wednesday after work.
I have monday - wednesday of next week off, and I fully intend to have a painting frenzy going on. Hopefully, by the time I sit down in class on wednesday June 13, I'll have a nice green car, nice and color sanded.
Well, 5 minutes till start of class, so I gotta seem interested. Looks like we are talking about Robert Mugabe today. Fun.
Zach
Zack, just a suggestion, try cutting back on the paint feed adjustment and work slower.
and dont expect a smooth finish from primer sealer, a little grain or peal is no problem and should be expected, your filler primer will take car of that and when it's sanded smooth you will have a nice base to lay down the top coat. Top coat paint is way different than sealer or primer it will lay down smooth.
and dont expect a smooth finish from primer sealer, a little grain or peal is no problem and should be expected, your filler primer will take car of that and when it's sanded smooth you will have a nice base to lay down the top coat. Top coat paint is way different than sealer or primer it will lay down smooth.
Well, I just broke down and bought a pair of fiberglass rocker covers.
As I started stripping mine, the passenger rocker cover just exploded in a poof of rust and bondo. Yuck. I figured the time it would take to fix it, vs the time it would take to just get some of the fiberglass ones and paint them and put them on would make it worth my while.
I looked at just buying a new steel passenger side cover, but that was more expensive then the fiberglass set.
Okay, back to work. I need to sand the engine cover, then epoxy prime the doors, front an rear trunk lids, and the engine cover. my goal is to have that done before I go clean up for class at 5.
Zach
Zach - Ur work room kicks ass! It'd look better if it had MY 914 in there getting all that attention....
I've got one hell of a farmers tan from working in the driveway...
Just m $0.02
I've got one hell of a farmers tan from working in the driveway...
Just m $0.02
So after several days of work, the car looks annoyingly the same.
My weekend was spent camping. 2 days of work gone. Camping was good, and I forgot that it was on the calendar, so that was fine.
Monday, I epoxy primed the doors, trunk lids (both sides), engine lid and duck tail. I waited for that to dry, and put on a second coat. Cleaned my air brush and showered up for class.
Tuesday, I did some more body filler work where I noticed it needed it. I realized that I had forgotten to fix some deepish surface rust in the door seal channel, so those went off to the side. I started spraying on coats of high build primer, and was getting runs all over the place. Huh. So, by trial and error I learned what the "packing" bolt does. I also learned that the primer needs to be thinned out considerably, or it will not flow very well out of the paint gun. I was busy until around 11pm. I was planning on working very late into the night, but decided against it.
Also on Tuesday, I shot a rabbit from out of my garden (we grow rabbits in the garden too, you see). I was skinning it for dinner, and was wrist deep in gore then I hear a voice from around the corner. Some masonry guy who Erin had called to give an estimate for repointing our brickwork was standing there, staring at my gutting a rabbit. He took a quick look around the house, and said he would come back the next day to do a full estimate. He never showed. I guess I scared him off. Pansy. I made a rabbit soup, and laughed about the entire encounter.
Wednesday, I got up fairly early, and set up the shop area to make it easier to paint. I sanded the the F&R trunk lids, engine lid, and duck tail. I found some low spots, and filled them in with more body filler. On the body of the car, I sanded off the runs (there were not as many as I had remembered) but it still took a little time. I mixed up more build primer, and put two coats on the three lids and the duck tail. NO RUNS. Okay, I am getting the hang of this. I cleaned out my gun. I called Erin to see if I had time to mix and spray the body of the car again, but I did not. Oh well.
So, the car is not green yet. the body still needs another 2 coats of build primer, and everything needs sanding. And then I can make it green.
Except for the doors, which still need some rust ground out. Oh, and the headlamp lids and the little pieces that go in front of them - I totally forgot about all that stuff. I don't think I am going to bother stripping those pieces. Just sand them smooth, seal, prime and paint. Oh, and the rocker covers that I had to order Monday. Those will need done too.
I did get a lot done. But it does not really seem like it. The car is still grey, and seems like it has been grey forever (but its really just been a few weeks).
I am antzy. I want to get this puppy DONE.
Zach
My weekend was spent camping. 2 days of work gone.
Camping was good, and I forgot that it was on the calendar, so that was fine.Monday, I epoxy primed the doors, trunk lids (both sides), engine lid and duck tail. I waited for that to dry, and put on a second coat. Cleaned my air brush and showered up for class.
Tuesday, I did some more body filler work where I noticed it needed it. I realized that I had forgotten to fix some deepish surface rust in the door seal channel, so those went off to the side. I started spraying on coats of high build primer, and was getting runs all over the place. Huh. So, by trial and error I learned what the "packing" bolt does. I also learned that the primer needs to be thinned out considerably, or it will not flow very well out of the paint gun. I was busy until around 11pm. I was planning on working very late into the night, but decided against it.
Also on Tuesday, I shot a rabbit from out of my garden (we grow rabbits in the garden too, you see). I was skinning it for dinner, and was wrist deep in gore then I hear a voice from around the corner. Some masonry guy who Erin had called to give an estimate for repointing our brickwork was standing there, staring at my gutting a rabbit. He took a quick look around the house, and said he would come back the next day to do a full estimate. He never showed. I guess I scared him off. Pansy. I made a rabbit soup, and laughed about the entire encounter.
Wednesday, I got up fairly early, and set up the shop area to make it easier to paint. I sanded the the F&R trunk lids, engine lid, and duck tail. I found some low spots, and filled them in with more body filler. On the body of the car, I sanded off the runs (there were not as many as I had remembered) but it still took a little time. I mixed up more build primer, and put two coats on the three lids and the duck tail. NO RUNS. Okay, I am getting the hang of this. I cleaned out my gun. I called Erin to see if I had time to mix and spray the body of the car again, but I did not. Oh well.
So, the car is not green yet. the body still needs another 2 coats of build primer, and everything needs sanding. And then I can make it green.
Except for the doors, which still need some rust ground out. Oh, and the headlamp lids and the little pieces that go in front of them - I totally forgot about all that stuff. I don't think I am going to bother stripping those pieces. Just sand them smooth, seal, prime and paint. Oh, and the rocker covers that I had to order Monday. Those will need done too.
I did get a lot done. But it does not really seem like it. The car is still grey, and seems like it has been grey forever (but its really just been a few weeks).
I am antzy. I want to get this puppy DONE.
Zach
That rabbit story still has me laughing 
This is a "lo-fi" version of our main content. To view the full version with more information, formatting and images, please click here.