I bought this car when I got out of college in 1973. Drove it for many years, the odometer died about 185,000 with the original engine- heads had never been replaced. I drove it a few years afterwards, so it probably had 200K on it. Still had original front shocks. I ended up parking it when someone broke out the front windshield. By that time, I had 4 children, and no time for a play car. I let it sit for something like 16 years, some of which was outside. Unfortunately, the rear window had come unglued, and let water into the car, rusting the floorboard. the rear firewall had also rusted. Longs were in pretty good shape, but had rust at the jack points, and some at the hump on the front where it catches dirt against the outer long.
I spent about 2 1/2 years reworking the car. I didn't want a show car, just a car to drive for fun without having to worry about mechanical issues. I received a lot of help from 914 world, and want to thank all who participate. Just about every question I had, I could find an answer somewhere. I also want to thank all the people who supply parts for these old cars. AutoAtlanta was a good source for quite a bit of the parts I needed, ranging from metal to bearings, to rubber, etc. I had great service from them. Eric Shea was a good source for CV stuff, brake stuff, etc. Chris's fuel lines worked great. Got a 2056 kit from Jake Raby. I received other things and lots of help from members also. thanks guys.
I will post some photos of the progress to maybe encourage others as they work on theirs. Thanks again, JoeO
First, before and after photos. the white showning on the before is from some white primer I had used on my car when I repainted it many, many years ago.
Full Version: Rustoration thread on 4732919151
Very nice work. 
Some pnotos of the body work. Initial work was on hell hole area and longs. right long had rust at the hump near the front where there was no clearance between it and the outer long. I cut out the jack points and the rusty area at the front long and welded in new material. I cut out the section of the hell hole near the firewall and welded in new metal. I ground out all the dimples in the top area of the long, and primed with zinc, and then welded in a cap over this area. I put in the outer long reinforcements from Restoration Design to stiffen up everything. If I had it to do over again, I would have probably not done so, as this required removing the thresholds, etc. and was more work. I cleaned up everything to bare metal, and primed with zinc primer all areas that would be covered with metal.
After the photos above were taken, I also cut out the rusty strip that would be near the top of the battery on the side panel, and welded in new metal.
The floors had rust from the water that leaked in through the rear window. I made a rotisserie similar to that on the plans from Auto Atlanta's website. Used 2 1/2 inch tubing, and made a custom fit front and rear cross bar. This worked well. When finished, i sold it to a fellow member for the cost of metal to me, which was about $250.00
The drivers footwell was the worst area in the car. I cut out the rusty sections and made new sections by hand and welded in. The floor panels were from Restoration Design, and fit well. However they didn't go up the front of the floor, so I had to hand make this section. I used the pedal console to make sure that everything would fit.
The inner longs were not rusty, but the flanges at the bottom on the rear were. I had seen a video on AA's website where George said only cut out what you need. This made sense to me, so I ended up cutting about 1 inch or so off the bottom of the rear lower firewall, and then wending in several short pieces of sheet metal that I had bent into an angle to replace the flanges on the original lower firewalls. This was cheaper than buying the firewall pieces, and also resulted in removal of less material to allow the car to get distorted. The inside of the firewalls was in good shape, so I just cleaned the area betweenthe two firewalls and painted before the final welding in of the floor pans.
The rusted section of the firewalls was cut out and replaced with sheet metal. I bent up "U" sections and welded to the inside of the firewall to reinforce the panels as was stamped into the original sections. I hand made (hammer, vise, and a 18" hand sheet metal brake from Harbor Freight) the other sections of the firewall. These were welded in. I tried to make a engine shelf piece, but it didn't turn out very good, so I bought one from restoration Designs, as well as a battery tray. Both sides of the firewall had to be repaired.
After getting the floorpan and firewall fixed, I removed the car before finishing up with fenders, etc. I replaced the right quarterpanel with one from a parts car. It had the typical rust at the sail panel. On the drivers side, I replaced the entire sail panel, with a weld as can be seen on the side panel. On the passenger side, i just made an angle piece and replaced only the rusty section. This was an easier fix. The other areas were not rusty, so didn't need any fixes.
I lost a lot of the photos I made during the middle of the rebuild, so I can't share all them. After replacing the jack posts, I welded in the restoration design reinforcements. The way I did it, I had to cut out the thresholds, so I replaced these with new ones that I made. This was pretty easy, just make the straight section, and then make a conical piece to match up to the door opening vertical wall.
I lost a lot of the photos I made during the middle of the rebuild, so I can't share all them. After replacing the jack posts, I welded in the restoration design reinforcements. The way I did it, I had to cut out the thresholds, so I replaced these with new ones that I made. This was pretty easy, just make the straight section, and then make a conical piece to match up to the door opening vertical wall.
The gas tank area was in great shape, just needed cleaning. Installed the sway bar from the parts car, as well as a front mounted rotary fuel from CB Performance. Added a small electric washer pump also.
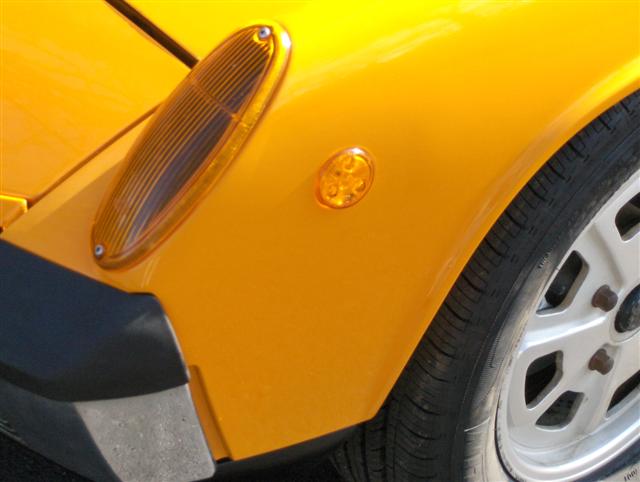
Click to view attachmentI changed the side marker lights. I considered eliminating them, but decided that the visibility would be an added safety feature. I used small LED lights from FLAPS. I cut a matching hole in the fender, and welded up the other holes from the Warts. I used two studs welded inside the fender, and then made a simple angle bracket that bridged across the studs to clamp the light into the fender. Looks good to me.
After some deliberation, I decided to replace the engine insulating panel. I bought the kit from AA. It has a first piece of Dynamat, and an outside piece of Dynamat foam stuff. It fit great, and lood great.
Engine was upgraded from a 1.7 to a 2056 built from one of Jake Raby's kits. Jake's kit was very complete, with all machining done, bolts, clutch, etc. I ended up using some Dellorto carbs from the parts car, but I hope to upgrade to a SDS FI system. I built the engine last winter'spring, and had to do so in my breakfast room, as you can see the garage was pretty dirty from reworking the car body.
For an engine stand, I used a $40 harbor Freight stand that I modified. I ground two sections of 3/4 inch steel by about 4 inches so that it would fit the radius of the engine case. I then bored holes in these pieces to match the engine case. With these bolted to the case, I welded them to the brackets on the engine stand. This served to support the engine during basic assembly. I added a clamped on bracket to the opposite side to support it after the added weight of heads, etc. was on. It worked well, and was fairly sturdy.
For an engine stand, I used a $40 harbor Freight stand that I modified. I ground two sections of 3/4 inch steel by about 4 inches so that it would fit the radius of the engine case. I then bored holes in these pieces to match the engine case. With these bolted to the case, I welded them to the brackets on the engine stand. This served to support the engine during basic assembly. I added a clamped on bracket to the opposite side to support it after the added weight of heads, etc. was on. It worked well, and was fairly sturdy.
After all this, I stripped the car with a hand grinder and wire brusy/ and flap sand wheel. Bottom is painted and undercoated. Outside is base clear, but didn't come out as well as I wanted. It looks pretty good, but one of the doors is off a slight shade for some reason. I painted the body first, and then the doors, so in my ignorance, I did something a little off. I may repaint the door, but I may just drive it like it is.
I bought new door panels from Morph. They fit grreat, and look great. I also got the carpet from him. Good stuff. I had the seats covered by a local upholstery company. I am pleased. I had a cloth covering put on for more confort. I plan to put in AC soon. It gets hot and muggy in SC during July and August.
For me, the journey was the destination, as I have greatly enjoyed working on this car. It gave me something to occupy my time after my last sone went off to college. I hope this inspires others to complete their cars. JoeO
Very nice job 
QUOTE(Joe Owensby @ May 18 2008, 09:34 PM) 
Looks good to me.
your turn signal lenses are upside down ...

other than that, great work!
 Andy
Andy
Nice job!!!!!
Bravo!!
I love these start to finish resto threads.
How would you compare the 2056 to the stock motor?
I love these start to finish resto threads.
How would you compare the 2056 to the stock motor?
Nice work! I love the color, too. What brand of paint did you use?
I am about 1/3 through a similar restoration. I hear what you are saying
about AC living in FL. The new compressors are supposed to pull only 2-3 HP
compared to the old ones which were over 10.
John
This is a "lo-fi" version of our main content. To view the full version with more information, formatting and images, please click here.