turnaround89
Oct 6 2008, 06:36 PM
jc914
Oct 6 2008, 06:44 PM
That look nice. great job

southernmost914
Oct 6 2008, 06:47 PM
I like it better than stock. You will have more foot room. On 70-72 models you will need to run the wires. On 73-76 the wires are located under the center carpet tunnel. You will just need the pig tail to lengthen them or just make one.

Steve
Cevan
Oct 6 2008, 07:21 PM
Very nice! I thought about making a new one, similar to yours and incorporating more storage space. Make sure you post photos of the finished product.
turnaround89
Oct 6 2008, 07:42 PM
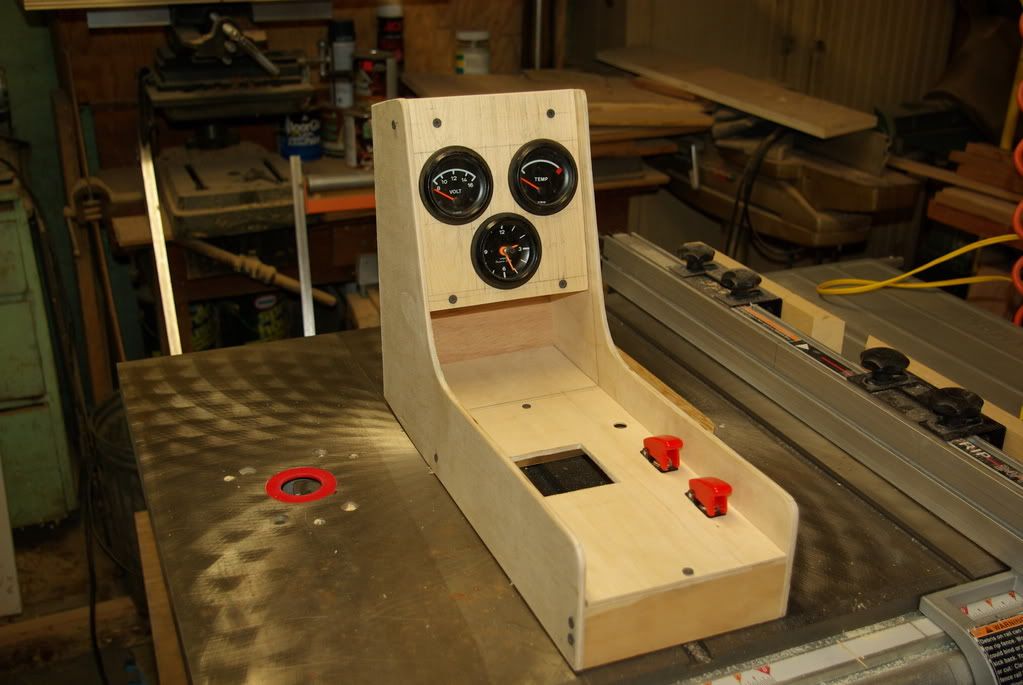
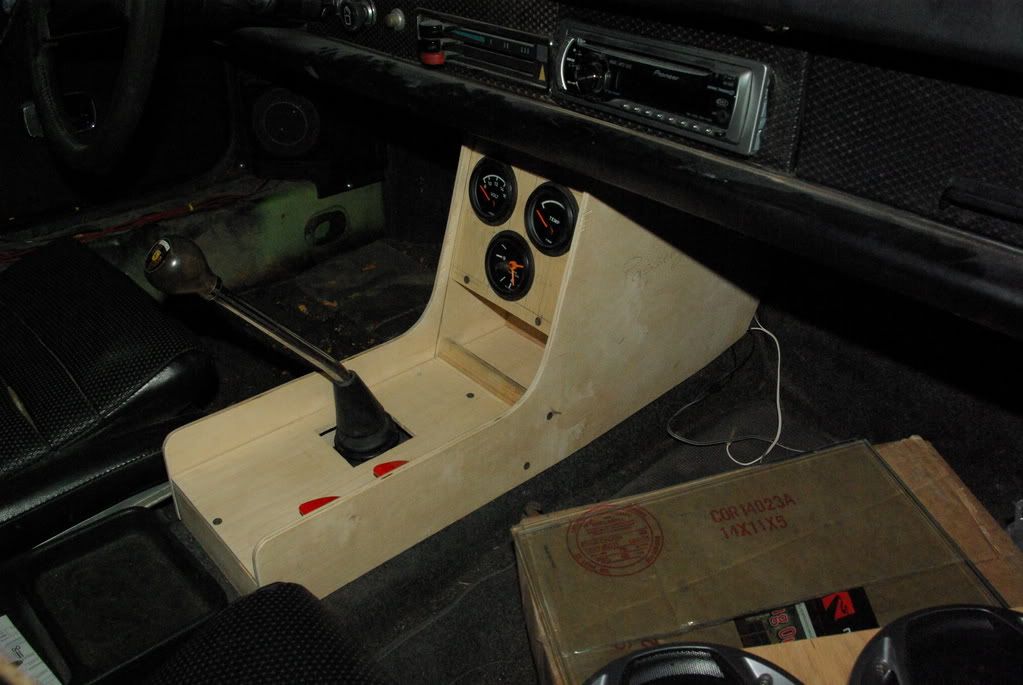
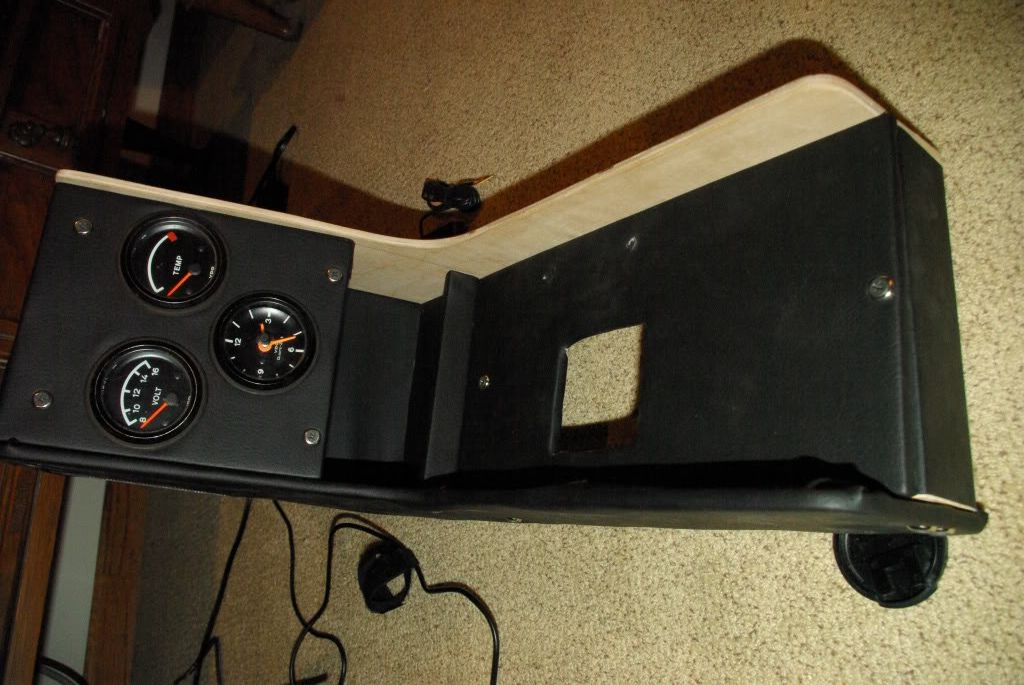
i will probably have it done tomorrow, covered in vinyl, i bought the only two switches that AZ had so i am gonna find another AZ in town and buy it from them, i don't want mismatched switches. I was thinking of using some finishing washers on all the screws, might give it an interesting look and break up just the black vinyl. Thanks for the compliments everybody. The driver side was cut really short because of the foot room issue and gas pedal clearance. there is a little overhang on the drivers side when the console is in the car, but if i shift it over it just doens't look right, it matches up with the arm rest pad at the back really well with the overhang that when its moved over it just doesn't line up anymore. So the overhang stays and its something no one will really notice anyway, i don't want a show car just something that is fun to drive and i don't have to worry about when i park it!!
I also thought about removing the arm rest pad and putting in speakers that point upwards right there, my arm doesn't really rest there and i kind of want a couple more speakers in the car as well. The speaker enclosure would line up with the center console and look really nice, but not sure about having speakers where my passengers arms will sit!!
Thanks again everybody for the compliments. Also gotta thank my grandma and grandpa(RIP papa, we miss you) for letting me use his awesome workshop and some of the extra plywood lying around the basement!!
Joe Owensby
Oct 6 2008, 08:11 PM
Looks Great. Please share a photo when you get it covered. I was planning to do something similar, but do not know how to cover it with vinyl. Regards, JoeO
jmill
Oct 6 2008, 08:18 PM
I was thinking of doing the same thing. Are you going to have the stock blower lever? If so don't forget to add the slot before you cover it.
BTW nice wood shop. I was thinking of buying a router table for my saw too. How do you like it? I wasn't sure if I wanted to do it because you have to drop the router bit everytime you cut with the saw. I figured it would be a pain to adjust the router height again.
Here's mine. I still need a few more gadgets to fill the place up.
jmill
Oct 6 2008, 08:34 PM
I was just thinking it might not be good to have the kill switch down low like that. You might hit it by accident with your right hand.
Wilhelm
Oct 6 2008, 08:40 PM
Great job, but where is the cup holder?
Dave_Darling
Oct 6 2008, 09:00 PM
Wiring: You should be able to find a red/white "switched power" wire on top of the tunnel. I forget if it's a male or a female spade connector, bot you'll want to start with the opposite so you can plug into it.
Hook into that (there should be an available plug), and run a (preferably red/white) wire to a female spade connector. Crimp that wire and a second wire into that connector, and run it another 6" to 12" to another female spade connector.
Similarly, chain together three female spade connectors on brown wire that will plug into the brown wire on top of the tunnel. That is have the connector for the on-top-of-tunnel connection, run a wire to one spade connector and crimp that and another brown wire into the spade. Run that to another spade, and crimp it and a third section of brown wire into the connector. Then make the final run to the third spade. (Note that you may have more grounds you need; e.g. for the switches you show.)
There will be a black, I think, wire that is always "hot" which should go straight to the clock.
There is the green/red wire (or was it green/black?) that runs to the oil temp gauge; just run a wire straight from its connector to the gauge.
Finally, there are the illumination lights. Most will only have one terminal, which you'd hook a black/blue wire. You can chain those together similar to the way you did the ground wires above. IIRC, the connection on top of the center tunnel is to a grey wire, not a bk/bl. If there are any lights that have two terminals on them, you'll need to run a ground to the other one. No big deal, and they can go either way around.
There is no separate signal wire for the voltmeter; it just measures what comes to it through the red/white wire.
Run 'em neatly, cover with shrink tubing or split-loom. Or a bunch of tie-wraps if you really want the home-built look...
--DD
angerosa
Oct 6 2008, 09:07 PM
very nice and I know wilhelm was just joking but I really would put a cup holder in there and maybe a change compartment.
turnaround89
Oct 6 2008, 09:43 PM
Cup holder in a german car, lol. it did cross my mind but the little compartment won over
jmill - The router table is great on the table saw, but i really don't use it all that much because my grandfather has a seperate router already plus two other portable routers(this workshop is LOADED for woodworking, not so much metalworking), don't know why he bought the table saw that way, but he did. I love the workshop you have, tons of space, mines a little small but as long as i don't build large items like furniture down there im good. A lot of great tools are in the shop right now, but like i said its small so things get cramped and put in corners, then you gotta move stuff out of the way to use one tool, works for me and my little projects but for larger undertakings it may not be the best.
Thanks again everybody, also Dave_Darling thanks for the wiring info, should all these wires be there in a 1972, i think i might have actually found the wire harness for the gauges as well while i was looking around the garage!!
Hopefully more pics will come tomorrow, i don't have class tomorrow so i should get a lot done, but covering something in vinyl takes time and patience!!
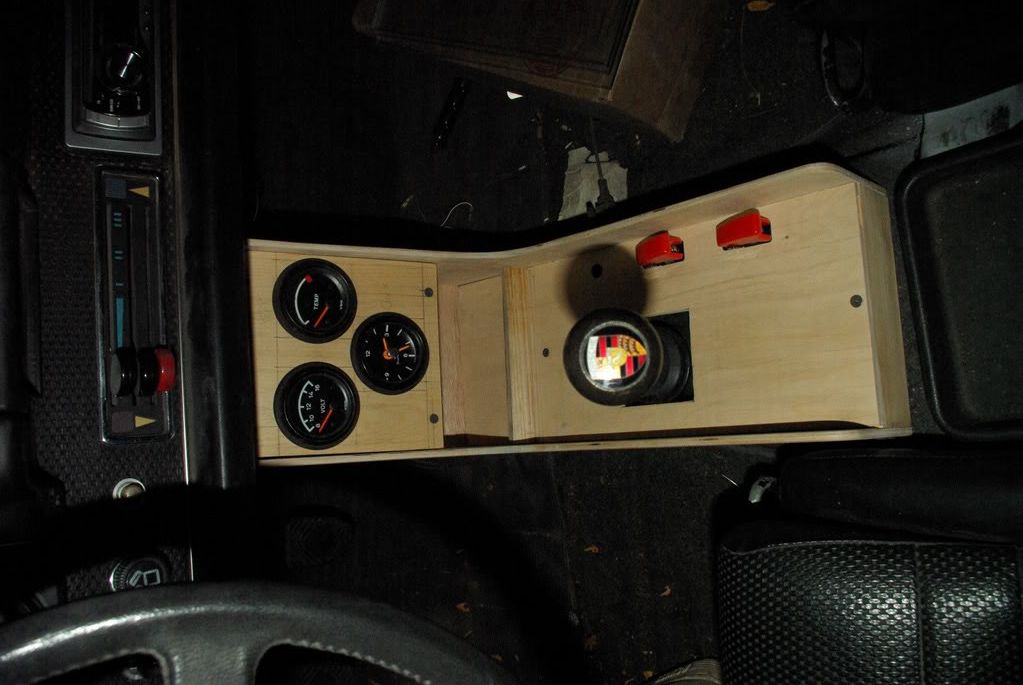
Just wanted to see what it looked like in the car!!

Michael N
Oct 6 2008, 10:13 PM
Looks fantastic!!!

championgt1
Oct 6 2008, 10:22 PM
That looks real good. Nice work!
ahdoman
Oct 6 2008, 10:23 PM
Something you might consider is to face the gauge plate at a slight angle towards you. I found that trying to read the gauges in a center console while driving is a little tough. After I tilted mine a little it made a big difference.
Dave_Darling
Oct 7 2008, 01:40 AM
It's unlikely that the connectors for the console wiring would be there on top of the 1972 914's center tunnel. Worth a look, absolutely, but you may have to find wires of the appropriate kind to hook up to...
--DD
tronporsche
Oct 7 2008, 03:29 AM
It looks really nice. I suggest taking it to a professional upholstery person and letting them wrap the vynl though. That is something that you want to last a long time, and if you don't have the experience, well....... Also, Have you considered a 3rd seatbelt in the middle ? I had one in mine, and it worked out great when I wanted to take both of my children out in the 914. But it won't work with speakers there !!!!!
jmill
Oct 7 2008, 10:15 AM
I like it. With a good cover job folks will think its stock.
Eric_Shea
Oct 7 2008, 10:36 AM
You do good work.
That's going to be smoking when covered.
Why not a round shift lever hole?
turnaround89
Oct 7 2008, 10:39 AM
Whoa tron, im only 19, i don't have any kids to put in the third seat, at least i don't think i do
. I am just now going to get the led lights for the sides, the extra switch, and the vinyl. Hopefully this won't take to long to complete but i want it to looks good. If i do end up doing a bad job with the vinyl i will take it to an upholstery shop but i might as well give it a go since ive never done a copmlex object like this, only simple things. be back with the stuff and more pics later today. Thanks everybody.
Anyone got any ideas on how to run the shift boot over the shifter. I want to cover the square there and will use a shift boot but haven't figured how to attach it to the console. If i attach it to the top youll see the stable unless i do that first and then put vinyl over the shift boot!!

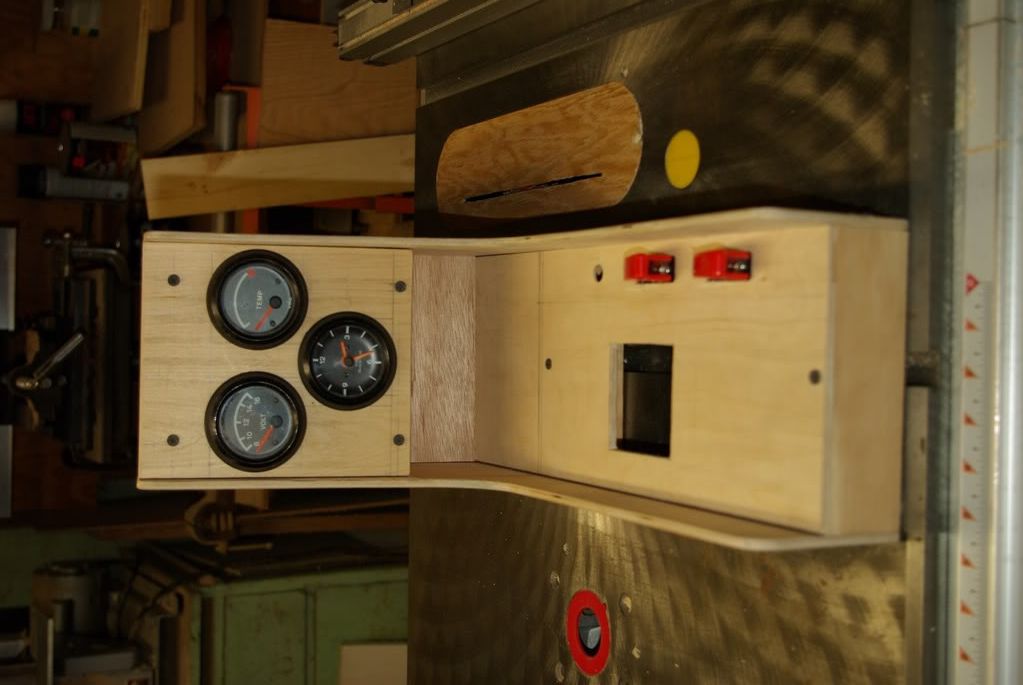
the reason there isn't a round shift hole is bc i didn't have a big enough hole saw. I used the biggest one i had and the shifter would hit the console when shifted into reverse and first, pushing the whole console over, so i decided to just make the square large and now, now rubbing or pushing on the console
Eric_Shea
Oct 7 2008, 10:48 AM
QUOTE
Anyone got any ideas on how to run the shift boot over the shifter. I want to cover the square there and will use a shift boot but haven't figured how to attach it to the console.
Well Sir,
For all the awesome work you put into that, I would think the proper sized hole saw would be a relatively cheap investment ($15 at Lowes?)
After I mentioned it I figured you were looking to make a leather boot stitched with 4 sides (like a tall pyramid). That would work for the square hole. Finish off the hole with the vinyl then staple the leather boot from underneath. Take off the knob and drop the console over the top and replace the knob.
That should give it a nice finished look.
You should make templates and a kit that guys could buy and put together themselves. Looks very clean.
turnaround89
Oct 7 2008, 12:20 PM
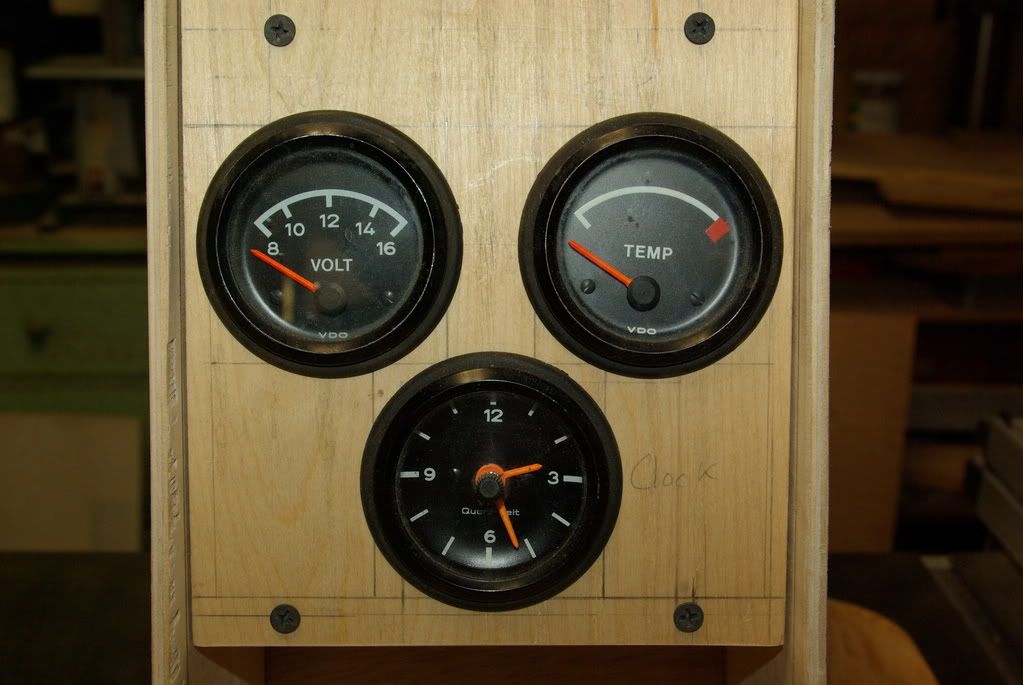
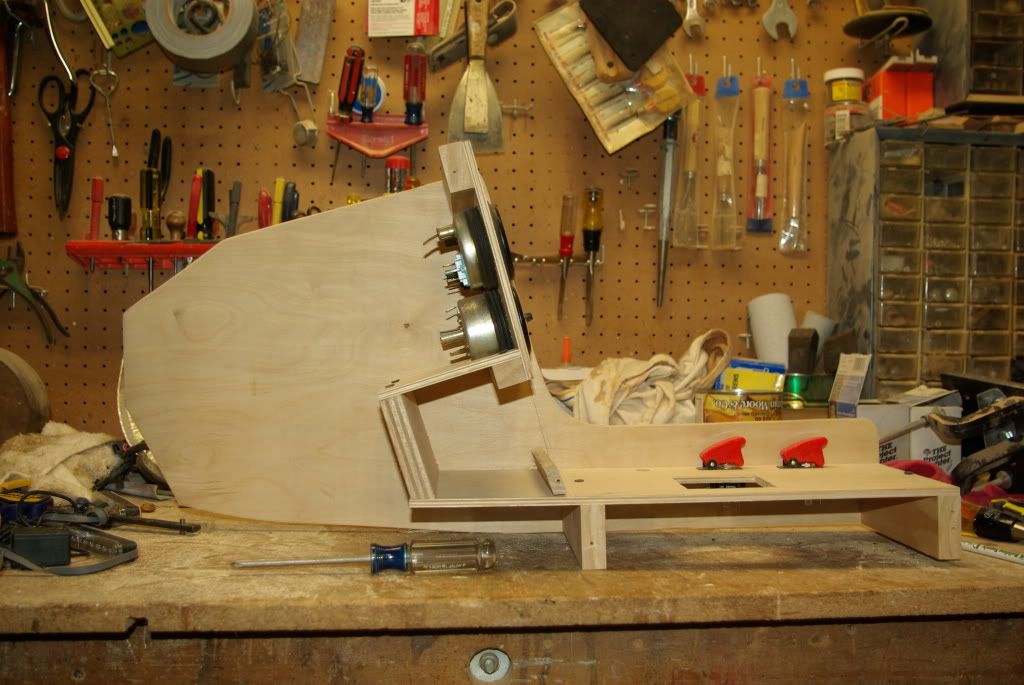
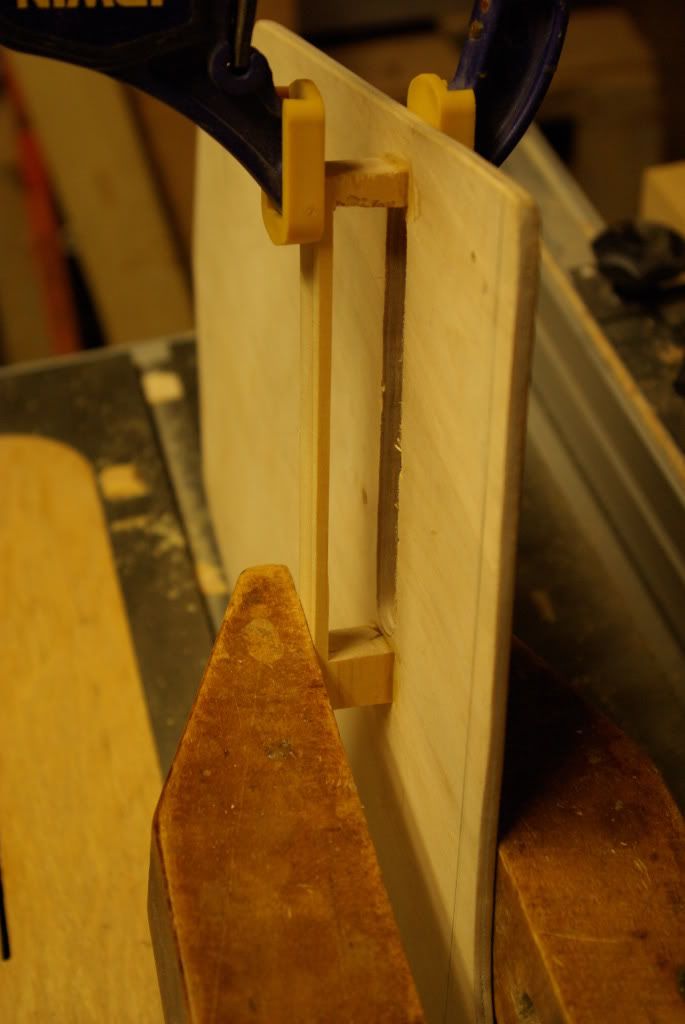
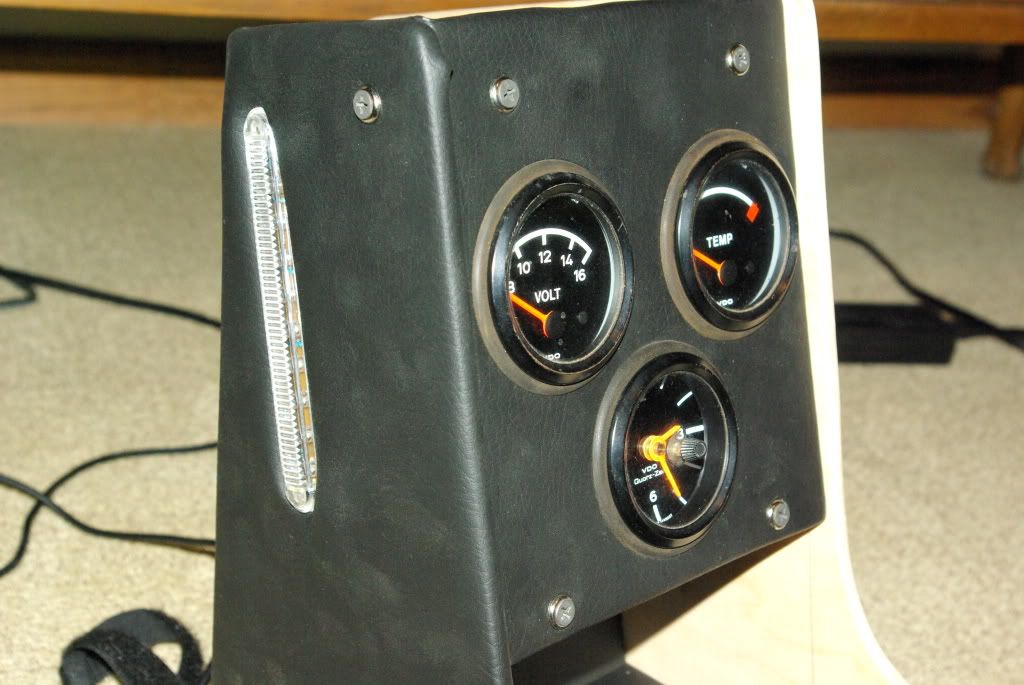
The tall pyramid is perfect, thanks, i never thought of that.My grandma can sew extremely well so i might have to ask her to do it. I also didn't think that vinyl is 16.99/yard, it was the nicest the fabric store had and looks great. I am just now putting the led lights in the side of the console. And for the template, anyone that has a 2.0 console can make the sides, thats what i used and then just used a lot of the old pieces from it but modified to the way i wanted. The shelf with the switches is a lot longer then a stock one, needed the extra length for the shelf. Its made of 1/4inch plywood and a little bit of poplar for all the braces. If i used 1/4inch ply the screws just split the stuff so i needed something thicker.
PanelBilly
Oct 7 2008, 01:08 PM
Click to view attachmentNow here's a router! If you're going
to cut something, you need to use a
man's tool. This would be the Tim the
Toolman model. Just draw what you
want to make in CAD, Yah it does
3D too, and turn on this beast.
Anybody need some office furniture manufactured?
tronporsche
Oct 7 2008, 01:27 PM
Don't forget, there is a fine type of foam that should go underneath that vynl, I believe this will also save the vynl from ripping around the corners. For my shifter, I used allen screws because I like the look. It will cover the hole, and allows a little more boot to be free.
Click to view attachment
turnaround89
Oct 7 2008, 01:59 PM
Thanks for the tip tron, however, the vinyl i bought has a good layer of foam on it already, so i think it will work. Your console is beautiful, looks so clean!! Here are some more pictures of the led brackets for the lights!
this just looked pretty cool!!
my928s4
Oct 7 2008, 02:07 PM
Your console looks great, excellent job.
Fancy making some more
turnaround89
Oct 7 2008, 03:57 PM
Anyone got any ideas on how to put the vinyl over this thing? All the staples i found are 1/4inch long and that won't work bc it might poke through the other side!! Would a glue work or will it not hold?
I wouldn''t mind making a few more, don't know what i would price it at though!! Pm me if you really interested, but let me finish this one first before anyone pm's me. can't really market an unfinished product.
Thanks everybody!!
JoeSharp
Oct 7 2008, 04:19 PM
Put something soft like an eighth of pine between your staple and the vinyl
VaccaRabite
Oct 7 2008, 04:25 PM
Dude, seriously, Eric is right. Pre-cut kits. They would sell and it looks like you have the shop to do it.
Zach
turnaround89
Oct 7 2008, 07:13 PM
Precut kits is about as far as i would go because the price would just sky rocket as soon as you want me to put in the leds or cover it in vinyl. The leds alone is 30.00 and the vinyl + time to cover the thing is costly. I wouldnt make a profit if i put the leds and covered it in vinyl plus switches or whatever. I would go for precut kits, however these aren't perfect by any means, the cuts aren't dead straight(little difficult with a jigsaw).
Ive got some of the things covered in vinyl right now, but the side pieces are the hardest and i am having some issues with those not coming out the way want, everything else is fine, but the side pieces won't be finished tonight i have a quiz to study for in organic chem tomorrow, school comes first then car!!
angerosa
Oct 7 2008, 09:09 PM
I want one.
Something else I thought of. Why don't you put a compartment in the side or maybe some speakers. Make use of the space that they never did at the factory!
jd74914
Oct 7 2008, 09:40 PM
QUOTE(turnaround89 @ Oct 7 2008, 08:13 PM)

i have a quiz to study for in organic chem tomorrow, school comes first then car!!
Aww, who studies for orgo.

(Well, to be fair I guess all of my Bio and ChemE friends do)
Good Luck, and the console looks great!
turnaround89
Oct 8 2008, 12:19 AM
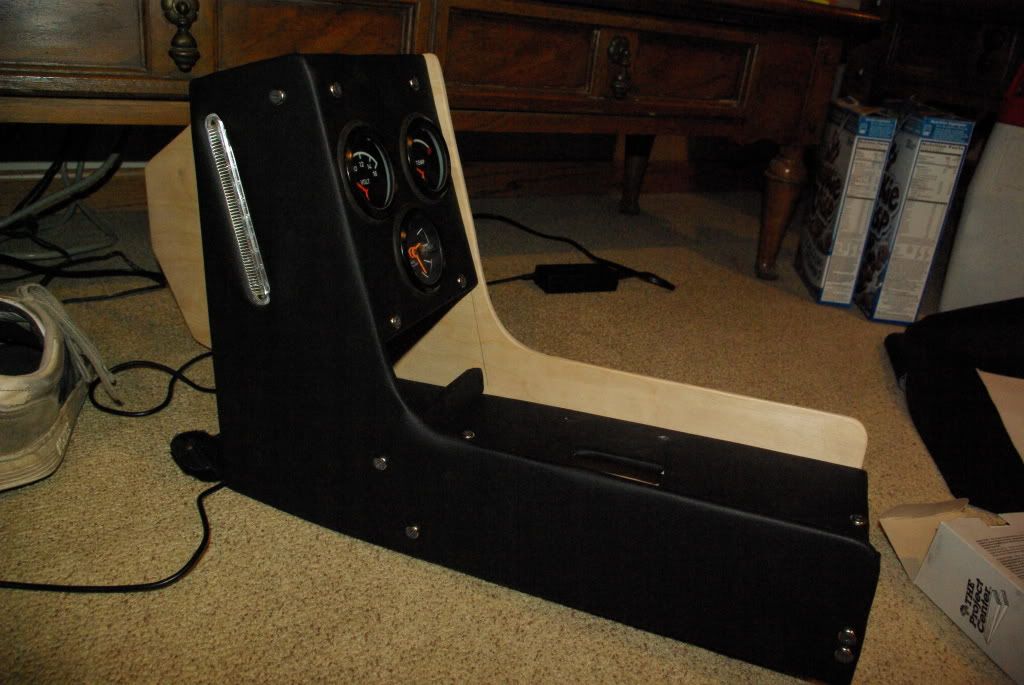
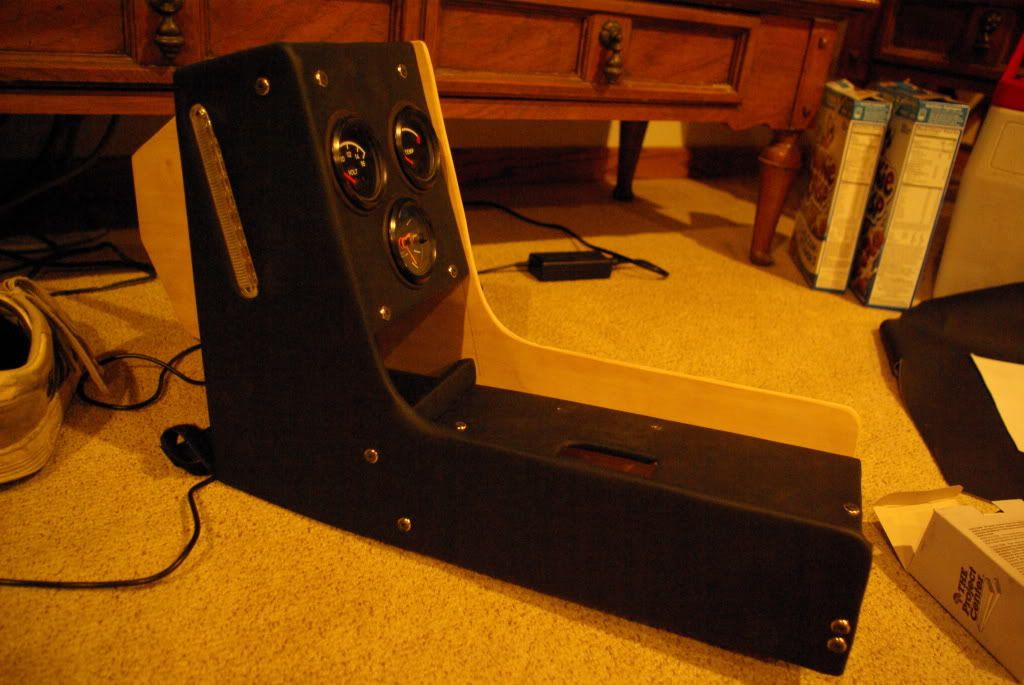
If i were to make the precut kits i would leave it up the the buyer to cut the holes for speakers, shifter, switches, and gauges. I would make it look like mine with the compartment but the plates that have the gauges and switches would be flat without any holes, that would be left up to the buyer that way it won't look exactly like mine bc some people may not want switches as well as i blocked off the heater lever and some people prolly want that. Heres some more pictures, getting closer to the final product, the light is not permanently in there but i love the look of it!! The light will be put in there permanently but not right now!
Almost finished, you get the idea of what the finished product will look like!! Im loving it right now, but i didn't cut enough off the pieces for the vinyl, i should have cut off more, thought i had enough space. So the fit is really tight right now and may get worse tomorrow

, i might have to recover the gauge plate and brackets
. If i remove the vinyl and cut more off the sides of the brackets and then recover them so the fit is not as tight!!!
Might finish it up tomorrow!!!
r_towle
Oct 8 2008, 11:37 AM
go get stainless screws or get button headed black screws if you want black....but loose the sheetrock screws.
Order up whatever finish screws you want from
http://www.rockler.comOR
McMaster Carr
Rich
jc914
Oct 8 2008, 11:47 AM
The final looks really good nice job.
my928s4
Oct 8 2008, 12:05 PM
QUOTE(turnaround89 @ Oct 7 2008, 11:19 PM)
If i were to make the precut kits i would leave it up the the buyer to cut the holes for speakers, shifter, switches, and gauges.
Console looks better every post, FWIW a precut kit sounds great.
Chris
turnaround89
Oct 8 2008, 12:21 PM
It not completely done yet, i still want to pull the vinyl off on some parts so the fit is better. I have to get the other side covered in vinyl as well as the insides so you don't see the wood. If i pull it apart tonight i will trace out all my pieces and make a precut kit and see how that goes. thanks everybody, just a little bit longer and the thing will be done
I also thought about the shift boot. I plan on the tall pyramid and instead of it going underneath the plate and stapling it there. I will use trons idea of bolting it down. I asked my dad if we could use the cnc at his workshop and he said yes. So a square piece of metal will be put over the square hole where the shifter comes through to hold down the shifter boot. The great thing is, is that we can write whatever on the plate like 914, PORSCHE, or the shift pattern on the top and bottom with Porsche on the sides. Cant wait for that to come(might be awhile for that) theres work at the shop that has to be finished before my dad will start a car project!!
jmill
Oct 8 2008, 12:22 PM
If you do precut kits you should make use of that router table. A bearing bit and a master copy would be all you need. You could pump them out real quick and cheap.
turnaround89
Oct 8 2008, 02:23 PM
I would only really need a master copy of the sides of the thing because everything else is a straight cut. How would i use a router with the master copy, could u explain that? If i can make them quick and cheap ill do it, but it will be a very basic console, no precut holes for gauges or the shifter(some people didn't like the square) so i would leave that up to whomever buys it. If i can get a setup going where i don't have to put a lot of time into it and i can make them quick all i would charge is for the wood used(not that expensive) and then a little extra for my time to make it. I would leave the covering with vinyl or whatever up to the buyer.
I am interested in making these precut kit

, just need a good system to do it and i will pump them out for sure for anyone who wants one. I also figured out how to get rid of the hangover the console has on the drivers side. If i cut the square to the end of the board, basically eliminating one of the left side of the square, i should be able to move the whole console over thus removing that hangover on the drivers side.
Or just making it skinnier would work too, but then the gauges won't fit in the gauge plate.
Back to work on the console now, just got out of class, figured id give the heads up on the precut kit, thought about it all day, and decided i will make them just need some time to get things perfect.
Like i said, this will be a very basic console, the buyer can modify it any way they want to in order to make it better or suit there needs. These are not perfect, but i think they look great!!
736conver
Oct 8 2008, 03:14 PM
I cant tell but are the sides bent in towards the back, or is it just straight.
jmill
Oct 8 2008, 03:21 PM
You buy a straight cut router bit with a bearing the same diameter as the bit. The bearing can be on the top or bottom. I prefer the top so I can watch it ride on the "master copy." You place the master on top of another board that is rough cut slightly larger. Stick the two together with a couple brads, screws, double stick tape, etc. You don't need much. You then set the router height so the bearing rides on the upper master and the bit cuts the bottom board. You push the two through your router and you have a perfect copy in about a minute. Buy a quality bit. It's worth the money. It will cut alot cleaner.
You'll learn fast that if you push too slow you'll burn the wood. Push too fast and you burn up a router.
Here's the bit you need if you have a 1/4' shank. You might need a 1/2' shank.
http://www.rockler.com/product.cfm?page=5411
turnaround89
Oct 8 2008, 05:25 PM
The sides are straight, which is why there is a little extra hanging over on the sides when it is in the car. Thanks for the help with the router info, however, now that i cut the pieces again and revinyled the thing, it still isn't fitting right so it will take awhile before i get this this perfect. Ill keep working on it and hopefully have something to show.
Does anyone have any ideas how much it would cost to have this thing covered by an auto upholstery shop. Im leaning towards that right now because it just isn't coming out the way i want. I even leaned towards fiberglassing the sides and then vinyl on the rest, that would look kind of weird though!!
736conver
Oct 8 2008, 05:41 PM
Check your foot room before you get it covered if your sides arent angled in. Is it shorter then the stock console, that might also solve the angle problem.
turnaround89
Oct 8 2008, 06:09 PM
Theres plenty of foot room between the gas pedal and back of the console, at least 1.5 ft maybe more. The only thing i notices is that my pant leg rubs the console a little.
The best way to cover it is to get Grandma to sew the inner and outer pieces together with a seam that runs along the top edge of each side. Then those fit over the sides (kinda like socks) before the end pieces are put on. Thats how I rebuilt mine anyway. The stock one has a fake seam or a heat seal seam along the sides too.
This is a "lo-fi" version of our main content. To view the full version with more information, formatting and images, please
click here.