Full Version: any tips on re-welding a trunk hinge?
im trying to fix the rear trunk [hinge mount to body] on the pass.side & dont know how to remove the grill above the battery.
There are 3 rubber covered slide on clips that slide on pins on the grill. The front pin(1) faces towards the front of the car and is horizonal. Two (2)pin on the rear of the grill are vertical. These are the same type clips that hold the PORSCHE letters on the grill. 
Steve
Steve
QUOTE(parked 15 years @ Jan 29 2009, 04:52 AM) 
im trying to fix the rear trunk [hinge mount to body] on the pass.side & dont know how to remove the grill above the battery.
it's fastened like the other grille bits - little rubber speed nuts on the back of pins that fit through the mating parts. Picture an earring back...
They're hard to get to - diagonal cutters can be used (IIRC - been a while) to wedge in behind them and gently pull them off.
I didn't bother removing the grill. Located proper postion of the mount. Pop riveted it to hold it (one rivet each side) .... stuck my head in the engine compartment and welded it in place.
I also cut the torsion bars out and went to gas shock kit to avoid it happening again.
I also cut the torsion bars out and went to gas shock kit to avoid it happening again.
 I don't have to remove the grill. Remove the old one completely (nice flat metal), bolt the hinge bracket to the hinge arm, bolt the hinge arm to the rear lid, install everything and have someone hold the rear lid in the correct location then tack-weld the bracket. Carefully remove all the bolts, and finish welding.
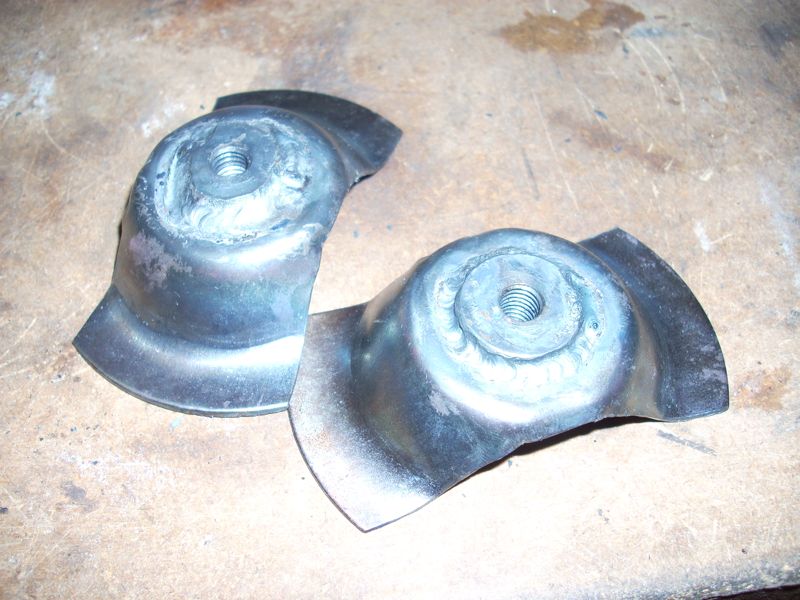
Also, make sure to add extra welds to the bracket. They tend to break. If you weld them like I have pictured here, then you need to make sure they don't protrude above the level of the bolt plate. You can also weld the backside, but make sure not to weld into the threads. Best to make sure the threads are clear with an 8mm x 1.25 tap before you weld it in.

QUOTE(SLITS @ Jan 29 2009, 05:59 AM)
I didn't bother removing the grill. Located proper postion of the mount. Pop riveted it to hold it (one rivet each side) .... stuck my head in the engine compartment and welded it in place.
I also cut the torsion bars out and went to gas shock kit to avoid it happening again.
thanks, back to the garage! i didnt want to break the thing & good advice really helps !
with Mark. Welding the threaded insert is a must. I go a little further and add more material to the bottom of the hinge bracket. I fold a piece of 16 gauge, sort of like a small piece of angle iron, and weld that to the bottom half. I cut a weep hole so it can't fill up with water. Wish I had a pic, sorry.I find it easiest to bolt the hinge bracket to the deck lid (in the middle of the slots) with a washer between the lid and the bracket, and then bolt the bracket to the hinge cup with the shoulder bolt, and put the deck lid in the absolute correct postion, and then fasten the cup to the inner wall.
I've got Clecos, which are much easier to use than pop rivets or sheet metal screws, but whatever it takes. I punch holes in the flange of the hinge cup, and make my welds in the holes. After you make each weld, you've got to have someone hold a dolly behind the wall (in the wheel house) and tap the flange tight against the wall. Every time you make a weld the hinge cup will pull away from the wall a little, so you've got to make sure to get it flush prior to every weld.
Sorry, I wish I had taken pics the last time I did this.
These answered are way too simplified. OK, first your going to need to drop the engine and pull the interior out. Stripping off every item that isn't welded on comes next, followed by a full walnut blasting or a chemical dip if your thinking of cutting open the longs for inspection and new heater ducting.
You just can't fix the part that's broken, you have to go full bore. This is a 914 after all.
You just can't fix the part that's broken, you have to go full bore. This is a 914 after all.
This is a "lo-fi" version of our main content. To view the full version with more information, formatting and images, please click here.