Help - Search - Members - Calendar
Full Version: Engine is dropped
914World.com > The 914 Forums > 914World Garage
VaccaRabite
Engine is down to rebuild after the low oil episode at Hershey. I'm probably don't need to rebuild it, but I am adding a new cam and I want to do some things that I did not know about when I built it the first time in 2007.

I pulled the engine out of my car this afternoon after trimming the hedges and killing all the weeds I could find to kill. I had removed the exhaust and CV bolts the other day. Drop went REAL easy. I used Foley's engine plate on a jack, and it was a 1 hour job (including removing the CVs, carbs, wires, etc). Did it all by my onesy while smoking a cigar.

Tin is off, engine and tranny are still attached. I'm going to cut the grass again tomorrow and then remove the transmission. maybe get the eads off too, depending on how much energy I have.

My goal is to have the engine stripped and back together in a month. I need to find out why the pump was not making pressure, add the cam, and remeasure all my bearing tolerances. I also want to change the distributor drive gear. The one in th engine now is a little worn. I have a very nicer one that i am going to put on the crank. When we were timing the engine a few months ago, the timing line was dancing around a little bit, and I think it was due to the drive gear wearing.

I am also going to pull all the galley plugs (the are already tapped, so that will be easy) and make sure they are not blocked or sludge filled.

I also want to take the craptastic aftermarket oil dipstick tube off and put on a proper 914 dipstick tube. That was a big part of my failure - trusting the aftermarket dipstick.

So, any way, a few pics of the drop.
IPB Image

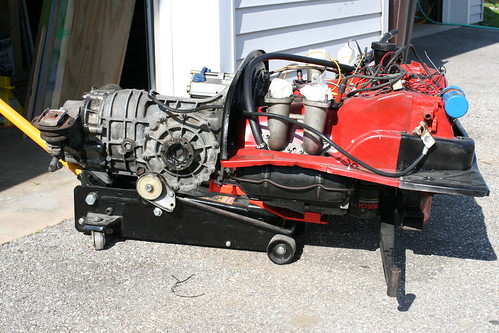
Came down so easy. I did not even have to remove the rear valence. Way less complicated then with the FI on.

Here is a mystery.
One of the things that I want to do is see if I can button up any leaks. It figures that I got the last known leak the week before I decide to take down my engine. But there was one more elusive drip.

IPB Image
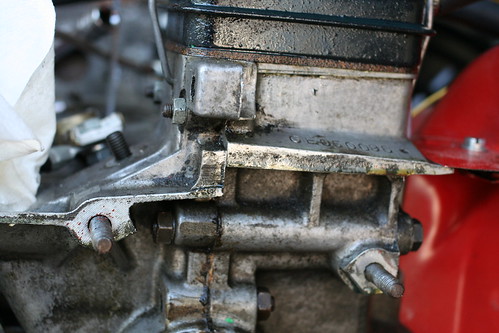
Do you see the oil under those two studs? How the heck does oil get there? There is also a little on the ridge right under the serial number.

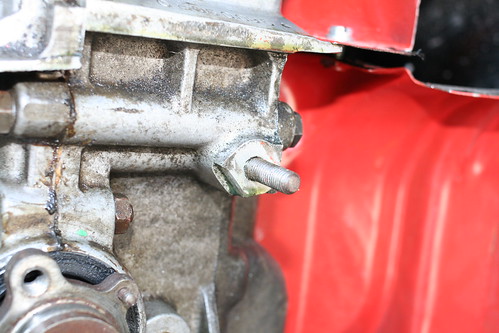
Here is another pic of the area.
IPB Image

So, but the end of the week, I hope to have the case split and cleaned and measured over the weekend. Aggressive schedule, but I only have 2 weeks of no classes until summer classes start again. Then the next time I will have to work with my motor is when I take off a week in June for my birthday. I'm hoping to have this sucker done by then! In june, I want to get my truck on the road.


Zach


statesblue
So where is Dallastown Pa.????
r_towle
Dude,
Your oil filler tower is leaking.
Look at the gasket in that picture...its soaked.

Rich
VaccaRabite
QUOTE(statesblue @ May 10 2009, 09:47 PM) *

So where is Dallastown Pa.????


Between York, PA and the Maryland Line.


QUOTE(r-towle @ May 10 2009, 10:19 PM)
Dude,
Your oil filler tower is leaking.
Look at the gasket in that picture...its soaked.


I get how that would leak on filling with oil, but how would it leak when the engine was operating? It looks like there is a splash plate that keeps oil from splashing up and out of the filler.

Zach
904svo
QUOTE(Vacca Rabite @ May 11 2009, 04:46 AM) *

QUOTE(statesblue @ May 10 2009, 09:47 PM) *

So where is Dallastown Pa.????


Between York, PA and the Maryland Line.


QUOTE(r-towle @ May 10 2009, 10:19 PM)
Dude,
Your oil filler tower is leaking.
Look at the gasket in that picture...its soaked.


I get how that would leak on filling with oil, but how would it leak when the engine was operating? It looks like there is a splash plate that keeps oil from splashing up and out of the filler.

Zach


That cause by excess crankshaft pressure, you need a bigger crank vent
system.


VaccaRabite
What is a crank vent? I have to assume this is different then the vents I have in the heads.

Zach
904svo
QUOTE(Vacca Rabite @ May 11 2009, 06:27 AM) *

What is a crank vent? I have to assume this is different then the vents I have in the heads.

Zach


The heads vent are two of them the third one is on the oil filler, some cars
have a PVC valve some don't, this used to go to the air clearner to remove
the fumes from the crankcase. When you change to carbs these now have to go
to a breather box, Jake sells them. You would be suprise how much pressure is
generated when the engine is running this will cause oil to be push pass the valve
stems and may cause problems on new engines causing the rings not do set right.
VaccaRabite
Okay. I had lines that ran from the head vents to an EMPI breather box. There was a third hose that went from the breather box to the oil filler. Are you saying that vent needs to be bigger?

Zach
904svo
QUOTE(Vacca Rabite @ May 11 2009, 07:33 AM) *

Okay. I had lines that ran from the head vents to an EMPI breather box. There was a third hose that went from the breather box to the oil filler. Are you saying that vent needs to be bigger?

Zach


Now how does it breath to the air?
There should be a forth opening either
to the air cleaner or to the atmosphere
with a filter on it. This is one case where
bigger is better.
McMark
The EMPI breather box lid has vents to atmosphere.

The dipstick tube is a PITA to replace. The stock ones are press fit and brazed into place. So getting them out without damage is almost impossible. Maybe Jake has a trick.

I have a solution for you that I'm happy with, but it's not simple.
r_towle
Zach,
Lets see the PVC valve...with carbs there should really be no valve...just a wide open port.

That is the little port next to the oil filler neck.

In the FI systems...some of them...there is a PCV valve...you need to drill it out.

Rich

charliew
Zach your truck is in the july 4wheel and off road mag. I think the wheels might be bigger though.

I hate to say it but keeping vw motors dry is the hardest thing I ever tried to do. In the late 60's I would use 3m trim cement to glue the valve cover gaskets on to make sure they didn't leak. What a pain to replace them. I was so glad to change to a hydralic cam and not need to adjust the valves.
VaccaRabite
QUOTE(McMark @ May 11 2009, 05:08 PM) *

The EMPI breather box lid has vents to atmosphere.

The dipstick tube is a PITA to replace. The stock ones are press fit and brazed into place. So getting them out without damage is almost impossible. Maybe Jake has a trick.

I have a solution for you that I'm happy with, but it's not simple.


I'd like to hear it.
The one that I have is NOT stock, unless it is the stock Bus stick tube. Mine curves, is chromed, and looks to be JB welded into place.

I have another case. It is unknown though, and does not have the galley plugs tapped like my current case does.

Zach
type11969
damn, and after all that work figuring out how to safety wire those CV bolts . . .

Good luck with the work, I'd offer to help but my quarter (drexel is on the quarter system which is stupid) is drawing to a close and you know how that is. I'm real curious to know what the issue is with your oil pressure. As for sealing it, Jake does offer some nice sealants through his store which he allegedly has good luck with . . . I'll let you know in a few weeks how well they work.
VaccaRabite
QUOTE(type11969 @ May 13 2009, 09:36 AM) *

damn, and after all that work figuring out how to safety wire those CV bolts . . .

Good luck with the work, I'd offer to help but my quarter (drexel is on the quarter system which is stupid) is drawing to a close and you know how that is. I'm real curious to know what the issue is with your oil pressure. As for sealing it, Jake does offer some nice sealants through his store which he allegedly has good luck with . . . I'll let you know in a few weeks how well they work.


From what I have been reading, my issue may be as simple as putting in a paper gasket where one should not have been. I used a paper gasket between the pump and the plate, and it seems like I was not supposed to have used a gasket there, just a little sealant.

I won't know for sure though until I get things apart and back together again.

I'd really like to be able to fix the dipstick tube so I can use that nice Mainley dipstick/temp gauge I bought. But, if its too much of a bitch to pull the tube and put in a new one, I now have the correct oil level market on the aftermarket dipstick.

Zach
type11969
Dunno, pretty sure the thin red gasket always goes between the pump and the plate on T1 pumps, that is what I have always done in the past with success. Now if you used the thicker gasket between the pump and the plate that is supposed to go between the pump and the case then that may be your issue . . .
hcdmueller
After building one of Jake's 2056 kits I can say that the sealants work. After a few hundred miles of very hard driving I have yet to see a drip of oil. I can say that you need a good breather setup. Mine was not good enough and I was getting over pressure in the case at high RPM. It would only happen when I was making high speed runs up the autobahn by my house. I was told by Jake that the Empi breather was not large enough for the engine. I punched out the PCV and tapped ports in to the heads for the breather setup. I am probably going to get a CFR breather can when I get back from the desert.

I built my kit on a GC case so I didn't have a secondary oil relief valve. I don't know if that is your problem or not. It will probably help you to install the oil pump without the gasket between the plate and the pump. I searched around Jakes site and decided that was my best choice. My oil pressure stays good at all temps and RPM's, including my very low idle. I still have some tuning to do before the car is 100%.
VaccaRabite
I got the oil dipstick tube off by tapping the epoxy with a cold chisel. Came off real easy. :-)

The crank vent does not have a valve in it, it is a straight shot into the oil filler.

But, do to the oil issue, I never got the car revved up enough to build pressure.

Zach
This is a "lo-fi" version of our main content. To view the full version with more information, formatting and images, please click here.
Invision Power Board © 2001-2024 Invision Power Services, Inc.