Wow. This thing was really rusty. I wish I had a pic of the fiberglass that was over this mess hiding it and helping the rust to gestate. Check out the bondo chunks. There was bailing wire holding the heat shield in place
notice how "clean and solid teh one corner looks. also teh trunk latch support boss. although they look sano, they are paper thin and rotted from behind where you cant see them...yet
Full Version: Rusty trunk repair / replacement
fdh
xcg
fdyrd
fdyh
Although the rear trunk section was obliterated, the muffler heat shield was perfect. Drilled out the spot welds on the transaxle cross brace reinforcement. The underside was rusty so I made a new one. I sand blasted the corners and the remaining rust that I could not grind. then I treated the raw metal with phosphoric acid AKA Ospho/metal ready/rust-mort/PPG DX-XXX...
the late model bumper shock mount brackets are stout! They reside in the corners under the trunk floor.
This trunk pc was galvanized. Be careful welding this toxic brew!!! I ground it off of the major weld areas and re-coat with a zinc rich weld thru primer. I use Wurth. it is critical to the longevity of a repair like this that no metal be left un-treated
heat shield
fdh
xcg
I'm in the middle of the same kind of repair. 
this was the only solid metal. note the rust hidden under teh rear trans cross support
prelim fittment. dont weld galvanized metal w/o a PROPER respirator!!!!!!!! it emits toxic evil mess you up fumes
customer was not concerned w originality in this area
Seam sealing the bottom is very important to the longevity of this repair. I also use Wurth or 3m weld thru primer anywhere I’m welding that I know I cant get to after the weld. Although I make allot of my metal for fun, RD is the more economical solution for pre-made quality steel. They come with an unknown soft primer that I remove. I am scared of peeling so I do everything I can to control the process from bare metal to finished paint.
clean, strip, clean, sand, clean, etch, clean, etching primer, epoxy primer, sand, then paint
clean, strip, clean, sand, clean, etch, clean, etching primer, epoxy primer, sand, then paint
The trunk latch support boss was toast also. It has no drains on its bottom. I scrubbed t4eh hell out of that seam sealer in the upper trunk since I knew I would be painting the whole thing later. after sanding I used etching primer on all bare metal and an epoxy primer to seal it all off
while I was in there I decided to weld up some extra holes from one of those plastic reflector things. This required me to paint the rear apron and outer tail light panel
while I was in there I decided to weld up some extra holes from one of those plastic reflector things. This required me to paint the rear apron and outer tail light panel
I was happy that most of the rusty got cut out with the rear section. I have done one where the rust was also forward of the trans brace. Water accumulates there but not as bad.
the moral of the story is SEAL YOUR TAIL LIGHTS
the moral of the story is SEAL YOUR TAIL LIGHTS
gfh
the engine and hell hole were the same before i started on this baby. now its a 1911cc 8.6 to 1. replaced teh hell hole, inner wheel house and teh left mini hell hole too
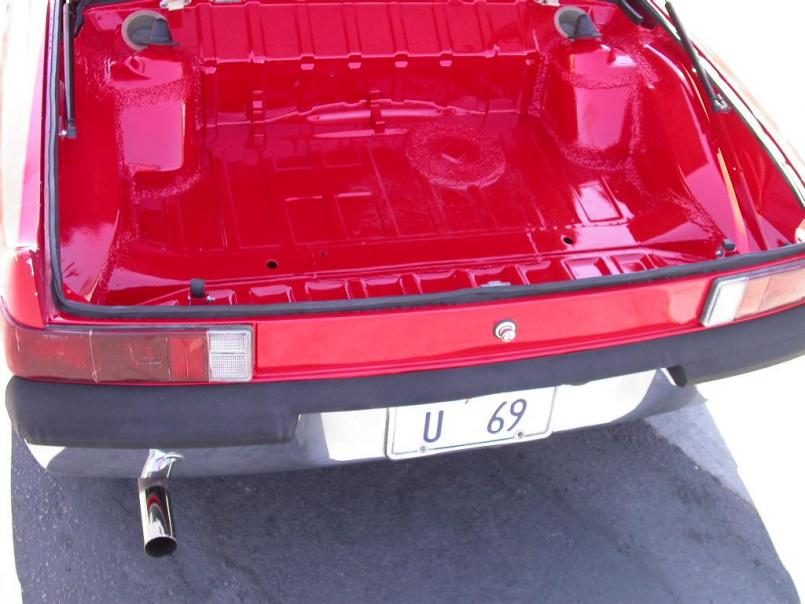
I wish this was my car. its so complete now. its a paint job away from 914 greatness
I wish this was my car. its so complete now. its a paint job away from 914 greatness
vhn
v ngf
vhgfhn
I love my job!
URY914: why would you add weight to your car? ....or do you speak of a different car? that light weight thing is bad ass!!! we just got our AX car down below 1700#. scales dont lie
gvj
HELL on earth
dsgfdb
mini hell
xgch
...back to the next rusty beast
...with a glimps of its future in teh background
...with a glimps of its future in teh background
Looks purdy now.
QUOTE(sean_v8_914 @ Jul 13 2009, 12:38 PM) 
vhgfhn
very nice I'm on my way to fixing my ride also
ouch. do you need any donor metal? show us the rest of teh damage. do I see a ripple half way up the seal flange?
QUOTE(sean_v8_914 @ Jul 14 2009, 12:01 AM)
ouch. do you need any donor metal? show us the rest of teh damage. do I see a ripple half way up the seal flange?
That is some beautiful work Sean!

Thanks for posting all the pictures. I needed a rustoration fix.
What do you say people, welder of the year nominee???
John
John, you got me beat by a long shot. you got my vote. your project was epic, man. Is she runnin yet?
oldschool: are you butting that in?
oldschool: are you butting that in?
for those who asked about material costs...I di not use the full gallon of paint, primer, rust mort but it would be stupid to pay the quart price.
Epoxy primer $120
Rust mort $62
Urethane single stage $120
Seam sealer $30
Etching primer $15
Weld thru primer $13
Welding gas $10
Replacement sheet metal $175
Epoxy primer $120
Rust mort $62
Urethane single stage $120
Seam sealer $30
Etching primer $15
Weld thru primer $13
Welding gas $10
Replacement sheet metal $175
forgot welding wire, grinding wheels, sand paper, blasting sand, sawsall blades, spot weld drilling bit, dremel cutting wheels, sanding discs, degreaser, wax and grease remover, paint thinner, laqueur thinner, body filler...
QUOTE(sean_v8_914 @ Jul 13 2009, 12:43 PM)
URY914: why would you add weight to your car? ....or do you speak of a different car? that light weight thing is bad ass!!! we just got our AX car down below 1700#. scales dont lie
I'm fixing the trunk in my street car. No trunk in the race car.
Sean,
It's obivious that you love your job. I love your work! Looks soo nice! Wish I still lived in San Diego. I would be happy for you to do some work for me on mine. Nothing that bad, just small dings and paint work.
Tom
It's obivious that you love your job. I love your work! Looks soo nice! Wish I still lived in San Diego. I would be happy for you to do some work for me on mine. Nothing that bad, just small dings and paint work.
Tom
old school bump...any progress?
This is a "lo-fi" version of our main content. To view the full version with more information, formatting and images, please click here.