You might have seen it in my progress thread that I'm switching to side shift on my 70'.
Question: When switching to side shift from Tail shift, do you have to change that plate mounted to the firewall that the linkage comes through?
Full Version: Switching to side-shift question....
QUOTE(RiqueMar @ Jul 23 2009, 12:33 PM) 
You might have seen it in my progress thread that I'm switching to side shift on my 70'.
Question: When switching to side shift from Tail shift, do you have to change that plate mounted to the firewall that the linkage comes through?
no just install the firewall conversion bushing
QUOTE(dr914@autoatlanta.com @ Jul 23 2009, 12:42 PM)
no just install the firewall conversion bushing
Damn. Not the answer I wanted to hear.
Is there a 'best' way to go about doing this?
Hmm, well I guess the "BEST WAY" is to
1. grind down/fill the firewall pivot
2. Cut an side shifter firewall to get the surround for the rubber boot
3. Weld the surround
4. Paint the area
5. Install a new side shifter bushing and boot.
Does that help? I am sure I can make it more complicated if you'd like
eric
1. grind down/fill the firewall pivot
2. Cut an side shifter firewall to get the surround for the rubber boot
3. Weld the surround
4. Paint the area
5. Install a new side shifter bushing and boot.
Does that help? I am sure I can make it more complicated if you'd like
eric
the conversion bushing isn't fun to put it, but it's better than the alternative...
soak it in HOT water for a bit before doing it
FWIW, even if you change the firewall piece, the other bushing isn't easier to put in...
soak it in HOT water for a bit before doing it
FWIW, even if you change the firewall piece, the other bushing isn't easier to put in...

"Conversion bushing" does this mean I don't have to change and weld in a new piece? Like an alternative?
No you don't need to put in a different piece. I did this on my 70 & just got the right bushing. They are easy to put it. Put it in boiling water to get it a little pliable. Then add a little grease & it goes right in. I haven't figered a perfect cover for the area. I just kept the stock sideshift boot on there even though it doesn't attatch to the firewall. This change is well worth the time
QUOTE(JRust @ Jul 23 2009, 02:02 PM)
No you don't need to put in a different piece. I did this on my 70 & just got the right bushing. They are easy to put it. Put it in boiling water to get it a little pliable. Then add a little grease & it goes right in. I haven't figered a perfect cover for the area. I just kept the stock sideshift boot on there even though it doesn't attatch to the firewall. This change is well worth the time
I'll go with that, as everything already looks good.
We do have a full shop and a fiberglass guy, maybe we can fab up a sort of boot for these type of conversions?

What's a good place for the bushing?
I've bought them from PP and AA, but you can probably get them locally in the So Cal area.
QUOTE(Cupomeat @ Jul 23 2009, 02:25 PM)
I've bought them from PP and AA, but you can probably get them locally in the So Cal area.
Is there an actual Conversion bushing? Or is it simply the one that is placed in the later models?
I just finished converting the flange on my 71 in prep for a sideshift tranny.
The pics below show what was described earlier:
1 Grind down the original flange
2 get a flange from a parted out sideshift chassis
3 Weld sideshift flange into place & paint
I just finished and haven't painted yet.
The pics below show what was described earlier:
1 Grind down the original flange
2 get a flange from a parted out sideshift chassis
3 Weld sideshift flange into place & paint
I just finished and haven't painted yet.
QUOTE(Spoke @ Jul 23 2009, 03:10 PM)
I just finished converting the flange on my 71 in prep for a sideshift tranny.
The pics below show what was described earlier:
1 Grind down the original flange
2 get a flange from a parted out sideshift chassis
3 Weld sideshift flange into place & paint
I just finished and haven't painted yet.
So it looks like the holes match up?
Is this the bushing that I just need to place in there? Click Here
that's the one!
much easier than the alternative, if you ask me.
much easier than the alternative, if you ask me.
QUOTE(tat2dphreak @ Jul 23 2009, 03:44 PM)
that's the one!
much easier than the alternative, if you ask me.
Cool, so it's just this, some boiling water, and we are in business.
You gots it now 
That piece of plastic conversion bushing is the piece you need. Only metal work needed is if you want the boot/cover to fit correctly.
Have you dealt with the engine mount bar? Ya needs the one with the hole it in for the sideshift. Search for sideshift+conversion and my user name for a decent thread on the process from 2 yrs ago. I never did find that camera with the final pics
QUOTE(ChrisNPDrider @ Jul 23 2009, 04:54 PM)
You gots it now
That piece of plastic conversion bushing is the piece you need. Only metal work needed is if you want the boot/cover to fit correctly.
Have you dealt with the engine mount bar? Ya needs the one with the hole it in for the sideshift. Search for sideshift+conversion and my user name for a decent thread on the process from 2 yrs ago. I never did find that camera with the final pics
No need for that search, I already have it.
I made a little tool that helps push the bushing into place (boiling water didnt soften mine very much)
its just a piece of all thread with two washers and nuts on each end. make sure the washers are bigger than the hole through the firewall and tighen down the nuts until it presses into place.
worked well for me
its just a piece of all thread with two washers and nuts on each end. make sure the washers are bigger than the hole through the firewall and tighen down the nuts until it presses into place.
worked well for me
I did the same thing as Brett... long bolt, nut and big washers="press"
I didn't know about the hot water at the time
I didn't know about the hot water at the time
As Bill Cosby might say here, Whever you are pushing something large out, you always need more hot water...
 Andy
Andy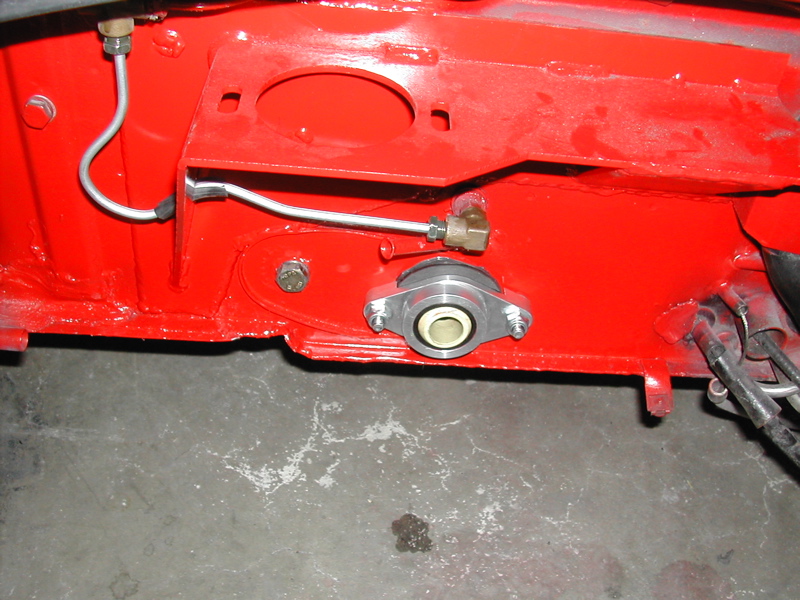
Yeah baby! Perfect excuse for an upgrade while you're there!
yea, why get a $13 part when you can completely upgrade the system
don't get me wrong, if I had an extra 1k lying around, a rennshift+rear kit would be ideal
don't get me wrong, if I had an extra 1k lying around, a rennshift+rear kit would be ideal
Why bother with any kind of an upgrade?
Because they make things work better, go faster, increase the fun factor, etc, etc.
I love upgrades!
Of course, budget is always the thing that gets in the way of most of them.
Because they make things work better, go faster, increase the fun factor, etc, etc.
I love upgrades!
Of course, budget is always the thing that gets in the way of most of them.
QUOTE
Of course, budget is always the thing that gets in the way of most of them. smile.gif
the good ones, anyway
QUOTE(RiqueMar @ Jul 23 2009, 12:33 PM)
You might have seen it in my progress thread that I'm switching to side shift on my 70'.
Question: When switching to side shift from Tail shift, do you have to change that plate mounted to the firewall that the linkage comes through?
Hi Rique,
I did the conversion to side shifter on my '70 also, and did not have to change anything on the firewall. I did hhave to get the specific shift rods for it, and got new bushings and ball cups at the same time. I'm in the process right now of putting the correct end cover on the trans to get rid of all that extra stuff (and the potential oul leaks at the seals...
Good luck,
Tim.
QUOTE(94Timmer @ Jul 24 2009, 11:57 AM)
QUOTE(RiqueMar @ Jul 23 2009, 12:33 PM)
You might have seen it in my progress thread that I'm switching to side shift on my 70'.
Question: When switching to side shift from Tail shift, do you have to change that plate mounted to the firewall that the linkage comes through?
Hi Rique,
I did the conversion to side shifter on my '70 also, and did not have to change anything on the firewall. I did hhave to get the specific shift rods for it, and got new bushings and ball cups at the same time. I'm in the process right now of putting the correct end cover on the trans to get rid of all that extra stuff (and the potential oul leaks at the seals...
Good luck,
Tim.
As for the kit, I do plan on getting it, I just want to drive mine first so that I know the difference between regular and a sort of upgrade.
If you are looking for a CSOB shift improvement, here is one that will only cost most 914 owners a little labor.
Click to view attachment
I used the U-joint and shaft out of an old steering linkage. Those U-joints last forever, and most 914 owners have a bunch of them laying around.
This is on Betty's car. It had a stock coupler, but a couple of welds were breaking loose, so I had to take it apart and fix it. I could not get that @#$# cone screw out! So I devised this, inspired by the J-West linkage. It is NOT as good as was James Adams sells, but it is a substantial improvement over the stock nylon bushings.
And best of all it was FREE!!!
 A friend used the steering coupler on his 914 race car and it worked out really good.
A pic of my "homemade" bushing tool.
Click to view attachment
Thats interesting. I would wonder if without the cone screw it would rotate slightly over time. Even though, I think I will give that a shot sometime I bet I can drill and tap the collars to utilize a cone screw.
I bet I can drill and tap the collars to utilize a cone screw.
QUOTE(Dr Evil @ Jul 26 2009, 11:06 PM)
Thats interesting. I would wonder if without the cone screw it would rotate slightly over time. Even though, I think I will give that a shot sometime
I bet I can drill and tap the collars to utilize a cone screw.Why would you need the cone screw???? The steering shaft ends that are welded into the tubes are splined and are notched for the bolts to pass through.....
The ends of the shafts are splined? Not that I recall. You sure?
Also, would not the brass bushings for the U joint have the same/similar effect?
QUOTE(Dr Evil @ Jul 26 2009, 11:58 PM)
The ends of the shafts are splined? Not that I recall. You sure?
Doc... 'cmon.... The U-Joint was salvaged from the STEERING linkage. Do you really the engineers at Porsche would want it to slip in a circular motion?????

I removed the existing end for the shift coupler and rear shift rod, cut the splined ends off the steering rod from under the dash and welded them into the shift linkage tubes. The U-Joint is a bit longer than the old coupler, so I had to shorten the rear tube some to get it to fit.
I also went to the hardware store and bought brass bushings to replace the bushing in the side shift console.
QUOTE(ClayPerrine @ Jul 27 2009, 09:23 AM)
QUOTE(Dr Evil @ Jul 26 2009, 11:58 PM)
The ends of the shafts are splined? Not that I recall. You sure?
Doc... 'cmon.... The U-Joint was salvaged from the STEERING linkage. Do you really the engineers at Porsche would want it to slip in a circular motion?????
I removed the existing end for the shift coupler and rear shift rod, cut the splined ends off the steering rod from under the dash and welded them into the shift linkage tubes. The U-Joint is a bit longer than the old coupler, so I had to shorten the rear tube some to get it to fit.
I also went to the hardware store and bought brass bushings to replace the bushing in the side shift console.
Ah, you cut and welded the steering splined ends
I thought you just clamped the things to the shafts
This is a "lo-fi" version of our main content. To view the full version with more information, formatting and images, please click here.