|
|
|
Porsche, and the Porsche crest are registered trademarks of Dr. Ing. h.c. F. Porsche AG.
This site is not affiliated with Porsche in any way. Its only purpose is to provide an online forum for car enthusiasts. All other trademarks are property of their respective owners. |
|
|

  |

| seanpaulmc |
 Feb 22 2021, 07:20 PM Feb 22 2021, 07:20 PM
Post
#1
|
|
Member  Group: Members Posts: 449 Joined: 6-December 16 From: Orlando, FL Member No.: 20,649 Region Association: South East States |
I recommend all new welders to get some 50 year old thin gage sheet metal to learn with. (IMG:style_emoticons/default/welder.gif) How hard could it be?
In doing so, you’ll practice with voltage and wire speed, stick out, part set up, metal cleaning, contamination and porosity, work area lighting, youtube, weld grinding, fabrication, clamping, gapping, blow thru, backing materials, warping, patience and wire brushing, to name a few. What I have... How many cracks can you spot? 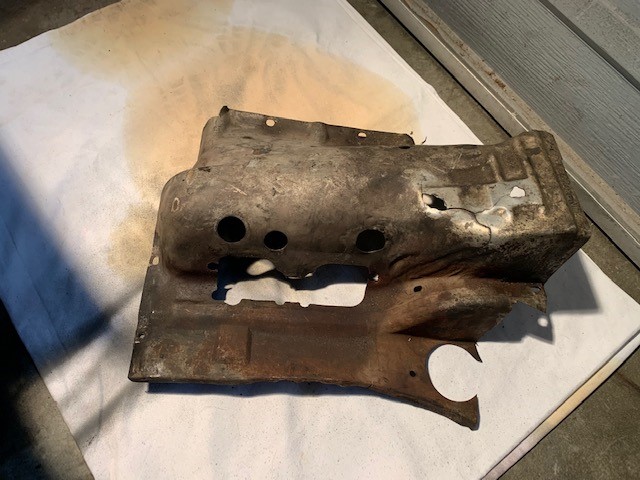 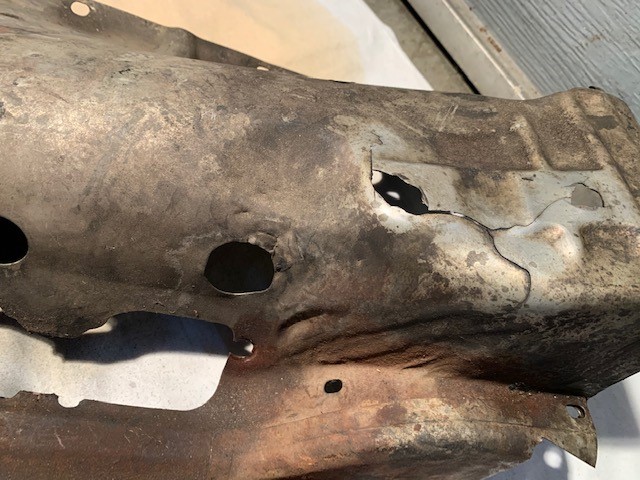 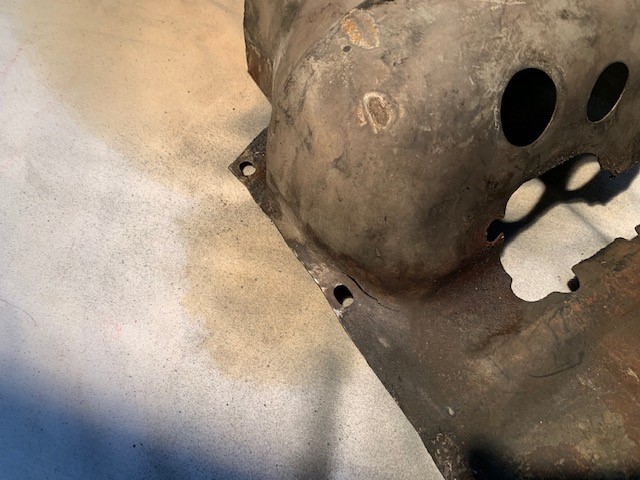 Save your original OG engine tin they say. It's the best they say. So after a few hours... I'm not kidding anyone here with these pictures, after many days I find myself with this... 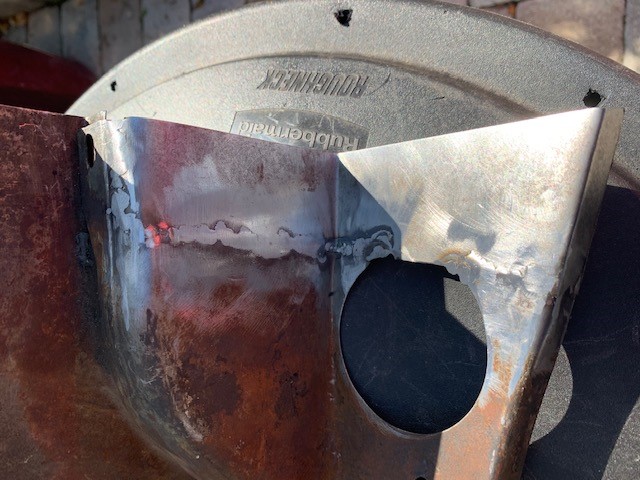 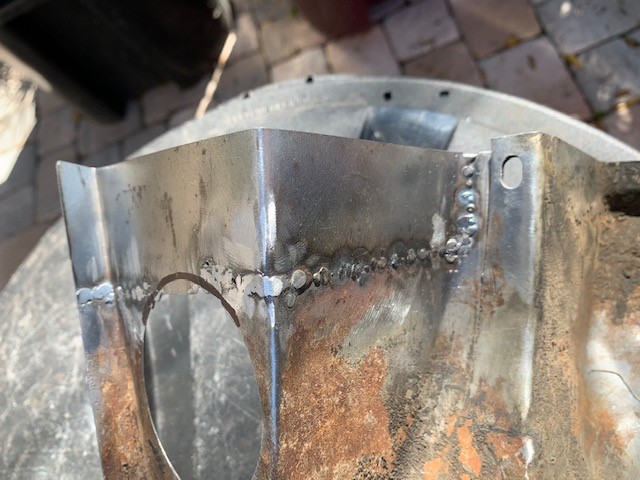 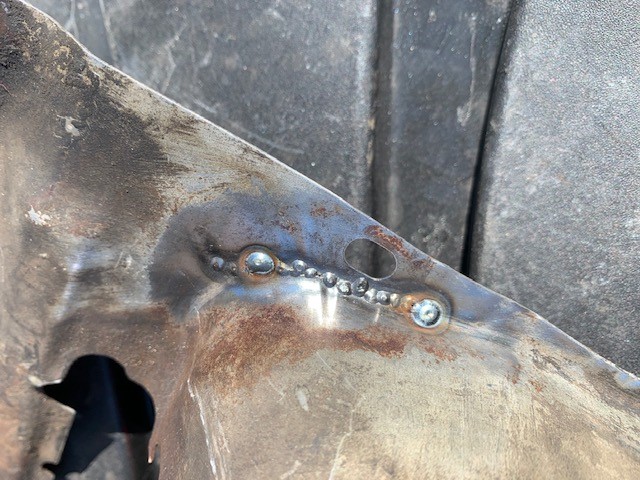 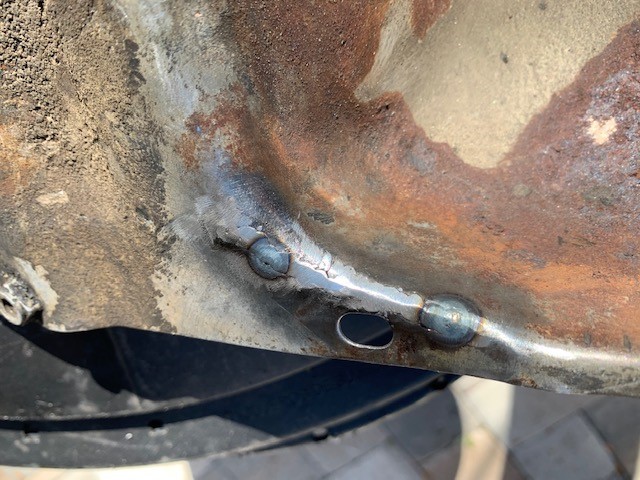 I have several questions for those with at least a few hours more experience. 1) How much more, if any, should these welds be ground down? Or, will the weld beads provide future strength to the thin, stretched sheet metal so leave as-is? 2) In order of preference, what would be the best three tools to use to grind down welds on thin sheet metal? Assume you don't have an air compressor. I don't. 3) For the top section where the coil attaches on the tin, the coil bracket uses P/N: N 010 210 13 which is M 6 x 10 hex-head bolt. Is the tin supposed to have a captured nut on the backside or just thicker sheet metal in the locations that are missing on my tin (see first few pictures). 4) Should the coil mounting location be relocated in order to avoid whatever the hell happened here? If so, where? In actuality I'm quite please with the results so far, maybe not the pace of the work, but at least the product thus far. It'll be useable tin and certainly better than it was. (IMG:style_emoticons/default/screwy.gif) This is literally the first time I have ever fabricated a patch and tried to weld anything. I'm working my way up to the easy stuff if there such a thing? I appreciate you entertaining my questions. Thanks, Sean |
   |

 
|
| Archie |
Feb 22 2021, 07:54 PM
Post
#2
|
|
Member Group: Members Posts: 197 Joined: 23-September 09 From: Western Canada Member No.: 10,844 Region Association: Pacific Northwest |
QUOTE(seanpaulmc @ Feb 22 2021, 05:20 PM)  I recommend all new welders to get some 50 year old thin gage sheet metal to learn with. :welder: How hard could it be? In doing so, you’ll practice with voltage and wire speed, stick out, part set up, metal cleaning, contamination and porosity, work area lighting, youtube, weld grinding, fabrication, clamping, gapping, blow thru, backing materials, warping, patience and wire brushing, to name a few. What I have... How many cracks can you spot? Save your original OG engine tin they say. It's the best they say. So after a few hours... I'm not kidding anyone here with these pictures, after many days I find myself with this... I have several questions for those with at least a few hours more experience. 1) How much more, if any, should these welds be ground down? Or, will the weld beads provide future strength to the thin, stretched sheet metal so leave as-is? 2) In order of preference, what would be the best three tools to use to grind down welds on thin sheet metal? Assume you don't have an air compressor. I don't. 3) For the top section where the coil attaches on the tin, the coil bracket uses P/N: N 010 210 13 which is M 6 x 10 hex-head bolt. Is the tin supposed to have a captured nut on the backside or just thicker sheet metal in the locations that are missing on my tin (see first few pictures). 4) Should the coil mounting location be relocated in order to avoid whatever the hell happened here? If so, where? In actuality I'm quite please with the results so far, maybe not the pace of the work, but at least the product thus far. It'll be useable tin and certainly better than it was. :screwy: This is literally the first time I have ever fabricated a patch and tried to weld anything. I'm working my way up to the easy stuff if there such a thing? I appreciate you entertaining my questions. Thanks, Sean Hello Sean, Regarding the welding techniques, please allow me to point you in THIS direction: https://www.youtube.com/watch?v=34bPn6lfyuA...f_g&index=4 He has an absolute encyclopedia of YouTube videos covering all aspects of bodywork welding and stuff with many handy tips and tricks which I dearly wish I'd known about when I started welding! ! Your welds don't look half-bad by the way! I'm a great believer in the no body-filler school of thought but it's tough to achieve. To your questions: 1) I like to grind them down as much as possible, but that's just me! 2) See Trev's blog. He recommends a super-coarse flexible disc. I like an electric belt-sander as you can follow the weld bead. 3) There are two captive nuts, if memory serves. 4) I'll pass and let more knowledgeable types chip in. Good luck and best wishes! |
|
|
|
| cary |
Feb 22 2021, 08:34 PM
Post
#3
|
|
Advanced Member Group: Members Posts: 3,900 Joined: 26-January 04 From: Sherwood Oregon Member No.: 1,608 Region Association: Pacific Northwest |
3" 36gr RoLoc on a 2" pad. Gives you a flexible edge.
Then tune with 2" 80gr. My .02c. |
|
|
|
| malcolm2 |
Feb 22 2021, 10:51 PM
Post
#4
|
|
Advanced Member Group: Members Posts: 2,749 Joined: 31-May 11 From: Nashville Member No.: 13,139 Region Association: South East States |
Paint 'em and drive it.
|
|
|
|
| rfinegan |
Feb 23 2021, 04:51 AM
Post
#5
|
|
Senior Member Group: Members Posts: 1,201 Joined: 8-February 13 From: NC Member No.: 15,499 Region Association: MidAtlantic Region |
I just spent a few hours on mine last night. And I only had 1 inch tear near the spark plug hole. I was blowing hole though it everywhere! (IMG:style_emoticons/default/WTF.gif) Use .023 solid wire and tip with Argon mix and low power /feed setting helped a lot. Flux core was just too HOT!
For me I ground the top side flush for a nice finish and left the back side a little thicker for support and keep me from grinding back through. You seem to be doing a fine job. A cut off wheel grinder and 3m roloc green discs cut the welds down fast and clean. If you want like new, buy a another set, but yours will work fine and clean up pretty good |
|
|
|
| Mark Henry |
Feb 23 2021, 08:26 AM
Post
#6
|
|
that's what I do! Group: Members Posts: 20,065 Joined: 27-December 02 From: Port Hope, Ontario Member No.: 26 Region Association: Canada |
Take a section of copper sheet or copper pipe and beat it flat, then back up the weld area with the copper. You still have to spot weld, but the copper backer stops it from blowing through and doesn't stick to the weld.
|
|
|
|
| Archie |
Feb 23 2021, 07:21 PM
Post
#7
|
|
Member Group: Members Posts: 197 Joined: 23-September 09 From: Western Canada Member No.: 10,844 Region Association: Pacific Northwest |
QUOTE(Mark Henry @ Feb 23 2021, 06:26 AM) Take a section of copper sheet or copper pipe and beat it flat, then back up the weld area with the copper. You still have to spot weld, but the copper backer stops it from blowing through and doesn't stick to the weld. Great advice! |
|
|
|
| Mark Henry |
Feb 24 2021, 08:56 AM
Post
#8
|
|
that's what I do! Group: Members Posts: 20,065 Joined: 27-December 02 From: Port Hope, Ontario Member No.: 26 Region Association: Canada |
QUOTE(Archie @ Feb 23 2021, 08:21 PM) QUOTE(Mark Henry @ Feb 23 2021, 06:26 AM) Take a section of copper sheet or copper pipe and beat it flat, then back up the weld area with the copper. You still have to spot weld, but the copper backer stops it from blowing through and doesn't stick to the weld. Great advice! Thanks (IMG:style_emoticons/default/smile.gif) Thicker copper sheet holds up better but beating copper pipe flat is handy for backing up curved shapes and hàrd to get to areas. The copper has to be pressed against the weld area, if there's a gap it will blow through. The pipe is too thin of a material and will degrade quickly, but I just make another tool. |
|
|
|
| Robarabian |
Feb 24 2021, 09:09 AM
Post
#9
|
|
914 A Roo Group: Members Posts: 739 Joined: 11-February 19 From: Simi Valley, Kalifornia Member No.: 22,865 Region Association: Southern California |
Yes on the copper. Also, where you see the nice ring around the weld, that shows you made good penetration and that is what you are trying to do, fuse the metals together. If you dont have enough penetration, it won't hold. If you over penetrate, you burn through. It is a balance. If you see those rings, grind it flat.. and the advice about grinding first and then the flap disc 60-80 grit is where its at. Kudos for doing it on your own!
|
|
|
|
| rfinegan |
Feb 24 2021, 09:26 AM
Post
#10
|
|
Senior Member Group: Members Posts: 1,201 Joined: 8-February 13 From: NC Member No.: 15,499 Region Association: MidAtlantic Region |
Got this a Harbor Freight for a few bucks....
 |
|
|
|
| dr914@autoatlanta.com |
Feb 24 2021, 10:09 AM
Post
#11
|
|
914 Guru Group: Members Posts: 8,239 Joined: 3-January 07 From: atlanta georgia Member No.: 7,418 Region Association: None |
the passenger side 2.0 engine cylinder cover is impossibly hard to find as many have been cut (as yours has) for air conditioning. I applaud you in your job to fix this piece. HOWEVER when it gets this bad, could be easier to convert a 1.7 1.8 piece (readily available) by relocating the two spark plug holes. We are in the process of recreating the right front piece where the accelerator cable passes through. THIS piece is IMPOSSIBLE to find
|
|
|
|
| Mark Henry |
Feb 24 2021, 10:46 AM
Post
#12
|
|
that's what I do! Group: Members Posts: 20,065 Joined: 27-December 02 From: Port Hope, Ontario Member No.: 26 Region Association: Canada |
QUOTE(dr914@autoatlanta.com @ Feb 24 2021, 11:09 AM) the passenger side 2.0 engine cylinder cover is impossibly hard to find as many have been cut (as yours has) for air conditioning. I applaud you in your job to fix this piece. HOWEVER when it gets this bad, could be easier to convert a 1.7 1.8 piece (readily available) by relocating the two spark plug holes. We are in the process of recreating the right front piece where the accelerator cable passes through. THIS piece is IMPOSSIBLE to find Like this one? BTW I have the other side as well but it lost its label. Attached thumbnail(s) 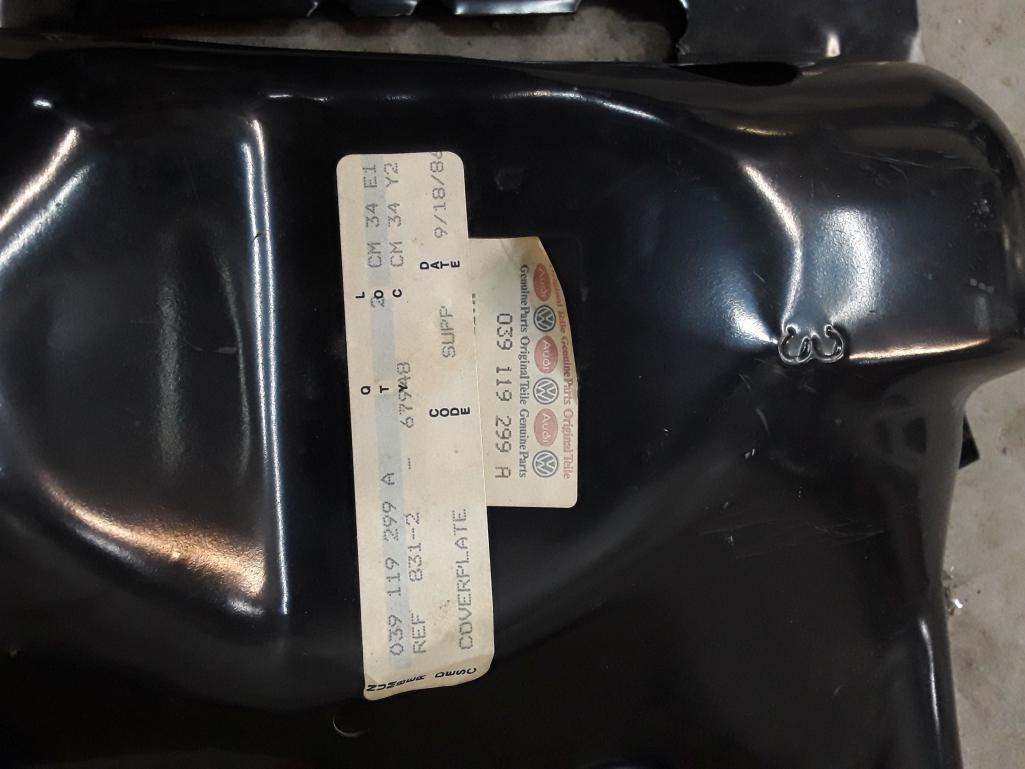 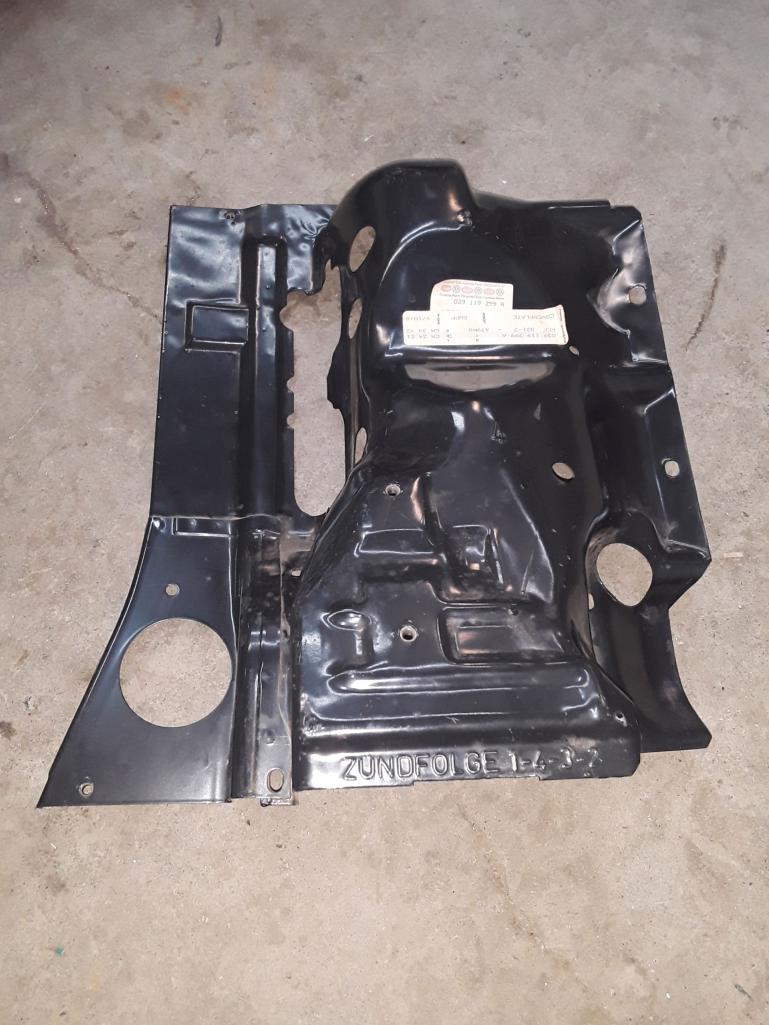
|
|
|
|
| bkrantz |
Feb 24 2021, 10:02 PM
Post
#13
|
|
914 Guru Group: Members Posts: 8,710 Joined: 3-August 19 From: SW Colorado Member No.: 23,343 Region Association: Rocky Mountains |
For grinding welds on sheet metal I like flappy sanding disks on an angle grinder. Cuts quickly enough but less likely to grind holes than a solid disk.
|
|
|
|
| Superhawk996 |
Feb 25 2021, 06:58 AM
Post
#14
|
|
914 Guru Group: Members Posts: 7,847 Joined: 25-August 18 From: Woods of N. Idaho Member No.: 22,428 Region Association: Galt's Gulch |
QUOTE(Mark Henry @ Feb 24 2021, 11:46 AM) Like this one? BTW I have the other side as well but it lost its label. @Jett Wow - I've never seen NOS tin. Really interesting to see what they looked like originally. |
 |
|
| bbrock |
Feb 25 2021, 08:37 AM
Post
#15
|
|
914 Guru Group: Members Posts: 5,269 Joined: 17-February 17 From: Montana Member No.: 20,845 Region Association: Rocky Mountains |
QUOTE(bkrantz @ Feb 24 2021, 09:02 PM) For grinding welds on sheet metal I like flappy sanding disks on an angle grinder. Cuts quickly enough but less likely to grind holes than a solid disk. You must have better technique than me. I tried them and was impressed with how quickly they ground down the welds but they put way too much heat into the piece. |
|
|
|
| Mark Henry |
Feb 25 2021, 08:41 AM
Post
#16
|
|
that's what I do! Group: Members Posts: 20,065 Joined: 27-December 02 From: Port Hope, Ontario Member No.: 26 Region Association: Canada |
QUOTE(Superhawk996 @ Feb 25 2021, 07:58 AM) QUOTE(Mark Henry @ Feb 24 2021, 11:46 AM) Like this one? BTW I have the other side as well but it lost its label. @Jett Wow - I've never seen NOS tin. Really interesting to see what they looked like originally. Yeah, just as wavy and wrinkled as the old tin in your teen. (IMG:style_emoticons/default/laugh.gif) The dies used to pop these pieces out were quite crude. |
|
|
|
| bbrock |
Feb 25 2021, 08:49 AM
Post
#17
|
|
914 Guru Group: Members Posts: 5,269 Joined: 17-February 17 From: Montana Member No.: 20,845 Region Association: Rocky Mountains |
I never thought about it before but that right front corner piece that is spot welded on looks like it would be pretty easy to reproduce and would make patching tins butchered for AC easier. Makes me wonder if there were plans to produce versions of the tin without that piece at one time for AC install.
|
|
|
|
| Jett |
Feb 25 2021, 09:10 AM
Post
#18
|
|
Senior Member Group: Members Posts: 1,699 Joined: 27-July 14 From: Seattle Member No.: 17,686 Region Association: Pacific Northwest |
QUOTE(Superhawk996 @ Feb 25 2021, 04:58 AM) QUOTE(Mark Henry @ Feb 24 2021, 11:46 AM) Like this one? BTW I have the other side as well but it lost its label. @Jett Wow - I've never seen NOS tin. Really interesting to see what they looked like originally. @superhawk996 looks like yours are not far off (IMG:style_emoticons/default/smile.gif) |
|
|
|
| 914_teener |
Feb 25 2021, 09:26 AM
Post
#19
|
|
914 Guru Group: Members Posts: 5,270 Joined: 31-August 08 From: So. Cal Member No.: 9,489 Region Association: Southern California |
QUOTE(Mark Henry @ Feb 24 2021, 08:46 AM) QUOTE(dr914@autoatlanta.com @ Feb 24 2021, 11:09 AM) the passenger side 2.0 engine cylinder cover is impossibly hard to find as many have been cut (as yours has) for air conditioning. I applaud you in your job to fix this piece. HOWEVER when it gets this bad, could be easier to convert a 1.7 1.8 piece (readily available) by relocating the two spark plug holes. We are in the process of recreating the right front piece where the accelerator cable passes through. THIS piece is IMPOSSIBLE to find Like this one? BTW I have the other side as well but it lost its label. Gotta kind of wonder if the old tooling for this is lying around the basement at the Karmen factory somewhere, or if it got melted down for some rebar in China. |
|
|
|
| Superhawk996 |
Feb 25 2021, 09:31 AM
Post
#20
|
|
914 Guru Group: Members Posts: 7,847 Joined: 25-August 18 From: Woods of N. Idaho Member No.: 22,428 Region Association: Galt's Gulch |
QUOTE(Mark Henry @ Feb 25 2021, 09:41 AM) The dies used to pop these pieces out were quite crude. That is an understatement. I had always assumed some of the distortions I've seen in tin were from rough handling and/or engine drops where the tin snagged on the seals. QUOTE(bbrock @ Feb 25 2021, 09:49 AM) I never thought about it before but that right front corner piece that is spot welded on looks like it would be pretty easy to reproduce and would make patching tins butchered for AC easier. That sure would be nice! It is a lot of work to fabricate from scratch and then you are constantly fighting with distortion induced by the welding repair. |
|
|
|
|
1 User(s) are reading this topic (1 Guests and 0 Anonymous Users)
0 Members:

|
Lo-Fi Version | Time is now: 31st May 2026 - 09:03 PM |
Invision Power Board
v9.1.4 © 2026 IPS, Inc.