|
|
|
|
|
|
March 2006 Attached thumbnail(s) 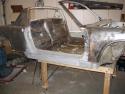  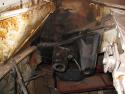
Panel and door frame removed.
Panel and door frame removed. Attached thumbnail(s) 
Work on the Hell Hole progressing nicely. Patches welded into place. Attached thumbnail(s) 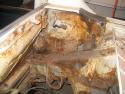 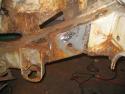 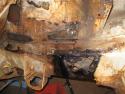 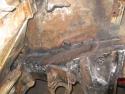
Starting the passenger side. Here's what I have to work with. Attached thumbnail(s) 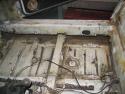  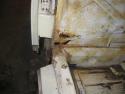 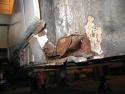 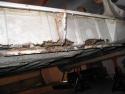 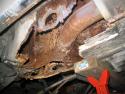 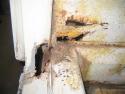 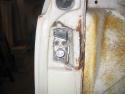
Finished patching the driver's side long, front wheel well, and door frame. Attached thumbnail(s) 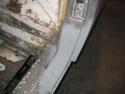 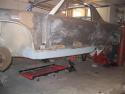 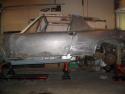
Here I've begun patching the driver's side long and cutting more rust out of the door frame. Attached thumbnail(s) 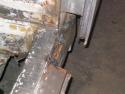 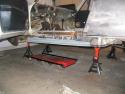
Ever since I was a young boy I've had an unatural affection for Porsche 914's. I got a model of one for my 8th birthday, and ever since then I've been hooked. Now, 31 years later, I've decided to do something about it.
Following a tragic event, I decided that I needed a project to sink myself into. A symbolic rebuilding, as it were, to represent the rebuilding of my life (violins start playing in the background). I found Rusti, a forgotten relic from a bygone era that no one wanted, waiting for me on the AutoTrader website. Uncared for, falling to pieces - it was if she cried out to me. I went to see her, and though she was in bad shape, I just knew I could fix her up. Her previous owner had every intention of restoring her, but due to events in his own life, had never gotten around to it. He had accumulated a surprising amount of spare parts for this project, but as his family grew and SUV got fed up with being parked in the driveway, his wife finally made the call that Rusti and all her baggage MUST go. So, we struck a favourable deal ("Get all this crap out of here, and we'll call it even") and Rusti had found a new home. After giving her some time to get used to her new accomodations (and me some time to figure out what I'd gotten myself into) I began her transformation. I'm sorry I don't have pictures from the very beginning, but I have started a photo record that I will update as I go along. For Rusti's first operation, I removed her drivetrain following a procedure I found on the Pelican Parts website (a well done tech article if anyone is interested). Then, I gutted her interior and front trunk. What lay before me now was the daunting size of the task before me. I knew that there were some structural problems from the outset, as Rusti sagged a little at the doors. In anticipation of this I had ordered a frame kit from Brad Mayeur, but I didn't realize the full extent of her injuries until I got to know her more intimately (mainly because I didn't know what the hell I was doing when I got her). Both longitudinals (inner and outer on both sides) were rusted right through on the bottom. The floor on the driver's side could barely support the seat. The firewall had several major rust spots. The area around the battery was virtually non-existent with the cancer going right into the frame riser and suspension console. Both front wheel wells had holes right into the cabin, and the front trunk had a well ventilated floor. I decided the area to start would be the longitudinals, and that is basically where I am at now. After putting Rusti on stands, I stripped all of the paint from the driver's side with a chemical stripper just to see if any more damage would reveal itself. Luckily, it was not was too bad. Using a sawzall and cutting wheel, I cut out all the major rust. I decided to lop the bottom half of the longitudinals right off and just rebuild them. I had the frame kit already, but I needed something solid to attach to and this seemed to be the most econimical solution. Before adding any new metal, I treated the entire area (and up into the longitudinal) with a rust converter to kill any surface rust and then coated it all with a weld-thru zinc primer. I had machine shop bend some 18 ga. sheet metal to fit the spots I cut out of the horizontal section of the longitudinal and then fashioned some patches on my own to fit the area where it bends and goes up into the rear wheel well/engine bay. I coated these and welded them in. I also fashioned my own patch for the front wheel well and welded it in so that it tied into the longitudinal. The next step is to install the frame kit on the driver's side and then start the whole procedure again on the passenger side. Once Rusti is all straight and strong again, I will strip her down completely and get all the rust out of her frame. I know some of you are wondering why I don't just go and get a new tub and move all of good parts to it, but for some reason it just doesn't seem right. Good bodies are hard to find in Canada, and I feel I owe it to Rusti (and myself) to see this thing through. Future plans for Rusti include new suspension (front and rear), a BMW brake upgrade, new wheels (17X7's already bought from Revolution), new paint (obviously), and more than likely a V8 or V6 conversion (I figure, "What the hell, I'm doing everything else!"). Follow along, and I will keep you updated. It should be an interesting couple of (few?) years. Attached thumbnail(s)  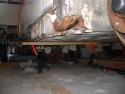 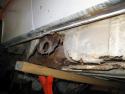 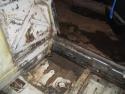 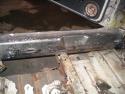 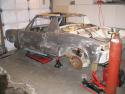 |


 Mar 9 2006, 09:29 AM