|
|
|
|
|
|
Converting a tail-shifter car to side-shifter.
The '70-'72 cars came with the tail-shifter gearbox, where the '73-'76 cars used the side-shifter. The side-shifter has half as many nylon bushings in the linkage, and is substantially easier to adjust, than the tail-shifter. The shift action of a side-shifter with new bushings is also much better than a tail-shifter with new bushings. So, since side-shifters are pretty common on market, converting an older tub to the newer gearbox is generally a win. The 914/6, btw, used yet another shift linkage, which isn't covered here. To do this, you'll need a side-shift gearbox, of course. It's possible to convert a tail-shifter to a side-shifter, but the parts are hard to obtain, and there are plenty of used side-shifters in the world. All of the tail-shifter gearbox parts other than the linkage and the end cover can be used in the side-shifter to refurbish it. You'll also need: - the complete gear linkage, including the gear lever assembly inside the car (they're quite different [picture]), the rod from the gear lever to the firewall, the U-joint coupler at the firewall, the rear rod from the coupler to the shift console, and the cup. - new bushings. You can get complete kits from various suppliers that include all of the nylon bushings, plus new cone screws used to attach the coupler to the rods. You'll need a special bushing at the firewall, made specifically to install a side-shifter rod in a tail-shift tub. The hole in the firewall on the tailshift tubs is substantially larger than the hole on the side-shift tubs, so the bushing is thicker to take up the clearance between the hole and the skinnier side-shifter forward rod. These conversion bushings are also available as part of the complete kits. - engine mounting bar and mounts. If you're keeping your old engine, you need to replace the engine mounting bar with the cast side-shift mounting bar. The rear side-shift linkage rod won't clear the tail-shift bar. When they switched bars, they also swapped where the rubber mounts go. On the tail-shifter, the bar-to-body mounts are rubber, and the bar-to-engine mounts are solid. On the side-shifter, the bar-to-body mounts are solid, and the bar-to-engine mounts are rubber. The bar-to-body mounts can be picked up new (complete with the correct bolts and nuts to mount the bar itself), as can the bar-to-engine mounts. The bar itself will have to be purchased used. You'll also need the small pieces that connect the engine to the rubber mounts. Replacing the mounting bar on the engine with the fan housing in place is possible, but you may find it easier to remove the housing. The tail-shifter linkage consists of: the gear lever assembly, the forward rod from the shift lever to the adjuster just forward of the firewall, the center "L", with the nylon ball [picture], the "hex ball" attached to the rear of the firewall, and the aft rod with the "L" tube the center "L" ball fits into. There may still be a cover over the L section on your car, which just pulls off the firewall (there may be a zip-tie holding it on). The aft rod connects to the tail part of the gearbox in a knife-and-fork arrangement. This may also have a squareish cover on it. To remove the tail-shifter aft linkage rod, you need to unbolt the support bracket at the tail end of the gearbox (forward of the knife-and-fork), and unbolt the large hex ball support at the firewall end of the aft linkage rod. The center L comes out after you disconnect the adjuster in the cabin, under the access panel at the rear of the center tunnel [picture]. You must completely remove the bolt to get the adjuster clamp off the rod, and you must remove that clamp to get the rod out of the car, as it has to go back through the firewall bushing. The clamp is held on with a 13mm bolt and a 13mm nut, and getting wrenches on both is not easy. Remove this, and you'll know why adjusting the tail-shifter is such a pain. This is also a good time to replace the clutch and speedo cables with new items if yours are marginal, as you'll be disconnecting both to pull the engine. Yes, you need to remove the engine to make this swap. Actually, you COULD do it with the engine in place, but you need to swap mounting bars, and while the bars are off and the engine is resting on a jack or whatever, the firewall bushing and the forward linkage rod for the side-shifter need to be installed. You cannot install the side-shifter rod with the engine and the mounting bar in place. Since doing all of this with the engine just above you is pretty unnerving, I'd just remove the engine. Gives you a chance to clean up the engine compartment some, too. Engine pulls are documented elsewhere, I'll not repeat how to do this here. After the engine is out, pull the linkage bits that are inside the car. The gear lever unbolts with three bolts, and just pulls up. There's a cup on the end of the forward rod that needs to be removed, as well as a support bracket. The forward rod can then be pulled back through the firewall bushing. The engine has to be out before this can happen. Remove the firewall bushing using a screwdriver to pry it out. It will bend easily, so use just a bit of force. To install the special conversion firewall bushing, put the bushing in a cup of water and heat it in a microwave for a few minutes. This should soften it enough that you can pound it into the hole with a mallet. You can also press the bushing into place using a long bolt with large washers on each end. Run the bolt with one washer through the firewall hole from the inside, and put a socket and extension on it. Put the bushing onto the bolt, then another big washer, then a nut. Tighten the nut and the bushing will press into place. The bolt has to be fairly long (4-6"). The bolt holding the transmission ears to the body mounts works very well, as long as you use a couple of 1/2" sockets as spacers. Make sure you get this bushing well seated, as it can pop out easily if you don't, and getting it to fit again if it does pop out involves dismantling much of the shift linkage (again). Grease the firewall bushing, and slide the forward rod on the side-shift linkage into it. The splined end goes in the car, and the tapered end with one hole hangs out into the engine bay. The rod will likely be a snug fit in the bushing, and you may need to tap it into the car with a mallet. Leave the tapered end plus a bit of the rod hanging free. Rebuild the coupler with the new bushings from the kit. The pin presses out using a drift and a hammer, or a vice and a socket. Tap it back in with a hammer. Attach the rebuilt coupler to the foward linkage rod with a new cone screw from the bushings kit. Swap out the rubber tail-shifter engine body mounts with the new solid mounts, and swap the engine mounting bars. The rubber tail-shifter body mount CAN be used to hold a side-shifter engine in a pinch, but the engine hangs lower, and the extra movement can make shifting harder, as it messes with the geometry of the shifter. Install the engine with the new gearbox. Where the side-shift linkage attaches to the gearbox is called the shift console. Install a new shift console bushing in the hole (channel locks used like a vice are good for snapping this into place), and install the aft linkage rod by sliding one end into this new bushing, then the forward end into the coupler. This usually requires a bit of angling to get it to all slide into place. Fit a new cup bushing to the gearbox shift ball, after greasing the new bushing. This is a very snug fit, so you may need to whack it on with a mallet. Don't put the bushing in the cup first, just leave it free. Attach the rear cup using a new cone screw, and slide the cup onto the bushing. Install the gear lever in the car. You'll want to attach the clevis onto the gear lever (remember the bronze bushing and some grease), then slide the clevis onto the splined end of the linkage rod. Bolt the gear lever plate to the center tunnel. Don't fit the clamp bolt for the clevis, yet. To adjust the linkage, put the gearbox in second gear at the gearbox itself, by moving the shift rod (the bit with the ball-and-cup at the aft end [picture]). The gearbox shift rod moves in and out as the gear lever is moved from side to side, and rotates as the gear lever is moved fore and aft. Rotating it aft is the same as pushing the gear lever forward. So, second gear is with the shift rod in the halfway position (in/out), and rotating aft. With the gearbox in second, get in the driver's seat and hold the aft end of the linkage rod through the rear access panel in the center tunnel using channel locks or vice grips (lightly!). Move the gear lever so it's forward and left so it's just resting lightly against the sprung lockout plate. Fit the clamp bolt on the clevis and tighten it. Move the gear lever through the gears to see if you can get all of the gears. You'll probably need to repeat this process once you have the car running again. Ideally, the 2nd/3rd plane should have the lever just kissing the lockout plate, but not pushing against the spring. This pretty much ensures you're not going to snag reverse instead of second, or first instead of third. Make sure you check the gearbox oil before starting the engine for the first time. This entire process CAN be done in one weekend, after you assemble all of the parts. Attached thumbnail(s)  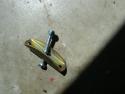 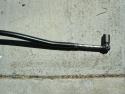 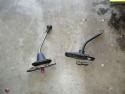 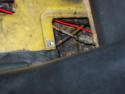
|


 Aug 5 2005, 12:56 PM